ViewDragHelper的使用
- 2020 年 4 月 23 日
- 筆記
我19年一整年都沒寫過博客,說實話沒寫的慾望,現在找到了動機,因為我發現讓我願意研究的東西,很大一部分因為它有意思,沒什麼興趣的知識,除非工作需要,真的不願意碰。今天介紹的是ViewDragHelper這個工具類。它在你自定義viewGroup時,幫你解決子view拖動、定位、狀態跟蹤。這是官方的解釋,當然,我用大白話在複述一下:子view想要自由飛翔,肯定得先經過父view的允許,而父view把做決定的權利全部交給了ViewDragHelper。雖然這個helper類代碼很長,有1500多行,但搞清楚了它開放給我們的幾個回調,以及一丁點對事件分發的理解,就可以寫出一個讓你成就感滿滿的控件。今天的目標:寫一個右滑就多出兩個子view的控件(大約150行代碼就行)。


這個例子是仿github上項目寫的,原項目地址//github.com/daimajia/AndroidSwipeLayout。當然這是精簡版的,別人的代碼總是望而生畏!ViewDragHelper從攔截到處理事件的整個過程,只公布了一個回調類給我們使用,我們可以從其中選一些對我們有用的去實現,這裡,我把我寫這個控件實現的類列舉出來:
public abstract boolean tryCaptureView(@NonNull View child, int pointerId);
1.當你拖動子view,這個方法肯定是要實現的,而且必須返回true,表示你要捕獲你拖動的子view,接下來它的位置信息、拖動速度等一系列參數才會被記錄,並返回給你。
public int clampViewPositionHorizontal(@NonNull View child, int left, int dx) {return 0;}
2.前面提過,你捕獲控件後,helper會返回給你一些數據,這個方法返回給你的就是控件水平位置信息。 重點理解left這個值。寫來寫去,就這個left值迷惑人!!!請慢慢品味下面這句話:以child父布局的左上角頂點為坐標原點,以右為x軸正方向,下為y軸正方向, left值等於child水平方向划過的像素數(從左往右,像素數為正,反之為負)與它自身的mLeft值的和。撇開數值的結果,通俗的來講就是你這次移動之後,child的水平位置應該在哪裡!為什麼是應該呢,因為這個方法走完,緊接着系統會拿該方法返回值作為view新的x坐標(即mLeft值)。那麼在系統告訴你view移動後,應該所處的位置與你最終返回的位置之間,你可以做邊界判斷。例如:子view初始位置mLeft = 0,如果我將view向左滑動20px,那麼此方法left就會返回給我-20,而我又不想拿這個值作為子view的新的x坐標。那我返回0,就可以讓子view水平還在原位置。以下兩個例子是left值的計算方法:
例子1:子view視圖的左頂點就在父布局的坐標原點處,當你手指從左往右滑動10個像素,left就等於像素數+10 加上view距離坐標原點橫坐標0,結果就是10;
例子2:父布局paddingleft 為20像素,如果單位是dp,最終也是轉為px計算的。子view的mleft = 20,當你手指從右往左滑動10個像素,left就等於像素數-10+20=10;
left理解通透之後,dx就好說了,還記得剛提到的可正可負的像素數嗎,哈哈,dx就是它!綜上,可以得出一個公式:left = view.getLeft()+dx.
3.clampViewPositionVertical和上一個方法就是雙胞胎兄弟,這個我就不多介紹了。更多的文字留給更神秘的方法。
public void onViewPositionChanged(@NonNull View changedView, int left, int top, int dx, int dy)
4.這個方法的解釋我覺得直接看源代碼更好理解:
 private void dragTo(int left, int top, int dx, int dy) {
        int clampedX = left;
        int clampedY = top;
        final int oldLeft = mCapturedView.getLeft();
        final int oldTop = mCapturedView.getTop();
        if (dx != 0) {
            clampedX = mCallback.clampViewPositionHorizontal(mCapturedView, left, dx);
            ViewCompat.offsetLeftAndRight(mCapturedView, clampedX - oldLeft);
        }
        if (dy != 0) {
            clampedY = mCallback.clampViewPositionVertical(mCapturedView, top, dy);
            ViewCompat.offsetTopAndBottom(mCapturedView, clampedY - oldTop);
        }

        if (dx != 0 || dy != 0) {
            final int clampedDx = clampedX - oldLeft;
            final int clampedDy = clampedY - oldTop;
            mCallback.onViewPositionChanged(mCapturedView, clampedX, clampedY,
                    clampedDx, clampedDy);
        }
    }
當view被拖動,會調用這個dragTo,這個方法將以上3個方法的執行順序以及參數傳遞,描述的非常清楚,可以看到onViewPositionChanged()參數中的left,top分別是前兩個方法返回給我們的,末尾的dx,dy對我們移動view也有用,待會可以看到。
public void onViewReleased(@NonNull View releasedChild, float xvel, float yvel) {
5.顧名思義,這個方法就是當我們手指離開view時調用的,xvel ,yvel分別是手指離開view時,view在x,y軸上的速度,這裡的速度是指每秒划過的像素數。這個方法執行後,假如我們想讓view恢復至初始位置,就可以在這裏面調用,根據速度,我們可以做些速度判斷,了解用戶到底想不想滑動,還是勻速滑動,埋個伏筆,待會寫控件時,這個方法裏面可以做些文章。
public int getViewHorizontalDragRange(@NonNull View child) {}
6.這個函數的使用和子view的點擊事件關聯性很大,同時結合事件分發,才能完整的將子view的點擊事件合理的處理,所以這個方法我在第二篇單獨講它的使用,現在你可以不重寫它,今天主要目標,讓我們的控件滑起來!
這幾個回調函數介紹完,看看xml布局,我們繼承水平的LinearLayout去實現。
 <com.lq.counter.swipeLayout.MyLinearSwipeLayout
        android:id="@+id/sample1"
        android:layout_width="match_parent"
        android:layout_height="120dp"
        android:orientation="horizontal">
        <LinearLayout
            android:id="@+id/bottom_layout"
            android:background="@mipmap/sceen"
            android:orientation="horizontal"
            android:visibility="visible"
            android:layout_width="match_parent"
            android:layout_height="match_parent">
        </LinearLayout>

        <LinearLayout
            android:id="@+id/bottom_wrapper"
            android:background="#66ddff00"
            android:layout_width="160dp"
            android:orientation="horizontal"
            android:layout_height="match_parent">
            <TextView
                android:id="@+id/tv1"
                android:layout_width="80dp"
                android:layout_height="match_parent"
                android:text="刪除"
                android:background="@mipmap/wind"
                />
            <TextView
                android:layout_width="80dp"
                android:layout_height="match_parent"
                android:text="收藏"
                android:background="@mipmap/kaer"
                />
        </LinearLayout>
    </com.lq.counter.swipeLayout.MyLinearSwipeLayout>
父布局裏面有兩個子LinearLayout,第一個我們稱為surface,它寬度為match_parent,是可見的布局,第二個我們稱為bottom,它在屏幕之外,是隱藏的布局(這裡是最基本的概念)。
1.首先在我們SwipeLayout的構造方法中初始化ViewDragHelper:helper = ViewDragHelper.create(this,callback);
2.準備好5個待會要用的方法:
 @Override
    public boolean onInterceptTouchEvent(MotionEvent ev) {
        return helper.shouldInterceptTouchEvent(ev);
    }

    @Override
    public boolean onTouchEvent(MotionEvent event) {
        helper.processTouchEvent(event);
        return true;
    }

    private View getSurfaceView(){
        return getChildAt(0);
    }

    private View getBottomView(){
        return getChildAt(1);
    }

    private enum State{
        CLOSE,
        OPEN
    }
這裡可以看到將控件的攔截和處理全都放權給了viewDragHelper,當然了,當你遇到子view點擊事件莫名其妙的失效或者產生時,你就要在攔截處理裏面找突破口,不過今天我們不涉及子view的點擊事件處理,只是為了完成滑動展示兩個隱藏子view就行。
3.開始重寫Callback
 private ViewDragHelper.Callback callback = new ViewDragHelper.Callback() {
        private State state;
        @Override
        public boolean tryCaptureView(@NonNull View child, int pointerId) {
            if (getSurfaceView().getLeft() == 0){
                state = State.CLOSE;
            }else {
                state = State.OPEN;
            }
            return true;
        }

    };
注意:getSurfaceView.getLeft==0,這麼寫是基於父布局paddingleft = 0來寫的,不過不要緊,這裡在捕獲子view時,先記錄了bottomLayout 是展示還是隱藏的,待會會用到這個狀態。
接着給兩個子view水平滑動設置邊界:
 @Override
        public int clampViewPositionHorizontal(@NonNull View child, int left, int dx) {
            if (child == getSurfaceView()) {
                if (left > 0) {
                    left = 0;
                }
                if (left < -getBottomView().getMeasuredWidth()) {
                    left = -getBottomView().getMeasuredWidth();
                }
            } else {
                int marleft = getSurfaceView().getMeasuredWidth() - getBottomView().getMeasuredWidth();
                if (left < marleft){
                    left = marleft;
                }
            }
            return left;
        }
surface有兩處邊界,bittomLayout只有一處邊界,理解他們各自的臨界狀態,可以通過畫些草圖,看bottomLayout完全展示和完全隱藏這兩種極端情況。
在回過頭看看上方的dragTo()方法,你會發現在調用了clampViewPositionHorizontal 之後,子view就會移動到新設置好的位置,但有個問題,既然我拖動的子view移動了,另一個子view卻依舊在原地,怎麼辦,這時
onViewPositionChanged()就可以解決這個問題,我們讓另一個view也跟着移動。
 @Override
        public void onViewPositionChanged(@NonNull View changedView, int left, int top, int dx, int dy) {
            if (changedView == getSurfaceView()){
                getBottomView().offsetLeftAndRight(dx);
            }else {
                getSurfaceView().offsetLeftAndRight(dx);
            }
            invalidate();
        }
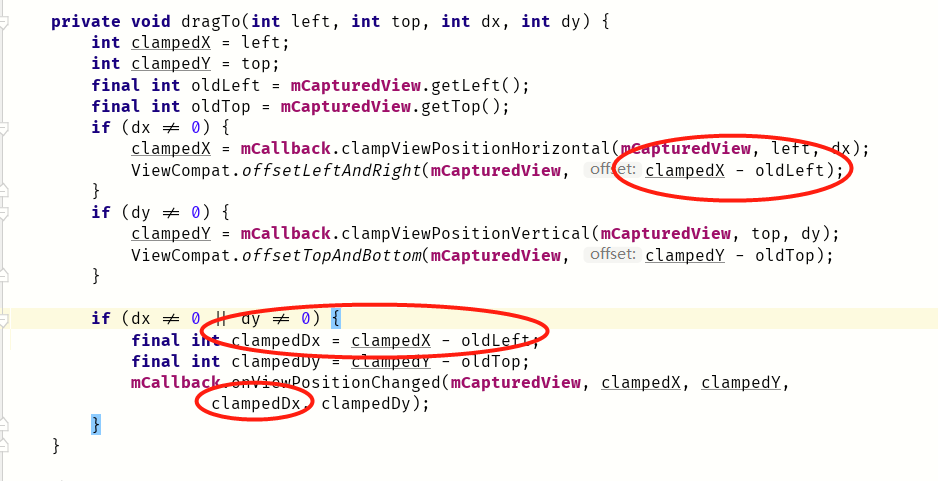
為什麼使用dx,我把dragTo的代碼再給大家看一次,並標註了一下,就更清楚了,一個子view移動多少距離,另一個子view也緊跟着在相同方向移動相同的距離,這樣整體看起來父布局就整個在滑動:

如果你寫到這裡,其實我們的view已經可以滑起來,但你會感覺手感欠佳,比如bottomLayout會展示一部分,一部分還在屏幕外,我想快速滑動一小段距離就把整個bottomLayout給展示出來,而不是滑動一整個
隱藏view的寬度才能看到它。對對對!這些都是缺點,接下來,今天介紹的最後一個回調onViewRelased 將解決這些問題。
@Override
        public void onViewReleased(@NonNull View releasedChild, float xvel, float yvel) {
            float minV = helper.getMinVelocity()*5;
            float fraction = state == State.CLOSE ? 0.25f:0.75f;
            if (Math.abs(xvel) > minV){
                if (state == State.CLOSE){
                    if (xvel > 0 ){
                        close();
                    }else {
                        open();
                    }
                }else {
                    if (xvel >0){
                        close();
                    }else {
                        open();
                    }
                }
            }else {
                //勻速
                if(Math.abs(getSurfaceView().getLeft()) > getBottomView().getMeasuredWidth()*fraction){
                    open();
                }else {
                    close();
                }
            }
            invalidate();
        }
 1.這裡有最小速度閾值,默認是100px/s,我乘以5是為了降低速度的敏感度。當大於最小速度,我們可以認為用戶快速地滑動了一下,那麼根據當前狀態,可以分兩組情況:
    現在是關閉,如果用戶快速右滑,xvel>0,那麼就是關閉,如果左滑呢,那麼就是打開。
    現在是關閉,推理同上。
2.小於最小速度,那麼就是勻速滑動,或慢慢滑動,這時不再以速度作為參考標準,而以surfaceLayout滑動的距離與bottomLayout的佔比fraction的大小比較作為用戶意圖的評判標準。分兩種情況:
    現在是關閉,此時fraction = 0.25,我們判斷如果surface的x坐標超過了bottomLayout寬度的四分之一,那麼就是打開,當然,我們此時使用的surface的x的絕對值,而這個值其實是不會大於0的,
因為在水平移動時,mLeft已經做了邊界處理。
    現在是打開,此時fraction = 0.75;這時surface隱藏在屏幕左邊的區域大小恰好就是bottomLayout整個的寬度,當用戶左滑時,getSuefaceView的橫坐標絕對值沒有改變,還是bottomLayout的
寬度,所以還是打開,當用戶右滑時,surface的mleft在bottomLayout的寬度比例1.0至0.75區間內,都可以認為維持現狀,即open,一旦到了[0.75,0]區間,那麼就認為是關閉。


接下來看open與close的實現:
   private void close(){
        helper.smoothSlideViewTo(getSurfaceView(), 0, 0);
    }

    private void open(){
        helper.smoothSlideViewTo(getSurfaceView(),-getBottomView().getMeasuredWidth(),0);
    }
這兩個方法都調用了smoothSlideViewTo,它的作用就是將你的view平滑地滾動到指定的位置。到了這裡,不知道你是否留意到,我滾動的view都是surfaceLayout,為什麼bottomLayout不去也調這個方法,
難道還讓它待在原地嗎,其實,我在open和close後面都加了一行invalidate,它讓我們的父布局重新layout一次,你把surfaceLayout移到坐標原點處,那麼按照LinearLayout的布局特徵,它會把另一個
子view的布局參數也挪到surfaceLayout後頭。而且,這個方法它本身只是設置好了view的終點位置,真正觸發滾動,還得用invalidate。它的實現跟scroller是類似的,在第一次重繪時,調用computeScroll,
在computeScroll裏面判斷是否已經移到終點,沒有的話接着invalidate,invalidate裏面又會去重繪。。。這樣一直持續下去,直至,computeScroll裏面認定view已經到達終點,就不再調invalidate。
  @Override
    public void computeScroll() {
        if (helper.continueSettling(true)){
            ViewCompat.postInvalidateOnAnimation(this);
        }
    }
這裡我們用continueSetting來判斷動畫是否應該繼續,為什麼用它呢,api文檔里提示了:
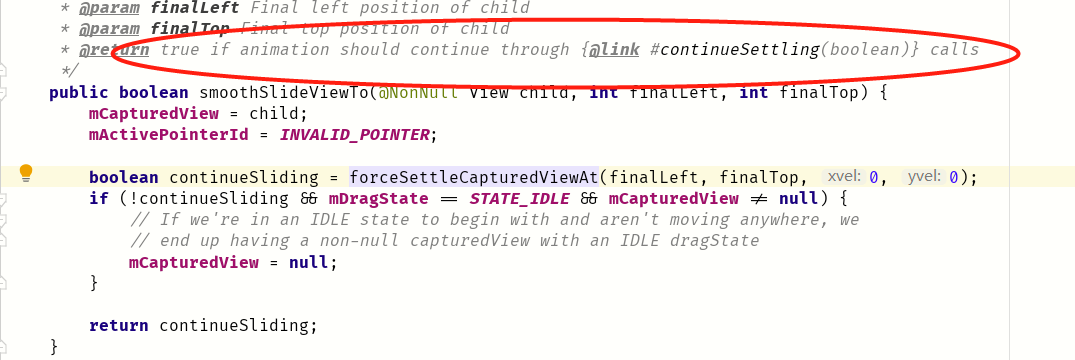
前面說過每次重繪都會調用computeScroll,而這個方法是空實現,所以我們就在它裏面判斷是否要繼續執行動畫,返回值為ture就是繼續執行動畫,當然了,continueSetting()這個方法為什麼傳true,
因為這個方法前頭有一段感人肺腑的話:Set this to true if you are calling this method from{@link android.view.View#computeScroll()},讓我節約了不少腦細胞。還有一點,如果繼續執行動畫,

ViewCompat.postInvalidateOnAnimation(this)換成invalidate也可以。最後是完整代碼,真的沒有150行!!!
public class SwipeLayout extends LinearLayout {
    private ViewDragHelper helper;
    public SwipeLayout(Context context) {
        this(context,null);
    }

    public SwipeLayout(Context context, @Nullable AttributeSet attrs) {
        this(context, attrs,0);
    }

    public SwipeLayout(Context context, @Nullable AttributeSet attrs, int defStyleAttr) {
        super(context, attrs, defStyleAttr);
        helper = ViewDragHelper.create(this,callback);
    }

    private ViewDragHelper.Callback callback = new ViewDragHelper.Callback() {
        private State state;
        @Override
        public boolean tryCaptureView(@NonNull View child, int pointerId) {
            if (getSurfaceView().getLeft() == 0){
                state = State.CLOSE;
            }else {
                state = State.OPEN;
            }
            return true;
        }

        @Override
        public int clampViewPositionHorizontal(@NonNull View child, int left, int dx) {
            if (child == getSurfaceView()) {
                if (left > 0) {
                    left = 0;
                }
                if (left < -getBottomView().getMeasuredWidth()) {
                    left = -getBottomView().getMeasuredWidth();
                }
            } else {
                int marleft = getSurfaceView().getMeasuredWidth() - getBottomView().getMeasuredWidth();
                if (left < marleft){
                    left = marleft;
                }
            }
            return left;
        }

        @Override
        public void onViewPositionChanged(@NonNull View changedView, int left, int top, int dx, int dy) {
            if (changedView == getSurfaceView()){
                getBottomView().offsetLeftAndRight(dx);
            }else {
                getSurfaceView().offsetLeftAndRight(dx);
            }
            invalidate();
        }

        @Override
        public void onViewReleased(@NonNull View releasedChild, float xvel, float yvel) {
            float minV = helper.getMinVelocity()*5;
            float fraction = state == State.CLOSE ? 0.25f:0.75f;
            if (Math.abs(xvel) > minV){
                if (state == State.CLOSE){
                    if (xvel > 0 ){
                        close();
                    }else {
                        open();
                    }
                }else {
                    if (xvel >0){
                        close();
                    }else {
                        open();
                    }
                }
            }else {
                //勻速
                if(Math.abs(getSurfaceView().getLeft()) > getBottomView().getMeasuredWidth()*fraction){
                    open();
                }else {
                    close();
                }
            }
            invalidate();
        }
    };

    private void close(){
        helper.smoothSlideViewTo(getSurfaceView(), 0, 0);
    }

    private void open(){
        helper.smoothSlideViewTo(getSurfaceView(),-getBottomView().getMeasuredWidth(),0);
    }

    @Override
    public void computeScroll() {
        if (helper.continueSettling(true)){
            ViewCompat.postInvalidateOnAnimation(this);
        }
    }

    @Override
    public boolean onInterceptTouchEvent(MotionEvent ev) {
        return helper.shouldInterceptTouchEvent(ev);
    }

    @Override
    public boolean onTouchEvent(MotionEvent event) {
        helper.processTouchEvent(event);
        return true;
    }

    private View getSurfaceView(){
        return getChildAt(0);
    }

    private View getBottomView(){
        return getChildAt(1);
    }

    private enum State{
        CLOSE,
        OPEN
    }
}
至此,這個控件滑一滑是沒問題的,但點一點是沒什麼反應的,下一篇,我們給這個控件加上點擊事件,還是基於這個類。相信,基於這個簡單控件的使用,dragViewHelper的基本使用是沒太大問題的。

