Netty源碼分析 (三)—– 服務端啟動源碼分析
- 2019 年 10 月 3 日
- 筆記
本文接着前兩篇文章來講,主要講服務端類剩下的部分,我們還是來先看看服務端的代碼
/** * Created by chenhao on 2019/9/4. */ public final class SimpleServer { public static void main(String[] args) throws Exception { EventLoopGroup bossGroup = new NioEventLoopGroup(1); EventLoopGroup workerGroup = new NioEventLoopGroup(); try { ServerBootstrap b = new ServerBootstrap(); b.group(bossGroup, workerGroup) .channel(NioServerSocketChannel.class) .handler(new SimpleServerHandler()) .childHandler(new SimpleServerInitializer()) .option(ChannelOption.SO_BACKLOG, 128) .childOption(ChannelOption.SO_KEEPALIVE, true); ChannelFuture f = b.bind(8888).sync(); f.channel().closeFuture().sync(); } finally { bossGroup.shutdownGracefully(); workerGroup.shutdownGracefully(); } } }
在前面兩篇博文中從源碼的角度分析了如下幾行代碼主要做了哪些工作。
EventLoopGroup bossGroup = new NioEventLoopGroup(1); EventLoopGroup workerGroup = new NioEventLoopGroup(); ServerBootstrap b = new ServerBootstrap(); b.group(bossGroup, workerGroup) .channel(NioServerSocketChannel.class) .handler(new SimpleServerHandler()) .childHandler(new SimpleServerInitializer()) .option(ChannelOption.SO_BACKLOG, 128) .childOption(ChannelOption.SO_KEEPALIVE, true);
本篇博文將從源碼的角度分析ChannelFuture f = b.bind(8888).sync() 的內部實現。這樣就完成了Netty服務器端啟動過程的源碼分析。
源碼分析ChannelFuture f = b.bind(8888).sync()
AbstractBootstrap.java
public ChannelFuture bind(int inetPort) { return bind(new InetSocketAddress(inetPort)); }
我們接着看重載的bind
public ChannelFuture bind(SocketAddress localAddress) { validate();//相關參數的檢查 if (localAddress == null) { throw new NullPointerException("localAddress"); } return doBind(localAddress);//下面將分析 }
該函數主要看兩點:validate()和doBind(localAddress)
validate()方法
//函數功能:檢查相關參數是否設置了 @SuppressWarnings("unchecked") public B validate() { if (group == null) {//這裡的group指的是:b.group(bossGroup, workerGroup)代碼中的bossGroup throw new IllegalStateException("group not set"); } if (channelFactory == null) { throw new IllegalStateException("channel or channelFactory not set"); } return (B) this; }
該方法主要檢查了兩個參數,一個是group,一個是channelFactory,在這裡可以想一想這兩個參數是在哪裡以及何時被賦值的?答案是在如下代碼塊中被賦值的,其中是將bossGroup賦值給了group,將BootstrapChannelFactory賦值給了channelFactory.
ServerBootstrap b = new ServerBootstrap(); b.group(bossGroup, workerGroup) .channel(NioServerSocketChannel.class)
doBind(localAddress)方法
doBind方法的源代碼如下:
private ChannelFuture doBind(final SocketAddress localAddress) { final ChannelFuture regFuture = initAndRegister();//1 final Channel channel = regFuture.channel();//2 if (regFuture.cause() != null) { return regFuture; } final ChannelPromise promise; if (regFuture.isDone()) { promise = channel.newPromise(); doBind0(regFuture, channel, localAddress, promise); } else { // Registration future is almost always fulfilled already, but just in case it's not. promise = new PendingRegistrationPromise(channel); regFuture.addListener(new ChannelFutureListener() { @Override public void operationComplete(ChannelFuture future) throws Exception { doBind0(regFuture, channel, localAddress, promise); } }); } return promise; }
doBind這個函數是我們要分析的重點,這個函數的主要工作有如下幾點:
1、通過initAndRegister()方法得到一個ChannelFuture的實例regFuture。
2、通過regFuture.cause()方法判斷是否在執行initAndRegister方法時產生來異常。如果產生來異常,則直接返回,如果沒有產生異常則進行第3步。
3、通過regFuture.isDone()來判斷initAndRegister方法是否執行完畢,如果執行完畢來返回true,然後調用doBind0進行socket綁定。如果沒有執行完畢則返回false進行第4步。
4、regFuture會添加一個ChannelFutureListener監聽,當initAndRegister執行完成時,調用operationComplete方法並執行doBind0進行socket綁定。
第3、4點想乾的事就是一個:調用doBind0方法進行socket綁定。
下面將分成4部分對每行代碼具體做了哪些工作進行詳細分析。
initAndRegister()
該方法的具體代碼如下:
final ChannelFuture initAndRegister() { //結論:這裡的channel為一個NioServerSocketChannel對象,具體分析見後面 final Channel channel = channelFactory().newChannel();//1 try { init(channel);//2 } catch (Throwable t) { channel.unsafe().closeForcibly(); // as the Channel is not registered yet we need to force the usage of the GlobalEventExecutor return new DefaultChannelPromise(channel, GlobalEventExecutor.INSTANCE).setFailure(t); } ChannelFuture regFuture = group().register(channel);//3 if (regFuture.cause() != null) { if (channel.isRegistered()) { channel.close(); } else { channel.unsafe().closeForcibly(); } } return regFuture; }
通過函數名以及內部調用的函數可以猜測該函數幹了兩件事情:
1、初始化一個Channel,要想初始化,肯定要先得到一個Channel。
final Channel channel = channelFactory().newChannel();//1 init(channel);//2
2、將Channel進行註冊。
ChannelFuture regFuture = group().register(channel);//3
下面我們將分析這幾行代碼內部干來些什麼。
final Channel channel = channelFactory().newChannel();
在上一篇文章中(Netty源碼分析 (二)—– ServerBootstrap)分析中,我們知道b.channel(NioServerSocketChannel.class)的功能為:設置父類屬性channelFactory 為: BootstrapChannelFactory類的對象。其中這裡BootstrapChannelFactory對象中包括一個clazz屬性為:NioServerSocketChannel.class
因此,final Channel channel = channelFactory().newChannel();就是調用的BootstrapChannelFactory類中的newChannel()方法,該方法的具體內容為:
private static final class BootstrapChannelFactory<T extends Channel> implements ChannelFactory<T> { private final Class<? extends T> clazz; BootstrapChannelFactory(Class<? extends T> clazz) { this.clazz = clazz; } @Override public T newChannel() { try { return clazz.newInstance(); } catch (Throwable t) { throw new ChannelException("Unable to create Channel from class " + clazz, t); } } @Override public String toString() { return StringUtil.simpleClassName(clazz) + ".class"; } }
看到這個類,我們可以得到的結論:final Channel channel = channelFactory().newChannel();這行代碼的作用為通過反射產生來一個NioServerSocketChannel類的實例。
NioServerSocketChannel構造器
下面將看下NioServerSocketChannel類的構造函數做了哪些工作。
NioServerSocketChannel類的繼承體系結構如下:
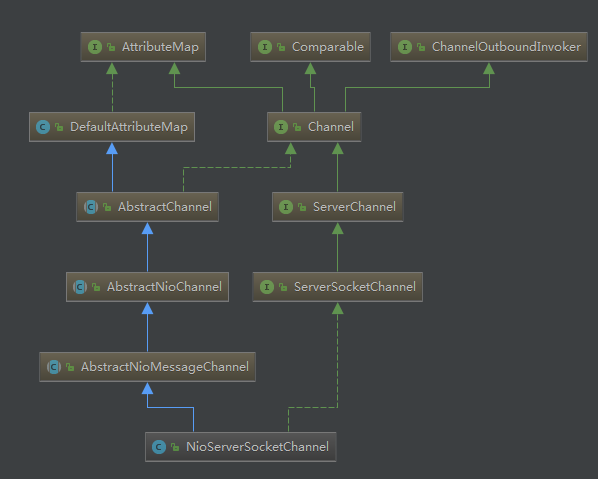
其無參構造函數如下:
public NioServerSocketChannel() { this(newSocket(DEFAULT_SELECTOR_PROVIDER)); }
無參構造函數中SelectorProvider DEFAULT_SELECTOR_PROVIDER = SelectorProvider.provider()。
函數newSocket的功能為:利用SelectorProvider產生一個SocketChannelImpl對象。
private static ServerSocketChannel newSocket(SelectorProvider provider) { try { return provider.openServerSocketChannel(); } catch (IOException e) { throw new ChannelException( "Failed to open a server socket.", e); } } public SocketChannel openSocketChannel() throws IOException { return new SocketChannelImpl(this); }
無參構造函數通過newSocket函數產生了一個SocketChannelImpl對象
然後調用了如下構造函數,我們繼續看
public NioServerSocketChannel(ServerSocketChannel channel) { super(null, channel, SelectionKey.OP_ACCEPT); config = new NioServerSocketChannelConfig(this, javaChannel().socket()); } //父類AbstractNioMessageChannel的構造函數 protected AbstractNioMessageChannel(Channel parent, SelectableChannel ch, int readInterestOp) { super(parent, ch, readInterestOp); } //父類 AbstractNioChannel的構造函數 protected AbstractNioChannel(Channel parent, SelectableChannel ch, int readInterestOp) { super(parent); this.ch = ch; this.readInterestOp = readInterestOp;//SelectionKey.OP_ACCEPT try { ch.configureBlocking(false);//設置當前的ServerSocketChannel為非阻塞的 } catch (IOException e) { try { ch.close(); } catch (IOException e2) { if (logger.isWarnEnabled()) { logger.warn( "Failed to close a partially initialized socket.", e2); } } throw new ChannelException("Failed to enter non-blocking mode.", e); } } //父類AbstractChannel的構造函數 protected AbstractChannel(Channel parent) { this.parent = parent; unsafe = newUnsafe(); pipeline = new DefaultChannelPipeline(this); }
new NioServerSocketChannel()產生一個實例對象時,調用上面這麼多構造函數主要幹了兩件事情:
1、產生來一個SocketChannelImpl類的實例,設置到ch屬性中,並設置為非阻塞的。
this.ch = ch;
ch.configureBlocking(false);
2、設置了config屬性
config = new NioServerSocketChannelConfig(this, javaChannel().socket()
3、設置SelectionKey.OP_ACCEPT事件
this.readInterestOp = readInterestOp;//SelectionKey.OP_ACCEPT
4、設置unsafe屬性
@Override protected AbstractNioUnsafe newUnsafe() { return new NioMessageUnsafe(); }
主要作用為:用來負責底層的connect、register、read和write等操作。
5、設置pipeline屬性
pipeline = new DefaultChannelPipeline(this);
每個Channel都有自己的pipeline,當有請求事件發生時,pipeline負責調用相應的hander進行處理。
這些屬性在後面都會用到,至於NioServerSocketChannel 對象中的unsafe、pipeline屬性的具體實現後面進行分析。
結論:final Channel channel = channelFactory().newChannel();這行代碼的作用為通過反射產生來一個NioServerSocketChannel類的實例,其中這個NioServerSocketChannel類對象有這樣幾個屬性:SocketChannel、NioServerSocketChannelConfig 、SelectionKey.OP_ACCEPT事件、NioMessageUnsafe、DefaultChannelPipeline
init(channel)
init方法的具體代碼如下:
@Override void init(Channel channel) throws Exception { //1、設置新接入channel的option final Map<ChannelOption<?>, Object> options = options(); synchronized (options) { channel.config().setOptions(options);//NioServerSocketChannelConfig } //2、設置新接入channel的attr final Map<AttributeKey<?>, Object> attrs = attrs(); synchronized (attrs) { for (Entry<AttributeKey<?>, Object> e: attrs.entrySet()) { @SuppressWarnings("unchecked") AttributeKey<Object> key = (AttributeKey<Object>) e.getKey(); channel.attr(key).set(e.getValue()); } } //3、設置handler到pipeline上 ChannelPipeline p = channel.pipeline(); if (handler() != null) {//這裡的handler()返回的就是第二部分.handler(new SimpleServerHandler())所設置的SimpleServerHandler p.addLast(handler()); } final EventLoopGroup currentChildGroup = childGroup; final ChannelHandler currentChildHandler = childHandler; final Entry<ChannelOption<?>, Object>[] currentChildOptions; final Entry<AttributeKey<?>, Object>[] currentChildAttrs; synchronized (childOptions) { currentChildOptions = childOptions.entrySet().toArray(newOptionArray(childOptions.size())); } synchronized (childAttrs) { currentChildAttrs = childAttrs.entrySet().toArray(newAttrArray(childAttrs.size())); } //p.addLast()向serverChannel的流水線處理器中加入了一個ServerBootstrapAcceptor,從名字上就可以看出來,這是一個接入器,專門接受新請求,把新的請求扔給某個事件循環器 p.addLast(new ChannelInitializer<Channel>() { @Override public void initChannel(Channel ch) throws Exception { ch.pipeline().addLast(new ServerBootstrapAcceptor( currentChildGroup, currentChildHandler, currentChildOptions, currentChildAttrs)); } }); }
該函數的功能為:
1、設置channel的options
如果沒有設置,則options為空,該屬性在ServerBootstrap類中的定義如下
Map<ChannelOption<?>, Object> options = new LinkedHashMap<ChannelOption<?>, Object>();
options可能如下:
public <T> boolean setOption(ChannelOption<T> option, T value) { validate(option, value); if (option == CONNECT_TIMEOUT_MILLIS) { setConnectTimeoutMillis((Integer) value); } else if (option == MAX_MESSAGES_PER_READ) { setMaxMessagesPerRead((Integer) value); } else if (option == WRITE_SPIN_COUNT) { setWriteSpinCount((Integer) value); } else if (option == ALLOCATOR) { setAllocator((ByteBufAllocator) value); } else if (option == RCVBUF_ALLOCATOR) { setRecvByteBufAllocator((RecvByteBufAllocator) value); } else if (option == AUTO_READ) { setAutoRead((Boolean) value); } else if (option == AUTO_CLOSE) { setAutoClose((Boolean) value); } else if (option == WRITE_BUFFER_HIGH_WATER_MARK) { setWriteBufferHighWaterMark((Integer) value); } else if (option == WRITE_BUFFER_LOW_WATER_MARK) { setWriteBufferLowWaterMark((Integer) value); } else if (option == MESSAGE_SIZE_ESTIMATOR) { setMessageSizeEstimator((MessageSizeEstimator) value); } else { return false; } return true; }
2、設置channel的attrs
如果沒有設置,則attrs為空,該屬性在ServerBootstrap類中的定義如下
private final Map<AttributeKey<?>, Object> attrs = new LinkedHashMap<AttributeKey<?>, Object>();
3、設置handler到channel的pipeline上
其中,這裡的handler為:在博文(Netty源碼分析 (二)—– ServerBootstrap)中分析的通過b.handler(new SimpleServerHandler())所設置的SimpleServerHandler對象
4、在pipeline上添加來一個ChannelInitializer對象,其中重寫來initChannel方法。該方法通過p.addLast()向serverChannel的流水線處理器中加入了一個 ServerBootstrapAcceptor,
從名字上就可以看出來,這是一個接入器,專門接受新請求,把新的請求扔給某個事件循環器
看到這裡,我們發現其實init只是初始化了一些基本的配置和屬性,以及在pipeline上加入了一個接入器,用來專門接受新連接,並沒有啟動服務.
group().register(channel)
回到 initAndRegister 方法中,繼續看 config().group().register(channel) 這行代碼,config 方法返回了 ServerBootstrapConfig,這個 ServerBootstrapConfig 調用了 group 方法,實際上就是 bossGroup。bossGroup 調用了 register 方法。
前面的分析我們知道group為:NioEvenLoopGroup,其繼承MultithreadEventLoopGroup,該類中的register方法如下:
@Override public ChannelFuture register(Channel channel) { return next().register(channel);//調用了NioEvenLoop對象中的register方法,NioEventLoop extends SingleThreadEventLoop }
next()方法的代碼如下,其功能為選擇下一個NioEventLoop對象。
@Override public EventExecutor next() { return chooser.next();//調用MultithreadEventExecutorGroup中的next方法 }
根據線程個數nThreads是否為2的冪次方來選擇chooser,其中這兩個chooser為: PowerOfTwoEventExecutorChooser、GenericEventExecutorChooser,這兩個chooser功能都是一樣,只是求余的方式不一樣。
next()方法返回的是一個NioEvenLoop對象
private final class PowerOfTwoEventExecutorChooser implements EventExecutorChooser { @Override public EventExecutor next() { return children[childIndex.getAndIncrement() & children.length - 1];//利用2的N次方法的特點,使用&求余更快。 } } private final class GenericEventExecutorChooser implements EventExecutorChooser { @Override public EventExecutor next() { return children[Math.abs(childIndex.getAndIncrement() % children.length)]; } }
結論:由於NioEventLoopGroup中維護着多個NioEventLoop,next方法回調用chooser策略找到下一個NioEventLoop,並執行該對象的register方法進行註冊。
由於NioEventLoop extends SingleThreadEventLoop,NioEventLoop沒有重寫該方法,因此看 SingleThreadEventLoop類中的register方法
@Override public ChannelFuture register(Channel channel) { return register(channel, new DefaultChannelPromise(channel, this)); } @Override public ChannelFuture register(final Channel channel, final ChannelPromise promise) { if (channel == null) { throw new NullPointerException("channel"); } if (promise == null) { throw new NullPointerException("promise"); } channel.unsafe().register(this, promise); return promise; }
在本博文第1部分的NioServerSocketChannel實例化中設置來unsafe屬性,具體是調用如下的方法來設置的,因此這裡的channel.unsafe()就是NioMessageUnsafe實例。
@Override protected AbstractNioUnsafe newUnsafe() { return new NioMessageUnsafe(); }
channel.unsafe().register(this, promise)這行代碼調用的是AbstractUnsafe類中的register方法,具體代碼如下:
@Override public final void register(EventLoop eventLoop, final ChannelPromise promise) { if (eventLoop == null) { throw new NullPointerException("eventLoop"); } //判斷該channel是否已經被註冊到EventLoop中 if (isRegistered()) { promise.setFailure(new IllegalStateException("registered to an event loop already")); return; } if (!isCompatible(eventLoop)) { promise.setFailure( new IllegalStateException("incompatible event loop type: " + eventLoop.getClass().getName())); return; } //1 將eventLoop設置在NioServerSocketChannel上 AbstractChannel.this.eventLoop = eventLoop; //判斷當前線程是否為該EventLoop中擁有的線程,如果是,則直接註冊,如果不是,則添加一個任務到該線程中 if (eventLoop.inEventLoop()) { register0(promise); } else { try { eventLoop.execute(new OneTimeTask() { //重點 @Override public void run() { register0(promise);//分析 } }); } catch (Throwable t) { logger.warn( "Force-closing a channel whose registration task was not accepted by an event loop: {}", AbstractChannel.this, t); closeForcibly(); closeFuture.setClosed(); safeSetFailure(promise, t); } } }
上面的重點是register0(promise)方法。基本邏輯為:
1、通過調用eventLoop.inEventLoop()方法判斷當前線程是否為該EventLoop中擁有的線程,如果是,則直接註冊,如果不是,說明該EventLoop在等待並沒有執行權,則進行第二步。
AbstractEventExecutor.java
@Override public boolean inEventLoop() { return inEventLoop(Thread.currentThread()); }
SingleThreadEventExecutor.java
@Override public boolean inEventLoop(Thread thread) { return thread == this.thread; }
2、既然該EventLoop中的線程此時沒有執行權,但是我們可以提交一個任務到該線程中,等該EventLoop的線程有執行權的時候就自然而然的會執行此任務,而該任務負責調用register0方法,這樣也就達到了調用register0方法的目的。
下面看register0這個方法,具體代碼如下:
private void register0(ChannelPromise promise) { try { // check if the channel is still open as it could be closed in the mean time when the register // call was outside of the eventLoop if (!promise.setUncancellable() || !ensureOpen(promise)) { return; } doRegister(); registered = true; safeSetSuccess(promise); //執行完,控制台輸出:channelRegistered pipeline.fireChannelRegistered(); if (isActive()) { //分析 pipeline.fireChannelActive(); } } catch (Throwable t) { // Close the channel directly to avoid FD leak. closeForcibly(); closeFuture.setClosed(); safeSetFailure(promise, t); } }
在上面的代碼中,是通過調用doRegister()方法完成NioServerSocketChannel的註冊,該方法的具體代碼如下:
@Override protected void doRegister() throws Exception { boolean selected = false; for (;;) { try { selectionKey = javaChannel().register(eventLoop().selector, 0, this); return; } catch (CancelledKeyException e) { if (!selected) { // Force the Selector to select now as the "canceled" SelectionKey may still be // cached and not removed because no Select.select(..) operation was called yet. eventLoop().selectNow(); selected = true; } else { // We forced a select operation on the selector before but the SelectionKey is still cached // for whatever reason. JDK bug ? throw e; } } } } protected SelectableChannel javaChannel() { return ch; }
在本博文的第1部分的NioServerSocketChannel的實例化分析中,我們知道這裡的javaChannel()方法返回的ch為實例化NioServerSocketChannel時產生的一個SocketChannelImpl類的實例,並設置為非阻塞的,具體見本博文的第1部分。
selectionKey = javaChannel().register(eventLoop().selector, 0, this);就完成了ServerSocketChannel註冊到Selector中。
回顧下,這裡的eventLoop().selector是什麼?答案是:KQueueSelectorImpl對象。
NioEventLoop(NioEventLoopGroup parent, ThreadFactory threadFactory, SelectorProvider selectorProvider) { super(parent, threadFactory, false); if (selectorProvider == null) { throw new NullPointerException("selectorProvider"); } provider = selectorProvider; selector = openSelector(); } private Selector openSelector() { final Selector selector; try { selector = provider.openSelector(); } catch (IOException e) { throw new ChannelException("failed to open a new selector", e); } //...省略了一部分代碼 return selector; }
ServerSocketChannel註冊完之後,接着執行pipeline.fireChannelRegistered方法。
public final ChannelPipeline fireChannelRegistered() { AbstractChannelHandlerContext.invokeChannelRegistered(this.head); return this; }
我們看到invokeChannelRegistered(this.head)傳的參數是head,這個head我們再下一篇文章中講,繼續往下看
static void invokeChannelRegistered(final AbstractChannelHandlerContext next) { EventExecutor executor = next.executor(); if (executor.inEventLoop()) { next.invokeChannelRegistered(); } else { executor.execute(new Runnable() { public void run() { next.invokeChannelRegistered(); } }); } }
看next.invokeChannelRegistered();
private void invokeChannelRegistered() { if (this.invokeHandler()) { try { ((ChannelInboundHandler)this.handler()).channelRegistered(this); } catch (Throwable var2) { this.notifyHandlerException(var2); } } else { this.fireChannelRegistered(); } }
接着看看this.handler(),實際上就是head的handler()
public ChannelHandler handler() { return this; }
返回的是this,那接着看 head中的channelRegistered(this)
public void channelRegistered(ChannelHandlerContext ctx) throws Exception { DefaultChannelPipeline.this.invokeHandlerAddedIfNeeded(); ctx.fireChannelRegistered(); }
繼續看ctx.fireChannelRegistered();
public ChannelHandlerContext fireChannelRegistered() { invokeChannelRegistered(this.findContextInbound()); return this; }
我們看看this.findContextInbound()
private AbstractChannelHandlerContext findContextInbound() { AbstractChannelHandlerContext ctx = this; do { ctx = ctx.next; } while(!ctx.inbound); return ctx; }
我們看到 ctx = ctx.next; 實際上是從head開始找,找到第一個 inbound 的hander
static void invokeChannelRegistered(final AbstractChannelHandlerContext next) { EventExecutor executor = next.executor(); if (executor.inEventLoop()) { next.invokeChannelRegistered(); } else { executor.execute(new Runnable() { public void run() { next.invokeChannelRegistered(); } }); } }
最後執行next.invokeChannelRegistered();
pipeline中維護了handler鏈表,還記得之前.handler(new SimpleServerHandler())初始化的handler在本博文的第1.2部分的分析中介紹了此handler被添加到此pipeline中了,通過遍歷鏈表,執行InBound類型handler的channelRegistered方法
因此執行到這裡,我們的控制台就回輸出:channelRegistered,這行信息。
到這裡,我們就將doBind方法final ChannelFuture regFuture = initAndRegister();給分析完了,得到的結論如下:
1、通過反射產生了一個NioServerSocketChannle對象。
2、完成了初始化
3、將NioServerSocketChannel進行了註冊。
接下來我們分析doBind方法的剩餘部分代碼主要做了什麼,
源代碼如下:
private ChannelFuture doBind(final SocketAddress localAddress) { final ChannelFuture regFuture = initAndRegister();//1 final Channel channel = regFuture.channel();//2 if (regFuture.cause() != null) { return regFuture; } final ChannelPromise promise; if (regFuture.isDone()) { promise = channel.newPromise(); doBind0(regFuture, channel, localAddress, promise); } else { // Registration future is almost always fulfilled already, but just in case it's not. promise = new PendingRegistrationPromise(channel); regFuture.addListener(new ChannelFutureListener() { @Override public void operationComplete(ChannelFuture future) throws Exception { doBind0(regFuture, channel, localAddress, promise); } }); } return promise; }
doBind0(regFuture, channel, localAddress, promise);
private static void doBind0( final ChannelFuture regFuture, final Channel channel, final SocketAddress localAddress, final ChannelPromise promise) { // This method is invoked before channelRegistered() is triggered. Give user handlers a chance to set up // the pipeline in its channelRegistered() implementation. channel.eventLoop().execute(new Runnable() { @Override public void run() { if (regFuture.isSuccess()) { channel.bind(localAddress, promise).addListener(ChannelFutureListener.CLOSE_ON_FAILURE); } else { promise.setFailure(regFuture.cause()); } } }); }
該函數主要是提交了一個Runnable任務到NioEventLoop線程中來進行處理。,這裡先看一下NioEventLoop類的execute方法
@Override public void execute(Runnable task) { if (task == null) { throw new NullPointerException("task"); } boolean inEventLoop = inEventLoop();//判斷當前線程是否為該NioEventLoop所關聯的線程,如果是,則添加任務到任務隊列中,如果不是,則先啟動線程,然後添加任務到任務隊列中去 if (inEventLoop) { addTask(task); } else { startThread(); addTask(task); //如果 if (isShutdown() && removeTask(task)) { reject(); } } if (!addTaskWakesUp && wakesUpForTask(task)) { wakeup(inEventLoop); } }
當提交的任務被線程執行後,則會執行channel.bind(localAddress, promise).addListener(ChannelFutureListener.CLOSE_ON_FAILURE)這行代碼,這行代碼完成的功能為:實現channel與端口的綁定。
具體如下:
AbstractChannel.java @Override public ChannelFuture bind(SocketAddress localAddress, ChannelPromise promise) { return pipeline.bind(localAddress, promise); }
在該方法中直接調用了pipeline的bind方法,這裡的pipeline時DefaultChannelPipeline的實例。
DefaultChannelPipeline.java @Override public ChannelFuture bind(SocketAddress localAddress, ChannelPromise promise) { return tail.bind(localAddress, promise); }
在上面方法中直接調用了TailContext實例tail的bind方法,tail在下一篇博文中有詳細的介紹。繼續看tail實例的bind方法
AbstractChannelHandlerContext.java @Override public ChannelFuture bind(final SocketAddress localAddress, final ChannelPromise promise) { //...省略有效性檢查 final AbstractChannelHandlerContext next = findContextOutbound();// EventExecutor executor = next.executor(); if (executor.inEventLoop()) { next.invokeBind(localAddress, promise); } else { safeExecute(executor, new OneTimeTask() { @Override public void run() { next.invokeBind(localAddress, promise); } }, promise, null); } return promise; }
此上面bind函數中的這行代碼:final AbstractChannelHandlerContext next = findContextOutbound();所完成的任務就是在pipeline所持有的以AbstractChannelHandlerContext為節點的雙向鏈表中從尾節點tail開始向前尋找第一個outbound=true的handler節點。
private AbstractChannelHandlerContext findContextOutbound() { AbstractChannelHandlerContext ctx = this; do { ctx = ctx.prev; } while (!ctx.outbound); return ctx; }
在 DefaultChannelPipeline 的構造器中, 會實例化兩個對象: head 和 tail, 並形成了雙向鏈表的頭和尾。 head 是 HeadContext 的實例, 它實現了 ChannelOutboundHandler 接口和ChannelInboundHandler 接口, 並且它的 outbound 字段為 true.而tail 是 TailContext 的實例,它實現了ChannelInboundHandler 接口,並且其outbound 字段為 false,inbound 字段為true。 基於此在如上的bind函數中調用了 findContextOutbound方法 找到的 AbstractChannelHandlerContext 對象其實就是 head.
繼續看,在pipelie的雙向鏈表中找到第一個outbound=true的AbstractChannelHandlerContext節點head後,然後調用此節點的invokeConnect方法,該方法的代碼如下:
private void invokeBind(SocketAddress localAddress, ChannelPromise promise) { try { ((ChannelOutboundHandler) handler()).bind(this, localAddress, promise); } catch (Throwable t) { notifyOutboundHandlerException(t, promise); } }
HeadContext類中的handler()方法代碼如下:
@Override public ChannelHandler handler() { return this; }
該方法返回的是其本身,這是因為HeadContext由於其繼承AbstractChannelHandlerContext以及實現了ChannelHandler接口使其具有Context和Handler雙重特性。
繼續看,看HeadContext類中的bind方法,代碼如下:
@Override public void bind( ChannelHandlerContext ctx, SocketAddress localAddress, ChannelPromise promise) throws Exception { unsafe.bind(localAddress, promise); }
unsafe這個字段是在HeadContext構造函數中被初始化的,如下:
HeadContext(DefaultChannelPipeline pipeline) { super(pipeline, null, HEAD_NAME, false, true); unsafe = pipeline.channel().unsafe(); }
而此構造函數中的pipeline.channel().unsafe()這行代碼返回的就是在本博文前面研究NioServerSocketChannel這個類的構造函數中所初始化的一個實例,如下:
unsafe = newUnsafe();//newUnsafe()方法返回的是NioMessageUnsafe對象。
接下來看NioMessageUnsafe類中的bind方法(準確來說:該方法在AbstractUnsafe中),該類bind具體方法代碼如下:
@Override public final void bind(final SocketAddress localAddress, final ChannelPromise promise) { //...省略了部分代碼 boolean wasActive = isActive(); try { doBind(localAddress);//核心代碼 } catch (Throwable t) { safeSetFailure(promise, t); closeIfClosed(); return; } if (!wasActive && isActive()) { invokeLater(new OneTimeTask() { @Override public void run() { pipeline.fireChannelActive(); } }); } safeSetSuccess(promise); }
上面的核心代碼就是:doBind(localAddress);需要注意的是,此doBind方法是在NioServerSocketChannel類中的doBind方法,不是其他類中的。
NioServerSocketChannel類中的doBind方法代碼如下:
@Override protected void doBind(SocketAddress localAddress) throws Exception { javaChannel().socket().bind(localAddress, config.getBacklog()); }
上面方法中javaChannel()方法返回的是NioServerSocketChannel實例初始化時所產生的Java NIO ServerSocketChannel實例(更具體點為ServerSocketChannelImple實例)。 等價於語句serverSocketChannel.socket().bind(localAddress)完成了指定端口的綁定,這樣就開始監聽此端口。綁定端口成功後,是這裡調用了我們自定義handler的channelActive方法,在綁定之前,isActive()方法返回false,綁定之後返回true。
@Override public boolean isActive() { return javaChannel().socket().isBound(); }
這樣,就進入了如下的if條件的代碼塊中
if (!wasActive && isActive()) { invokeLater(new OneTimeTask() { @Override public void run() { pipeline.fireChannelActive(); } }); } private void invokeLater(Runnable task) { try { //省略了部分代碼 eventLoop().execute(task); } catch (RejectedExecutionException e) { logger.warn("Can't invoke task later as EventLoop rejected it", e); } }
進而開始執行 pipeline.fireChannelActive();這行代碼 ,這行代碼的具體調用鏈如下所示:
DefaultChannelPipeline.java
@Override public ChannelPipeline fireChannelActive() { head.fireChannelActive(); if (channel.config().isAutoRead()) { channel.read(); } return this; } @Override public ChannelHandlerContext fireChannelActive() { final AbstractChannelHandlerContext next = findContextInbound(); EventExecutor executor = next.executor(); if (executor.inEventLoop()) { next.invokeChannelActive(); } else { executor.execute(new OneTimeTask() { @Override public void run() { next.invokeChannelActive(); } }); } return this; } private void invokeChannelActive() { try { ((ChannelInboundHandler) handler()).channelActive(this); } catch (Throwable t) { notifyHandlerException(t); } }
總結
最後,我們來做下總結,netty啟動一個服務所經過的流程
1.設置啟動類參數,最重要的就是設置channel
2.創建server對應的channel,創建各大組件,包括ChannelConfig,ChannelId,ChannelPipeline,ChannelHandler,Unsafe等
3.init 初始化這個 NioServerSocketChannel,設置一些attr,option,以及設置子channel的attr,option,給server的channel添加新channel接入器,並觸發addHandler事件
4.config().group().register(channel) 通過 ServerBootstrap 的 bossGroup 根據group長度取模得到NioEventLoop ,將 NioServerSocketChannel 註冊到 NioEventLoop 中的 selector 上,然後觸發 channelRegistered事件
5.調用到jdk底層做端口綁定,並觸發active事件
