曹工說Spring Boot源碼(26)– 學習位元組碼也太難了,實在不能忍受了,寫了個小小的位元組碼執行引擎
- 2020 年 3 月 31 日
- 筆記
曹工說Spring Boot源碼(26)– 學習位元組碼也太難了,實在不能忍受了,寫了個小小的位元組碼執行引擎
寫在前面的話
相關背景及資源:
曹工說Spring Boot源碼(1)– Bean Definition到底是什麼,附spring思維導圖分享
曹工說Spring Boot源碼(2)– Bean Definition到底是什麼,咱們對著介面,逐個方法講解
曹工說Spring Boot源碼(3)– 手動註冊Bean Definition不比遊戲好玩嗎,我們來試一下
曹工說Spring Boot源碼(4)– 我是怎麼自定義ApplicationContext,從json文件讀取bean definition的?
曹工說Spring Boot源碼(5)– 怎麼從properties文件讀取bean
曹工說Spring Boot源碼(6)– Spring怎麼從xml文件里解析bean的
曹工說Spring Boot源碼(7)– Spring解析xml文件,到底從中得到了什麼(上)
曹工說Spring Boot源碼(8)– Spring解析xml文件,到底從中得到了什麼(util命名空間)
曹工說Spring Boot源碼(9)– Spring解析xml文件,到底從中得到了什麼(context命名空間上)
曹工說Spring Boot源碼(10)– Spring解析xml文件,到底從中得到了什麼(context:annotation-config 解析)
曹工說Spring Boot源碼(11)– context:component-scan,你真的會用嗎(這次來說說它的奇技淫巧)
曹工說Spring Boot源碼(12)– Spring解析xml文件,到底從中得到了什麼(context:component-scan完整解析)
曹工說Spring Boot源碼(13)– AspectJ的運行時織入(Load-Time-Weaving),基本內容是講清楚了(附源碼)
曹工說Spring Boot源碼(14)– AspectJ的Load-Time-Weaving的兩種實現方式細細講解,以及怎麼和Spring Instrumentation集成
曹工說Spring Boot源碼(15)– Spring從xml文件里到底得到了什麼(context:load-time-weaver 完整解析)
曹工說Spring Boot源碼(16)– Spring從xml文件里到底得到了什麼(aop:config完整解析【上】)
曹工說Spring Boot源碼(17)– Spring從xml文件里到底得到了什麼(aop:config完整解析【中】)
曹工說Spring Boot源碼(18)– Spring AOP源碼分析三部曲,終於快講完了 (aop:config完整解析【下】)
曹工說Spring Boot源碼(19)– Spring 帶給我們的工具利器,創建代理不用愁(ProxyFactory)
曹工說Spring Boot源碼(20)– 碼網恢恢,疏而不漏,如何記錄Spring RedisTemplate每次操作日誌
曹工說Spring Boot源碼(21)– 為了讓大家理解Spring Aop利器ProxyFactory,我已經拼了
曹工說Spring Boot源碼(22)– 你說我Spring Aop依賴AspectJ,我依賴它什麼了
曹工說Spring Boot源碼(23)– ASM又立功了,Spring原來是這麼遞歸獲取註解的元註解的
曹工說Spring Boot源碼(24)– Spring註解掃描的瑞士軍刀,asm技術實戰(上)
曹工說Spring Boot源碼(25)– Spring註解掃描的瑞士軍刀,ASM + Java Instrumentation,順便提提Jar包破解
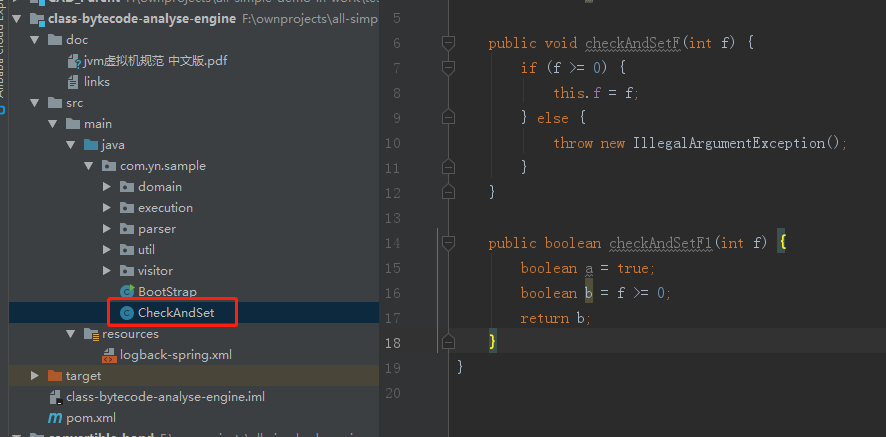
工程結構圖:

概要
本來,這兩三講,不是和asm有些關係嗎,但是asm難的地方,從來不在他自身,而是難在如何讀懂位元組碼。我給大家舉個例子,如下這個簡單的類:
public class CheckAndSet { private int f; public void checkAndSetF(int f) { if (f >= 0) { this.f = f; } else { throw new IllegalArgumentException(); } } public boolean checkAndSetF1(int f) { boolean a = true; boolean b = f >= 0; return b; } } 我們假設要用asm來寫出這個程式碼,要怎麼寫?可以利用我們上一講提到的asm插件:ASM ByteCode Outline來輔助,但是,如果不懂位元組碼,還是有很多坑的,一時半會趟不出來那種。位元組碼這個東西,如果始終繞不開的話,那還是要學。
上面那個簡單的類,用javap -v CheckAndSet.class 來反編譯的話,checkAndSetF1方法,會生成如下的位元組碼:
public boolean checkAndSetF1(int); descriptor: (I)Z flags: ACC_PUBLIC Code: stack=1, locals=4, args_size=2 0: iconst_1 1: istore_2 2: iload_1 3: iflt 10 6: iconst_1 7: goto 11 10: iconst_0 11: istore_3 12: iload_3 13: ireturn 這些位元組碼看起來,是不是摳腦殼?怎麼知道位元組碼對應的意思呢,這個當然是看文檔。
或者
https://docs.oracle.com/javase/specs/jvms/se10/html/jvms-4.html#jvms-4.1
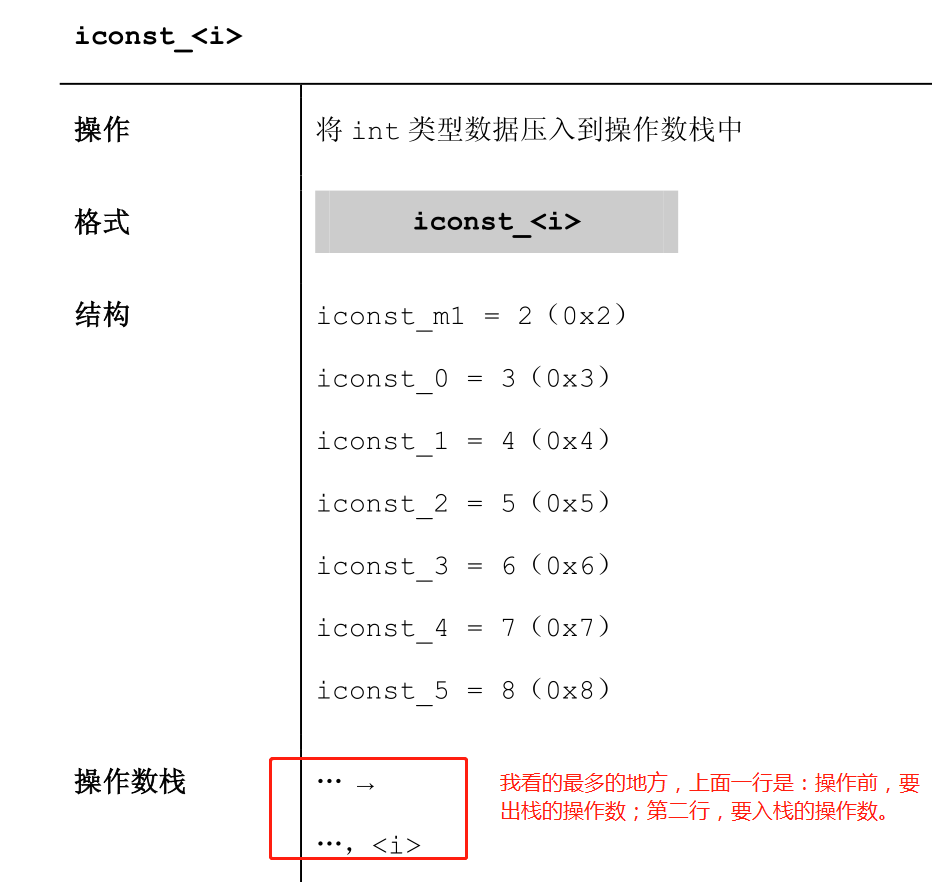
針對第一個pdf,大家可以從後往前查找(pdf最後附了個所有位元組碼指令的介紹),如:
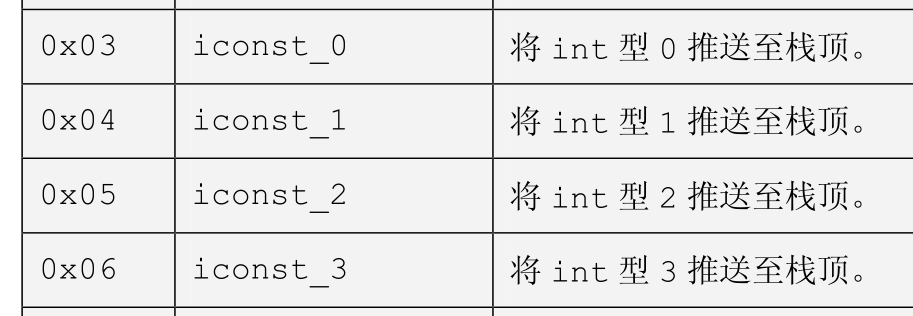
再往上查找,還會有詳細的說明:
靠著這個文檔,我開始了逐行手動計算:執行這個位元組碼之前,棧和本地變數表是什麼樣的;執行這個指令後,棧和本地變數表是什麼樣的。過程,那是相當痛苦,大概和下面的圖差不多(圖片來源於網路,我只是拿來描述下):
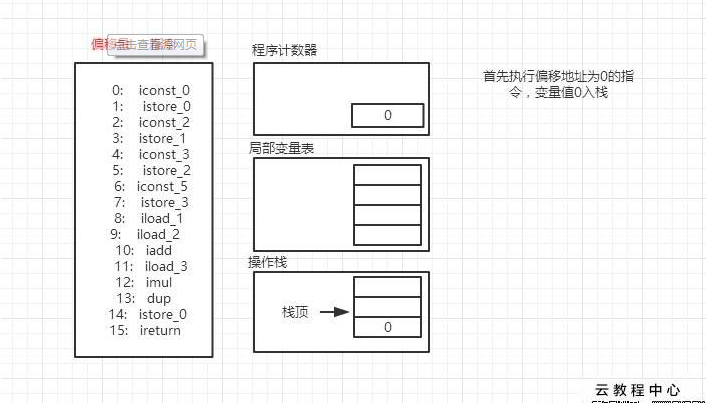
我可能還要原始一點,圖也沒畫,直接在notepad++里,記錄執行每一步之後,本地變數表和操作數棧的情況。這樣的效率真的太低了,而且看一會,我就忘了。。
然後我覺得,這個東西,好像可以寫個程式來幫我執行,無非就是一條條地執行位元組碼,然後維護一個本地變數list,維護一個棧;執行位元組碼的時候,我就照著位元組碼的意思來做:要取本地變數我就取本地變數,要入棧我就入棧,要出棧我就出棧,反正文檔很詳細嘛,照著來即可。
說干就干。
效果展示
最終實現出來,效果如下,可以展示每一步的位元組碼和執行之後的本地變數表和操作數棧的狀態。
比如執行如下方法:
public void checkAndSetF(int f) { if (f >= 0) { this.f = f; } else { throw new IllegalArgumentException(); } } 位元組碼:
public void checkAndSetF(int); descriptor: (I)V flags: ACC_PUBLIC Code: stack=2, locals=2, args_size=2 0: iload_1 1: iflt 12 4: aload_0 5: iload_1 6: putfield #2 // Field f:I 9: goto 20 12: new #3 // class java/lang/IllegalArgumentException 15: dup 16: invokespecial #4 // Method java/lang/IllegalArgumentException."<init>":()V 19: athrow 20: return 執行效果:

大致思路與實現
-
編譯目標class,我這裡拿前面的CheckAndSet.class舉例
-
javap -v CheckAndSet.class > a.txt,後續我們就會讀取a.txt來獲取方法的指令集合
-
編寫位元組碼執行引擎,一條一條地執行位元組碼
用javap -v來反編譯class,可以拿到class的位元組碼,大概有兩塊東西比較重要:
-
方法的指令集合,這是我們最需要的東西,我拿一條指令來舉例:
public void checkAndSetF(int); descriptor: (I)V flags: ACC_PUBLIC Code: stack=2, locals=2, args_size=2 0: iload_1 1: iflt 12 4: aload_0 5: iload_1 6: putfield #2 // Field f:I 9: goto 20 12: new #3 // class java/lang/IllegalArgumentException 15: dup 16: invokespecial #4 // Method java/lang/IllegalArgumentException."<init>":()V 19: athrow 20: return比如,其中的
6: putfield #2 // Field f:I這條,其中,真正的指令,其實只有下面這部分:6: putfield #2剩下的
// Field f:I是javap給我們提供的注釋,真正的class中是沒有這部分的。那麼,6: putfield #2要怎麼看呢,其中的
#2是什麼鬼意思?別慌,接著看另一塊很重要的東西:常量池。 -
常量池
Constant pool: #1 = Methodref #6.#26 // java/lang/Object."<init>":()V #2 = Fieldref #5.#27 // com/yn/sample/CheckAndSet.f:I #3 = Class #28 // java/lang/IllegalArgumentException ... #5 = Class #29 // com/yn/sample/CheckAndSet ... #27 = NameAndType #7:#8 // f:I前面的#2,就是上面的:
#2 = Fieldref #5.#27 // com/yn/sample/CheckAndSet.f:I其中,
// com/yn/sample/CheckAndSet.f:I也是注釋,前面的#5.#27才是class中真實存在的。不管怎麼說,大家反正也知道#2的意思,就是
CheckAndSet的f這個field。
有了這兩塊東西,基本可以開搞了。
單條指令的執行
比如,我要執行:
6: putfield #2 利用#2拿到要執行指令的field(利用反射),然後再從棧里,彈出來:目標對象、要設置的field的入參。就可以像下面這樣執行了:
Field field; ... /** * 從堆棧依次出棧: * value,objectref */ Object value = context.getOperandStack().removeLast(); Object target = context.getOperandStack().removeLast(); try { field.set(target,value); } catch (IllegalAccessException e) { throw new RuntimeException(e); } 執行引擎核心邏輯與指令的執行順序控制
本來,我一開始是直接遍歷某個方法的指令集的:
public boolean checkAndSetF1(int);
descriptor: (I)Z flags: ACC_PUBLIC Code: stack=1, locals=4, args_size=2 0: iconst_1 1: istore_2 2: iload_1 3: iflt 10 6: iconst_1 7: goto 11 10: iconst_0 11: istore_3 12: iload_3 13: ireturn 就是按順序執行,0 1 2 …13 。但是這是有bug的,因為我忽略了下面這種跳轉指令:
3: iflt 10 ... 7: goto 11 所以,後來我改成了,將這個指令集合,弄成一個鏈表,每個指令中,維護下一條指令的引用。
@Data public class MethodInstructionVO { /** * 序列號 */ private String sequenceNumber; /** * 操作碼 */ private String opcode; /** * 操作碼的說明 */ private String opCodeDesc; /** * 操作數 */ private String operand; /** * 操作數的說明 */ private String comment; /** * 按順序執行的情況下的下一條指令,比如,javap反編譯後,位元組碼如下: * 0: iconst_1 * 1: istore_2 * 2: iload_1 * 3: iflt 10 * 6: iconst_1 * 7: goto 11 * 那麼,0: iconst_1 這條指令的nextInstruction就會執行偏移為1的那個; */ @JSONField(serialize = false) MethodInstructionVO nextInstruction; } 上面的最後一個欄位,就是用來指向下一條指令的。默認就是指向下一條,比如:
stack=1, locals=4, args_size=2 0: iconst_1 -- next指向 1 1: istore_2 -- next指向 2 2: iload_1 -- next指向 3,最後一條的next為null 大概的核心執行框架如下:
1. MethodInstructionVO currentInstruction = instructionVOList.get(0); while (true) { // 2. ExecutorByOpCode executorByOpCode = executorByOpCodeMap.get(currentInstruction.getOpcode()); if (executorByOpCode == null) { log.info("currentInstruction:{}", currentInstruction); } // 3. InstructionExecutionContext context = new InstructionExecutionContext(); context.setTarget(target); context.setConstantPoolItems(constantPoolItems); context.setLocalVariables(localVariables); context.setOperandStack(operandStack); String desc = OpCodeEnum.getDescByNameIgnoreCase(currentInstruction.getOpcode()); currentInstruction.setOpCodeDesc(desc); context.setInstructionVO(currentInstruction); /** * 4. 如果該位元組碼執行後,返回值不為空,則表示,需要跳轉到其他指令執行 */ InstructionExecutionResult instructionExecutionResult = executorByOpCode.execute(context); log.info("after {},noperand stack:{},nlocal variables:{}", JSONObject.toJSONString(currentInstruction, SerializerFeature.PrettyFormat), operandStack, localVariables); // 5 if (instructionExecutionResult == null) { currentInstruction = currentInstruction.getNextInstruction(); if (currentInstruction == null) { System.out.println("execute over---------------"); break; } continue; } else if (instructionExecutionResult.isReturnInstruction()) { // 6 return instructionExecutionResult.getResult(); } else if (instructionExecutionResult.isExceptional()) { // 7 log.info("method execute over,throw exception:{}", instructionExecutionResult.getResult()); throw (Throwable) instructionExecutionResult.getResult(); } // 8 String sequenceNum = instructionExecutionResult.getInstructionSequenceNum(); currentInstruction = instructionVOHashMap.get(sequenceNum); log.info("will skip to {}", currentInstruction); } -
1處,默認獲取第一條指令
-
2處,獲取指令對應的處理器,比如,獲取iconst_1指令對應的處理器
-
3處,構造要傳入處理器的參數上下文,包括了當前指令、操作數棧、本地變數表、常量池等
-
4處,調用第二步的處理器的execute方法,傳入第三步的參數;將執行結果賦值給局部變數
instructionExecutionResult。
-
5處,如果返回結果為null,說明不需要跳轉,則將當前指令的next,賦值給當前指令。
if (instructionExecutionResult == null) { currentInstruction = currentInstruction.getNextInstruction(); -
6處,如果返回結果不為空,且是return指令,則直接返回結果
-
7處,如果返回結果不為空,且是拋出了異常,則將異常繼續拋出
-
8處,如果返回結果不為空,比如遇到goto 指令,處理器返回時,會在instructionExecutionResult的instructionSequenceNum欄位,設置要跳轉到的指令;則查找到該指令,賦值給currentInstruction
如何根據位元組碼指令,查找處理器
定義了一個通用的處理器:
public interface ExecutorByOpCode { String getOpCode(); /** * * @param context * @return 如果需要跳轉,則返回要跳轉的指令的偏移量;否則返回null */ InstructionExecutionResult execute(InstructionExecutionContext context); } 然後,我這邊針對各種指令,寫了一堆實現類:

拿一個最簡單的iconst_0舉例:
@Component public class ExecutorForIConst0 extends BaseExecutorForIConstN implements ExecutorByOpCode{ @Override public String getOpCode() { return OpCodeEnum.iconst_0.name(); } @Override public InstructionExecutionResult execute(InstructionExecutionContext context) { super.execute(context, 0); return null; } } public class BaseExecutorForIConstN { // 1 public void execute(InstructionExecutionContext context,Integer counter) { context.getOperandStack().addLast(counter); } } - 1處,將常量0,壓入操作數棧。
每個位元組碼處理器,都註解了@Component,然後在執行引擎類中,注入了全部的處理器:
@Component @Slf4j public class MethodExecutionEngine implements InitializingBean { ClassInfo classInfo; // 1 @Autowired private List<ExecutorByOpCode> executorByOpCodes; private Map<String, ExecutorByOpCode> executorByOpCodeMap = new HashMap<>(); // 2 @Override public void afterPropertiesSet() throws Exception { if (executorByOpCodes != null) { for (ExecutorByOpCode executorByOpCode : executorByOpCodes) { executorByOpCodeMap.put(executorByOpCode.getOpCode().toLowerCase(), executorByOpCode); } } } - 1處,注入全部的處理器
- 2處,將處理器寫入map,key:位元組碼指令;value:處理器本身。
- 後續執行引擎,就可以根據位元組碼指令,查找到對應的處理器。
遍歷讀取文件所有行,採用visitor模式回調visitor介面
就是普通的讀文件,寫得比較隨意,讀成了行的集合。
String filepath = "F:\ownprojects\all-simple-demo-in-work\class-bytecode-analyse-engine\target\classes\com\yn\sample\a.txt"; JavapClassFileParser javapClassFileParser = context.getBean(JavapClassFileParser.class); ClassInfo classInfo = javapClassFileParser.parse(filepath); 在parse方法內,程式碼如下:
// 1 lines = FileReaderUtil.readFile2Lines(filePath); if (CollectionUtils.isEmpty(lines)) { return null; } // 2 ClassMethodCodeVisitor classMethodCodeVisitor = null; for (int i = 0; i < lines.size(); i++) { String currentLine = lines.get(i); if (i == 0) { ... -
1處,讀取文件,獲取全部行
-
遍歷所有行,這塊寫得比較亂一點,比如,當前行包含了「Constant pool:」時,將當前解析狀態修改為
常量池解析開始:/** * 當本行包含Constant pool:時,接下來就是一堆的常量: * Constant pool: * #1 = Methodref #6.#25 // java/lang/Object."<init>":()V * #2 = Fieldref #5.#26 // com/yn/sample/CheckAndSet.f:I * 切換狀態到常量池解析開始的狀態 */ if (currentLine.contains("Constant pool:")) { classConstantPoolInfoVisitor.visitConstantPoolStarted(); state = ParseStateEnum.CONSTANT_POOL_STARTED.state; continue; }下一次循環,就會進入解析狀態為
常量池解析開始時的邏輯:if (state == ParseStateEnum.CONSTANT_POOL_STARTED.state) { // 1. ConstantPoolItem item = ParseEngineHelper.parseConstantPoolItem(currentLine); if (item == null) { // 2. classConstantPoolInfoVisitor.visitConstantPoolEnd(); state = ParseStateEnum.METHOD_INFO_STARTED.state; continue; } else { // 3 classConstantPoolInfoVisitor.visitConstantPoolItem(item); continue; } }-
1處,當前行的格式應該為,
#1 = Methodref #6.#26 // java/lang/Object."<init>":()V根據正則,解析當前行為如下結構:
public class ConstantPoolItem { /** * 格式如: * #1 */ private String id; /** * 如: * Methodref */ private ConstantPoolItemTypeEnum constantPoolItemTypeEnum; /** * #6.#25 */ private String value; /** * 對於value的注釋,因為value欄位一般就是對常量池的id引用, * javap反編譯後,為了方便大家閱讀,這裡會顯示為相應的常量 */ private String comment; } -
2處,如果返回的常量池對象為null,說明當前常量池解析結束,則修改解析狀態為:
方法解析開始。 -
3處,如果解析出來了常量池對象,則回調visitor介面。
-
在解析過程中,會不斷回調我們的visitor介面,比如:
package com.yn.sample.visitor; import com.yn.sample.domain.ConstantPoolItem; import java.util.ArrayList; public interface ClassConstantPoolInfoVisitor { /** * 常量池解析開始 */ void visitConstantPoolStarted(); /** * 解析到每一個常量池對象時,回調本方法 * @param constantPoolItem */ void visitConstantPoolItem(ConstantPoolItem constantPoolItem); /** * 常量池解析結束 */ void visitConstantPoolEnd(); /** * 獲取最終的常量池對象 * @return */ ArrayList<ConstantPoolItem> getConstantPoolItemList(); } 整體流程
-
讀取文件,獲取位元組碼
package com.yn.sample; @Component @ComponentScan("com.yn.sample") public class BootStrap { public static void main(String[] args) throws Throwable { AnnotationConfigApplicationContext context = new AnnotationConfigApplicationContext(BootStrap.class); /** * 解析文件 */ String filepath = "F:\ownprojects\all-simple-demo-in-work\class-bytecode-analyse-engine\target\classes\com\yn\sample\a.txt"; JavapClassFileParser javapClassFileParser = context.getBean(JavapClassFileParser.class); ClassInfo classInfo = javapClassFileParser.parse(filepath); } }位元組碼讀取後,存在classInfo中。
-
調用CheckAndSet類的實例的checkAndSetF(int)介面,參數為12,即,調用如下方法:
public void checkAndSetF(int f) { if (f >= 0) { this.f = f; } else { throw new IllegalArgumentException(); } } -
構造本地變數list、操作數棧
private Object doExecute(Object target, MethodInfo methodInfo, List<ConstantPoolItem> constantPoolItems, List<Object> arguments) throws Throwable { List<MethodInstructionVO> instructionVOList = methodInfo.getInstructionVOList(); /** * 構造next欄位,將位元組碼指令list轉變為鏈表 */ assemblyInstructionList2LinkedList(instructionVOList); /** * 本地變數表,按照從javap中解析出來的: * Code: * stack=1, locals=4, args_size=2 * 來創建本地變數的堆棧 */ Integer localVariablesSize = methodInfo.getMethodCodeStackSizeAndLocalVariablesTableSize().getLocalVariablesSize(); List<Object> localVariables = constructLocalVariableList(target, arguments, localVariablesSize); /** * 構造指令map,方便後續跳轉指令使用 * key:指令的sequenceNum * value:指令 */ HashMap<String, MethodInstructionVO> instructionVOHashMap = new HashMap<>(); for (MethodInstructionVO vo : instructionVOList) { instructionVOHashMap.put(vo.getSequenceNumber(), vo); } return null; } -
調用執行引擎逐行解釋執行位元組碼
這部分參見前面,已經講過。
總結
源碼放在:
https://gitee.com/ckl111/class-bytecode-analyse-engine
目前沒實現的有:
- 方法調用方法,只支援調用單個方法。方法堆棧待實現。
- 很多其他各種指令
目前只能執行下面這個類中的方法,後續遇到其他位元組碼指令,再慢慢加吧:
後續有時間再寫其他的吧,如果大家有興趣,可以自己寫。