python爬取部落格園
一、爬蟲簡介:
網路爬蟲(又稱為網頁蜘蛛,網路機器人,在 FOAF 社區中間,更經常的稱為網頁追逐者),是一種按照一定的規則,自動地抓取萬維網資訊的 程式 或者 腳本 。 另外一些不常使用的名字還有螞蟻、自動索引、模擬程式或者蠕蟲。
二、需求
期末臨近,學院老師讓我們每個人導出自己部落格園寫過的部落格,當然我是一個初學python爬蟲的懶人,就決定用爬蟲來試試。
我需要的是爬取我的個人部落格的主頁的部落格標題、鏈接、概要、點贊評論數等,我決定先爬十頁試試水。
三、流程分析
第一步 找地址
我們需要找到自己的部落格地址,比如我的主頁地址是這個//www.cnblogs.com/wjingbo/,不過我需要爬取的並不是他一頁,當我點擊下一頁的時候,他變成了這樣//www.cnblogs.com/wjingbo/default.html?page=2,顯然這個page2便是第二頁,這時候規律來了,我們只需要一個循環每次+1便能完成爬取每一個頁。
第二步 分析網頁
我們分析這個網頁,然後找到自己想要的資訊在哪。這時候我們按下F12或者右鍵頁面選擇檢查,查看頁面元素。
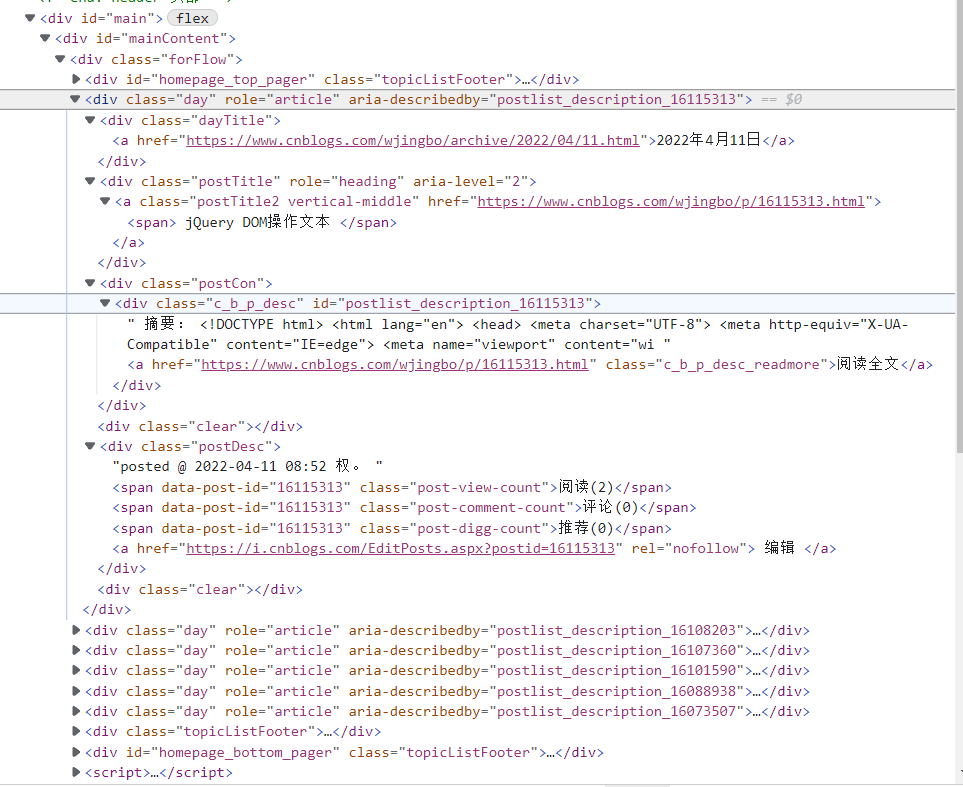
然後我們會發現標題在span標籤中,鏈接在一個a標籤中,這時候我們找到我們全部需要的資訊的位置,然後通過python現有的庫,來進行爬取內容。
第三步 分析數據
我們爬取完數據會發現他並不是我們單純想要的數據,會有很多換行符、空格、一些雜七雜八的標籤,我們這時候就需要python的re庫進行正則的過濾,過濾出我們自己想要的資訊。
第四步 保存數據
我們數據已經爬取完了全部存到了一個列表當中,這時候我們需要保存的我們的數據到excel中,這時候我們需要用到python的操作excel的庫進行操作。
四、程式碼分解
①引入需要的庫
from bs4 import BeautifulSoup  #網頁解析
import re    #正則表表達式文字匹配
import urllib.request,urllib.error  #指定url,獲取網頁數據
import xlwt  #進行excel操作
②向網頁請求數據
def askURL(url):
    head = {   #偽裝請求頭,模擬瀏覽器訪問
       "User-Agent":" Mozilla / 5.0(Linux;Android6.0;Nexus5 Build / MRA58N) AppleWebKit / 537.36(KHTML, likeGecko) Chrome / 99.0.4844.51Mobile Safari / 537.36"
    }
    request = urllib.request.Request(url,headers=head)
    html = ""
    try:
        response = urllib.request.urlopen(request)  #中間部分程式碼可以不用動
        html = response.read().decode('utf-8')
        #print(html)
    except urllib.error.URLError as e:              #異常處理
        if hasattr(e,"code"):
            print(e.code)
        if hasattr(e,"reason"):
            print(e.reason)
    return html  #返回爬到所有的html數據
③分析數據(難點)
這部分需要的知識量較大一些,可以著重學一下正則表達式。
#正則表達式控制獲取詳細內容
findTitle = re.compile(r'<span>(.*?)</span>',re.S)
findlink = re.compile(r'<a class="postTitle2 vertical-middle" href="(.*?)">')
findzhaiyao = re.compile(r'<div class="c_b_p_desc"(.*?)<a',re.S)
finddate = re.compile(r'<div class="postDesc">posted @(.*?)權',re.S)
findread = re.compile(r'<span class="post-view-count" data-post-id=(.*?)</span>')
findcomment = re.compile(r'<span class="post-comment-count" data-post-id=(.*?)</span>')
finddigg = re.compile(r'<span class="post-digg-count" data-post-id=(.*?)</span>')
獲取數據函數。
def getData(baseurl):
    datalist = []  # 2 解析數據
    allTitle = []  #存儲標題
    allLink = []   #存儲鏈接
    allZhaiyao = [] #存儲摘要
    alldate = []    #存儲日期
    allRead = []    #存儲閱讀數
    allComment = [] #存儲評論數
    allDigg = []    #存儲推薦數
    for i in range(0,10):
        url = baseurl + str(i+1)    #對目標鏈接地址page=後面的數字進行循環
        html = askURL(url)          #調用爬取函數
        soup = BeautifulSoup(html, "html.parser")

        for item in soup.find_all('div',class_="day"):  #簡單過濾資訊
            #print(item)

            item = str(item)

            title = re.findall(findTitle,item)     #匹配數據
            allTitle.extend(title)      #添加數據到列表

            link = re.findall(findlink,item)
            allLink.extend(link)

            zhaiyao = re.findall(findzhaiyao,item)
            allZhaiyao.extend(zhaiyao)

            date = re.findall(finddate,item)
            alldate.extend(date)

            readNum = re.findall(findread,item)
            allRead.extend(readNum)

            commentNum = re.findall(findcomment,item)
            allComment.extend(commentNum)

            diggNum = re.findall(finddigg,item)
            allDigg.extend(diggNum)
    #print(allTitle)
    #print(allLink)
    #print(allZhaiyao)
    #print(alldate)
    #print(allRead)
    #print(allComment)
    #print(allDigg)

    for j in range(0,100):      #循環10頁就是100條數據,這個循環是過濾掉所有不需要的資訊
        data = []
        title = allTitle[j].strip()     #去除字元串里的空格
        data.append(title)

        link = allLink[j]
        data.append(link)

        zhaiyao = allZhaiyao[j].strip()
        zhaiyao = zhaiyao.split('">')[1]
        data.append(zhaiyao.replace("\n",""))

        date = alldate[j].strip()
        data.append(date)

        readNum = allRead[j].split('>')[1]      #通過分割字元串來去除無用資訊
        data.append(readNum)

        commentNum = allComment[j].split('>')[1]
        data.append(commentNum)

        diggNum = allDigg[j].split('>')[1]
        data.append(diggNum)

        datalist.append(data)

    print(datalist)
    return datalist     #返回列表
這部分比較麻煩,我大概調試了3個小時。
④保存數據
def saveData(datalist,savepath):
    print("save...")
    book = xlwt.Workbook(encoding="utf-8",style_compression=0)
    sheet = book.add_sheet('部落格園隨筆列表',cell_overwrite_ok=True)    #創建sheet1
    col = ("標題","原文鏈接","摘要","時間","閱讀","評論","推薦")        #加標題
    for i in range(0,7):
        sheet.write(0,i,col[i])
    for i in range(0,100):          #添加數據到excel*(100條)
        print("第%d條"%(i+1))        #列印條數
        data = datalist[i]
        for j in range(0,7):
            sheet.write(i+1,j,data[j])      #添加每個子列表中的7個數據
    book.save(savepath)            #保存excel
⑤主函數
def main():
    baseurl = "//www.cnblogs.com/wjingbo/default.html?page="
    datalist = getData(baseurl)         #調研分析數據函數
    #1 爬取網頁
    savepath = ".\\權。的部落格資訊.xls"     #excel保存的位置名稱
    saveData(datalist,savepath)          #調用保存函數
⑥設置程式入口
if __name__ == "__main__":
    main()
    print("爬取完畢!")
到這裡就完成爬取工作了。
五、完整源程式碼
# -*- coding = utf-8 -*-
# @Time : 2022/4/27 8:21
# @Author :王敬博
# @File : test.py
# @Software: PyCharm
from bs4 import BeautifulSoup  #網頁解析
import re    #正則表表達式文字匹配
import urllib.request,urllib.error  #指定url,獲取網頁數據
import xlwt  #進行excel操作
import sqlite3  #進行SQLite資料庫操作
import pymysql.cursors  #連接mysql資料庫

def main():
    baseurl = "//www.cnblogs.com/wjingbo/default.html?page="
    datalist = getData(baseurl)         #調研分析數據函數
    #1 爬取網頁
    savepath = ".\\權。的部落格資訊.xls"     #excel保存的位置名稱
    saveData(datalist,savepath)          #調用保存函數


def askURL(url):
    head = {   #偽裝請求頭,模擬瀏覽器訪問
       "User-Agent":" Mozilla / 5.0(Linux;Android6.0;Nexus5 Build / MRA58N) AppleWebKit / 537.36(KHTML, likeGecko) Chrome / 99.0.4844.51Mobile Safari / 537.36"
    }
    request = urllib.request.Request(url,headers=head)
    html = ""
    try:
        response = urllib.request.urlopen(request)
        html = response.read().decode('utf-8')
        #print(html)
    except urllib.error.URLError as e:
        if hasattr(e,"code"):
            print(e.code)
        if hasattr(e,"reason"):
            print(e.reason)
    return html  #返回爬到所有的html數據

#正則表達式控制獲取詳細內容
findTitle = re.compile(r'<span>(.*?)</span>',re.S)
findlink = re.compile(r'<a class="postTitle2 vertical-middle" href="(.*?)">')
findzhaiyao = re.compile(r'<div class="c_b_p_desc"(.*?)<a',re.S)
finddate = re.compile(r'<div class="postDesc">posted @(.*?)權',re.S)
findread = re.compile(r'<span class="post-view-count" data-post-id=(.*?)</span>')
findcomment = re.compile(r'<span class="post-comment-count" data-post-id=(.*?)</span>')
finddigg = re.compile(r'<span class="post-digg-count" data-post-id=(.*?)</span>')

def getData(baseurl):
    datalist = []  # 2 解析數據
    allTitle = []  #存儲標題
    allLink = []   #存儲鏈接
    allZhaiyao = [] #存儲摘要
    alldate = []    #存儲日期
    allRead = []    #存儲閱讀數
    allComment = [] #存儲評論數
    allDigg = []    #存儲推薦數
    for i in range(0,10):
        url = baseurl + str(i+1)    #對目標鏈接地址page=後面的數字進行循環
        html = askURL(url)          #調用爬取的函數
        soup = BeautifulSoup(html, "html.parser")

        for item in soup.find_all('div',class_="day"):  #簡單過濾資訊
            #print(item)

            item = str(item)

            title = re.findall(findTitle,item)     #匹配數據
            allTitle.extend(title)      #添加數據到列表

            link = re.findall(findlink,item)
            allLink.extend(link)

            zhaiyao = re.findall(findzhaiyao,item)
            allZhaiyao.extend(zhaiyao)

            date = re.findall(finddate,item)
            alldate.extend(date)

            readNum = re.findall(findread,item)
            allRead.extend(readNum)

            commentNum = re.findall(findcomment,item)
            allComment.extend(commentNum)

            diggNum = re.findall(finddigg,item)
            allDigg.extend(diggNum)
    #print(allTitle)
    #print(allLink)
    #print(allZhaiyao)
    #print(alldate)
    #print(allRead)
    #print(allComment)
    #print(allDigg)

    for j in range(0,100):      #循環10頁就是100條數據,這個循環是過濾掉所有不需要的資訊
        data = []
        title = allTitle[j].strip()     #去除字元串里的空格
        data.append(title)

        link = allLink[j]
        data.append(link)

        zhaiyao = allZhaiyao[j].strip()
        zhaiyao = zhaiyao.split('">')[1]
        data.append(zhaiyao.replace("\n",""))

        date = alldate[j].strip()
        data.append(date)

        readNum = allRead[j].split('>')[1]      #通過分割字元串來去除無用資訊
        data.append(readNum)

        commentNum = allComment[j].split('>')[1]
        data.append(commentNum)

        diggNum = allDigg[j].split('>')[1]
        data.append(diggNum)

        datalist.append(data)

    print(datalist)
    return datalist     #返回列表

def saveData(datalist,savepath):
    print("save...")
    book = xlwt.Workbook(encoding="utf-8",style_compression=0)
    sheet = book.add_sheet('部落格園隨筆列表',cell_overwrite_ok=True)    #創建sheet1
    col = ("標題","原文鏈接","摘要","時間","閱讀","評論","推薦")        #加標題
    for i in range(0,7):
        sheet.write(0,i,col[i])
    for i in range(0,100):          #添加數據到excel*(100條)
        print("第%d條"%(i+1))        #列印條數
        data = datalist[i]
        for j in range(0,7):
            sheet.write(i+1,j,data[j])      #添加每個子列表中的7個數據
    book.save(savepath)            #保存excel

if __name__ == "__main__":
    main()
    print("爬取完畢!")
六、效果展示

到這裡就結束了,如果有什麼不懂的問題,可以私信我哦!如果對你有幫助記得點贊哦!
註:禁止商業轉載,非商業轉載須註明地址,謝謝合作。


