Springboot 載入配置文件源碼分析
- 2021 年 11 月 21 日
- 筆記
- JAVA, springboot
Springboot 載入配置文件源碼分析
本文的分析是基於springboot 2.2.0.RELEASE。
本篇文章的相關源碼位置://github.com/wbo112/blogdemo/tree/main/springbootdemo/springboot-profiles
springboot載入配置文件如application.yml是通過org.springframework.boot.context.config.ConfigFileApplicationListener這個類來完成的。這個類的載入也是通過spring.factories文件中來載入的。

ConfigFileApplicationListener這個類同時實現了EnvironmentPostProcessor、ApplicationListener這兩個介面。
EnvironmentPostProcessor介面需要實現的postProcessEnvironment方法,這個方法主要就是用來對Environment來進行增強處理的。而Environment主要是用來表示當前應用程式運行環境的介面。在我們這裡來說讀取的配置文件最終也會放到這裡面來。
簡單的調用關係就是下面的圖來,具體是怎麼調到onApplicationEvent的,比較簡單,就不和大家一起看了。直接看本次的重點吧。
下面的方法都是ConfigFileApplicationListener這個類中
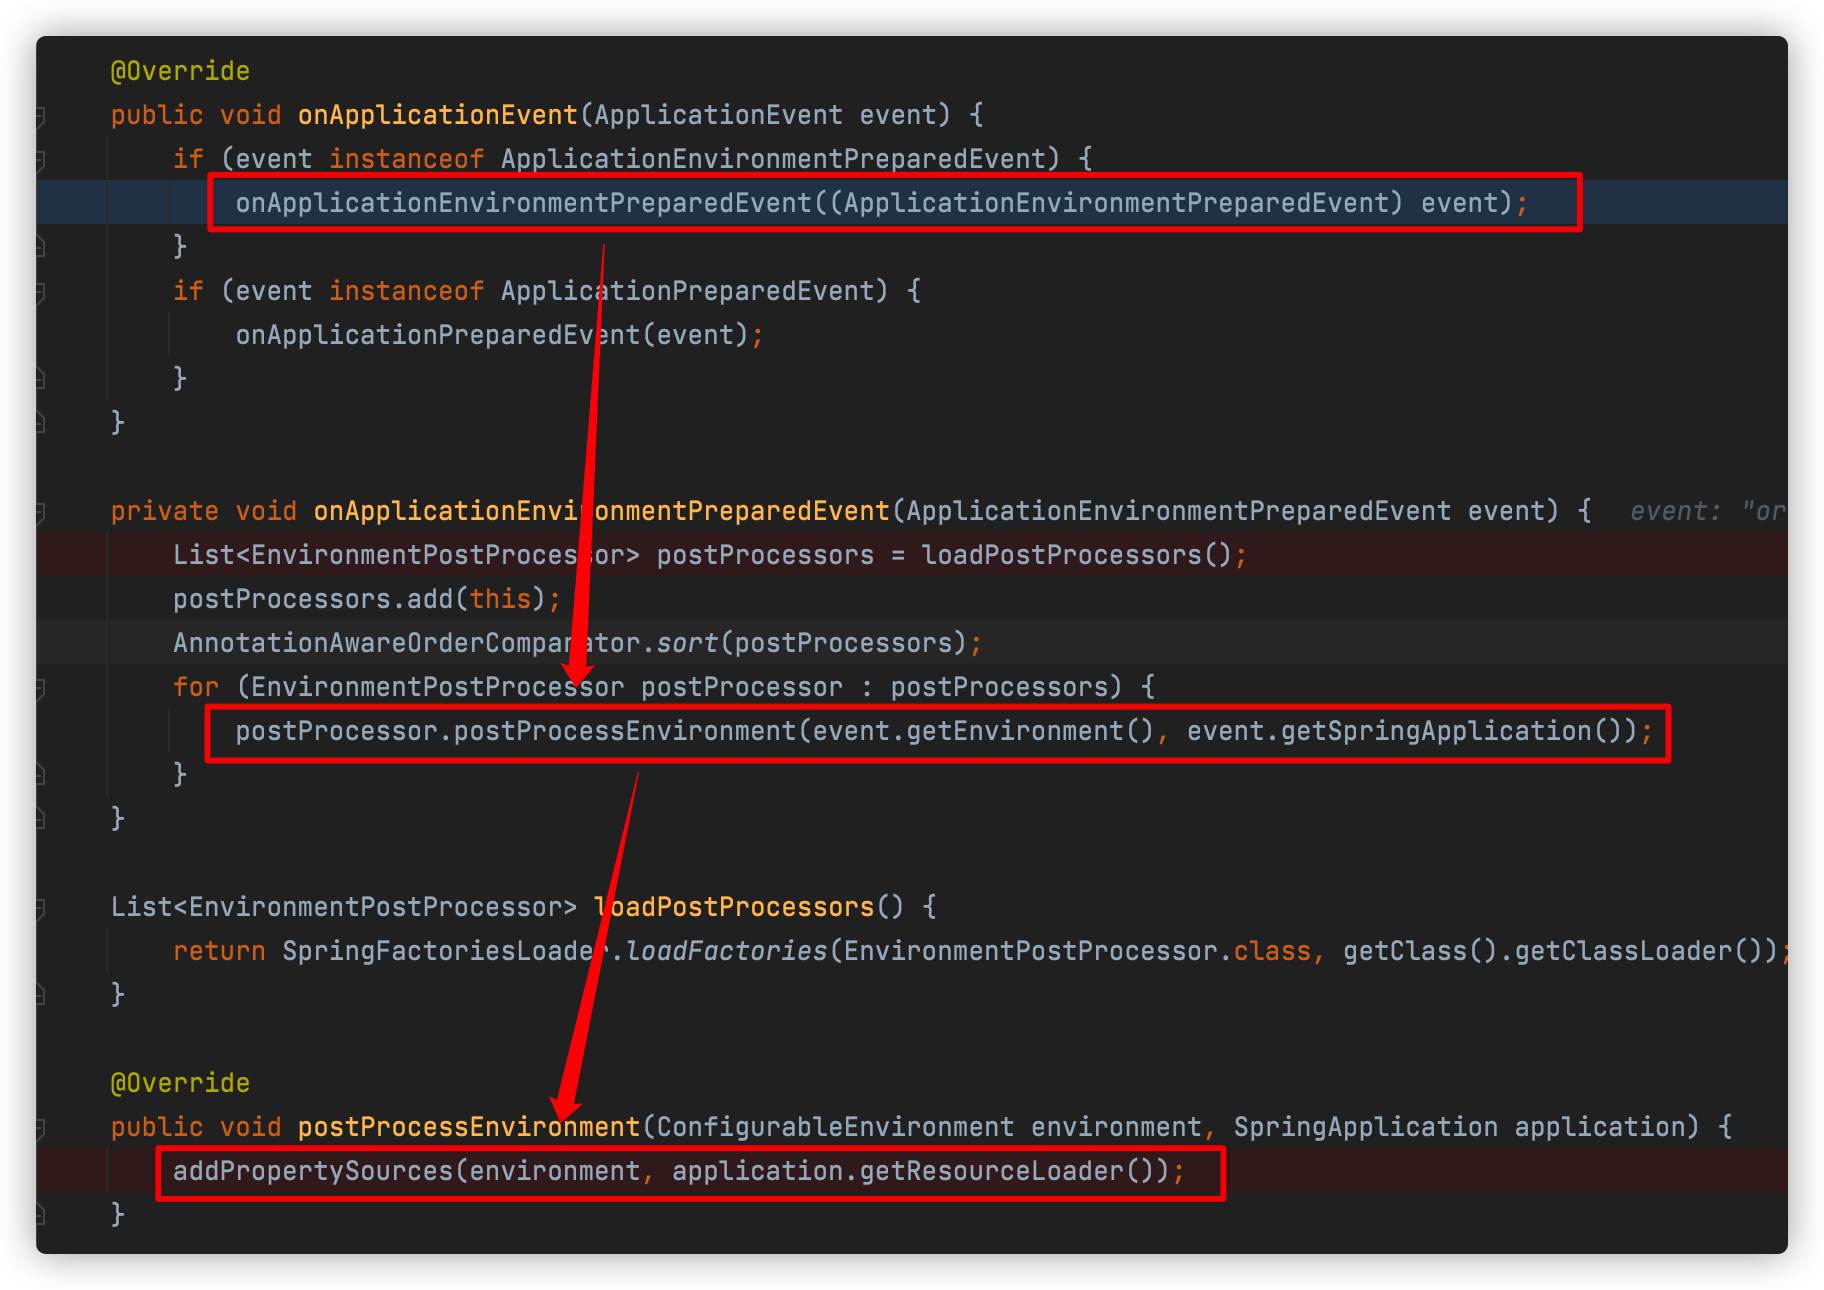
在addPropertySources中首先會添加一個用來處理生成隨機數的RandomValuePropertySource,然後就會通過內部類Loader來載入配置文件。所以我們本次的主要是看Loader類的load方法的執行流程

下面我們來具體看看load方法的執行流程
		void load() {
      //配置文件的載入就是通過這裡來完成的。
      //DEFAULT_PROPERTIES = "defaultProperties";
      //LOAD_FILTERED_PROPERTY是一個set<String>,裡面有兩個元素{"spring.profiles.active","spring.profiles.include"}
			FilteredPropertySource.apply(this.environment, DEFAULT_PROPERTIES, LOAD_FILTERED_PROPERTY,
         //下面這裡是一個lambda表達式,這裡暫時省略,後面具體調用到這裡我們再具體看。
					(defaultProperties) -> {
						......
					});
		}
上面的會調用到FilteredPropertySource的靜態方法,這個也比較簡單,就幾行程式碼。最終又會調用到上面我們的省略的lambda表達式
static void apply(ConfigurableEnvironment environment, String propertySourceName, Set<String> filteredProperties,
      Consumer<PropertySource<?>> operation) {
   //這個是獲取到當前程式的運行時環境。主要就是當前系統的環境變數、當前程式的環境變數等等,下面放個圖一起看看
   MutablePropertySources propertySources = environment.getPropertySources();
  //這裡是從運行時環境中查找key=defaultProperties的屬性值,一般情況下,我們沒有配置這個屬性,獲取到的original就是null,就會走到下面的if分支中,回到我們的lambda表達式中,我們就看這個分支吧
   PropertySource<?> original = propertySources.get(propertySourceName);
   if (original == null) {
      operation.accept(null);
      return;
   }
   propertySources.replace(propertySourceName, new FilteredPropertySource(original, filteredProperties));
   try {
      operation.accept(original);
   }
   finally {
      propertySources.replace(propertySourceName, original);
   }
}
我們看看上面的MutablePropertySources propertySources = environment.getPropertySources();裡面的內容

可以看到它裡面有個propertySourceList,裡面有6個對象,裡面具體內容不打開看了。我們最終讀取的配置文件也會添加到這個列表裡面去
我們再回到上面的程式碼,看看lambda表達式中的調用吧
				//這個就是上面load方法中我們之前省略掉的lambda表達式了
				//這裡的入參defaultProperties是null
				(defaultProperties) -> {
          	//這裡定義一個profiles,用來存放我們需要載入的profile的名字。
						this.profiles = new LinkedList<>();
						this.processedProfiles = new LinkedList<>();
						this.activatedProfiles = false;
						this.loaded = new LinkedHashMap<>();

          //這個方法首先會在profiles中添加一個null的空對象。代表一個全局的profile,這個它一定會載入。
          //後面會繼續從environment中查找屬性為"spring.profiles.active","spring.profiles.include"的值通過屬性綁定的形式轉化成profile,也添加到profiles中來,我們這裡沒有定義這兩個屬性,所以也就不會添加了
          //繼續判斷profiles的size,如果只有一個null的話,會在裡面添加一個名為default的profile,作為默認的profile
						initializeProfiles();

          //到這裡我們的profiles中已經有兩個對象了,一個全局的null,一個默認的default。
          //如果我們沒有定義自己的profile,那就會使用保留默認的;
          //如果我們定義了自己的profile,就會刪除掉默認的名為default的profile

						while (!this.profiles.isEmpty()) {
							Profile profile = this.profiles.poll();
              //首先這裡的profile的是null,不會進入下面的if分支
							if (isDefaultProfile(profile)) {
                //這裡會判斷如果不是默認的profile,就會加入到environment激活的Profile列表中
								addProfileToEnvironment(profile.getName());
							}
              //在這裡就會去載入配置文件。
              //這裡有3個參數
              //1. 我們本次的profile
              //2. 是個lambda表達式,主要是對要載入的配置文件進行過濾。如果不符合需要,就不會載入
              //3. 也是個lambda表達式,主要是是解析後的文檔進行一個處理(加入到臨時列表中)
              //這個方法比較重要。我們進這個方法去看看
							load(profile, this::getPositiveProfileFilter,
									addToLoaded(MutablePropertySources::addLast, false));
							this.processedProfiles.add(profile);
						}
						load(null, this::getNegativeProfileFilter, addToLoaded(MutablePropertySources::addFirst, true));
						addLoadedPropertySources();
						applyActiveProfiles(defaultProperties);
					});
			//這個方法就是從指定的位置去查找配置文件進行載入
			private void load(Profile profile, DocumentFilterFactory filterFactory, DocumentConsumer consumer) {
			//getSearchLocations()獲取的要查找配置文件的目錄位置
      //默認的會從下面4個位置去查找file:./config/, file:./, classpath:/config/, classpath:/
      getSearchLocations().forEach((location) -> {
				boolean isFolder = location.endsWith("/");
        //由於我們上面的查找路徑都是/結束的,所以查找的是目錄,這裡會返回需要查找的文件名application
				Set<String> names = isFolder ? getSearchNames() : NO_SEARCH_NAMES;
        //下面的方法就是從指定位置,使用profile,根據指定的名字去查找配置文件進行載入
				names.forEach((name) -> load(location, name, profile, filterFactory, consumer));
			});
		}
上面看到getSearchLocations(),getSearchNames()分別是指定配置文件查找位置和具體的文件名。在ConfigFileApplicationListener類中也提供了對應的set方法,說明我們也可以根據自己的需要來進行指定。
從上面也能看到我們idea開發中在resource目錄中配置的application.yml中目錄和文件名分別是通過getSearchLocations()和getSearchNames()指定的。
從上面也能看到默認會在file:./config/, file:./, classpath:/config/, classpath:/這4個位置去尋找文件名為application的配置文件。下面就是具體去查找並載入配置文件了
	private void load(String location, String name, Profile profile, DocumentFilterFactory filterFactory,
				DocumentConsumer consumer) {
     //我們這裡的name ="application",所以就不會走到這個分支
			if (!StringUtils.hasText(name)) {
				......
			}
			Set<String> processed = new HashSet<>();

    // this.propertySourceLoaders就是具體來負責載入配置文件的。它是在ConfigFileApplicationListener構造方法中賦值的,
    //具體的程式碼是下面這行
    //this.propertySourceLoaders = SpringFactoriesLoader.loadFactories(PropertySourceLoader.class,getClass().getClassLoader());
    //當前的有兩個類PropertiesPropertySourceLoader,YamlPropertySourceLoader
    //PropertiesPropertySourceLoader來載入後綴"properties", "xml" 的配置文件
    //YamlPropertySourceLoader來載入後綴為"yml", "yaml"的配置文件
			for (PropertySourceLoader loader : this.propertySourceLoaders) {
				for (String fileExtension : loader.getFileExtensions()) {
					if (processed.add(fileExtension)) {
            //具體在這裡就會遍歷PropertySourceLoader,來載入配置文件
            //loader就是PropertySourceLoader
            //location + name就是文件前綴了。如file:./config/application
            //"." + fileExtension是文件後綴
            //後面幾個參數都是入口傳入的
						loadForFileExtension(loader, location + name, "." + fileExtension, profile, filterFactory,
								consumer);
					}
				}
			}
		}
在這裡就是分別使用PropertiesPropertySourceLoader,YamlPropertySourceLoader去做具體的載入解析了
private void loadForFileExtension(PropertySourceLoader loader, String prefix, String fileExtension,
      Profile profile, DocumentFilterFactory filterFactory, DocumentConsumer consumer) {
   //這裡是生成文檔過濾器
   //第一次進來的profile==null,不會走進下面的if分支
  //下面這有兩個DocumentFilter,它們有什麼區別呢?
  //第一個defaultFilter傳入的是null,也就是說如果當前載入的配置文件中如果沒有spring.profiles這個屬性,那就會被載入
  //第二個profileFilter傳入的是profile,那就需要配置文件中的spring.profiles包含了當前的profile,且處於激活狀態
   DocumentFilter defaultFilter = filterFactory.getDocumentFilter(null);
   DocumentFilter profileFilter = filterFactory.getDocumentFilter(profile);
   if (profile != null) {
      // Try profile-specific file & profile section in profile file (gh-340)
     	//這裡就會去查找類似我們工程中的配置文件application-test.properties了
      String profileSpecificFile = prefix + "-" + profile + fileExtension;
      load(loader, profileSpecificFile, profile, defaultFilter, consumer);
      load(loader, profileSpecificFile, profile, profileFilter, consumer);
      // Try profile specific sections in files we've already processed

     //這個情況就是類似我們配置文件application-test.properties的情況了
     //雖然profile==test時會去載入application-test.properties,但是由於application-test.properties配置文件中的			             			//spring.profiles=sitdba,是不能被profile=test的profileFilter匹配到的,
     //但是可以被profiles=sitdbaprofileFilter匹配匹配到,也就是會在下面的for循環中被載入到
      for (Profile processedProfile : this.processedProfiles) {
         if (processedProfile != null) {
            String previouslyLoaded = prefix + "-" + processedProfile + fileExtension;
            load(loader, previouslyLoaded, profile, profileFilter, consumer);
         }
      }
   }
  //第一次profile==null,就會載入類似application.yml這種,文件名中沒有包含profile的配置文件
   // Also try the profile-specific section (if any) of the normal file
   load(loader, prefix + fileExtension, profile, profileFilter, consumer);
}
在這裡就是具體拼接文件名:如application.yml,application-xxx.properties這種配置文件具體去載入了
private void load(PropertySourceLoader loader, String location, Profile profile, DocumentFilter filter,
      DocumentConsumer consumer) {
   try {
     //這裡就是使用資源載入器去載入指定位置上的資源,也就是載入我們的配置文件。
     //如果找不到配置文件就直接返回,如果能找到就進行後面配置文件的載入了
      Resource resource = this.resourceLoader.getResource(location);
      if (resource == null || !resource.exists()) {
         if (this.logger.isTraceEnabled()) {
            StringBuilder description = getDescription("Skipped missing config ", location, resource,
                  profile);
            this.logger.trace(description);
         }
         return;
      }
      if (!StringUtils.hasText(StringUtils.getFilenameExtension(resource.getFilename()))) {
         if (this.logger.isTraceEnabled()) {
            StringBuilder description = getDescription("Skipped empty config extension ", location,
                  resource, profile);
            this.logger.trace(description);
         }
         return;
      }
      String name = "applicationConfig: [" + location + "]";
     	//這裡會將配置文件轉化成Document。
     	//yml文件中會用---進行區分成不同的文件,所以這裡就是一個list,表示載入多個
      List<Document> documents = loadDocuments(loader, name, resource);

     //例如一個空的文件,就會走到這裡,返回
      if (CollectionUtils.isEmpty(documents)) {
         if (this.logger.isTraceEnabled()) {
            StringBuilder description = getDescription("Skipped unloaded config ", location, resource,
                  profile);
            this.logger.trace(description);
         }
         return;
      }
      List<Document> loaded = new ArrayList<>();

     //這裡會對Document進行過濾,對於符合條件的進行後續處理
      for (Document document : documents) {
        //這個過濾的話主要有兩點
        //1.如果profile是null,那麼就需要document的document.getProfiles()為空,就是配置文件中沒有spring.profiles
        //2.如果profile不是null,那麼就判斷document的profiles中包含profile,且當前激活的profile包含了document的profile
         if (filter.match(document)) {
           	//這個是查找document中的spring.profiles.active加入到profiles中,在入口的lambda表達式就會繼續從profiles中去遍歷查找配置文件
           //在這個方法中只會添加一次,後面再添加的話,判斷之前已經有添加,就會直接返回。同時在添加完了激活的profile後,會刪除掉開始加入的名為default的默認的profile
            addActiveProfiles(document.getActiveProfiles());

           //這個是通過spring.profiles.include屬性添加引入的外部文件的profile
            addIncludedProfiles(document.getIncludeProfiles());
           //將document加入到loaded列表中
            loaded.add(document);
         }
      }
     //這裡對上面的document順序進行反轉
      Collections.reverse(loaded);
      if (!loaded.isEmpty()) {
        	//在這裡會將document載入到成員變數loaded(它的結構是Map<Profile, MutablePropertySources>,下面的圖就是當前loaded中的內容)中
         loaded.forEach((document) -> consumer.accept(profile, document));
         if (this.logger.isDebugEnabled()) {
            StringBuilder description = getDescription("Loaded config file ", location, resource, profile);
            this.logger.debug(description);
         }
      }
   }
   catch (Exception ex) {
      throw new IllegalStateException("Failed to load property source from location '" + location + "'", ex);
   }
}
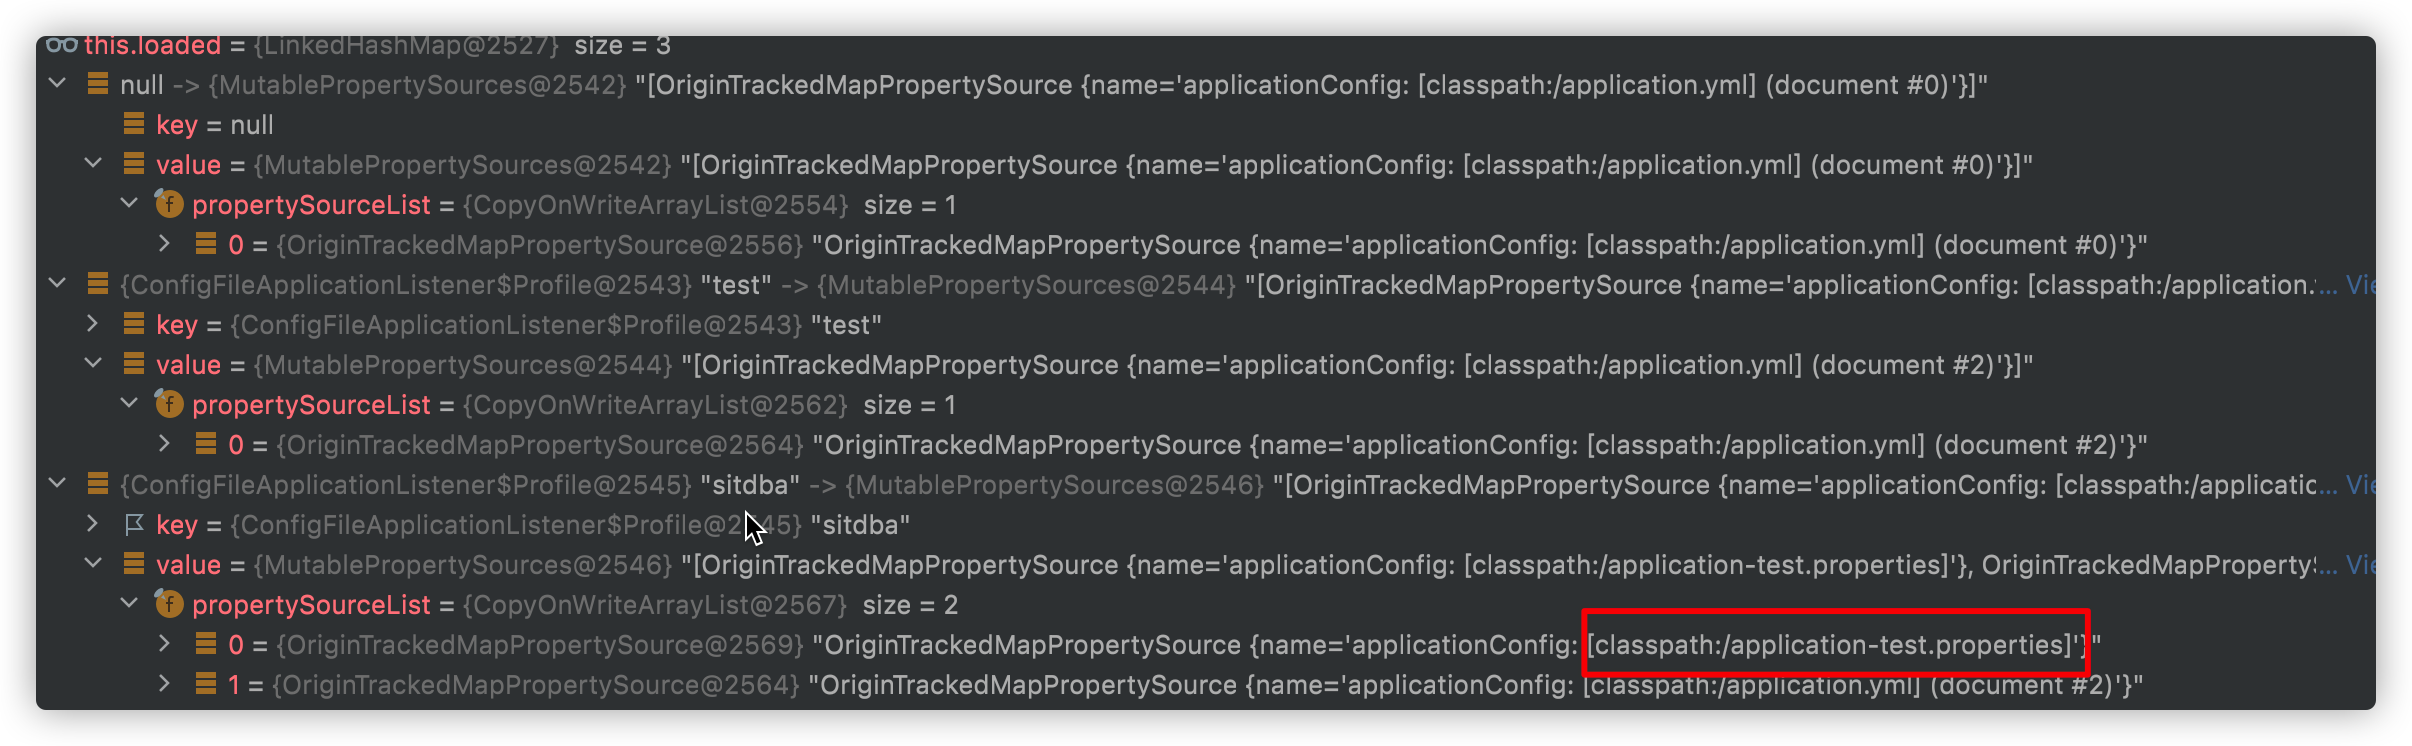
從上面的圖上也能看到application-test.propertie並沒有在profile=test下面,而是在profile=sitdba下面
我們再次回到之前開頭的位置
(defaultProperties) -> {
this.profiles = new LinkedList<>();
this.processedProfiles = new LinkedList<>();
this.activatedProfiles = false;
this.loaded = new LinkedHashMap<>();
initializeProfiles();
while (!this.profiles.isEmpty()) {
Profile profile = this.profiles.poll();
if (isDefaultProfile(profile)) {
addProfileToEnvironment(profile.getName());
}
load(profile, this::getPositiveProfileFilter,
addToLoaded(MutablePropertySources::addLast, false));
//將激活並已經解析過的profile添加到列表中,最後會將這個列表中的profile作為environment中激活的profile
this.processedProfiles.add(profile);
}
//這個是什麼場景呢?
load(null, this::getNegativeProfileFilter, addToLoaded(MutablePropertySources::addFirst, true));
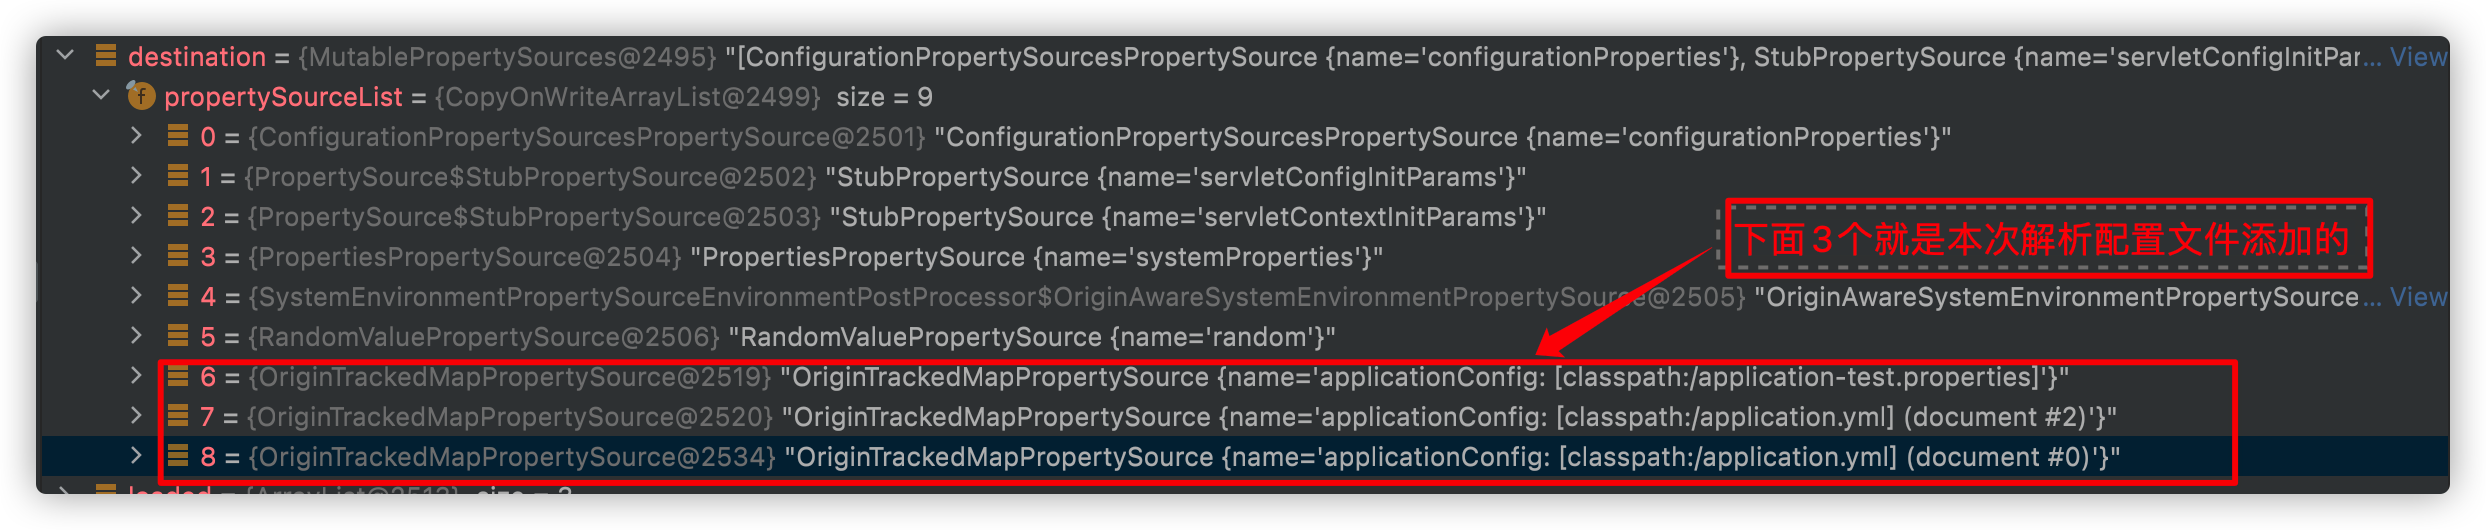
//這裡就會將我們載入的配置文件都添加到this.environment.getPropertySources()屬性上
addLoadedPropertySources();
//將上面的this.processedProfiles作為激活的profile
applyActiveProfiles(defaultProperties);
}
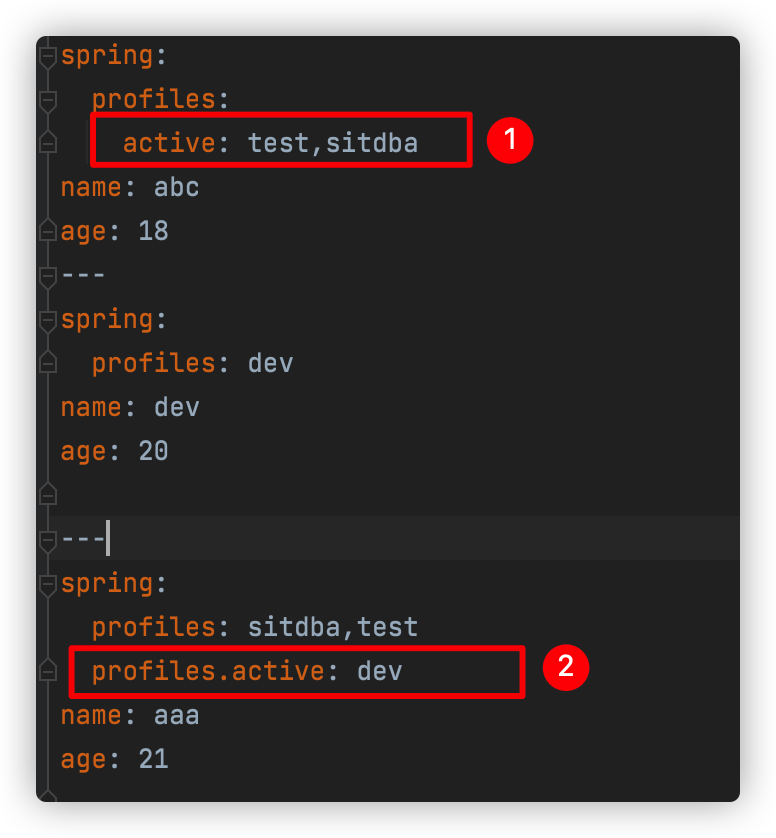
上面是我們的application.yml。
-
圖1標註的順序也是很重要的,如果寫成sitdba,test。那樣是不會載入application-test.properties這個配置文件的。
-
圖2標註的dev這個profile並不會被載入。原因我們上面的也說過了,因為
addActiveProfiles只會添加一次。
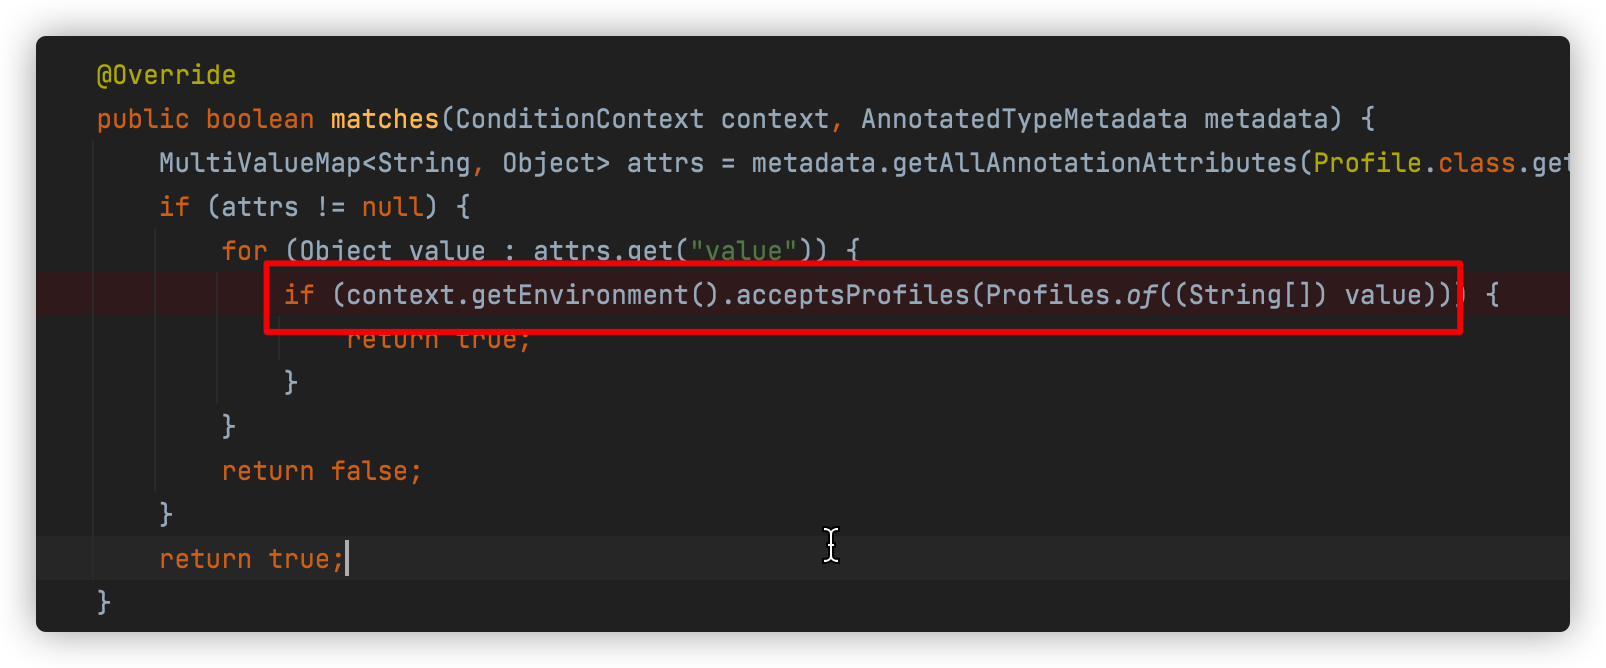
profile也可以通過它來過濾我們不同環境中載入的不同的bean,如下圖這樣

具體的過濾是通過ProfileCondition來實現的。也是查看當前profile註解中的值是否屬於當前激活的profile
最終所有的配置文件屬性等都會添加到Environment中,關於Environment,下篇文章和大家一起看看它的作用吧。


