國慶七天假 不如來學學Vue-Router
- 2021 年 10 月 3 日
- 筆記
Vue-Router
基本介紹
Vue-Router是Vue全家桶中至關重要的一個擴展化插件,使用它能夠讓我們的組件切換更加的方便,更加容易的開發前後端分離項目,目前Vue-Router版本已更新到4.x,我們就以4.x為例了解它的用法。

後端路由
學習Vue-Router之前,我們有必要了解一下什麼是後端路由。
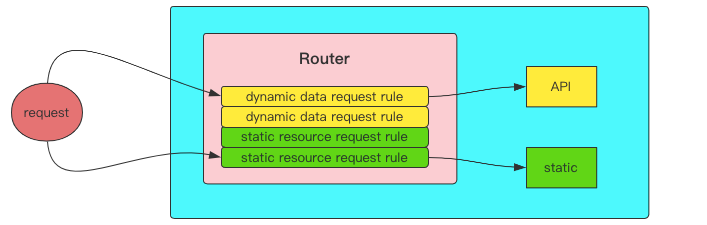
在早期前後端混合開發時,前端具體所展示的內容是由後端負責的,也就是說用戶在瀏覽器中的一次請求操作會直接傳遞到後端伺服器上,後端伺服器會根據這個請求內容返回給瀏覽器不同的頁面,如下所示:
前端路由
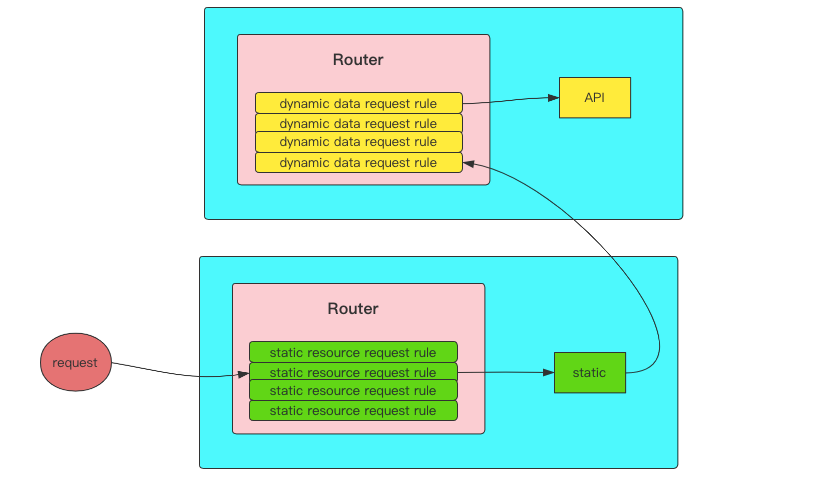
現在的項目越來越大,前後端混合的開發模式並不適用於大型項目,於是出現了前後端分離的開發模式,即用戶在頁面上所有靜態資源請求大部分都是面向前端伺服器發起的,然後再由前端伺服器動態請求後端伺服器的API介面獲得所需要展示的數據最終結合前端伺服器中的靜態資源回饋給瀏覽器:
前置知識
簡單認識url
用戶與Web伺服器之間是經由瀏覽器通過url打交道的,因此在學習Vue-Router插件之前你應該掌握一些必要的url相關知識。
下面是url的組成部分,截圖自Node.js官網中對url的描述:
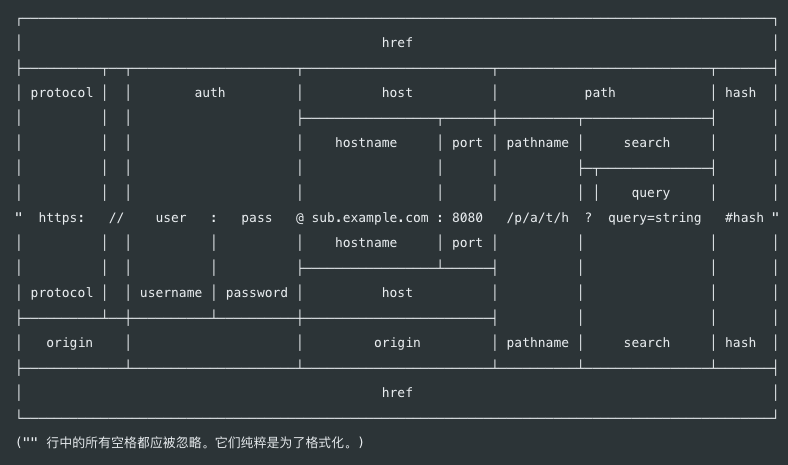
值得注意的是,auth部分是對身份許可權的認證,目前在絕大多數應用中已經極少看到了,因此這裡不再進行介紹。
我們以下面這個url進行說明:
//localhost/book/1?page=2#caption_01
釋義如下:
- https:代指請求協議,最常見的有http與https協議
- localhost:為host主機部分,其實完整寫法應該是localhost:80,但是瀏覽器會自動為我們填上一個80的埠號,所以上面沒有顯式的寫出來
- /book/1:這一段是path即請求的資源路徑(伺服器上不一定真實存在),通常情況下/book這一段是固定的。而/1這個只是一個書籍編號而已,它不是固定的,因此對於1來說他可以作為查詢的params,即查詢參數,這在RestAPI設計風格中極為常見
- ?page=2:這一段是請求的具體參數,即query部分,指的是我們請求book1這本書從第2頁開始
- #caption_01:一個錨點的跳轉,用於定位具體的內容,當打開這個url後它會直接跳轉到第二章節,注意該部分絕大多數情況下都不會被路由系統所處理
單頁面原理
Vue單頁面開發的原理實際上就是利用<a>標籤的錨點切換來完成的,舉個例子。
訪問下面的這個url就是主頁:
//loclhost/#/index
跳轉時只需要修改錨點的定位即可,如從首頁跳轉到新聞頁面:
//loclhost/#/news
下面我們基於此原理利用原生的HTML+CSS來實現一個單頁面應用:
程式碼示例:
<style>
    * {
        margin: 0;
        padding: 0;
        box-sizing: border-box;
        list-style: none;
    }

    .components {
        display: none;
    }

    :target {
        display: block;
    }

    body header {
        background-color: #565656;
        height: 48px;
    }

    body header ul {
        height: 100%;
        display: flex;
        flex-flow: row wrap;
        align-items: center;
        padding: 1rem;
    }

    body header ul li:first-of-type,
    body header ul li:nth-of-type(2) {
        margin-right: 2rem;
    }

    body header ul li:last-of-type {
        margin-left: auto;
    }

    body header ul li a {
        color: #fff;
        text-decoration: none;
    }

    body main {
        display: flex;
        justify-content: center;
        align-items: center;
        margin-top: 68px;
        font-size: 5rem;
    }
</style>

<body>
    <header>
        <ul>
            <li><a href="#/index">主頁</a></li>
            <li><a href="#/news">新聞</a></li>
            <li><a href="#/backend">後台</a></li>
        </ul>
    </header>
    <main>
        <!-- 主頁 -->
        <div id="/index" class="components">
            <span>HELLO INDEX</span>
        </div>
        <!-- 新聞 -->
        <div id="/news" class="components">
            <span>HELLO NEWS</span>
        </div>
        <!-- 後台 -->
        <div id="/backend" class="components">
            <span>HELLO BACKEND</span>
        </div>
    </main>
    <footer></footer>
</body>
hash與history
Vue-Router中對於組件的切換有2種模式,分別是hash模式和history模式。
當使用hash模式時,若你訪問/index頁面則瀏覽器地址欄中的url是這個樣子的:
//loclhost/#/index
而使用history模式時,url看起來會正常許多:
//loclhost/index
使用hash模式的優缺點如下:
- 優點是#後面的資訊永遠不會被發送到Vue伺服器的路由上,因此不會出現請求錯誤的情況
- 缺點是對SEO會有不好的影響,以及看起來不是那麼美觀
而使用history模式的優缺點如下:
- 優點是組件的切換看起來不再是錨點定位了,更加的美觀了
- 缺點是如果用戶在瀏覽器中直接訪問某個嵌套的子組件時,會報404錯誤,並且我們還需要在伺服器上加上一個回退路由,所以配置比較麻煩
hash模式是我們在開發時建議使用的,儘管history模式讓url看起來美觀了許多,但是你需要做一些額外的配置,過程比較繁瑣,你可以參閱官方文檔尋找這部分的資料。
hash和history其實都是window的2個子對象,使用location.hash可修改當前url中#後的部分,比如我們在瀏覽器的控制台中輸入以下命令:
location.hash = "/index"
你會發現瀏覽器的地址欄中url會變更為:
//localhost:5500/#/index
同理,history模式也提供了一些鏈接跳轉的方法支援。
如,在瀏覽器的控制台中輸入以下命令:
history.pushState({}, "", "/index")
你會發現瀏覽器的地址欄中url會變更為:
//localhost:5500/index
如果你想了解更多,請參照之前JavaScript中的widnow對象章節。
歷史記錄棧
當瀏覽一個網頁時,只要地址欄中的url發生改變都會被瀏覽器記錄到一個「棧」中。
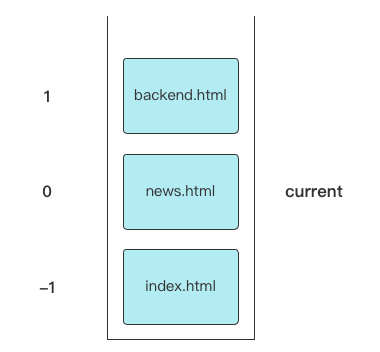
如下所示,我們先瀏覽了index.html、然後又瀏覽了news.html、最後瀏覽了backend.html:

當你點擊back按鈕或者調用router.back()以及history.back()方法後,它會向後回退一格,同時圖中左側的計數器也會發生變化:
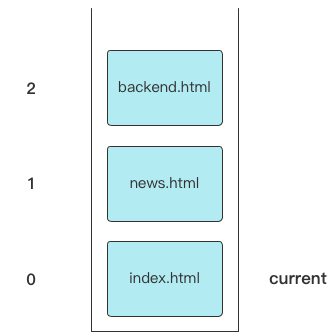
同理,當你點擊forward按鈕或者調用router.forward()以及history.forward()方法後,它又會向前推進一格,回到圖1的狀態:
如果你通過router.go()或者history.go()方法,並且填入的參數是-2時,那麼它會向後回退2格,變成下面這種狀態:
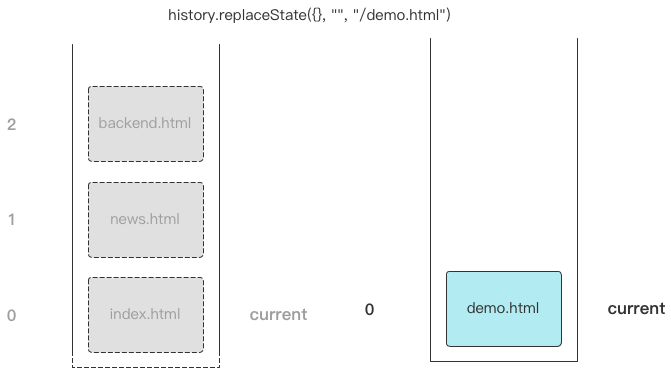
而router.replace()的意思是,跳轉至新的頁面,並且清空整個棧,如下所示,它等同於history.replaceState()方法:
基本使用
初始化項目
使用Vite生成項目,跟隨指引一步一步的進行初始化:
$ npm init @vitejs/app <project-name>
進入到項目根目錄下,安裝Vue-Router插件,輸入以下命令後它將會安裝Vue-Router 4.x的最新版本:
$ npm install vue-router@4
在src下新建一個router目錄,並在其中新建一個index.js文件,該文件將作為Vue-Router插件的配置文件存在:
$ mkdir ./src/router
$ touch ./src/router/index.js
刪除.src/components/HelloWorld.vue:
$ rm -rf ./src/components/HelloWorld.vue
清空.src/App.vue中的程式碼,並粘貼下面的程式碼:
<template>
  <div>hello world</div>
</template>

<script setup>
</script>

<style>

</style>
接下來你就可以啟動這個Vue項目了,默認項目的埠是3000:
$ npm run dev
快速的上手
我們需要先準備3個組件、分別是Index、Book、Hot,程式碼基本一致:
<template>
  <div>
    <h1>Hello Index</h1>
  </div>
</template>

<script setup>
</script>

<style scoped>
h1 {
  font-size: 8rem;
}
</style>
要想使用Vue-Router插件,我們就必須在.src/router/index.js文件中對其進行引入:
// 1. 導入使用hash模式、使用history模式、以及創建全局路由對象的方法
import { createWebHashHistory, createWebHistory, createRouter } from "vue-router";

// 2. 導入組件
import Index from "../components/Index.vue"
import Book from "../components/Book.vue"
import Hot from "../components/Hot.vue"

// 3.配置路由映射表
const routes = [
    { path: "/index", component: Index },
    { path: "/book", component: Book },
    { path: "/hot", component: Hot },
]

// 4.創建全局路由對象,並且使用hash模式初始化這個全局路由對象
const router = createRouter({
    routes,
    history: createWebHashHistory()
})

// 5.導出全局路由對象
export default router
然後需要到.src/main.js中為當前的Vue應用載入這個插件:
import { createApp } from 'vue'
import App from './App.vue'
import router from "./router/index"

const app = createApp(App);
// 載入插件
app.use(router);
app.mount('#app');
最後修改一下App.vue的程式碼,我們要在App.vue中使用<router-link>以及<router-view>組件來做路由的入口和出口,注意<router-link>以及<router-view>組件都是Vue-Router所自帶的組件,內部已完成全局註冊,可以直接使用:
<template>
  <div>
    <header id="header">
      <!-- 路由入口,相當於a標籤 -->
      <router-link :to="{ path: '/index' }">主頁</router-link>
      <router-link :to="{ path: '/book' }">書籍</router-link>
      <router-link :to="{ path: '/hot' }">熱門</router-link>
    </header>
    <main id="main">
      <!-- 路由出口,當點擊<router-link>後,路由表中的組件會在此處顯示 -->
      <router-view></router-view>
    </main>
  </div>
</template>

<script setup>
// 註冊組件
import Index from "./components/Index.vue";
import Book from "./components/Book.vue";
import Hot from "./components/Hot.vue";
</script>

<style>
/* 全局樣式設置 */
* {
  margin: 0;
  padding: 0;
  box-sizing: border-box;
  list-style: none;
}

header#header {
  height: 50px;
  padding: 1rem;
  background: #565656;
  display: flex;
  justify-content: flex-start;
  align-items: center;
  box-shadow: #aaa 0 5px 5px;
}

header#header a {
  text-decoration: none;
  margin-right: 2rem;
  color: #fff;
}

main#main {
  display: flex;
  flex-flow: column;
  justify-content: center;
  align-items: center;
  height: 80vh;
}
</style>
實際上<router-link>中的to屬性也可以不用進行動態綁定,而是直接填入path,但是我們並不推薦這樣使用:
<!-- 不推薦 -->
<router-link to="/index">主頁</router-link>

<!-- 推薦 -->
<router-link :to="{ path: '/index' }">主頁</router-link>
name具名路由
對.src/index.js里routes中每一條rule對象,我們都可以為它們加上一個name屬性:
const routes = [
    { path: "/index", name: "index", component: Index },
    { path: "/book", name: "book", component: Book },
    { path: "/hot", name: "hot", component: Hot },
]
這樣在為模板中的<router-link>設置to屬性時,可以動態的綁定一個對象並指定需要跳轉的rule的name屬性即可:
<header id="header">
  <!-- 路由入口,相當於a標籤 -->
  <router-link :to="{ name: 'index' }">主頁</router-link>
  <router-link :to="{ name: 'book' }">書籍</router-link>
  <router-link :to="{ name: 'hot' }">熱門</router-link>
</header>
alias路由別名
對.src/index.js里routes中每一條rule對象,我們都可以為它們加上一個alias屬性:
const routes = [
    {
        path: "/index",
        name: "index",
        alias: ["/index.htm", "/index.html"],
        component: Index
    }
]
配置好之後不管你訪問下面那個url,它都會跳轉至Index組件中:
//localhost:3000/index
//localhost:3000/index.htm
//localhost:3000/index.html
redirect重定向
如果想在路由中定義重定向,則只需要配置redirect屬性即可:
const routes = [
    {
        path: "/",
        redirect: { name: "index" }
    },
    {
        path: "/index",
        name: "index",
        alias: ["/index.htm", "/index.html"],
        component: Index
    },
]
這樣當你訪問 localhost:3000 時,它會自動跳轉到Index中。
meta定義路由元資訊
對.src/index.js里routes中每一條rule對象,我們都可以為它們加上一個meta屬性:
const routes = [
    {
        path: "/index",
        name: "index",
        alias: ["/index.htm", "/index.html"],
        meta: { title: "主頁", verify: false },
        component: Index
    }
]
在後續開發時,我們能通過一些方式拿到這些內容,因此你可以將meta屬性定義成這個route的附加資訊:
<script setup>
import { onMounted } from "vue";
import { useRoute } from "vue-router";

const route = useRoute();

onMounted(() => {
  console.log(route.meta.verify);
  console.log(route.meta.title);
});
</script>
router-link的點按效果
默認的<router-link>點擊後沒有任何樣式,我們可以在App.vue中配置一個全局的style,它的作用在於所有的<router-link>點擊後都會應用這個樣式類,如下所示:
.router-link-active {
  text-shadow: #ddd 2px 5px 5px !important;
}
最終結果:
你也可以為每個<router-link>單獨添加active-class屬性,然後定義屬性值的class style,它的優先值高於.router-link-active:
// template
<router-link to="/index" active-class="choice_index">主頁</router-link>

// style
.choice_index{
  color : red !important;
}
路由對象
Router介紹
useRouter()是Vue-Router中提供的一個構造方法,調用它可以得到一個全局的Router對象,即整個routes路由映射表。
如果想在模板中使用這個全局路由對象,你可以直接像下面這樣操作:
{{$router}}
要想在腳本中使用這個全局路由對象你必須先對其進行導入:
import { useRouter } from "vue-router";
接下來需要進行實例化操作:
const router = useRouter();
全局路由對象中可以調用很多方法、如push()、back()等,如下表所示:
| 方法 | 描述 |
|---|---|
| push() | 等同於window.history.pushState(),打開一個新的url |
| replace() | 等同於window.history.replaceState(),打開一個新的url,並清空當前活動窗口的歷史記錄 |
| back() | 等同於window.history.back(),執行頁面回退操作 |
| forward() | 等同於window.history.forward(),執行頁面前進操作 |
| go(±n) | 等同於window.history.go(),執行頁面回退或前進n個操作 |
Route介紹
useRoute()是Vue-Router中提供的一個構造方法,調用它可以得到一個當前活動的Route對象,即當前所匹配到的rule。
如果想在模板中使用這個活動路由對象,你可以直接像下面這樣操作:
{{$route}}
要想在腳本中使用這個活動路由對象你必須先對其進行導入:
import { useRoute } from "vue-router";
接下來需要進行實例化操作:
const route = useRoute();
活動路由對象中可以調用很多屬性、如path、name等,如下表所示:
| 屬性 | 描述 |
|---|---|
| path | 獲取當前活動路由的path |
| name | 獲取當前活動路由的name |
| params | 獲取當前活動路由的params |
| query | 獲取當前活動路由的query |
| meta | 獲取當前活動路由的meta |
| hash | 獲取當前活動路由的hash |
| redirectedFrom | 獲取當前活動路由的前一個跳轉鏈接 |
在腳本中進行跳轉
如果你想在<script setup>進行路由跳轉,可以調用router.push()或者router.replace()方法,如下所示:
<script setup>
import { onMounted } from "vue";
import { useRouter } from "vue-router";

const router = useRouter();

onMounted(() => {
  router.push({ name: "book" });
});
</script>
獲取路由的元資訊
如果你想在<script setup>中獲取當前路由的meta元資訊,可以調用route.meta獲得整個meta對象,如下所示:
<script setup>
import { onMounted } from "vue";
import { useRoute } from "vue-router";

const route = useRoute();

onMounted(() => {
    console.log(route.meta);
});
</script>
路由視圖
嵌套視圖
組件是允許嵌套的,當然<router-view>也同樣支援嵌套,舉個例子,我們的Index中有2個子組件分別是login和register,當點擊這2個組件中任何一個時我們希望在Index中展示這2個組件,而不是單獨進行跳轉。
首先我們需要在routes中為rule配置children選項,如下所示,注意第2層rule的path必須加上前綴:
const routes = [
    {
        path: "/index",
        name: "index",
        alias: ["/index.htm", "/index.html"],
        meta: { title: "主頁", verify: false },
        component: Index,
        children: [
            { path: "/index/login", name: "login", meta: { title: "登錄" }, component: Login },
            { path: "/index/register", name: "register", meta: { title: "註冊" }, component: Register },
        ]
    },
]
其次是需要在Index組件中開放<router-link>和<router-view>,此外還需要在Index組件中對Login和Register組件進行註冊:
<template>
  <div>
    <header id="index-header">
      <router-link :to="{ name: 'register' }">註冊</router-link>
      <router-link :to="{ name: 'login' }">登錄</router-link>
    </header>
    <main id="index-main">
      <router-view></router-view>
    </main>
  </div>
</template>

<script setup>
import Register from "./Register.vue";
import Login from "./Login.vue";

import { onMounted } from "vue";
import { useRoute } from "vue-router";

const route = useRoute();

onMounted(() => {
  console.log(route.meta);
});
</script>

<style scoped>
#index-header {
  height: 2rem;
  border: 1px solid #ddd;
  display: flex;
  align-items: center;
  padding: 0.5rem;
  background: #6b6b6b;
}

#index-header a {
  color: #fff;
  text-decoration: none;
}

#index-header a:first-of-type {
  margin-right: 0.5rem;
}

#index-main {
  width: 200px;
  height: 100px;
  border: 1px solid #ddd;
  display: flex;
  justify-content: center;
  align-items: center;
}
</style>
下面是Login和Register組件的程式碼,它們的結構基本一致:
<template>
  <div>
    <form action="#">
      <div><input type="text" /></div>
      <div><input type="password" /></div>
      <div><button>login</button></div>
    </form>
  </div>
</template>

<script setup>
</script>

<style scoped>

</style>
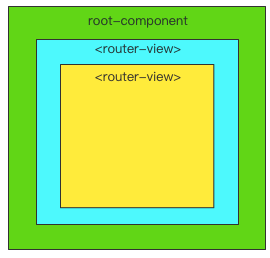
效果展示,首先最外部的App.vue中具有一個<router-view>,它主要作用於主頁、書籍以及熱門的切換,而在Index.vue中也具有一個<router-view>,它則只用於登錄或者註冊的切換,於是這個嵌套關係就出來了:
命名視圖
嵌套視圖是具有層級的,而命名視圖沒有層級,即可以在一個組件模板中多次使用<router-view>,它是一種扁平化的設計。
如,頭部導航欄,左側菜單欄,右邊內容塊三個組件,都顯示在一個頁面上,就可以使用命名視圖,換而言之,命名視圖是由多個組件構成一個頁面的。
核心程式碼如下,由於命名視圖使用較少,這裡不再進行具體演示:
// template

<router-view></router-view>
<router-view name="menu"></router-view>
<router-view name="show"></router-view>


// .src/router/index.js

const routes = [
    {
        path: "/index",
        name: "index",
        alias: ["/index.htm", "/index.html"],
        meta: { title: "主頁", verify: false },
        // 由於這個頁面是由3個組件構成的,所以這裡要使用components而不是component
        components: {
            // 如果<view-router>沒有name屬性,則用default
            default: header,
            menu: menu,
            show: show,
        }
    },
]
參數相關
params
從restAPI設計規範來看,url的路徑不可能全部由routes進行配置,因為params總是動態變化的。
如下所示:
GET localhost:3000/#/book          // 查詢所有書籍
GET localhost:3000/#/book/1       // 查詢編號為1的書籍
GET localhost:3000/#/book/2      // 查詢編號為2的書籍
我們需要有一個動態的路由機制,在rule中匹配時的程式碼如下:
{ path: "/book/:id?", name: "book", alias: ["/book.htm", "/book.html"], component: Book }

// id代表接收的這個params名稱是id
// ?代表這個params可以有也可以沒有
而<router-link>則需要向下面這樣設置:
<router-link :to="{name : 'book', params : {id : book.id}}">{{book.name}}</router-link>
當你需要在模板中取得這個params時,需要通過當前路由對象route獲得:
{{$route.params.id}}
當你需要在腳本中取得這個params時,也需要通過當前路由對象route獲得:
import { useRoute } from "vue-router";
const route = useRoute();
route.params.id
我們以Book組件為例,默認它將使用AllBook組件展示所有圖書,當你選中一本圖書後它將使用BookDetails組件展示書籍詳情:
Book組件程式碼如下:
<template>
  <div>
    <AllBook v-if="!$route.params.id" />
    <BookDetails v-else />
  </div>
</template>

<script setup>
import AllBook from "./AllBook.vue";
import BookDetails from "./BookDetails.vue";
import { provide } from "vue";
import { reactive } from "vue";
import { useRoute } from "vue-router";

const route = useRoute();

const bookAry = reactive([
  {
    id: 1,
    name: "紅樓夢",
    author: "曹雪芹",
    chapter: [
      "第一回 甄士隱夢幻識通靈 賈雨村風塵懷閨秀",
      "第二回 賈夫人仙逝揚州城 冷子興演說榮國府",
      "第三回 開生面夢演紅樓夢 立新場情傳幻境情",
    ],
  },
  {
    id: 2,
    name: "西遊記",
    author: "吳承恩",
    chapter: [
      "第一回 靈根育孕源流出 心性修持大道生",
      "第二回 悟徹菩提真妙理 斷魔歸本合元神",
      "第三回 四海千山皆拱伏 九幽十類盡除名",
    ],
  },
  {
    id: 3,
    name: "三國演義",
    author: "羅貫中",
    chapter: [
      "第一回 宴桃園豪傑三結義 斬黃巾英雄首立功",
      "第二回 張翼德怒鞭督郵 何國舅謀誅宦豎",
      "第三回 議溫明董卓叱丁原 饋金珠李肅說呂布",
    ],
  },
  {
    id: 4,
    name: "水滸傳",
    author: "施耐庵",
    chapter: [
      "第一回 張天師祈禳瘟疫 洪太尉誤走妖魔",
      "第二回 王教頭私走延安府 九紋龍大鬧史家村",
      "第三回 史大郎夜走華陰縣 魯提轄拳打鎮關西",
    ],
  },
]);

provide("bookAry", bookAry);
</script>

<style scoped>
</style>
AllBook組件程式碼如下:
<template>
  <div>
    <ul>
      <li v-for="book in bookAry" :key="book.id">
        <router-link :to="{ name: 'book', params: { id: book.id } }">{{
          book.name
        }}</router-link>
      </li>
    </ul>
  </div>
</template>

<script setup>
import { inject } from "vue";

const bookAry = inject("bookAry");
</script>

<style scoped>
</style>
BookDetails組件程式碼如下:
<template>
  <div>
    <div v-for="book in bookAry" :key="book.id">
      <div v-if="book.id == $route.params.id">
        <h1>{{ book.name }}</h1>
        <h3>{{ book.author }}</h3>
        <ul>
          <li v-for="chapter in book.chapter" :key="chapter">{{ chapter }}</li>
        </ul>
      </div>
    </div>
  </div>
</template>

<script setup>
import { inject } from "vue";

const bookAry = inject("bookAry");
</script>

<style scoped>
</style>
query
在發送具有條件篩選的請求、或者提交具有數據的請求時query是非常常用的。
如下這個例子:
GET localhost:3000/#/book/1?chapter=2 // 查詢編號為1的書籍的第二章
而對於<router-link>則需要向下面這樣設置:
<router-link :to="{name : 'book', params : {id : book.id}, query : {chapter : bookChapter}}">{{book.name}}</router-link>
當你需要在模板中取得這個query時,需要通過當前路由對象route獲得:
{{$route.query.chapter}}
當你需要在腳本中取得這個params時,也需要通過當前路由對象route獲得:
import { useRoute } from "vue-router";
const route = useRoute();
route.query.chapter
這裡我們不再進行演示,因為它和params是非常相似的。
導航守衛
基本概念
每個組件切換都需要經歷兩個階段,你可以將它理解為2個保安。
- 前置守衛:對切換前的行為進行檢查,檢查通過後必須調用next()方法才能繼續進行切換
- 後置守衛:對切換後的工作進行善後,可以理解為路由切換組件時最後運行的一個鉤子函數
一般來說前置守衛使用較多,後置守衛使用較少。
全局守衛
在router全局路由對象中設置的導航守衛為全局守衛,如下所示我們希望組件在切換時能夠獲取當前活動路由對象的meta元資訊中的title屬性,以設置document的title。
下面這段程式碼可以放在./src/router/index.js中:
router.beforeEach((to, from, next) => {
    // from為當前活動路由對象
    // to為即將活動的下一個路由對象
    console.log(`from : ${from.path} => to : ${to.path}`);
    next();
})

router.afterEach((to, from)=>{
    document.title = to.meta.title || "Web Site"
})
路由守衛
我們也可以對某個route單獨的配置守衛,當然這很少使用到:
const routes = [
    { path: "/", redirect: { name: "index" } },
    {
        path: "/index",
        name: "index",
        component: Index,
        beforeEnter: (to, from) => {
            // false攔截、true通過
            return false
        },
    }
]
組件守衛
我們也可以單獨的為某一個組件添加以下守衛,當然這也很少使用到:
import { onBeforeRouteLeave, onBeforeRouteUpdate } from 'vue-router'

export default {
  setup() {
    onBeforeRouteLeave((to, from, next) => {
        next()
    })

    onBeforeRouteUpdate((to, from, next) => {
        next()
    })
  },
}
keep-alive
組件快取
的時候我們希望當組件發生切換後,再次back回來時之前被切換的組件仍然保留被切換之前的狀態,當出現這種需求時就可以採用<keep-alive>進行組件快取。
如下示例,我們快取了Register組件和Login組件,這樣在用戶輸入過程中切換組件會保留組件的狀態:
程式碼如下:
<main id="index-main">
    <!-- 固定格式! -->
    <router-view v-slot="{ Component }">
    <keep-alive>
        <component :is="Component"></component>
    </keep-alive>
    </router-view>
</main>
鉤子函數
Vue3中提供了2個生命周期鉤子函數:
- onActivated:被 keep-alive 快取的組件激活時調用
- onDeactivated:被 keep-alive 快取的組件失活時調用
常用屬性
以下是<keep-alive>上可添加的一些屬性:
- include : string | RegExp | Array 只有名稱匹配的組件會被快取。
- exclude : string | RegExp | Array 任何名稱匹配的組件都不會被快取。
- max : number | string 最多可以快取多少組件實例。
示例演示:
<!-- 只快取 Login 和 Register 組件 -->
<router-view v-slot="{ Component }">
  <keep-alive>
    <component :is="Component" :include="['Login', 'Register']"></component>
  </keep-alive>
</router-view>
其他知識
資源懶載入
在使用Vite進行項目打包後,所有的資源文件都會整合到一起,最終輸出一個chunk。
這樣做會帶來一個問題,當你的項目過大時用戶打開頁面首次載入chunk會顯得非常慢,因為它會將所有的組件、第三方庫一次性載入出來。
這種情況下,我們就需要進行按需載入了,對於沒有展示的組件或沒有使用的第三方庫暫時不進行載入,當進行路由跳轉時才進行載入,如下所示:
// 將
// import UserDetails from './views/UserDetails'
// 替換成
const UserDetails = () => import('./views/UserDetails')

const router = createRouter({
  // ...
  routes: [{ path: '/users/:id', component: UserDetails }],
})
修改完成後再次打包,你會發現它將輸出多個chunk。
組件切換動畫
想要在你的路徑組件上使用轉場,並對導航進行動畫處理,你需要使用 v-slot API:
<router-view v-slot="{ Component }">
  <transition name="fade">
    <component :is="Component" />
  </transition>
</router-view>
Transition 的所有功能 在這裡同樣適用。
上面的用法會對所有的路由使用相同的過渡。如果你想讓每個路由的組件有不同的過渡,你可以將元資訊和動態的name 結合在一起,放在<transition>上:
const routes = [
  {
    path: '/custom-transition',
    component: PanelLeft,
    meta: { transition: 'slide-left' },
  },
  {
    path: '/other-transition',
    component: PanelRight,
    meta: { transition: 'slide-right' },
  },
]
<router-view v-slot="{ Component, route }">
  <!-- 使用任何自定義過渡和回退到 `fade` -->
  <transition :name="route.meta.transition || 'fade'">
    <component :is="Component" />
  </transition>
</router-view>
也可以根據目標路由和當前路由之間的關係,動態地確定使用的過渡。使用和剛才非常相似的片段:
<!-- 使用動態過渡名稱 -->
<router-view v-slot="{ Component, route }">
  <transition :name="route.meta.transition">
    <component :is="Component" />
  </transition>
</router-view>
我們可以添加一個 after navigation hook,根據路徑的深度動態添加資訊到meta欄位。
router.afterEach((to, from) => {
  const toDepth = to.path.split('/').length
  const fromDepth = from.path.split('/').length
  to.meta.transitionName = toDepth < fromDepth ? 'slide-right' : 'slide-left'
})
版本區別
Route和Router
在Options API中,如果想要在<script>中獲取Route或者Router需要使用this進行調用:
<script>
export default {
    name : "Index",
    data(){
        return {}
    },
    mounted(){
        console.log(this.$route);
        console.log(this.$router);
    }
}
</script>
組件守衛
在Options API中,組件守衛多了一個鉤子函數,儘管很少使用,但是還是要列出來,如下所示:
const UserDetails = {
  template: `...`,
  beforeRouteEnter(to, from) {
    // 在渲染該組件的對應路由被驗證前調用
    // 不能獲取組件實例 `this` !
    // 因為當守衛執行時,組件實例還沒被創建!
  },
  beforeRouteUpdate(to, from) {
    // 在當前路由改變,但是該組件被複用時調用
    // 舉例來說,對於一個帶有動態參數的路徑 `/users/:id`,在 `/users/1` 和 `/users/2` 之間跳轉的時候,
    // 由於會渲染同樣的 `UserDetails` 組件,因此組件實例會被複用。而這個鉤子就會在這個情況下被調用。
    // 因為在這種情況發生的時候,組件已經掛載好了,導航守衛可以訪問組件實例 `this`
  },
  beforeRouteLeave(to, from) {
    // 在導航離開渲染該組件的對應路由時調用
    // 與 `beforeRouteUpdate` 一樣,它可以訪問組件實例 `this`
  },
}
keep-alive&transition
在Vue2中,keep-alive和transition調用很簡單,如下所示:
<keep-alive>
  <router-view><router-view/>
</keep-alive>

<transition enter-active-class="animate__animated  animate__bounce">
  <router-view><router-view/>
</transition>

