一文幫你搞懂 Android 文件描述符
- 2021 年 3 月 3 日
- 筆記
- Android 組件化, FD, 文件描述符
介紹文件描述符的概念以及工作原理,並通過源碼了解 Android 中常見的 FD 泄漏。
一、什麼是文件描述符?
文件描述符是在 Linux 文件系統的被使用,由於Android基 於Linux 系統,所以Android也繼承了文件描述符系統。我們都知道,在 Linux 中一切皆文件,所以系統在運行時有大量的文件操作,內核為了高效管理已被打開的文件會創建索引,用來指向被打開的文件,這個索引即是文件描述符,其表現形式為一個非負整數。
可以通過命令 ls -la /proc/$pid/fd 查看當前進程文件描述符使用資訊。

上圖中 箭頭前的數組部分是文件描述符,箭頭指向的部分是對應的文件資訊。

Android系統中可以打開的文件描述符是有上限的,所以分到每一個進程可打開的文件描述符也是有限的。可以通過命令 cat /proc/sys/fs/file-max 查看所有進程允許打開的最大文件描述符數量。

當然也可以查看進程的允許打開的最大文件描述符數量。Linux默認進程最大文件描述符數量是1024,但是較新款的Android設置這個值被改為32768。

可以通過命令 ulimit -n 查看,Linux 默認是1024,比較新款的Android設備大部分已經是大於1024的,例如我用的測試機是:32768。
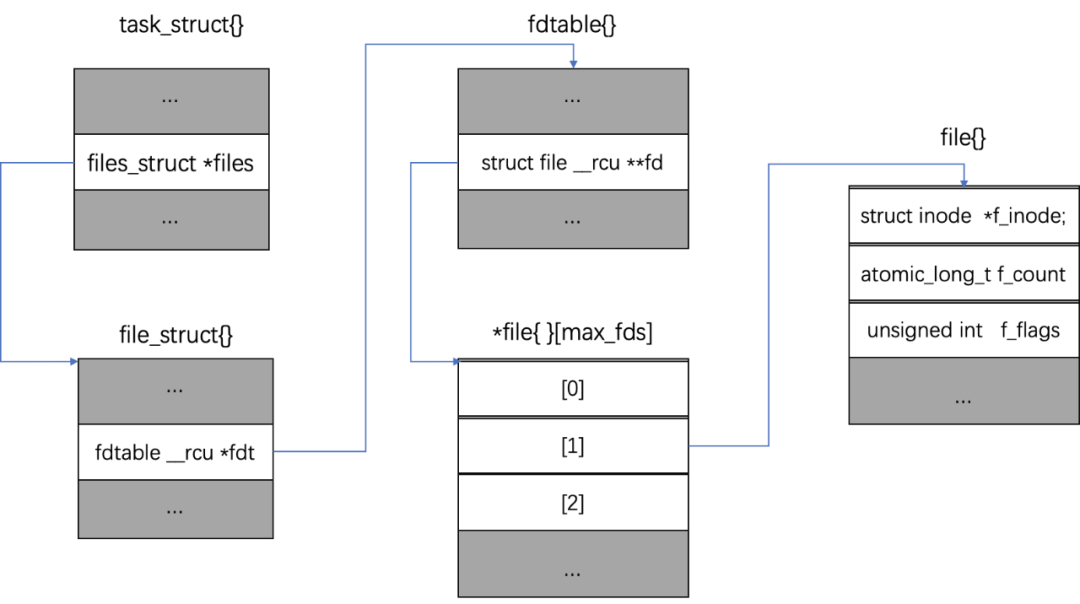
通過概念性的描述,我們知道系統在打開文件的時候會創建文件操作符,後續就通過文件操作符來操作文件。那麼,文件描述符在程式碼上是怎麼實現的呢,讓我們來看一下Linux中用來描述進程資訊的 task_struct 源碼。
struct task_struct
{
// 進程狀態
long               state;
// 虛擬記憶體結構體
struct mm_struct *mm;
// 進程號
pid_t              pid;
// 指向父進程的指針
struct task_struct*parent;
// 子進程列表
struct list_head children;
// 存放文件系統資訊的指針
struct fs_struct* fs;
// 存放該進程打開的文件指針數組
struct files_struct *files;
};
task_struct 是 Linux 內核中描述進程資訊的對象,其中files指向一個文件指針數組 ,這個數組中保存了這個進程打開的所有文件指針。 每一個進程會用 files_struct 結構體來記錄文件描述符的使用情況,這個 files_struct 結構體為用戶打開表,它是進程的私有數據,其定義如下:
/*
 * Open file table structure
 */
struct files_struct {
  /*
   * read mostly part
   */
    atomic_t count;//自動增量
    bool resize_in_progress;
    wait_queue_head_t resize_wait;

    struct fdtable __rcu *fdt; //fdtable類型指針
    struct fdtable fdtab;  //fdtable變數實例
  /*
   * written part on a separate cache line in SMP
   */
    spinlock_t file_lock ____cacheline_aligned_in_smp;
    unsigned int next_fd;
    unsigned long close_on_exec_init[1];//執行exec時需要關閉的文件描述符初值結合(從主進程中fork出子進程)
    unsigned long open_fds_init[1];//todo 含義補充
    unsigned long full_fds_bits_init[1];//todo 含義補充
    struct file __rcu * fd_array[NR_OPEN_DEFAULT];//默認的文件描述符長度
};
一般情況,「文件描述符」指的就是文件指針數組 files 的索引。
Linux 在2.6.14版本開始通過引入struct fdtable作為file_struct的間接成員,file_struct中會包含一個struct fdtable的變數實例和一個struct fdtable的類型指針。
struct fdtable {
    unsigned int max_fds;
    struct file __rcu **fd;      //指向文件對象指針數組的指針
    unsigned long *close_on_exec;
    unsigned long *open_fds;     //指向打開文件描述符的指針
    unsigned long *full_fds_bits;
    struct rcu_head rcu;
};
在file_struct初始化創建時,fdt指針指向的其實就是當前的的變數fdtab。當打開文件數超過初始設置的大小時,file_struct發生擴容,擴容後fdt指針會指向新分配的fdtable變數。
struct files_struct init_files = {
    .count      = ATOMIC_INIT(1),
    .fdt        = &init_files.fdtab,//指向當前fdtable
    .fdtab      = {
        .max_fds    = NR_OPEN_DEFAULT,
        .fd     = &init_files.fd_array[0],//指向files_struct中的fd_array
        .close_on_exec  = init_files.close_on_exec_init,//指向files_struct中的close_on_exec_init
        .open_fds   = init_files.open_fds_init,//指向files_struct中的open_fds_init
        .full_fds_bits  = init_files.full_fds_bits_init,//指向files_struct中的full_fds_bits_init
    },
    .file_lock  = __SPIN_LOCK_UNLOCKED(init_files.file_lock),
    .resize_wait    = __WAIT_QUEUE_HEAD_INITIALIZER(init_files.resize_wait),
};
RCU(Read-Copy Update)是數據同步的一種方式,在當前的Linux內核中發揮著重要的作用。
RCU主要針對的數據對象是鏈表,目的是提高遍歷讀取數據的效率,為了達到目的使用RCU機制讀取數據的時候不對鏈表進行耗時的加鎖操作。這樣在同一時間可以有多個執行緒同時讀取該鏈表,並且允許一個執行緒對鏈表進行修改(修改的時候,需要加鎖)。
RCU適用於需要頻繁的讀取數據,而相應修改數據並不多的情景,例如在文件系統中,經常需要查找定位目錄,而對目錄的修改相對來說並不多,這就是RCU發揮作用的最佳場景。
struct file 處於內核空間,是內核在打開文件時創建,其中保存了文件偏移量,文件的inode等與文件相關的資訊,在 Linux 內核中,file結構表示打開的文件描述符,而inode結構表示具體的文件。在文件的所有實例都關閉後,內核釋放這個數據結構。
struct file {
    union {
        struct llist_node   fu_llist; //用於通用文件對象鏈表的指針
        struct rcu_head     fu_rcuhead;//RCU(Read-Copy Update)是Linux 2.6內核中新的鎖機制
    } f_u;
    struct path     f_path;//path結構體,包含vfsmount:指出該文件的已安裝的文件系統,dentry:與文件相關的目錄項對象
    struct inode        *f_inode;   /* cached value */
    const struct file_operations    *f_op;//文件操作,當進程打開文件的時候,這個文件的關聯inode中的i_fop文件操作會初始化這個f_op欄位

    /*
     * Protects f_ep_links, f_flags.
     * Must not be taken from IRQ context.
     */
    spinlock_t      f_lock;
    enum rw_hint        f_write_hint;
    atomic_long_t       f_count; //引用計數
    unsigned int        f_flags; //打開文件時候指定的標識,對應系統調用open的int flags參數。驅動程式為了支援非阻塞型操作需要檢查這個標誌
    fmode_t         f_mode;//對文件的讀寫模式,對應系統調用open的mod_t mode參數。如果驅動程式需要這個值,可以直接讀取這個欄位
    struct mutex        f_pos_lock;
    loff_t          f_pos; //目前文件的相對開頭的偏移
    struct fown_struct  f_owner;
    const struct cred   *f_cred;
    struct file_ra_state    f_ra;

    u64         f_version;
#ifdef CONFIG_SECURITY
    void            *f_security;
#endif
    /* needed for tty driver, and maybe others */
    void            *private_data;

#ifdef CONFIG_EPOLL
    /* Used by fs/eventpoll.c to link all the hooks to this file */
    struct list_head    f_ep_links;
    struct list_head    f_tfile_llink;
#endif /* #ifdef CONFIG_EPOLL */
    struct address_space    *f_mapping;
    errseq_t        f_wb_err;
    errseq_t        f_sb_err; /* for syncfs */
}
整體的數據結構示意圖如下:
到這裡,文件描述符的基本概念已介紹完畢。
二、文件描述符的工作原理
上文介紹了文件描述符的概念和部分源碼,如果要進一步理解文件描述符的工作原理,需要查看由內核維護的三個數據結構。
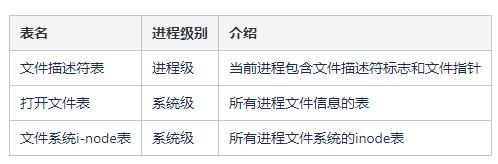
i-node是 Linux 文件系統中重要的概念,系統通過i-node節點讀取磁碟數據。表面上,用戶通過文件名打開文件。實際上,系統內部先通過文件名找到對應的inode號碼,其次通過inode號碼獲取inode資訊,最後根據inode資訊,找到文件數據所在的block,讀出數據。
三個表的關係如下:
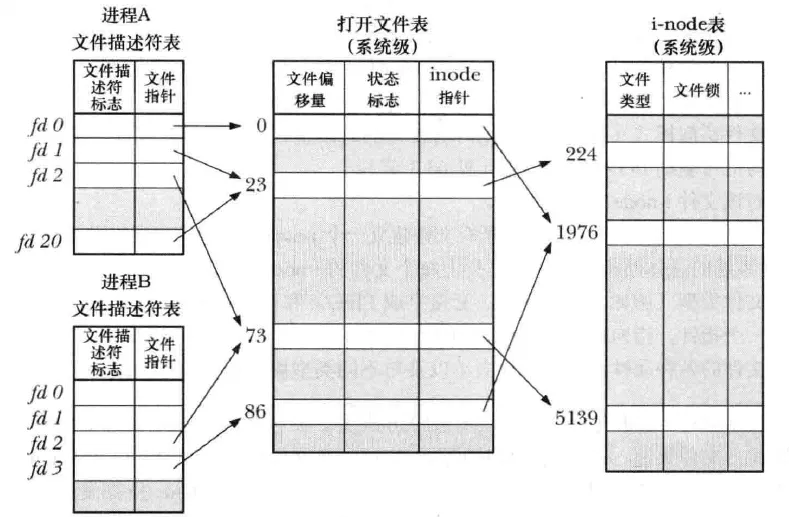
進程的文件描述符表為進程私有,該表的值是從0開始,在進程創建時會把前三位填入默認值,分別指向 標準輸入流,標準輸出流,標準錯誤流,系統總是使用最小的可用值。
正常情況一個進程會從fd[0]讀取數據,將輸出寫入fd[1],將錯誤寫入fd[2]
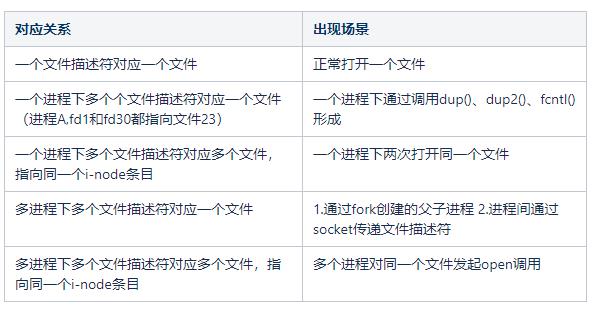
每一個文件描述符都會對應一個打開文件,同時不同的文件描述符也可以對應同一個打開文件。這裡的不同文件描述符既可以是同一個進程下,也可以是不同進程。
每一個打開文件也會對應一個i-node條目,同時不同的文件也可以對應同一個i-node條目。
光看對應關係的結論有點亂,需要梳理每種對應關係的場景,幫助我們加深理解。
問題:如果有兩個不同的文件描述符且最終對應一個i-node,這種情況下對應一個打開文件和對應多個打開文件有什麼區別呢?
答:如果對一個打開文件,則會共享同一個文件偏移量。
舉個例子:
fd1和fd2對應同一個打開文件句柄,fd3指向另外一個文件句柄,他們最終都指向一個i-node。
如果fd1先寫入「hello」,fd2再寫入「world」,那麼文件寫入為「helloworld」。
fd2會在fd1偏移之後添加寫,fd3對應的偏移量為0,所以直接從開始覆蓋寫。
三、Android中FD泄漏場景
上文介紹了 Linux 系統中文件描述符的含義以及工作原理,下面我們介紹在Android系統中常見的文件描述符泄漏類型。
3.1 HandlerThread泄漏
HandlerThread是Android提供的帶消息隊列的非同步任務處理類,他實際是一個帶有Looper的Thread。正常的使用方法如下:
//初始化
private void init(){
   //init
  if(null != mHandlerThread){
     mHandlerThread = new HandlerThread("fd-test");
     mHandlerThread.start();
     mHandler = new Handler(mHandlerThread.getLooper());
  }
}

//釋放handlerThread
private void release(){
   if(null != mHandler){
      mHandler.removeCallbacksAndMessages(null);
      mHandler = null;
   }
   if(null != mHandlerThread){
      mHandlerThread.quitSafely();
      mHandlerThread = null;
   }
}
HandlerThread在不需要使用的時候,需要調用上述程式碼中的release方法來釋放資源,比如在Activity退出時。另外全局的HandlerThread可能存在被多次賦值的情況,需要做空判斷或者先釋放再賦值,也需要重點關注。
HandlerThread會泄漏文件描述符的原因是使用了Looper,所以如果普通Thread中使用了Looper,也會有這個問題。下面讓我們來分析一下Looper的程式碼,查看到底是在哪裡調用的文件操作。
HandlerThread在run方法中調用Looper.prepare();
public void run() {
    mTid = Process.myTid();
    Looper.prepare();
    synchronized (this) {
        mLooper = Looper.myLooper();
        notifyAll();
    }
    Process.setThreadPriority(mPriority);
    onLooperPrepared();
    Looper.loop();
    mTid = -1;
}
Looper在構造方法中創建MessageQueue對象。
private Looper(boolean quitAllowed) {
    mQueue = new MessageQueue(quitAllowed);
    mThread = Thread.currentThread();
}
MessageQueue,也就是我們在Handler學習中經常提到的消息隊列,在構造方法中調用了native層的初始化方法。
MessageQueue(boolean quitAllowed) {
    mQuitAllowed = quitAllowed;
    mPtr = nativeInit();//native層程式碼
}
MessageQueue對應native程式碼,這段程式碼主要是初始化了一個NativeMessageQueue,然後返回一個long型到Java層。
static jlong android_os_MessageQueue_nativeInit(JNIEnv* env, jclass clazz) {
    NativeMessageQueue* nativeMessageQueue = new NativeMessageQueue();
    if (!nativeMessageQueue) {
        jniThrowRuntimeException(env, "Unable to allocate native queue");
        return 0;
    }
    nativeMessageQueue->incStrong(env);
    return reinterpret_cast<jlong>(nativeMessageQueue);
}
NativeMessageQueue初始化方法中會先判斷是否存在當前執行緒的Native層的Looper,如果沒有的就創建一個新的Looper並保存。
NativeMessageQueue::NativeMessageQueue() :mPollEnv(NULL), mPollObj(NULL), mExceptionObj(NULL) {
    mLooper = Looper::getForThread();
    if (mLooper == NULL) {
        mLooper = new Looper(false);
        Looper::setForThread(mLooper);
    }
}
在Looper的構造函數中,我們發現「eventfd」,這個很有文件描述符特徵的方法。
Looper::Looper(bool allowNonCallbacks): mAllowNonCallbacks(allowNonCallbacks),
      mSendingMessage(false),
      mPolling(false),
      mEpollRebuildRequired(false),
      mNextRequestSeq(0),
      mResponseIndex(0),
      mNextMessageUptime(LLONG_MAX) {
    mWakeEventFd.reset(eventfd(0, EFD_NONBLOCK | EFD_CLOEXEC));//eventfd
    LOG_ALWAYS_FATAL_IF(mWakeEventFd.get() < 0, "Could not make wake event fd: %s", strerror(errno));
    AutoMutex _l(mLock);
    rebuildEpollLocked();
}
從C++程式碼注釋中可以知道eventfd函數會返回一個新的文件描述符。
/**
 * [eventfd(2)](//man7.org/linux/man-pages/man2/eventfd.2.html) creates a file descriptor
 * for event notification.
 *
 * Returns a new file descriptor on success, and returns -1 and sets `errno` on failure.
 */
int eventfd(unsigned int __initial_value, int __flags);
3.2 IO泄漏
IO操作是Android開發過程中常用的操作,如果沒有正確關閉流操作,除了可能會導致記憶體泄漏,也會導致FD的泄漏。常見的問題程式碼如下:
private void ioTest(){
    try {
        File file = new File(getCacheDir(), "testFdFile");
        file.createNewFile();
        FileOutputStream out = new FileOutputStream(file);
        //do something
        out.close();
    }catch (Exception e){
        e.printStackTrace();
    }
}
如果在流操作過程中發生異常,就有可能導致泄漏。正確的寫法應該是在final塊中關閉流。
private void ioTest() {
    FileOutputStream out = null;
    try {
        File file = new File(getCacheDir(), "testFdFile");
        file.createNewFile();
        out = new FileOutputStream(file);
        //do something
        out.close();
    } catch (Exception e) {
        e.printStackTrace();
    } finally {
        if (null != out) {
            try {
                out.close();
            } catch (IOException e) {
                e.printStackTrace();
            }
        }
    }
}
同樣,我們在從源碼中尋找流操作是如何創建文件描述符的。首先,查看 FileOutputStream 的構造方法 ,可以發現會初始化一個名為fd的 FileDescriptor 變數,這個 FileDescriptor 對象是Java層對native文件描述符的封裝,其中只包含一個int類型的成員變數,這個變數的值就是native層創建的文件描述符的值。
public FileOutputStream(File file, boolean append) throws FileNotFoundException
{
   //......
  this.fd = new FileDescriptor();
   //......
  open(name, append);
   //......
}
open方法會直接調用jni方法open0.
/**
 * Opens a file, with the specified name, for overwriting or appending.
 * @param name name of file to be opened
 * @param append whether the file is to be opened in append mode
 */
private native void open0(String name, boolean append)
    throws FileNotFoundException;

private void open(String name, boolean append)
    throws FileNotFoundException {
    open0(name, append);
}
Tips: 我們在看android源碼時常常遇到native方法,通過Android Studio無法跳轉查看,可以在 androidxref 網站,通過「Java類名_native方法名」的方法進行搜索。例如,這可以搜索 FileOutputStream_open0 。
接下來,讓我們進入native方法查看對應實現。
JNIEXPORT void JNICALL
FileOutputStream_open0(JNIEnv *env, jobject this, jstring path, jboolean append) {
    fileOpen(env, this, path, fos_fd,
             O_WRONLY | O_CREAT | (append ? O_APPEND : O_TRUNC));
}
在fileOpen方法中,通過handleOpen生成native層的文件描述符(fd),這個fd就是這個所謂對面的文件描述符。
void fileOpen(JNIEnv *env, jobject this, jstring path, jfieldID fid, int flags)
{
    WITH_PLATFORM_STRING(env, path, ps) {
        FD fd;
        //......
        fd = handleOpen(ps, flags, 0666);
        if (fd != -1) {
            SET_FD(this, fd, fid);
        } else {
            throwFileNotFoundException(env, path);
        }
    } END_PLATFORM_STRING(env, ps);
}


FD handleOpen(const char *path, int oflag, int mode) {
    FD fd;
    RESTARTABLE(open64(path, oflag, mode), fd);//調用open,獲取fd
    if (fd != -1) {
        //......
        if (result != -1) {
            //......
        } else {
            close(fd);
            fd = -1;
        }
    }
    return fd;
}
到這裡就結束了嗎?
回到開始,FileOutputStream構造方法中初始化了Java層的文件描述符類 FileDescriptor,目前這個對象中的文件描述符的值還是初始的-1,所以目前它還是一個無效的文件描述符,native層完成fd創建後,還需要把fd的值傳到 Java層。
我們再來看SET_FD這個宏的定義,在這個宏定義中,通過反射的方式給Java層對象的成員變數賦值。由於上文內容可知,open0是對象的jni方法,所以宏中的this,就是初始創建的FileOutputStream在Java層的對象實例。
#define SET_FD(this, fd, fid) \
    if ((*env)->GetObjectField(env, (this), (fid)) != NULL) \
        (*env)->SetIntField(env, (*env)->GetObjectField(env, (this), (fid)),IO_fd_fdID, (fd))
而fid則會在native程式碼中提前初始化好。
static void FileOutputStream_initIDs(JNIEnv *env) {
    jclass clazz = (*env)->FindClass(env, "java/io/FileOutputStream");
    fos_fd = (*env)->GetFieldID(env, clazz, "fd", "Ljava/io/FileDescriptor;");
}
收,到這裡FileOutputStream的初始化跟進就完成了,我們已經找到了底層fd初始化的路徑。Android的IO操作還有其他的流操作類,大致流程基本類似,這裡不再細述。
並不是不關閉就一定會導致文件描述符泄漏,在流對象的析構方法中會調用close方法,所以這個對象被回收時,理論上也是會釋放文件描述符。但是最好還是通過程式碼控制釋放邏輯。
3.3 SQLite泄漏
在日常開發中如果使用資料庫SQLite管理本地數據,在資料庫查詢的cursor使用完成後,亦需要調用close方法釋放資源,否則也有可能導致記憶體和文件描述符的泄漏。
public void get() {
    db = ordersDBHelper.getReadableDatabase();
    Cursor cursor = db.query(...);
    while (cursor.moveToNext()) {
      //......
    }
    if(flag){
       //某種原因導致retrn
       return;
    }
    //不調用close,fd就會泄漏
    cursor.close();
}
按照理解query操作應該會導致文件描述符泄漏,那我們就從query方法的實現開始分析。
然而,在query方法中並沒有發現文件描述符相關的程式碼。
經過測試發現,moveToNext 調用後才會導致文件描述符增長。通過query方法可以獲取cursor的實現類SQLiteCursor。
public Cursor query(CursorFactory factory, String[] selectionArgs) {
    final SQLiteQuery query = new SQLiteQuery(mDatabase, mSql, mCancellationSignal);
    final Cursor cursor;
      //......
      if (factory == null) {
          cursor = new SQLiteCursor(this, mEditTable, query);
      } else {
          cursor = factory.newCursor(mDatabase, this, mEditTable, query);
      }
      //......
}
在SQLiteCursor的父類找到moveToNext的實現。getCount 是抽象方法,在子類SQLiteCursor實現。
@Override
public final boolean moveToNext() {
    return moveToPosition(mPos + 1);
}
public final boolean moveToPosition(int position) {
    // Make sure position isn't past the end of the cursor
    final int count = getCount();
    if (position >= count) {
        mPos = count;
        return false;
    }
    //......
}
getCount 方法中對成員變數mCount做判斷,如果還是初始值,則會調用fillWindow方法。
@Override
public int getCount() {
    if (mCount == NO_COUNT) {
        fillWindow(0);
    }
    return mCount;
}
private void fillWindow(int requiredPos) {
    clearOrCreateWindow(getDatabase().getPath());
    //......
}
clearOrCreateWindow 實現又回到父類 AbstractWindowedCursor 中。
protected void clearOrCreateWindow(String name) {
    if (mWindow == null) {
        mWindow = new CursorWindow(name);
    } else {
        mWindow.clear();
    }
}
在CursorWindow的構造方法中,通過nativeCreate方法調用到native層的初始化。
public CursorWindow(String name, @BytesLong long windowSizeBytes) {
    //......
    mWindowPtr = nativeCreate(mName, (int) windowSizeBytes);
    //......
}
在C++程式碼中會繼續調用一個native層CursorWindow的create方法。
static jlong nativeCreate(JNIEnv* env, jclass clazz, jstring nameObj, jint cursorWindowSize) {
    //......
    CursorWindow* window;
    status_t status = CursorWindow::create(name, cursorWindowSize, &window);
    //......
    return reinterpret_cast<jlong>(window);
}
在CursorWindow的create方法中,我們可以發現fd創建相關的程式碼。
status_t CursorWindow::create(const String8& name, size_t size, CursorWindow** outCursorWindow) {
    String8 ashmemName("CursorWindow: ");
    ashmemName.append(name);
    status_t result;
    int ashmemFd = ashmem_create_region(ashmemName.string(), size);
    //......
}
ashmem_create_region 方法最終會調用到open函數打開文件並返回系統創建的文件描述符。這部分程式碼不在贅述,有興趣的可以自行查看 。
native完成初始化會把fd資訊保存在CursorWindow中並會返回一個指針地址到Java層,Java層可以通過這個指針操作c++層對象從而也能獲取對應的文件描述符。
3.4 InputChannel 導致的泄漏
WindowManager.addView
通過WindowManager反覆添加view也會導致文件描述符增長,可以通過調用removeView釋放之前創建的FD。
private void addView() {
    View windowView = LayoutInflater.from(getApplication()).inflate(R.layout.layout_window, null);
    //重複調用
    mWindowManager.addView(windowView, wmParams);
}
WindowManagerImpl中的addView最終會走到ViewRootImpl的setView。
public void addView(View view, ViewGroup.LayoutParams params, Display display, Window parentWindow) {
    //......
    root = new ViewRootImpl(view.getContext(), display);
    //......
    root.setView(view, wparams, panelParentView);
}
setView中會創建InputChannel,並通過Binder機制傳到服務端。
public void setView(View view, WindowManager.LayoutParams attrs, View panelParentView) {
    //......
    //創建inputchannel
    if ((mWindowAttributes.inputFeatures
        & WindowManager.LayoutParams.INPUT_FEATURE_NO_INPUT_CHANNEL) == 0) {
        mInputChannel = new InputChannel();
    }
    //遠程服務介面
    res = mWindowSession.addToDisplay(mWindow, mSeq, mWindowAttributes,
        getHostVisibility(), mDisplay.getDisplayId(), mWinFrame,
        mAttachInfo.mContentInsets, mAttachInfo.mStableInsets,
        mAttachInfo.mOutsets, mAttachInfo.mDisplayCutout, mInputChannel);//mInputChannel 作為參數傳過去
    //......
    if (mInputChannel != null) {
        if (mInputQueueCallback != null) {
            mInputQueue = new InputQueue();
            mInputQueueCallback.onInputQueueCreated(mInputQueue);
        }
        //創建 WindowInputEventReceiver 對象
        mInputEventReceiver = new WindowInputEventReceiver(mInputChannel,
            Looper.myLooper());
    }
}
addToDisplay是一個AIDL方法,它的實現類是源碼中的Session。最終調用的是 WindowManagerService 的 addWIndow 方法。
public int addToDisplay(IWindow window, int seq, WindowManager.LayoutParams attrs,
        int viewVisibility, int displayId, Rect outFrame, Rect outContentInsets,
        Rect outStableInsets,
        DisplayCutout.ParcelableWrapper outDisplayCutout, InputChannel outInputChannel,
        InsetsState outInsetsState, InsetsSourceControl[] outActiveControls) {
    return mService.addWindow(this, window, seq, attrs, viewVisibility, displayId, outFrame,
            outContentInsets, outStableInsets, outDisplayCutout, outInputChannel,
            outInsetsState, outActiveControls, UserHandle.getUserId(mUid));
}
WMS在 addWindow 方法中創建 InputChannel 用於通訊。
public int addWindow(Session session, IWindow client, int seq,
        LayoutParams attrs, int viewVisibility, int displayId, Rect outFrame,
        Rect outContentInsets, Rect outStableInsets, Rect outOutsets,
        DisplayCutout.ParcelableWrapper outDisplayCutout, InputChannel outInputChannel) {
        //......
        final boolean openInputChannels = (outInputChannel != null
        && (attrs.inputFeatures & INPUT_FEATURE_NO_INPUT_CHANNEL) == 0);
        if  (openInputChannels) {
            win.openInputChannel(outInputChannel);
        }
        //......
}
在 openInputChannel 中創建 InputChannel ,並把客戶端的傳回去。
void openInputChannel(InputChannel outInputChannel) {
    //......
    InputChannel[] inputChannels = InputChannel.openInputChannelPair(name);
    mInputChannel = inputChannels[0];
    mClientChannel = inputChannels[1];
    //......
}
InputChannel 的 openInputChannelPair 會調用native的 nativeOpenInputChannelPair ,在native中創建兩個帶有文件描述符的 socket 。
int socketpair(int domain, int type, int protocol, int sv[2]) {
    //創建一對匿名的已經連接的套接字
    int rc = __socketpair(domain, type, protocol, sv);
    if (rc == 0) {
        //跟蹤文件描述符
        FDTRACK_CREATE(sv[0]);
        FDTRACK_CREATE(sv[1]);
    }
    return rc;
}
WindowManager 的分析涉及WMS,WMS內容比較多,本文重點關注文件描述符相關的內容。簡單的理解,就是進程間通訊會創建socket,所以也會創建文件描述符,而且會在服務端進程和客戶端進程各創建一個。另外,如果系統進程文件描述符過多,理論上會造成系統崩潰。
四、如何排查
如果你的應用收到如下這些崩潰堆棧,恭喜你,你的應用存在文件描述符泄漏。
- abort message ‘could not create instance too many files’
- could not read input file descriptors from parcel
- socket failed:EMFILE (Too many open files)
- …
文件描述符導致的崩潰往往無法通過堆棧直接分析。道理很簡單: 出問題的程式碼在消耗文件描述符同時,正常的程式碼邏輯可能也同樣在創建文件描述符,所以崩潰可能是被正常程式碼觸發了。
4.1 列印當前FD資訊
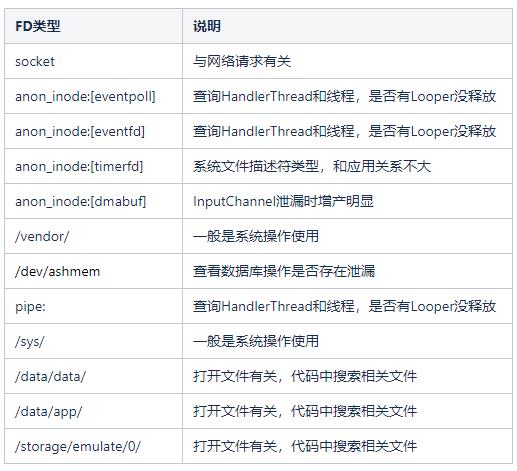
遇到這類問題可以先嘗試本體復現,通過命令 『ls -la /proc/$pid/fd』 查看當前進程文件描述符的消耗情況。一般android應用的文件描述符可以分為幾類,通過對比哪一類文件描述符數量過高,來縮小問題範圍。
4.2 dump系統資訊
通過dumpsys window ,查看是否有異常window。用於解決 InputChannel 相關的泄漏問題。
4.3 線上監控
如果是本地無法復現問題,可以嘗試添加線上監控程式碼,定時輪詢當前進程使用的FD數量,在達到閾值時,讀取當前FD的資訊,並傳到後台分析,獲取FD對應文件資訊的程式碼如下。
if (Build.VERSION.SDK_INT >= VersionCodes.L) {
    linkTarget = Os.readlink(file.getAbsolutePath());
} else {
    //通過 readlink 讀取文件描述符資訊
}
4.4 排查循環列印的日誌
除了直接對 FD相關的資訊進行分析,還需要關注logcat中是否有頻繁列印的資訊,例如:socket創建失敗。


