羽夏看Linux內核——引導啟動(下)
- 2022 年 8 月 12 日
- 筆記
- Linux 系統內核, 羽夏看Linux內核
寫在前面
此系列是本人一個字一個字碼出來的,包括示例和實驗截圖。如有好的建議,歡迎反饋。碼字不易,如果本篇文章有幫助你的,如有閑錢,可以打賞支持我的創作。如想轉載,請把我的轉載信息附在文章後面,並聲明我的個人信息和本人博客地址即可,但必須事先通知我。
你如果是從中間插過來看的,請仔細閱讀 羽夏看Linux系統內核——簡述 ,方便學習本教程。
練習及參考
- 繪製執行進入保護模式的時候的內存布局狀態。
🔒 點擊查看答案 🔒
圖是我自己畫的,有的地方畫的有點誇張,不是按照比例畫的,僅供參考:

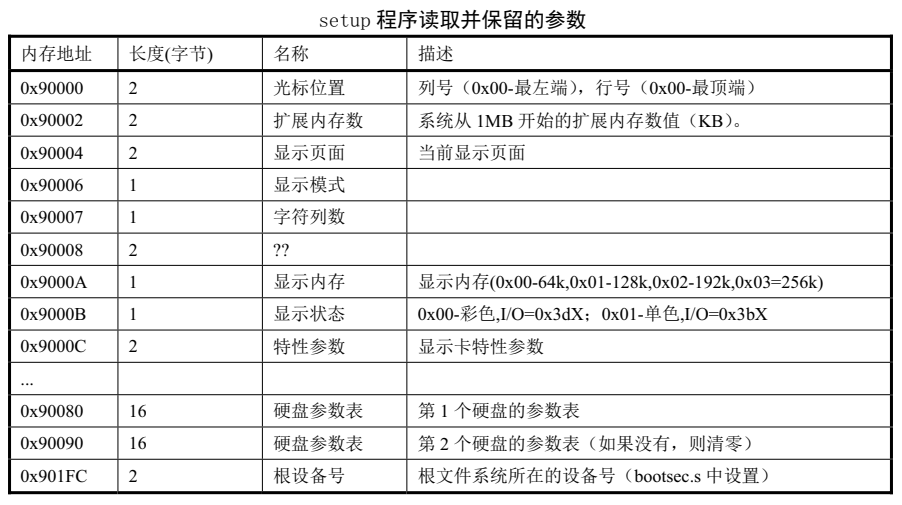
- 用表格的形式展示
setup.s程序在內存中保存的數據。
🔒 點擊查看答案 🔒
.word 0x00eb,0x00eb的作用是啥?
🔒 點擊查看答案 🔒
其實就是個 jmp 指令的二進制,由於每個指令執行都需要耗費幾個機器時間,這裡的作用就是延時。
- 介紹到最後的
jmpi 0,8代碼最終跳到了哪個地址?為什麼?
🔒 點擊查看答案 🔒
最終跳到了 0 地址。由於目前 CPU 處於保護模式,8 現在是段選擇子,含義是以 0環 權限使用索引為 1 的段描述符,是第二個,基址為 0 ,所以是 0 地址。
當前 CPU 狀態
在正式開始之前我們得梳理一下當前CPU的狀態,之後再繼續講解head.s這塊代碼。
當前,我們CPU已經開啟了保護模式,但沒有開啟分頁保護,也就是所謂的虛擬地址,只是有了段相關的權限檢查。此時,我們的CPU地址具有32位的訪問能力了。
清楚了目前的狀態,我們就可以繼續了。
head.s
head.s程序在被編譯生成目標文件後會與內核其他程序一起被鏈接成system模塊,位於system模塊的最前面開始部分。system模塊將被放置在磁盤上setup模塊之後開始的扇區中,即從磁盤上第6個扇區開始放置。一般情況下Linux 0.11內核的system模塊大約有120 KB左右,因此在磁盤上大約佔240個扇區。
從此,CPU正式運行在保護模式了。彙編語法也變了,變成了比較麻煩的AT&T語法。對於AT&T彙編不熟悉的,可以參考我的 羽夏筆記—— AT&T 與 GCC ,別的教程也可。看明白後,回來繼續。
在正式開始介紹之前,我們先把目前的GDT表的內容放上,IDT表目前是空的:
gdt:
    .word 0,0,0,0       ! dummy

    .word 0x07FF        ! 8Mb - limit=2047 (2048*4096=8Mb)
    .word 0x0000        ! base address=0
    .word 0x9A00        ! code read/exec
    .word 0x00C0        ! granularity=4096, 386

    .word 0x07FF        ! 8Mb - limit=2047 (2048*4096=8Mb)
    .word 0x0000        ! base address=0
    .word 0x9200        ! data read/write
    .word 0x00C0        ! granularity=4096, 386
第一部分代碼開始:
startup_32:
    movl $0x10,%eax
    mov %ax,%ds
    mov %ax,%es
    mov %ax,%fs
    mov %ax,%gs
    lss _stack_start,%esp
    call setup_idt
    call setup_gdt
可以看到mov指令來初始化段寄存器ds/es/fs/gs,指向可讀可寫但不能執行的數據段。然後加載堆棧段描述符,我們來看看_stack_start到底是啥:
long user_stack [ PAGE_SIZE>>2 ] ;

struct {
    long * a;
    short b;
    } stack_start = { & user_stack [PAGE_SIZE>>2] , 0x10 };
誒?你是找不到滴。它在linuxsrc/kernel/sched.c文件當中。lss作用在這裡最終的效果是把0x10作為段選擇子加載到ss中,並將user_stack的地址放到esp中。
setup_idt和setup_gdt分別對應建立新的IDT表和GDT表,我們先看看setup_idt這個函數:
/*
 *  setup_idt
 *
 *  sets up a idt with 256 entries pointing to
 *  ignore_int, interrupt gates. It then loads
 *  idt. Everything that wants to install itself
 *  in the idt-table may do so themselves. Interrupts
 *  are enabled elsewhere, when we can be relatively
 *  sure everything is ok. This routine will be over-
 *  written by the page tables.
 */
setup_idt:
    lea ignore_int,%edx
    movl $0x00080000,%eax
    movw %dx,%ax         /* selector = 0x0008 = cs */
    movw $0x8E00,%dx        /* interrupt gate - dpl=0, present */

    lea _idt,%edi
    mov $256,%ecx
rp_sidt:
    movl %eax,(%edi)
    movl %edx,4(%edi)
    addl $8,%edi
    dec %ecx
    jne rp_sidt
    lidt idt_descr
    ret
ignore_int是一個函數,作用是打印Unknown interrupt這個字符串,然後結束。想看看的給你瞅一眼:
/* This is the default interrupt "handler" :-) */
int_msg:
    .asciz "Unknown interrupt\n\r"
.align 2
ignore_int:
    pushl %eax
    pushl %ecx
    pushl %edx
    push %ds
    push %es
    push %fs
    movl $0x10,%eax
    mov %ax,%ds
    mov %ax,%es
    mov %ax,%fs
    pushl $int_msg
    call _printk
    popl %eax
    pop %fs
    pop %es
    pop %ds
    popl %edx
    popl %ecx
    popl %eax
    iret
_printk是一個函數,被定義在linuxsrc/kernel/printk.c的printk函數。_printk是printk函數編譯成函數模塊的表示名稱。
前四行有效彙編就是構造一個中斷門,用來作為默認的「中斷處理程序」。後面就是用構造好的「中斷處理程序」向存儲中斷表的_idt填充256次,最後加載構造完的新IDT表,雖然沒啥真正的作用,但它有了真正的中斷處理能力。
接下來看GDT的:
/*
 *  setup_gdt
 *
 *  This routines sets up a new gdt and loads it.
 *  Only two entries are currently built, the same
 *  ones that were built in init.s. The routine
 *  is VERY complicated at two whole lines, so this
 *  rather long comment is certainly needed :-).
 *  This routine will beoverwritten by the page tables.
 */
setup_gdt:
    lgdt gdt_descr
    ret
這個函數更簡單,這個是構造好了的。我們瞅一眼,順便把IDT帶上:
idt_descr:
    .word 256*8-1       # idt contains 256 entries
    .long _idt
.align 2
.word 0
gdt_descr:
    .word 256*8-1       # so does gdt (not that that's any
    .long _gdt          # magic number, but it works for me :^)

    .align 3
_idt: .fill 256,8,0     # idt is uninitialized

_gdt: .quad 0x0000000000000000      /* NULL descriptor */
    .quad 0x00c09a0000000fff        /* 16Mb */
    .quad 0x00c0920000000fff        /* 16Mb */
    .quad 0x0000000000000000        /* TEMPORARY - don't use */
    .fill 252,8,0                   /* space for LDT's and TSS's etc */
我們繼續:
movl $0x10,%eax     # reload all the segment registers
mov %ax,%ds         # after changing gdt. CS was already
mov %ax,%es         # reloaded in 'setup_gdt'
mov %ax,%fs
mov %ax,%gs
lss _stack_start,%esp
xorl %eax,%eax
然後又來了一遍加載,每次更新GDT之後,由於段描述符的變化,我們必須重新加載一遍,保證與最新的保持一致。
1:  incl %eax           # check that A20 really IS enabled
    movl %eax,0x000000  # loop forever if it isn't
    cmpl %eax,0x100000
    je 1b
這部分開始檢查A20是否真正的開啟了,防止出了差錯,否則就一直循環。
/*
 * NOTE! 486 should set bit 16, to check for write-protect in supervisor
 * mode. Then it would be unnecessary with the "verify_area()"-calls.
 * 486 users probably want to set the NE (#5) bit also, so as to use
 * int 16 for math errors.
 */
    movl %cr0,%eax          # check math chip
    andl $0x80000011,%eax   # Save PG,PE,ET
/* "orl $0x10020,%eax" here for 486 might be good */
    orl $2,%eax             # set MP
    movl %eax,%cr0
    call check_x87
    jmp after_page_tables
這段代碼就是檢查數字協處理器芯片是否存在。這個和硬件相關,這個不是我們的重點,簡單了解即可。
完成無誤後,我們跳轉到after_page_tables:
after_page_tables:
    pushl $0        # These are the parameters to main :-)
    pushl $0
    pushl $0
    pushl $L6       # return address for main, if it decides to.
    pushl $_main
    jmp setup_paging
L6:
    jmp L6          # main should never return here, but
                    # just in case, we know what happens.
到這裡,我們開始壓棧,這個是一個十分重要的點,我會留一個思考題在這裡,這裡先不講。
壓棧完畢後,然後跳轉到setup_paging:
setup_paging:
    movl $1024*5,%ecx       /* 5 pages - pg_dir+4 page tables */
    xorl %eax,%eax
    xorl %edi,%edi          /* pg_dir is at 0x000 */
    cld;rep;stosl
    movl $pg0+7,_pg_dir     /* set present bit/user r/w */
    movl $pg1+7,_pg_dir+4   /*  --------- " " --------- */
    movl $pg2+7,_pg_dir+8   /*  --------- " " --------- */
    movl $pg3+7,_pg_dir+12  /*  --------- " " --------- */
    movl $pg3+4092,%edi
    movl $0xfff007,%eax     /*  16Mb - 4096 + 7 (r/w user,p) */
    std
1:  stosl                   /* fill pages backwards - more efficient :-) */
    subl $0x1000,%eax
    jge 1b
    xorl %eax,%eax          /* pg_dir is at 0x0000 */
    movl %eax,%cr3          /* cr3 - page directory start */
    movl %cr0,%eax
    orl $0x80000000,%eax
    movl %eax,%cr0          /* set paging (PG) bit */
    ret                     /* this also flushes    prefetch-queue */
這些代碼會讓改Linux內核向現代操作系統更近了一步,開啟分頁保護。
在正式開始之前我們先回顧一下與分頁相關的知識。

其中,有兩個位我們必須清楚開啟分頁機制的位PG。
PG位是啟用分頁機制。在開啟這個標誌之前必須已經或者同時開啟PE標誌。PG = 0且PE = 0,處理器工作在實地址模式下。PG = 0且PE = 1,處理器工作在沒有開啟分頁機制的保護模式下。PG = 1且PE = 0,在PE沒有開啟的情況下無法開啟PG。PG = 1且PE = 1,處理器工作在開啟了分頁機制的保護模式下。
由於當前內存只有16 MB,所以它採用了10-10-12分頁。setup_paging開始的代碼將會在0地址開始設置頁表,這會覆蓋head.s的開頭的代碼。不過沒關係,一切都在計算當中,並不會覆蓋到當前要執行的代碼。
看一下分頁情況:
/*
 * I put the kernel page tables right after the page directory,
 * using 4 of them to span 16 Mb of physical memory. People with
 * more than 16MB will have to expand this.
 */
.org 0x1000
pg0:

.org 0x2000
pg1:

.org 0x3000
pg2:

.org 0x4000
pg3:
為什麼要按照0x1000都間隔進行分頁呢?這個是由於CPU規定的,每個頁表是0x1000位元組的大小。這裡一共分了4個頁,對於16 MB內存足夠了。
但是,為什麼給_pg_dir賦值的要加個7呢?我們來看一下10-10-12分頁:
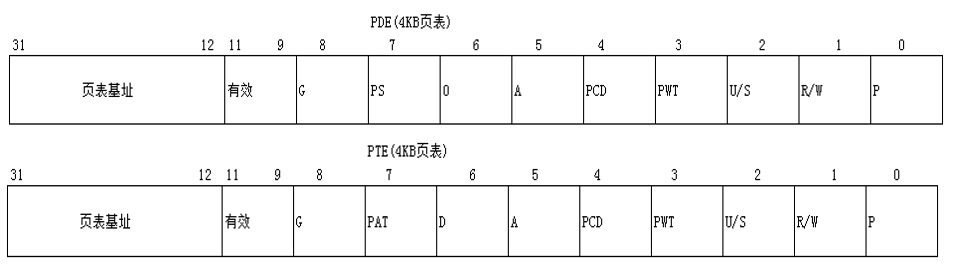
到這裡,你可能就意識到了:_pg_dir其實就是所謂的PDE,如果加了7,就是加上了幾個最後三個屬性。其實這幾張頁表都是內核專用的。
這幾句彙編可能比較難懂一些:
    movl $0xfff007,%eax     /*  16Mb - 4096 + 7 (r/w user,p) */
    std
1:  stosl                   /* fill pages backwards - more efficient :-) */
    subl $0x1000,%eax
    jge 1b
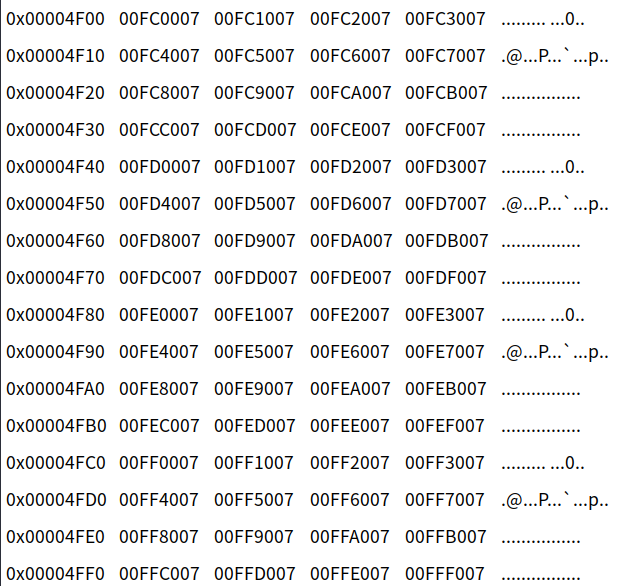
我們現在的ecx是0,根據stos彙編的意思,也就是說把每一個頁表填寫上對應的數值,且執行一次。這麼寫的作用僅僅是為了更方便,更迅速。注意,它是從高地址向低地址填充頁表的。
如果不理解,我們給一個最開始填充後的情況:
最後一塊代碼:
xorl %eax,%eax      /* pg_dir is at 0x0000 */
movl %eax,%cr3      /* cr3 - page directory start */
movl %cr0,%eax
orl $0x80000000,%eax
movl %eax,%cr0      /* set paging (PG) bit */
ret                 /* this also flushes prefetch-queue */
由於訪問物理內存需要CR3,它指向頁目錄表基址,所以給它賦值,之後開啟分頁保護開關,最後返回,所有的引導流程結束。
練習與思考
本節的答案將會在下一節進行講解,務必把本節練習做完後看下一個講解內容。不要偷懶,實驗是學習本教程的捷徑。
俗話說得好,光說不練假把式,如下是本節相關的練習。如果練習沒做成功,就不要看下一節教程了。
- 複習本篇分析的代碼流程,熟悉分頁和中斷門的構造。
- 在分頁代碼分析部分,你是怎麼知道是
10-10-12分頁,而不是2-9-9-12分頁? - 最後的代碼到底返回到了哪裡?
- 繪製當前
system模塊的內存分佈。
下一篇
羽夏看Linux內核——內核初始化

