Electron結合React和TypeScript進行開發
- 2022 年 4 月 24 日
- 筆記
- Electron, NodeJs, React, typescript
結合React+TypeScript進行Electron開發
1. electron基本簡介
electron是使用JavaScript,HTML和CSS構建跨平台的桌面應用程序。我們可以使用一套代碼打包成Mac、Windows和Linux的應用,electron比你想像的更簡單,如果把你可以建一個網站,你就可以建一個桌面應用程序,我們只需要把精力放在應用的核心上即可。
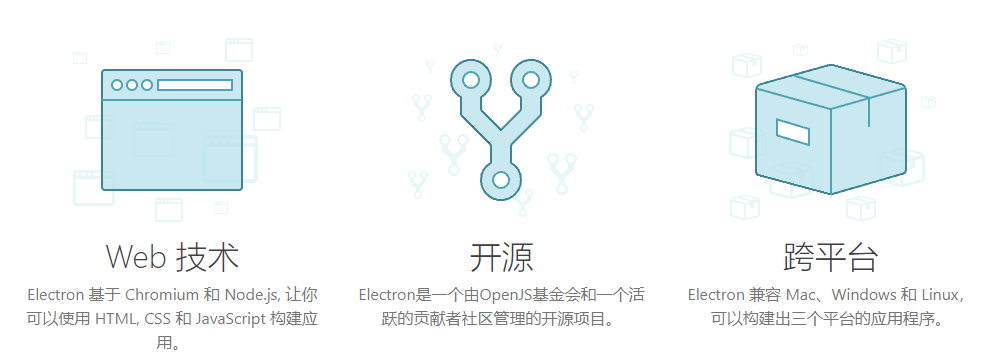
為什麼選擇electron?
- Electron 可以讓你使用純JavaScript調用豐富的原生APIs來創造桌面應用。你可以把它看作是專註於桌面應用。
- 在PC端桌面應用開發中,nwjs和electron都是可選的方案,它們都是基於Chromium和Node的結合體,而electron相對而言是更好的選擇方案,它的社區相對比較活躍,bug比較少,文檔相對利索簡潔。
- electron相對來說比nw.js靠譜,有一堆成功的案例:Atom編輯器 Visual Studio Code WordPress等等。
- Node.js的所有內置模塊都在Electron中可用。
2. 快速上手
2.1 安裝React(template為ts)
yarn create react-app electron-demo-ts --template typescript
2.2 快速配置React
工程架構
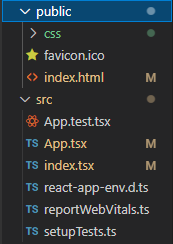
index.html
<!DOCTYPE html>
<html lang="en">
  <head>
    <meta charset="utf-8" />
    <link rel="icon" href="%PUBLIC_URL%/favicon.ico" />
    <meta name="viewport" content="width=device-width, initial-scale=1" />
    <meta name="theme-color" content="#000000" />
    <meta
      name="description"
      content="Bleak's electron app base react"
    />
    <meta http-equiv="Content-Security-Policy" content="default-src 'self' 'unsafe-inline';">
    <link rel="stylesheet" href="%PUBLIC_URL%/css/reset.css">
    <title>electron App</title>
  </head>
  <body>
    <noscript>You need to enable JavaScript to run this app.</noscript>
    <div id="root"></div>
  </body>
</html>
App.tsx
import React from 'react'

export default function App() {
  return (
    <div>App</div>
  )
}
index.tsx
import React from 'react';
import ReactDOM from 'react-dom/client';
import App from './App';
import reportWebVitals from './reportWebVitals';

const root = ReactDOM.createRoot(
  document.getElementById('root') as HTMLElement
);
root.render(
  // <React.StrictMode>
    <App />
  // </React.StrictMode>
);

// If you want to start measuring performance in your app, pass a function
// to log results (for example: reportWebVitals(console.log))
// or send to an analytics endpoint. Learn more: //bit.ly/CRA-vitals
reportWebVitals();
2.3 安裝electron
將electron包安裝到您的應用程序的devDependencies.
// npm
npm install --save-dev electron
// yarn
yarn add --dev electron
2.4 配置main.js、preload.js和package.json文件
main.js
// 導入app、BrowserWindow模塊
// app 控制應用程序的事件生命周期。事件調用app.on('eventName', callback),方法調用app.functionName(arg)
// BrowserWindow 創建和控制瀏覽器窗口。new BrowserWindow([options]) 事件和方法調用同app
// Electron參考文檔 //www.electronjs.org/docs
const {app, BrowserWindow, nativeImage } = require('electron')
const path = require('path')
// const url = require('url');


function createWindow () {
    // Create the browser window.
    const mainWindow = new BrowserWindow({
        width: 800, // 窗口寬度
        height: 600,  // 窗口高度
        // title: "Electron app", // 窗口標題,如果由loadURL()加載的HTML文件中含有標籤<title>,該屬性可忽略
        icon: nativeImage.createFromPath('public/favicon.ico'), // "string" || nativeImage.createFromPath('public/favicon.ico')從位於 path 的文件創建新的 NativeImage 實例
        webPreferences: { // 網頁功能設置
            webviewTag: true, // 是否使用<webview>標籤 在一個獨立的 frame 和進程里顯示外部 web 內容
            webSecurity: false, // 禁用同源策略
            preload: path.join(__dirname, 'preload.js'),
            nodeIntegration: true // 是否啟用node集成 渲染進程的內容有訪問node的能力,建議設置為true, 否則在render頁面會提示node找不到的錯誤
        }
    })


    // 加載應用 --打包react應用後,__dirname為當前文件路徑
    // mainWindow.loadURL(url.format({
    //   pathname: path.join(__dirname, './build/index.html'),
    //   protocol: 'file:',
    //   slashes: true
    // }));


    // 因為我們是加載的react生成的頁面,並不是靜態頁面
    // 所以loadFile換成loadURL。
    // 加載應用 --開發階段  需要運行 yarn start
    mainWindow.loadURL('//localhost:3000');

    // 解決應用啟動白屏問題
    mainWindow.on('ready-to-show', () => {
        mainWindow.show();
        mainWindow.focus();
    });

    // 當窗口關閉時發出。在你收到這個事件後,你應該刪除對窗口的引用,並避免再使用它。
    mainWindow.on('closed', () => {
        mainWindow = null;
    });

    // 在啟動的時候打開DevTools
    mainWindow.webContents.openDevTools()
}

app.allowRendererProcessReuse =true;

// This method will be called when Electron has finished
// initialization and is ready to create browser windows.
// Some APIs can only be used after this event occurs.
app.whenReady().then(() =>{
    console.log('qpp---whenready');
    createWindow();})

// Quit when all windows are closed.
app.on('window-all-closed', function () {
    // On macOS it is common for applications and their menu bar
    // to stay active until the user quits explicitly with Cmd + Q
    console.log('window-all-closed');
    if (process.platform !== 'darwin') app.quit()
})

app.on('activate', function () {
    // On macOS it's common to re-create a window in the app when the
    // dock icon is clicked and there are no other windows open.
    if (BrowserWindow.getAllWindows().length === 0) createWindow()
})

// In this file you can include the rest of your app's specific main process
// code. You can also put them in separate files and require them here.
package.json
這時候我們來修改package.json文件。
- 配置啟動文件,添加
main字段,我們這裡也就是main.js文件。如果沒有添加,Electron 將嘗試加載包含在package.json文件目錄中的index.js文件。 - 配置運行命令,使用“electron”: “electron .” 區別於react的啟動命令“start”: “react-scripts start”,
- 安裝concurrently:
yarn add concurrently
{
    ...
    "main": "main.js", // 配置啟動文件
  	"homepage": ".", // 設置應用打包的根路徑
    "scripts": {
        "start": "react-scripts start",  // react 啟動命令
        "build": "react-scripts build",
        "test": "react-scripts test",
        "eject": "react-scripts eject",
        "electron": "electron .",  // electron 啟動命令
        "dev": "concurrently \"npm run start\" \"npm run electron\""
    },
}
preload.js
window.addEventListener('DOMContentLoaded', () => {
    const replaceText = (selector, text) => {
        const element = document.getElementById(selector)
            if (element) element.innerText = text
    }

    for (const dependency of ['chrome', 'node', 'electron']) {
        replaceText(`${dependency}-version`, process.versions[dependency])
    }
})
此時的工程架構
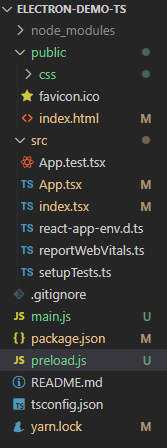
2.5 運行electron項目
- 先
yarn start然後再開一個終端yarn electron - 或者是
npm run dev
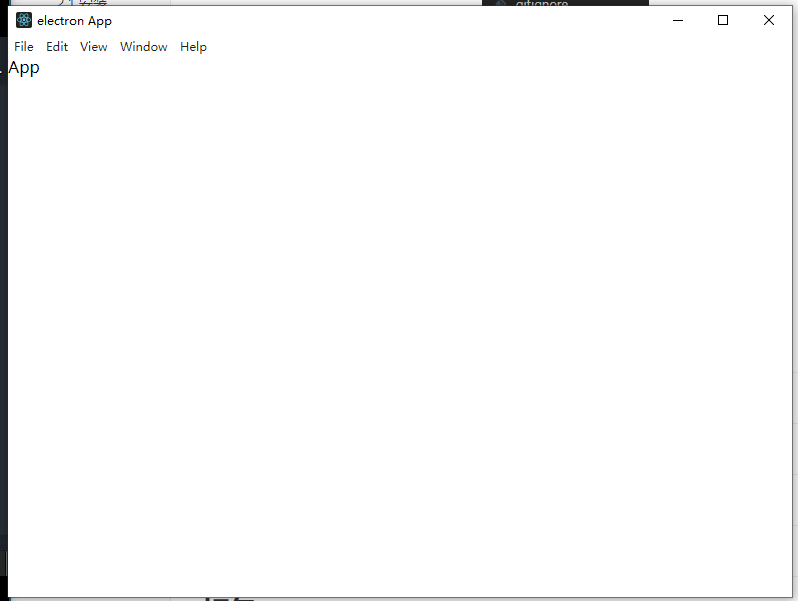
其實我們就可以看出Electron就是一個應用套了一個谷歌瀏覽器殼子,然後裏面是前端頁面。
2.6 打包項目
使用electron-packager依賴:
yarn add --dev electron-packager
package.json配置打包命令:
"package": "electron-packager . bleak-electron-app --platform=win32 --arch=x64 --overwrite --electron-version=18.1.0 --icon=./public/favicon.ico"
配置解釋:
electron-packager <應用目錄> <應用名稱> <打包平台> <架構x86 還是 x64> <架構> <electron版本> <圖標>
overwrite 如果輸出目錄已經存在,替換它
然後運行命令:
yarn package
打包時間慢的話可按照下面兩種方式優化:
方法1:
在執行electron-packager前先運行set ELECTRON_MIRROR=//npm.taobao.org/mirrors/electron/
方法2:
在electron-packager命令行加入參數--download.mirrorOptions.mirror=//npm.taobao.org/mirrors/electron/
(Windows x64)完整版如下:
electron-packager . bleak-electron-app --platform=win32 --arch=x64 --overwrite --electron-version=18.0.4 --download.mirrorOptions.mirror=//npm.taobao.org/mirrors/electron/
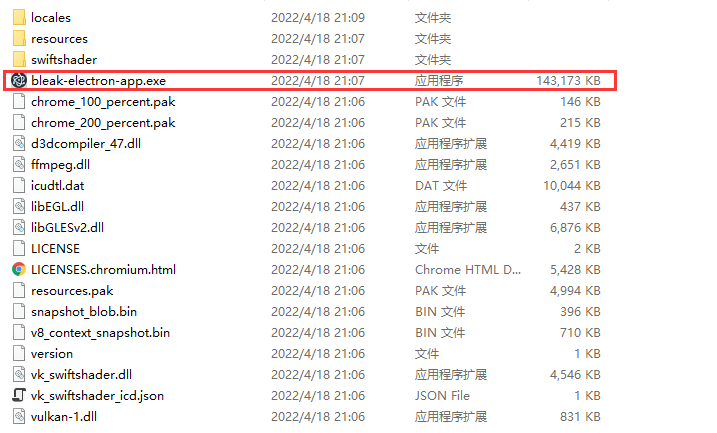
然後運行bleak-electron-app-win32-x64裏面的exe文件就可以了。
3. 自動刷新頁面
當你用react開發的時候,網頁內容會自動熱更新,但是electron窗口的main.js中代碼發生變化時不能熱加載。
安裝插件electron-reloader:
yarn add --dev electron-reloader
npm install --save-develectron-reloader
然後在路口引用插件:
const reloader = require('electron-reloader')
reloader(module)
就可以實現electron插件熱更新。
4. 主進程和渲染進程
Electron運行package.json的main腳本的進程稱為主進程。在主進程中運行的腳本通過創建web頁面來展示用戶節面,一個Electron應用總是有且只有一個主進程。
由於Electron使用了Chromium來展示web頁面,所以Chromium的多進程架構也被使用到,每個Electron鍾大哥web頁面運行在它的叫渲染進程的進程中。
在普通的瀏覽器中,web頁面無法訪問操作系統的原生資源。然而Electron的用戶在Node.js的API支持下可以在頁面中和操作系統進行一些底層交互。
ctrl + shift + i 打開渲染進程調試(devtools)
默認打開調試:
// 在啟動的時候打開DevTools
mainWindow.webContents.openDevTools()
5.定義原生菜單、頂部菜單
5.1 自定義菜單
可以使用Menu菜單來創建原生應用菜單和上下文菜單。
- 首先判斷是什麼平台,是mac還是其他:
const isMac = process.platform === 'darwin'
- 創建菜單模板:
其是由一個個MenuItem組成的,可以在菜單項官網API查看。
const template = [
  // { role: 'appMenu' }
  // 如果是mac系統才有
  ...(isMac ? [{
    label: app.name,
    submenu: [
      { role: 'about' },
      { type: 'separator' },
      { role: 'services' },
      { type: 'separator' },
      { role: 'hide' },
      { role: 'hideOthers' },
      { role: 'unhide' },
      { type: 'separator' },
      { role: 'quit' }
    ]
  }] : []),
  // { role: 'fileMenu' }
  {
    label: '文件',
    submenu: [
      isMac ? { role: 'close' } : { role: 'quit', label: '退出' }
    ]
  },
  // { role: 'editMenu' }
  {
    label: '編輯',
    submenu: [
      { role: 'undo', label: '撤消' },
      { role: 'redo', label: '恢復' },
      { type: 'separator' },
      { role: 'cut', label: '剪切' },
      { role: 'copy', label: '複製' },
      { role: 'paste', label: '粘貼' },
      ...(isMac ? [
        { role: 'pasteAndMatchStyle' },
        { role: 'delete' },
        { role: 'selectAll' },
        { type: 'separator' },
        {
          label: 'Speech',
          submenu: [
            { role: 'startSpeaking' },
            { role: 'stopSpeaking' }
          ]
        }
      ] : [
        { role: 'delete', label: '刪除' },
        { type: 'separator' },
        { role: 'selectAll', label: '全選' }
      ])
    ]
  },
  // { role: 'viewMenu' }
  {
    label: '查看',
    submenu: [
      { role: 'reload', label: '重新加載' },
      { role: 'forceReload', label: '強制重新加載' },
      { role: 'toggleDevTools', label: '切換開發工具欄' },
      { type: 'separator' },
      { role: 'resetZoom', label: '原始開發工具欄窗口大小' },
      { role: 'zoomIn', label: '放大開發工具欄窗口'},
      { role: 'zoomOut', label: '縮小開發工具欄窗口' },
      { type: 'separator' },
      { role: 'togglefullscreen', label:'切換開發工具欄全屏' }
    ]
  },
  // { role: 'windowMenu' }
  {
    label: '窗口',
    submenu: [
      { role: 'minimize', label:'最小化' },
      ...(isMac ? [
        { type: 'separator' },
        { role: 'front' },
        { type: 'separator' },
        { role: 'window' }
      ] : [
        { role: 'close', label: '關閉' }
      ])
    ]
  },
  {
    role: 'help',
    label: '幫助',
    submenu: [
      {
        label: '從Electron官網學習更多',
        click: async () => {
          const { shell } = require('electron')
          await shell.openExternal('//electronjs.org')
        }
      }
    ]
  }
]
- 根據模板創建menu:
const menu = Menu.buildFromTemplate(template)
- 設置菜單:
Menu.setApplicationMenu(menu)
5.2 給菜單定義點擊事件
可以通過click屬性來設置點擊事件
5.3 抽離菜單定義
創建一個menu.js:
const {app, Menu } = require('electron')

const isMac = process.platform === 'darwin'

const template = [
  // { role: 'appMenu' }
  // 如果是mac系統才有
  ...(isMac ? [{
    label: app.name,
    submenu: [
      { role: 'about' },
      { type: 'separator' },
      { role: 'services' },
      { type: 'separator' },
      { role: 'hide' },
      { role: 'hideOthers' },
      { role: 'unhide' },
      { type: 'separator' },
      { role: 'quit' }
    ]
  }] : []),
  // { role: 'fileMenu' }
  {
    label: '文件',
    submenu: [
      isMac ? { role: 'close' } : { role: 'quit', label: '退出' }
    ]
  },
  // { role: 'editMenu' }
  {
    label: '編輯',
    submenu: [
      { role: 'undo', label: '撤消' },
      { role: 'redo', label: '恢復' },
      { type: 'separator' },
      { role: 'cut', label: '剪切' },
      { role: 'copy', label: '複製' },
      { role: 'paste', label: '粘貼' },
      ...(isMac ? [
        { role: 'pasteAndMatchStyle' },
        { role: 'delete' },
        { role: 'selectAll' },
        { type: 'separator' },
        {
          label: 'Speech',
          submenu: [
            { role: 'startSpeaking' },
            { role: 'stopSpeaking' }
          ]
        }
      ] : [
        { role: 'delete', label: '刪除' },
        { type: 'separator' },
        { role: 'selectAll', label: '全選' }
      ])
    ]
  },
  // { role: 'viewMenu' }
  {
    label: '查看',
    submenu: [
      { role: 'reload', label: '重新加載' },
      { role: 'forceReload', label: '強制重新加載' },
      { role: 'toggleDevTools', label: '切換開發工具欄' },
      { type: 'separator' },
      { role: 'resetZoom', label: '原始開發工具欄窗口大小' },
      { role: 'zoomIn', label: '放大開發工具欄窗口'},
      { role: 'zoomOut', label: '縮小開發工具欄窗口' },
      { type: 'separator' },
      { role: 'togglefullscreen', label:'切換開發工具欄全屏' }
    ]
  },
  // { role: 'windowMenu' }
  {
    label: '窗口',
    submenu: [
      { role: 'minimize', label:'最小化' },
      ...(isMac ? [
        { type: 'separator' },
        { role: 'front' },
        { type: 'separator' },
        { role: 'window' }
      ] : [
        { role: 'close', label: '關閉' }
      ])
    ]
  },
  {
    role: 'help',
    label: '幫助',
    submenu: [
      {
        label: '從Electron官網學習更多',
        click: async () => {
          const { shell } = require('electron')
          await shell.openExternal('//electronjs.org')
        }
      }
    ]
  }
]

const menu = Menu.buildFromTemplate(template)
Menu.setApplicationMenu(menu)
然後在main.js中createWindow的方法使用require調用:
const createWindow = () => {
    ......
    require('./menu')
    ......
}
5.4 自定義頂部菜單
我們可以自定義頂部菜單,通過以下兩個步驟進行:
- 先通過frame創建無邊框窗口。
function createWindow () {
    const mainWindow = new BrowserWindow({
        ......
        frame: false
    })
}
- 然後再通過前端頁面布局設置頂部菜單
如果想讓頂部菜單支持拖拽,可以加如下css:
-webkit-app-region: drag;
5.5 在渲染進程中使用主進程方法remote和electron(點擊創建新窗口)
我們想要通過remote來使用主進程方法和功能。
- 首先要安裝
@electron/remote
yarn add @electron/remote
- 在主進程main.js中配置remote:
const remote = require("@electron/remote/main")
remote.initialize()

const createWindow = () => {
    let mainWindow = new BrowserWindow({
        ......
        webPreferences: { // 網頁功能設置
        	......
            nodeIntegration: true, // 是否啟用node集成 渲染進程的內容有訪問node的能力,建議設置為true, 否則在render頁面會提示node找不到的錯誤
            contextIsolation : false, //允許渲染進程使用Nodejs
        }
    })
    remote.enable(mainWindow.webContents)
}
- 在渲染進程中使用remote的BrowserWindow:App.tsx
import React from 'react'
// 使用electron的功能
// const electron = window.require('electron')
// 使用remote
const { BrowserWindow } = window.require("@electron/remote")

export default function App() {
  const openNewWindow = () => {
    new BrowserWindow({
      width:500,
      height:500
    })
  }

  return (
    <div>
      App
      <div>
        <button onClick={openNewWindow}>點我開啟新窗口</button>
      </div>
    </div>
  )
}
我們想要通過使用electron提供給渲染進程的API:
const electron = window.require('electron')
然後從electron中提取方法。
5.6 點擊打開瀏覽器
使用electron中的shell可以實現此功能:
import React from 'react'
// 使用electron的功能
// const electron = window.require('electron')
// 使用remote
// const { BrowserWindow } = window.require("@electron/remote")
// 使用shell
const { shell } = window.require('electron')

export default function App() {
  const openNewWindow = () => {
    shell.openExternal('//www.baidu.com')
  }

  return (
    <div>
      App
      <div>
        <button onClick={openNewWindow}>點我開啟新窗口打開百度</button>
      </div>
    </div>
  )
}
6. 打開對話框讀取文件
6.1 讀取文件
主進程中的dialog模塊可以顯示用於打開和保存文件、警報等的本機系統對話框。
因為dialog模塊屬於主進程,如果我們在渲染進程中需要使用則需要使用remote模塊。
App.tsx
import React,{ useRef } from 'react'
// 使用electron的功能
// const electron = window.require('electron')

// 使用remote
// const remote = window.require('@electron/remote')
// const { BrowserWindow } = window.require("@electron/remote")
const { dialog } = window.require("@electron/remote")

// 使用shell
const { shell } = window.require('electron')

// 使用fs
const fs = window.require('fs')

export default function App() {
  // ref
  const textRef = useRef<HTMLTextAreaElement | null>(null)

  const openNewWindow = () => {
    shell.openExternal('//www.baidu.com')
  }

  const openFile = () => {
    const res = dialog.showOpenDialogSync({
      title: '讀取文件', // 對話框窗口的標題
      buttonLabel: "讀取", // 按鈕的自定義標籤, 當為空時, 將使用默認標籤。
      filters: [ // 用於規定用戶可見或可選的特定類型範圍
        //{ name: 'Images', extensions: ['jpg', 'png', 'gif', 'jpeg', 'webp'] },
        //{ name: 'Movies', extensions: ['mkv', 'avi', 'mp4'] },
        { name: 'Custom File Type', extensions: ['js'] },
        { name: 'All Files', extensions: ['*'] },
      ]
    })
    const fileContent:string  = fs.readFileSync(res[0]).toString();
    (textRef.current as HTMLTextAreaElement).value = fileContent
  }

  return (
    <div>
      App Test
      <div>
        <button onClick={openNewWindow}>點我開啟新窗口打開百度</button>
      </div>
      <div>
        <button onClick={openFile}>打開文件</button>
        <textarea ref={textRef}></textarea>
      </div>
    </div>
  )
}
6.2 保存文件
保存文件需要使用dialog函數里的showSaveDialogSync,與之前的讀取文件所用到的showOpenDialogSync類似:
const saveFile = () => {
    const res = dialog.showSaveDialogSync({
        title:'保存文件',
        buttonLable: "保存",
        filters: [
            { name: 'index', extensions: ['js']}
        ]
    })
    fs.writeFileSync(res, textRef.current?.value)
}
7. 定義快捷鍵
7.1 主線程定義
引入globalShortcut
const {app, BrowserWindow, nativeImage, globalShortcut } = require('electron')
註冊快捷鍵打印字符串、窗口最大化、窗口最小化、關閉窗口。
const createWindow = () => {
    ......
    // 註冊快捷鍵
    globalShortcut.register('CommandOrControl+X', () => {
        console.log('CommandOrControl + X is pressed')
    })

    globalShortcut.register('CommandOrControl+M', () => {
        mainWindow.maximize()
    })

    globalShortcut.register('CommandOrControl+T', () => {
        mainWindow.unmaximize()
    })

    globalShortcut.register('CommandOrControl+H', () => {
        mainWindow.close()
    })

    // 檢查快捷鍵是否註冊成功
    // console.log(globalShortcut.isRegistered('CommandOrControl+X'))
}

// 將要退出時的生命周期,註銷快捷鍵
app.on('will-quit', () => {
    // 註銷快捷鍵
    globalShortcut.unregister('CommandOrControl+X')
    // 註銷所有快捷鍵
    globalShortcut.unregisterAll()
})
7.2在渲染進程中定義
通過retmote來定義
const { globalShortcut } = window.require("@electron/remote")


globalShortcut.register("Ctrl+O", () => {
    console.log('ctrl+O is pressed.')
})
8. 主進程和渲染進程通訊
在渲染進程使用ipcRenderer,主進程使用ipcMain,可以實現主進程和渲染進程的通訊:
App.tsx
......
import React,{ useState, useRef } from 'react'
const { shell, ipcRenderer } = window.require('electron')
export default function App() {
    // state
  	const [windowSize, setWindowSize] = useState('max-window')
    ......
    // 傳參
    const maxWindow = () => {
        ipcRenderer.send('max-window', windowSize);
        if(windowSize === 'max-window') {
            setWindowSize('unmax-window')
        } else {
            setWindowSize('max-window')
        }
    }
        ......
        return (
            <div>
                    <div>
                        <button onClick={maxWindow}>與主進程進行通訊,窗口最大化或取消窗口最大化</button>
                    </div>
                </div>
            </div>
        )
}
main.js
const {app, BrowserWindow, nativeImage, globalShortcut, ipcMain } = require('electron')
const createWindow = () => {
    let mainWindow = ......
    ......
    // 定義通訊事件
    ipcMain.on('max-window', (event, arg) => {
        if(arg === 'max-window') {
            mainWindow.maximize()
        } else if (arg === 'unmax-window') {
            mainWindow.unmaximize()
        }
    })
    ......
}
......


