React項目中使用wangeditor以及擴展上傳附件菜單
- 2022 年 4 月 15 日
- 筆記
- javascript, React, Web前端, 插件
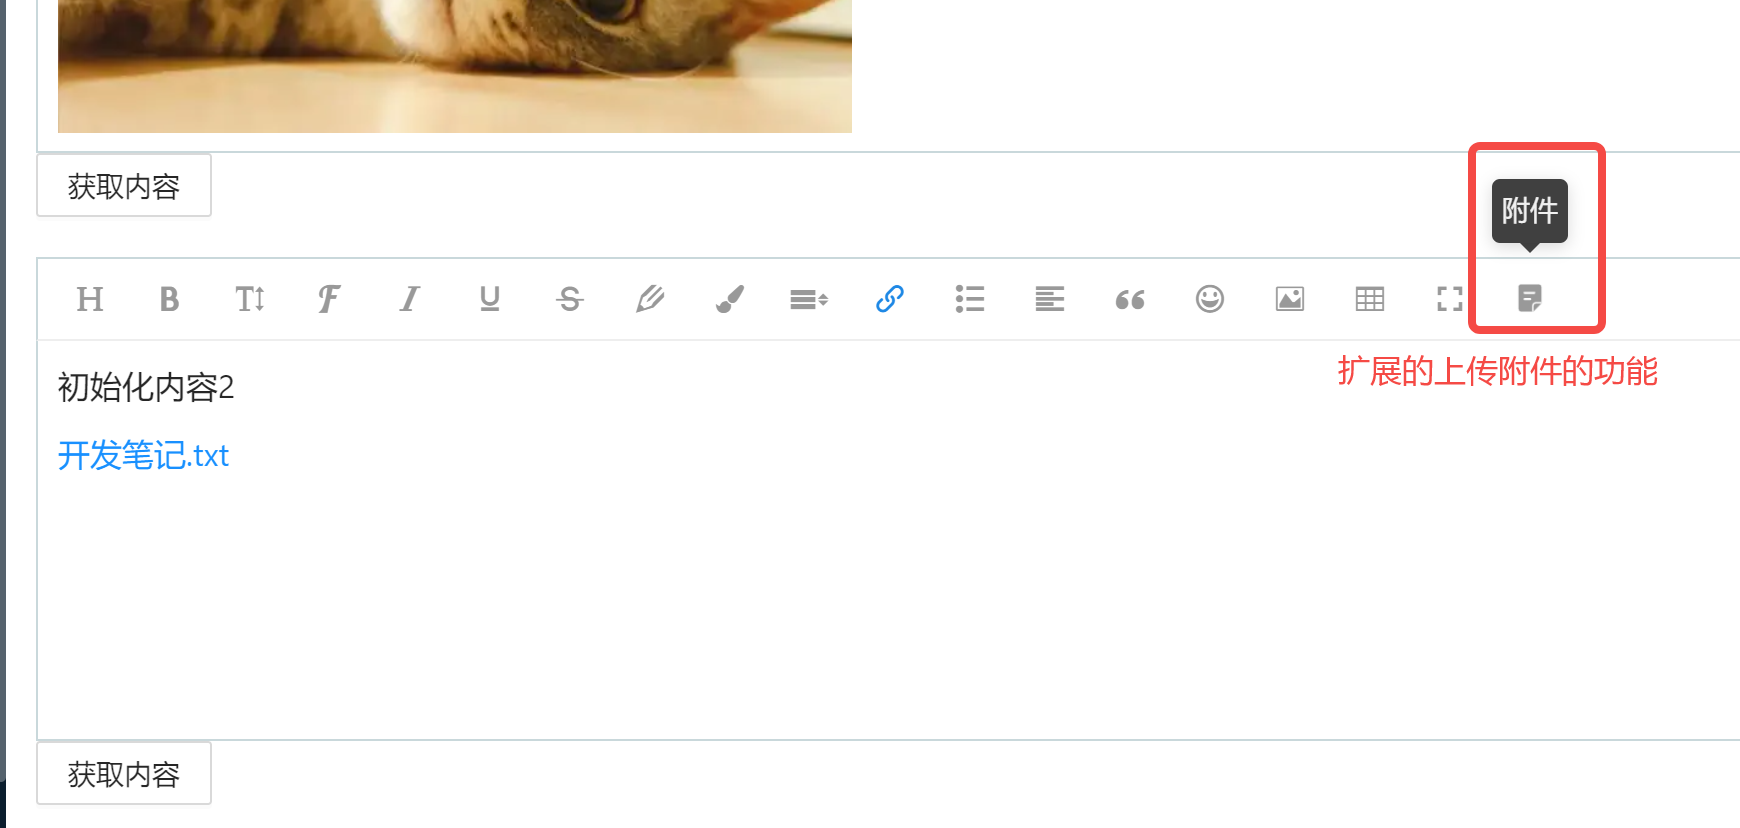
在最近的工作中需要用到富文本編輯器,結合項目的UI樣式以及業務需求,選擇了wangEditor。另外在使用的過程中發現wangEditor只有上傳圖片和視頻的功能,沒有上傳文本附件的功能,所以需要對其擴展一個上傳附件的功能。
我們的項目前端是用的react框架,在這裡就記錄一下我在項目中對wangEditor的簡單封裝使用以及擴展上傳附件菜單。
需要購買阿里雲產品和服務的,點擊此鏈接領取優惠券紅包,優惠購買哦,領取後一個月內有效: //promotion.aliyun.com/ntms/yunparter/invite.html?userCode=fp9ccf07
1、npm 或yarn安裝 wangEditor
yarn add wangeditor -S
![]()
2、封裝成一個簡單的組件
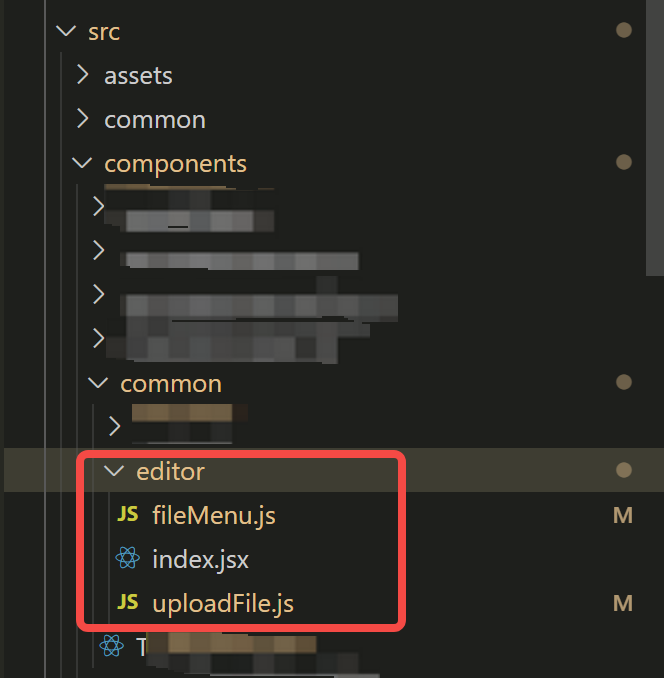
在components/common目錄下新建一個editor文件夾,該文件夾下是封裝的組件,
目錄結構如下:

下面直接貼代碼
2.1、index.jsx:
import React, { Component } from 'react';
import { message, Spin } from 'antd';
import Wangeditor from 'wangeditor';
import fileMenu from './fileMenu';
import $axios from '@/request';

/**
 * 對wangEditor進行封裝後的富文本編輯器組件,引用該組件時可傳入一下參數
 *    isUploadFile: 是否可上傳附件(自定義擴展菜單)
 *    defaultHtml: 默認初始化內容
 *    height: 設置編輯器高度
 *    uploadFileServer:附件上傳接口地址
 *    maxFileSize:上傳附件大小最大限制(單位:M)
 *    uploadImgServer:圖片上傳接口地址
 *    maxImgSize:上傳圖片大小最大限制(單位:M)
 *    menus: 可顯示的菜單項
 */
export default class Editor extends Component {
  constructor(props) {
    super(props)
    this.containerRef = React.createRef();
    this.state = {
      isUploading: false, //是否正在上傳附件或圖片
    }
  }

  componentDidMount = () => {
    const div = this.containerRef.current;
    const editor = new Wangeditor(div);
    editor.config.height = this.props?.height || 200;
    editor.config.menus = this.props?.menus || [
      'head', // 標題
      'bold', // 粗體
      'fontSize', // 字號
      'fontName', // 字體
      'italic', // 斜體
      'underline', // 下劃線
      'strikeThrough', // 刪除線
      'foreColor', // 文字顏色
      'backColor', // 背景顏色
      'lineHeight', // 行高
      'link', // 插入鏈接
      'list', // 列表
      'justify', // 對齊方式
      'quote', // 引用
      'emoticon', // 表情
      'image', // 插入圖片
      'table', // 表格
      // 'video', // 插入視頻
      // 'code', // 插入代碼
      // 'undo', // 撤銷
      // 'redo' // 重複
    ];

    this.editor = editor;
    this.setCustomConfig();
    editor.create();
    editor.txt.html(this?.props?.defaultHtml)
    // 要放在editor實例化之後創建上傳菜單
    this?.props?.isUploadFile &&
      fileMenu(
        editor,
        this.containerRef.current,
        {
          uploadFileServer: this.props?.uploadFileServer, // 附件上傳接口地址
          maxFileSize: this.props?.maxFileSize || 10,  // 限制附件最大尺寸(單位:M)
        },
        this.changeUploading
      );
  };


  changeUploading = (flag) => {
    this.setState({ isUploading: flag });
  }

  onChange = html => {
    this?.props?.onChange(html);
  };

  // 上傳圖片
  setCustomConfig = () => {
    const _this = this;
    const { customConfig } = this.props
    this.editor.customConfig = {
      // 關閉粘貼內容中的樣式
      pasteFilterStyle: false,
      // 忽略粘貼內容中的圖片
      pasteIgnoreImg: true,
      ...customConfig,
    }

    const uploadImgServer = this.props?.uploadImgServer; // 上傳圖片的地址
    const maxLength = 1; // 限制每次最多上傳圖片的個數
    const maxImgSize = 2; // 上傳圖片的最大大小(單位:M)
    const timeout = 1 * 60 * 1000 // 超時 1min
    let resultFiles = [];

    // this.editor.config.uploadImgMaxSize = maxImgSize * 1024 * 1024; // 上傳圖片大小2M
    this.editor.config.uploadImgMaxLength = maxLength; // 限制一次最多上傳 1 張圖片
    this.editor.config.customUploadImg = function (files, insert) { //上傳圖片demo
      _this.changeUploading(true);
      for (let file of files) {
        const name = file.name
        const size = file.size
        // chrome 低版本 name === undefined
        if (!name || !size) {
          _this.changeUploading(false);
          return;
        }
        if (maxImgSize * 1024 * 1024 < size) {
          // 上傳附件過大
          message.warning('上傳附件不可超過' + maxImgSize + 'M');
          _this.changeUploading(false);
          return;
        }
        // 驗證通過的加入結果列表
        resultFiles.push(file);
      }
      console.log(resultFiles)
      if (resultFiles.length > maxLength) {
        message.warning('一次最多上傳' + maxLength + '個文件');
        _this.changeUploading(false);
        return;
      }

      // files 是 input 中選中的文件列表
      const formData = new window.FormData();
      formData.append('file', files[0]);

      if (uploadImgServer && typeof uploadImgServer === 'string') {
        // 定義 xhr
        const xhr = new XMLHttpRequest()
        xhr.open('POST', uploadImgServer)
        // 設置超時
        xhr.timeout = timeout
        xhr.ontimeout = function () {
          message.error('上傳圖片超時')
        }
        // 監控 progress
        if (xhr.upload) {
          xhr.upload.onprogress = function (e) {
            let percent = void 0
            // 進度條
            if (e.lengthComputable) {
              percent = e.loaded / e.total
              console.log('上傳進度:', percent);
            }
          }
        }
        // 返回數據
        xhr.onreadystatechange = function () {
          let result = void 0
          if (xhr.readyState === 4) {
            if (xhr.status < 200 || xhr.status >= 300) {
              message.error('上傳失敗');
              _this.changeUploading(false);
              resultFiles = [];
              return;
            }
            result = xhr.responseText
            if ((typeof result === 'undefined' ? 'undefined' : typeof result) !== 'object') {
              try {
                result = JSON.parse(result)
              } catch (ex) {
                message.error('上傳失敗');
                _this.changeUploading(false);
                resultFiles = [];
                return;
              }
            }
            const res = result || []
            if (res?.code == 200) {
              // 上傳代碼返回結果之後,將圖片插入到編輯器中
              insert(res?.data?.url || '');
              _this.changeUploading(false);
              resultFiles = [];
            }
          }
        }
        // 自定義 headers
        xhr.setRequestHeader('token', sessionStorage.getItem('token'));

        // 跨域傳 cookie
        xhr.withCredentials = false
        // 發送請求
        xhr.send(formData);
      }
    };
  };
  render() {
    return (
      <Spin spinning={this.state.isUploading} tip={"上傳中……"}>
        <div ref={this.containerRef} />
      </Spin>
    );
  }
}
2.2、fileMenu.js:
import uploadFile from './uploadFile';
import fileImg from '@/assets/img/file.png';

/**
 * 擴展 上傳附件的功能
  editor: wangEdit的實例
  editorSelector: wangEdit掛載點的節點
  options: 一些配置
*/
export default (editor, editorSelector, options, changeUploading) => {
  editor.fileMenu = {
    init: function (editor, editorSelector) {
      const div = document.createElement('div');
      div.className = 'w-e-menu';
      div.style.position = 'relative';
      div.setAttribute('data-title', '附件');
      const rdn = new Date().getTime();
      div.onclick = function () {
        document.getElementById(`up-${rdn}`).click();
      }

      const input = document.createElement('input');
      input.style.position = 'absolute';
      input.style.top = '0px';
      input.style.left = '0px';
      input.style.width = '40px';
      input.style.height = '40px';
      input.style.zIndex = 10;
      input.type = 'file';
      input.name = 'file';
      input.id = `up-${rdn}`;
      input.className = 'upload-file-input';

      div.innerHTML = `<span class="upload-file-span" style="position:absolute;top:0px;left:0px;width:40px;height:40px;z-index:20;background:#fff;"><img src=${fileImg} style="width:15px;margin-top:12px;" /></span>`;
      div.appendChild(input);
      editorSelector.getElementsByClassName('w-e-toolbar')[0].append(div);

      input.onchange = e => {
        changeUploading(true);
        // 使用uploadFile上傳文件
        uploadFile(e.target.files, {
          uploadFileServer: options?.uploadFileServer, // 附件上傳接口地址
          maxFileSize: options?.maxFileSize, //限制附件最大尺寸
          onOk: data => {
            let aNode = '<p><a href=' + data.url + ' download=' + data.name + '>' + data.name + '</a></p>';
            editor.txt.append(aNode);
            changeUploading(false);
            // editor.cmd.do(aNode, '<p>'+aNode+'</p>');
            // document.insertHTML(aNode)
          },
          onFail: err => {
            changeUploading(false);
            console.log(err);
          },
          // 上傳進度,後期可添加上傳進度條
          onProgress: percent => {
            console.log(percent);
          },
        });
      };
    },
  }

  // 創建完之後立即實例化
  editor.fileMenu.init(editor, editorSelector)
}
2.3、uploadFile.js:
import { message } from 'antd'

/**
 * 上傳附件功能的實現
 * @param {*} files
 * @param {*} options
 * @returns
 */
function uploadFile(files, options) {
  if (!files || !files.length) {
    return
  }
  let uploadFileServer = options?.uploadFileServer; //上傳地址
  const maxFileSize = options?.maxFileSize || 10;
  const maxSize = maxFileSize * 1024 * 1024 //100M
  const maxLength = 1; // 目前限制單次只可上傳一個附件
  const timeout = 1 * 60 * 1000 // 超時 1min
  // ------------------------------ 驗證文件信息 ------------------------------
  const resultFiles = [];
  for (let file of files) {
    const name = file.name;
    const size = file.size;
    // chrome 低版本 name === undefined
    if (!name || !size) {
      options.onFail('');
      return
    }
    if (maxSize < size) {
      // 上傳附件過大
      message.warning('上傳附件不可超過' + maxFileSize + 'M');
      options.onFail('上傳附件不可超過' + maxFileSize + 'M');
      return
    }
    // 驗證通過的加入結果列表
    resultFiles.push(file);
  }
  if (resultFiles.length > maxLength) {
    message.warning('一次最多上傳' + maxLength + '個文件');
    options.onFail('一次最多上傳' + maxLength + '個文件');
    return
  }


  // 添加附件數據(目前只做單文件上傳)
  const formData = new FormData()
  formData.append('file', files[0]);
  // ------------------------------ 上傳附件 ------------------------------
  if (uploadFileServer && typeof uploadFileServer === 'string') {
    // 定義 xhr
    const xhr = new XMLHttpRequest();
    xhr.open('POST', uploadFileServer);
    // 設置超時
    xhr.timeout = timeout;
    xhr.ontimeout = function () {
      message.error('上傳附件超時');
      options.onFail('上傳附件超時');
    }
    // 監控 progress
    if (xhr.upload) {
      xhr.upload.onprogress = function (e) {
        let percent = void 0;
        // 進度條
        if (e.lengthComputable) {
          percent = e.loaded / e.total;
          console.log('上傳進度:', percent);
          if (options.onProgress && typeof options.onProgress === 'function') {
            options.onProgress(percent);
          }
        }
      }
    }
    // 返回數據
    xhr.onreadystatechange = function () {
      let result = void 0;
      if (xhr.readyState === 4) {
        if (xhr.status < 200 || xhr.status >= 300) {
          // hook - error
          if (options.onFail && typeof options.onFail === 'function') {
            options.onFail(result);
          }
          message.error('上傳失敗');
          return;
        }
        result = xhr.responseText
        if ((typeof result === 'undefined' ? 'undefined' : typeof result) !== 'object') {
          try {
            result = JSON.parse(result);
          } catch (ex) {
            // hook - fail
            if (options.onFail && typeof options.onFail === 'function') {
              options.onFail(result);
            }
            message.error('上傳失敗');
            return;
          }
        }
        const res = result || []
        if (res?.code == 200) {
          options.onOk && options.onOk(res.data);
        }
      }
    }
    // 自定義 headers
    xhr.setRequestHeader('token', sessionStorage.getItem('token'));

    // 跨域傳 cookie
    xhr.withCredentials = false;
    // 發送請求
    xhr.send(formData);
  }
}
export default uploadFile
3、使用富文本編輯器editor組件
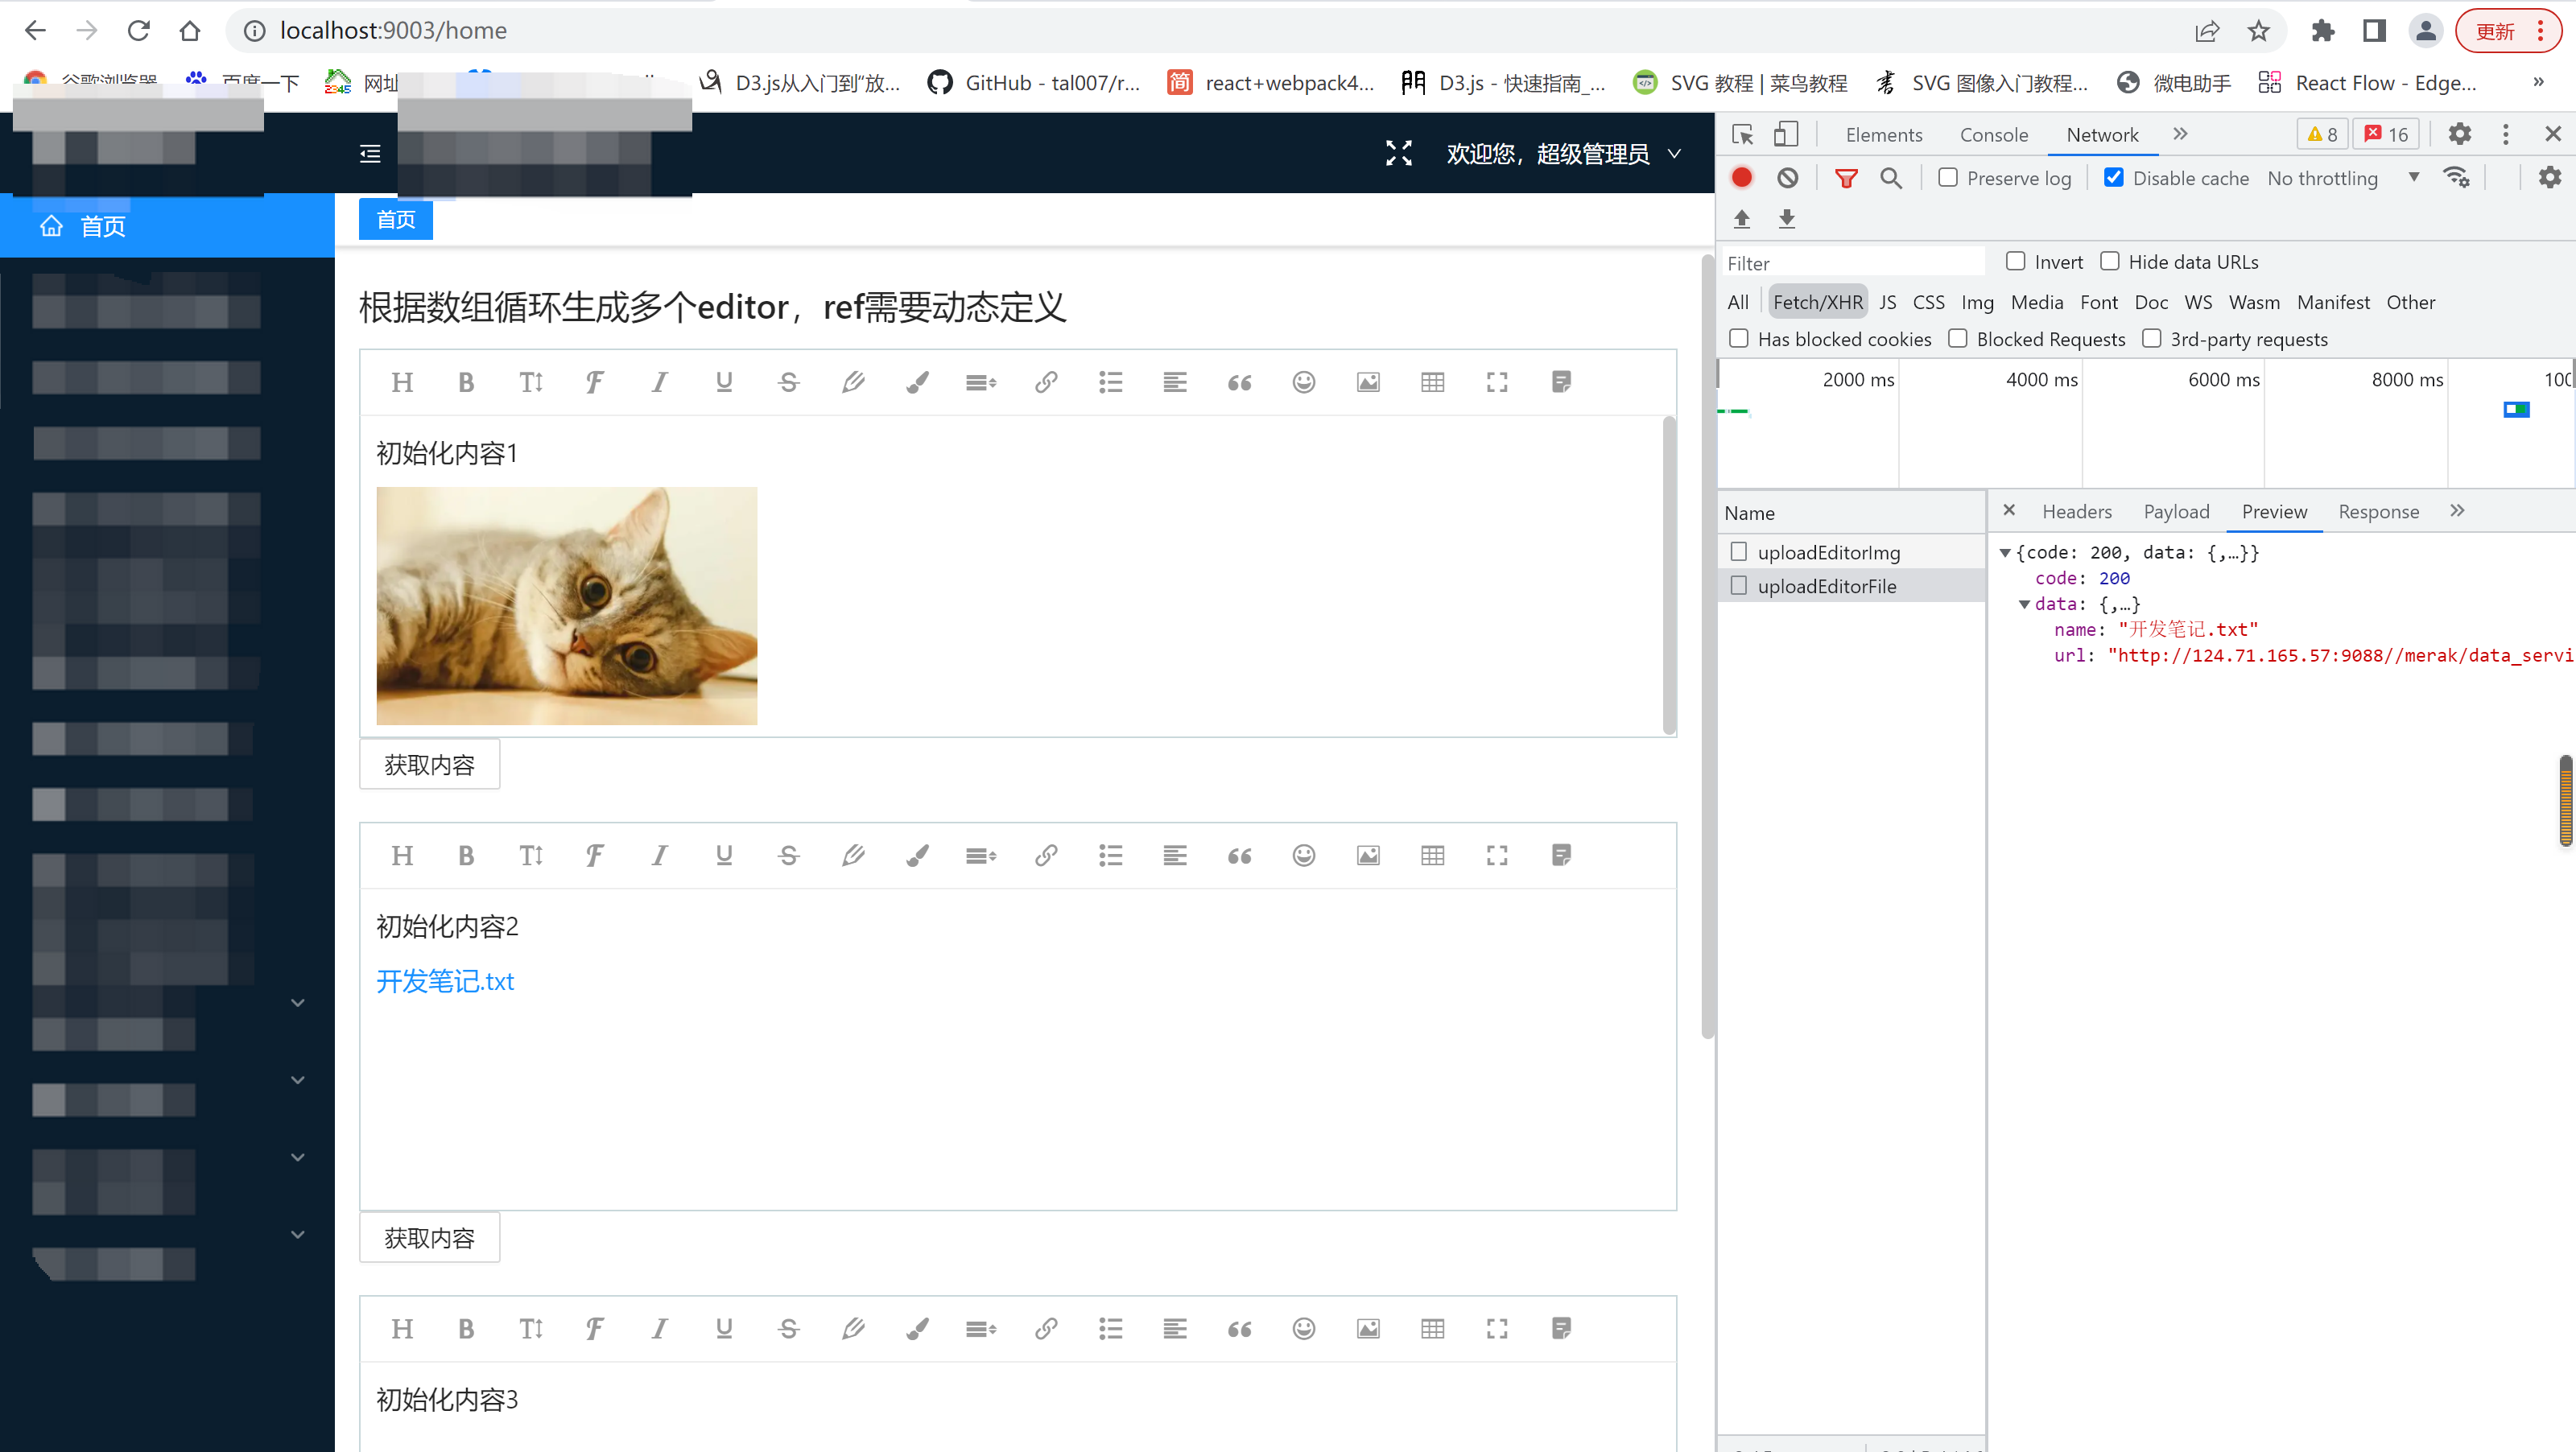
在首頁Home.jsx里測試使用editor組件,在這裡,演示在同一個頁面使用多個editor組件,還是直接上代碼:
3.1、Home.jsx:
import React, { createRef } from "react";
import { connect } from 'react-redux';
import { Button } from 'antd';

import Editor from '@/components/common/editor';

class Home extends React.Component {
  constructor(props) {
    super(props);
    this.editorRefSingle = createRef();
    this.state = {
      editorList: []
    }
  }

  componentDidMount() {
    let list = [
      { id: 1, content: '<p>初始化內容1</p>' },
      { id: 2, content: '<p>初始化內容2</p>' },
      { id: 3, content: '<p>初始化內容3</p>' }
    ];
    list.forEach(item => {
      this['editorRef' + item.id] = createRef();
    })
    this.setState({
      editorList: list
    })
  }

  // 獲取內容(數組多個editor)
  getEditorContent = (item) => {
    let editorHtml = this['editorRef' + item.id].current.editor.txt.html();
    console.log('從多個中獲取一個:', editorHtml, item);
  }

  // 獲取內容(單個editor)
  getEditorContentSingle = () => {
    let editorHtml = this.editorRefSingle.current.editor.txt.html();
    console.log('獲取單個:', editorHtml);
  }


  render() {
    return (
      <div className="main-container home" style={{ margin: 0, height: '100%' }}>
        {/* editor的測試demo */}
        <div style={{paddingBottom:10}}>
          <h2>根據數組循環生成多個editor,ref需要動態定義</h2>
          {
            this.state.editorList.map((item) => (
              <div className="mb_20" key={item.id}>
                <Editor
                  ref={this['editorRef' + item.id]}
                  isUploadFile={true}
                  defaultHtml={item.content}
                  uploadFileServer="//rap2api.taobao.org/app/mock/297868/libo/test1/uploadEditorFile"
                  maxFileSize={10}
                  uploadImgServer="//rap2api.taobao.org/app/mock/297868/libo/test1/uploadEditorImg"
                  maxImgSize={2}
                />
                <Button onClick={() => this.getEditorContent(item)}>獲取內容</Button>
              </div>
            ))
          }

          <h2>單個editor</h2>
          <div className="mb_20">
            <Editor
              ref={this.editorRefSingle}
              isUploadFile={true}
              defaultHtml="<p>初始化內容哈哈哈</p>"
              height={100}
              uploadFileServer="//rap2api.taobao.org/app/mock/297868/libo/test1/uploadEditorFile"
              maxFileSize={5}
              uploadImgServer="//rap2api.taobao.org/app/mock/297868/libo/test1/uploadEditorImg"
              maxImgSize={2}
              menus={['head', // 標題
                'bold', // 粗體
                'fontSize', // 字號
                'fontName', // 字體
                'italic', // 斜體
                'underline', // 下劃線
                'foreColor', // 文字顏色
                'backColor', // 背景顏色
                'link', // 插入鏈接
                'list', // 列表
                'justify', // 對齊方式
                'image', // 插入圖片
                'table', // 表格
              ]}
            />
            <Button onClick={this.getEditorContentSingle}>獲取內容</Button>
          </div>
        </div>
      </div>
    )
  }
}

const mapStateToProps = (state) => {
  return {
    userInfo: state.userInfo.user,
    menuC: state.userInfo.menuC,
  }
}

export default connect(mapStateToProps, {

})(Home);
4、效果


備註:代碼里的上傳圖片和上傳附件的接口地址是維護在rap2上的mock數據。根據需要改成自己的真實接口即可。


