8、Spring Boot任務
- 2020 年 11 月 25 日
- 筆記
- springboot
1.異步任務
在Java應用中,絕大多數情況下都是通過同步的方式來實現交互處理的;但是在處理與第三方系統交互的時候,容易造成響應遲緩的情況,之前大部分都是使用多線程來完成此類任務,其實,在Spring 3.x之後,就已經內置了@Async來完美解決這個問題。
主要使用兩個註解完成,@EnableAysnc、@Aysnc
(1).Springboot04TaskApplication.java
|
@EnableAsync //開啟異步註解功能 @SpringBootApplication public class Springboot04TaskApplication {
public static void main(String[] args) { SpringApplication.run(Springboot04TaskApplication.class, args); }
} |
(2).AsyncController.java
|
package com.hosystem.task.controller;
import com.hosystem.task.service.AsyncService; import org.springframework.beans.factory.annotation.Autowired; import org.springframework.web.bind.annotation.GetMapping; import org.springframework.web.bind.annotation.RestController;
@RestController public class AsyncController {
@Autowired AsyncService asyncService;
@GetMapping(“/hello”) public String hello(){ asyncService.hello(); return “success”; } } |
(3).AsyncService.java
|
package com.hosystem.task.service;
import org.springframework.scheduling.annotation.Async; import org.springframework.stereotype.Service;
@Service public class AsyncService {
//通知spring這是一個異步方法 @Async public void hello(){ try { Thread.sleep(3000); } catch (InterruptedException e) { e.printStackTrace(); } System.out.println(“處理數據….”); } } |

2.定時任務
開發中經常需要執行一些定時任務,比如需要在每天凌晨時候,分析一次前一天的日誌信息。Spring為我們提供了異步執行任務調度的方式,提供TaskExecutor 、TaskScheduler 接口。
使用到的註解有兩個,@EnableScheduling、@Scheduled
Cron表達式:

(1).ScheduledService.java
|
package com.hosystem.task.service;
import org.springframework.scheduling.annotation.Scheduled; import org.springframework.stereotype.Service;
@Service public class ScheduledService {
/** * second(秒), minute(分), hour(時), day of month(日), month(月), day of week(周幾). * 0 * * * * MON-FRI * [0 0/5 14,18 * * ?]:每天14點整,和18點整,每隔5分鐘執行一次 * [0 15 10 ? * 1-6]:每個月的周一至周六10:15分執行一次 * [0 0 2 ? * 6L]:每個月的最後一個周六凌晨2點執行一次 * [0 0 2 LW * ?]:每個月的最後一個工作日凌晨2點執行一次 * [0 0 2-4 ? * 1#1]:每個月的第一個周一凌晨2點到4點期間,每個整點都執行一次; */ // @Scheduled(cron = “0 * * * * MON-SAT”) //@Scheduled(cron = “0,1,2,3,4 * * * * MON-SAT”) // @Scheduled(cron = “0-4 * * * * MON-SAT”) @Scheduled(cron = “0/4 * * * * 0-7”) //每4秒執行一次 public void hello() { System.out.println(“hello …”); } } |
(2).Springboot04TaskApplication.java
|
package com.hosystem.task;
import org.springframework.boot.SpringApplication; import org.springframework.boot.autoconfigure.SpringBootApplication; import org.springframework.scheduling.annotation.EnableAsync; import org.springframework.scheduling.annotation.EnableScheduling; import org.springframework.scheduling.annotation.Scheduled;
@EnableScheduling //開啟基於註解定時任務 @SpringBootApplication public class Springboot04TaskApplication {
public static void main(String[] args) { SpringApplication.run(Springboot04TaskApplication.class, args); }
} |
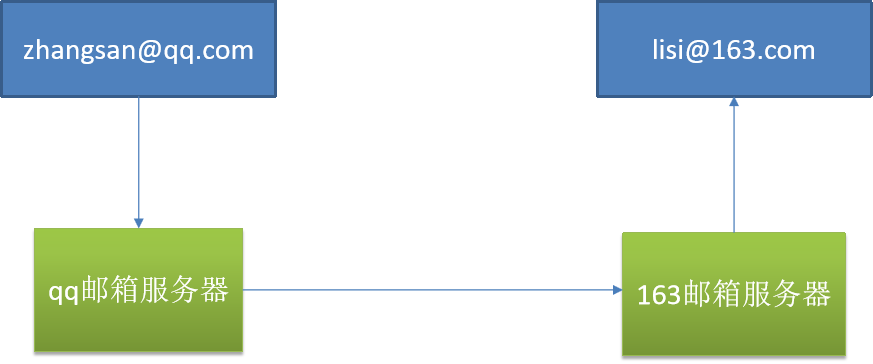
3.郵件任務
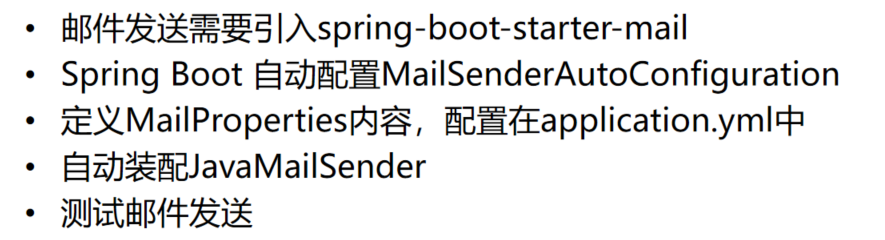
(1).導入pom.xml
|
<!–mail–> <dependency> <groupId>org.springframework.boot</groupId> <artifactId>spring-boot-starter-mail</artifactId> </dependency> |
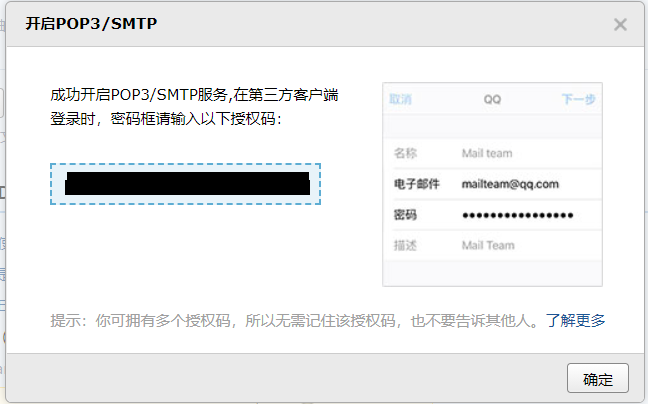
(2).開啟POP3/SMTP
(3).開啟IMAP/SMTP
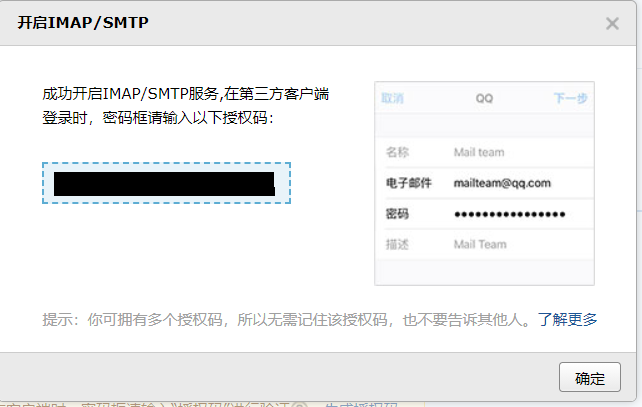
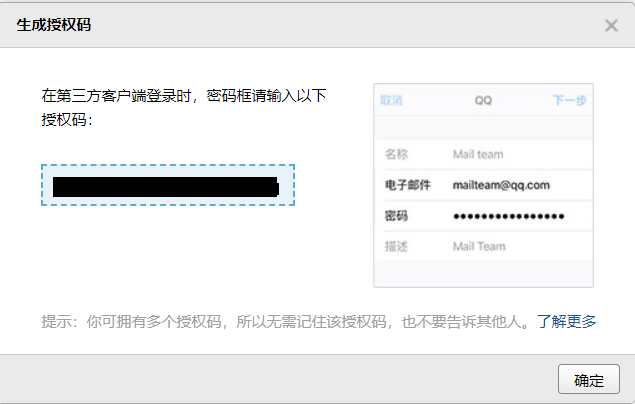
(4).生成授權碼
(5).applicaiton.properties
|
server.port=80
#配置郵箱信息 spring.mail.username=[email protected] #授權碼 spring.mail.password=password #smtp地址 spring.mail.host=smtp.qq.com spring.mail.protocol=smtp spring.mail.properties.mail.smtp.ssl.enable=true |
(6).Springboot04TaskApplicationTests.java
SendMailTest測試郵箱發送,一定要在mail中開啟SMTP
|
package com.hosystem.task;
import org.junit.jupiter.api.Test; import org.springframework.beans.factory.annotation.Autowired; import org.springframework.boot.test.context.SpringBootTest; import org.springframework.mail.SimpleMailMessage; import org.springframework.mail.javamail.JavaMailSenderImpl; import org.springframework.mail.javamail.MimeMessageHelper;
import javax.mail.internet.MimeMessage; import java.io.File;
@SpringBootTest class Springboot04TaskApplicationTests {
@Autowired JavaMailSenderImpl mailSender;
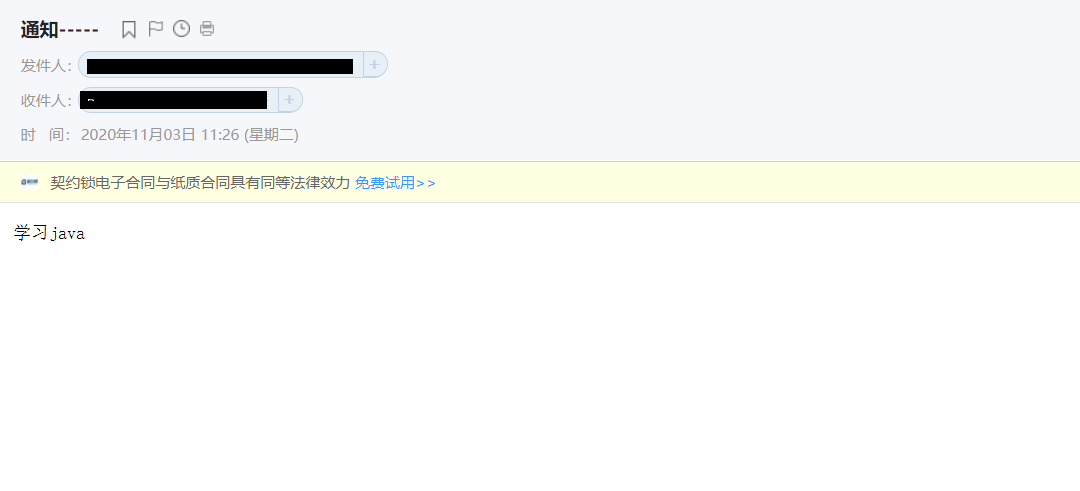
@Test public void contextLoads() { SimpleMailMessage simpleMailMessage = new SimpleMailMessage(); //郵件設置 simpleMailMessage.setSubject(“通知—–“); simpleMailMessage.setText(“學習java”); //setTo:目的郵件地址 setFrom:發送郵件地址 simpleMailMessage.setTo(“[email protected]”); simpleMailMessage.setFrom(“username@qq.com”); mailSender.send(simpleMailMessage); }
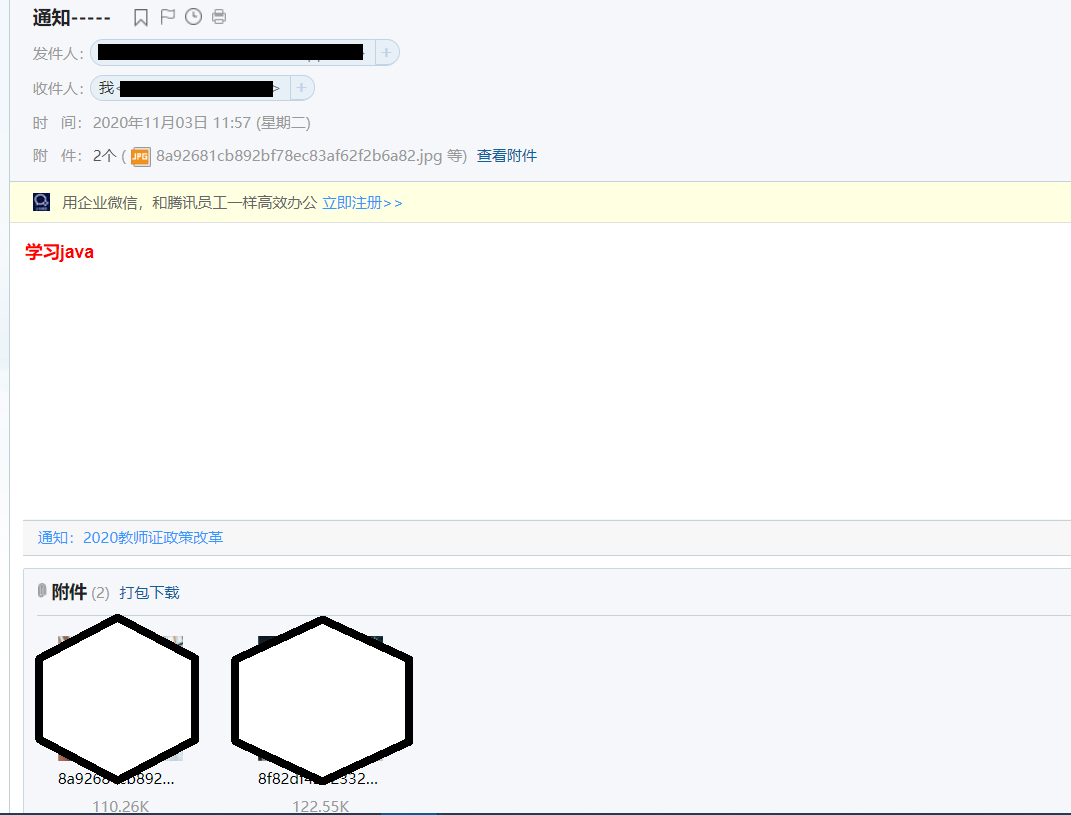
@Test public void test01() throws Exception{ //1.創建一個複雜的消息郵件 MimeMessage mimeMessage = mailSender.createMimeMessage(); MimeMessageHelper helper = new MimeMessageHelper(mimeMessage, true);
//郵件設置 helper.setSubject(“通知—–“);
/** * public void setText(String text) throws MessagingException {this.setText(text, false); } */ helper.setText(“<b style=’color:red’>學習java</b>”,true); //setTo:目的郵件地址 setFrom:發送郵件地址 helper.setTo(“username@163.com”); helper.setFrom(“username@qq.com”);
//上傳文件 helper.addAttachment(“8a92681cb892bf78ec83af62f2b6a82.jpg”,new File(“E:\\Users\\Asuna\\Desktop\\html\\8a92681cb892bf78ec83af62f2b6a82.jpg”)); helper.addAttachment(“8f82df421233241732db6ec6baed07e.jpg”,new File(“E:\\Users\\Asuna\\Desktop\\html\\8f82df421233241732db6ec6baed07e.jpg”));
mailSender.send(mimeMessage); }
} |