1.Sentinel源码分析—FlowRuleManager加载规则做了什么?
- 2019 年 10 月 3 日
- 笔记
最近我很好奇在RPC中限流熔断降级要怎么做,hystrix已经1年多没有更新了,感觉要被遗弃的感觉,那么我就把眼光聚焦到了阿里的Sentinel,顺便学习一下阿里的源代码。
这一章我主要讲的是FlowRuleManager在加载FlowRule的时候做了什么,下一篇正式讲Sentinel如何控制并发数的。
下面我给出一个简化版的demo,这个demo只能单线程访问,先把过程讲清楚再讲多线程版本。
初始化流量控制的规则:限定20个线程并发访问
public class FlowThreadDemo { private static AtomicInteger pass = new AtomicInteger(); private static AtomicInteger block = new AtomicInteger(); private static AtomicInteger total = new AtomicInteger(); private static AtomicInteger activeThread = new AtomicInteger(); private static volatile boolean stop = false; private static final int threadCount = 100; private static int seconds = 60 + 40; private static volatile int methodBRunningTime = 2000; public static void main(String[] args) throws Exception { System.out.println( "MethodA will call methodB. After running for a while, methodB becomes fast, " + "which make methodA also become fast "); tick(); initFlowRule(); Entry methodA = null; try { TimeUnit.MILLISECONDS.sleep(5); methodA = SphU.entry("methodA"); activeThread.incrementAndGet(); //Entry methodB = SphU.entry("methodB"); TimeUnit.MILLISECONDS.sleep(methodBRunningTime); //methodB.exit(); pass.addAndGet(1); } catch (BlockException e1) { block.incrementAndGet(); } catch (Exception e2) { // biz exception } finally { total.incrementAndGet(); if (methodA != null) { methodA.exit(); activeThread.decrementAndGet(); } } } private static void initFlowRule() { List<FlowRule> rules = new ArrayList<FlowRule>(); FlowRule rule1 = new FlowRule(); rule1.setResource("methodA"); // set limit concurrent thread for 'methodA' to 20 rule1.setCount(20); rule1.setGrade(RuleConstant.FLOW_GRADE_THREAD); rule1.setLimitApp("default"); rules.add(rule1); FlowRuleManager.loadRules(rules); } private static void tick() { Thread timer = new Thread(new TimerTask()); timer.setName("sentinel-timer-task"); timer.start(); } static class TimerTask implements Runnable { @Override public void run() { long start = System.currentTimeMillis(); System.out.println("begin to statistic!!!"); long oldTotal = 0; long oldPass = 0; long oldBlock = 0; while (!stop) { try { TimeUnit.SECONDS.sleep(1); } catch (InterruptedException e) { } long globalTotal = total.get(); long oneSecondTotal = globalTotal - oldTotal; oldTotal = globalTotal; long globalPass = pass.get(); long oneSecondPass = globalPass - oldPass; oldPass = globalPass; long globalBlock = block.get(); long oneSecondBlock = globalBlock - oldBlock; oldBlock = globalBlock; System.out.println(seconds + " total qps is: " + oneSecondTotal); System.out.println(TimeUtil.currentTimeMillis() + ", total:" + oneSecondTotal + ", pass:" + oneSecondPass + ", block:" + oneSecondBlock + " activeThread:" + activeThread.get()); if (seconds-- <= 0) { stop = true; } if (seconds == 40) { System.out.println("method B is running much faster; more requests are allowed to pass"); methodBRunningTime = 20; } } long cost = System.currentTimeMillis() - start; System.out.println("time cost: " + cost + " ms"); System.out.println("total:" + total.get() + ", pass:" + pass.get() + ", block:" + block.get()); System.exit(0); } } } FlowRuleManager
在这个demo中,首先会调用FlowRuleManager#loadRules进行规则注册
我们先聊一下规则配置的代码:
private static void initFlowRule() { List<FlowRule> rules = new ArrayList<FlowRule>(); FlowRule rule1 = new FlowRule(); rule1.setResource("methodA"); // set limit concurrent thread for 'methodA' to 20 rule1.setCount(20); rule1.setGrade(RuleConstant.FLOW_GRADE_THREAD); rule1.setLimitApp("default"); rules.add(rule1); FlowRuleManager.loadRules(rules); }这段代码里面先定义一个流量控制规则,然后调用loadRules进行注册。
FlowRuleManager初始化
FlowRuleManager
FlowRuleManager 类里面有几个静态参数:
//规则集合 private static final Map<String, List<FlowRule>> flowRules = new ConcurrentHashMap<String, List<FlowRule>>(); //监听器 private static final FlowPropertyListener LISTENER = new FlowPropertyListener(); //用来监听配置是否发生变化 private static SentinelProperty<List<FlowRule>> currentProperty = new DynamicSentinelProperty<List<FlowRule>>(); //创建一个延迟的线程池 @SuppressWarnings("PMD.ThreadPoolCreationRule") private static final ScheduledExecutorService SCHEDULER = Executors.newScheduledThreadPool(1, new NamedThreadFactory("sentinel-metrics-record-task", true)); static { //设置监听 currentProperty.addListener(LISTENER); //每一秒钟调用一次MetricTimerListener的run方法 SCHEDULER.scheduleAtFixedRate(new MetricTimerListener(), 0, 1, TimeUnit.SECONDS); }在初始化的时候会为静态变量都赋上值。
在新建MetricTimerListener实例的时候做了很多事情,容我慢慢分析。
MetricTimerListener
public class MetricTimerListener implements Runnable { private static final MetricWriter metricWriter = new MetricWriter(SentinelConfig.singleMetricFileSize(), SentinelConfig.totalMetricFileCount()); .... }首次初始化MetricTimerListener的时候会创建一个MetricWriter实例。我们先看传入的两个参数SentinelConfig.singleMetricFileSize()和SentinelConfig.totalMetricFileCount()。
SentinelConfig在首次初始化的时候会初始化静态代码块:
SentinelConfig
static { try { initialize(); loadProps(); resolveAppType(); RecordLog.info("[SentinelConfig] Application type resolved: " + appType); } catch (Throwable ex) { RecordLog.warn("[SentinelConfig] Failed to initialize", ex); ex.printStackTrace(); } }这段静态代码块主要是设置一下配置参数。
SentinelConfig#singleMetricFileSize
SentinelConfig#totalMetricFileCount
public static long singleMetricFileSize() { try { //获取的是 1024 * 1024 * 50 return Long.parseLong(props.get(SINGLE_METRIC_FILE_SIZE)); } catch (Throwable throwable) { RecordLog.warn("[SentinelConfig] Parse singleMetricFileSize fail, use default value: " + DEFAULT_SINGLE_METRIC_FILE_SIZE, throwable); return DEFAULT_SINGLE_METRIC_FILE_SIZE; } } public static int totalMetricFileCount() { try { //默认是:6 return Integer.parseInt(props.get(TOTAL_METRIC_FILE_COUNT)); } catch (Throwable throwable) { RecordLog.warn("[SentinelConfig] Parse totalMetricFileCount fail, use default value: " + DEFAULT_TOTAL_METRIC_FILE_COUNT, throwable); return DEFAULT_TOTAL_METRIC_FILE_COUNT; } } singleMetricFileSize方法和totalMetricFileCount主要是获取SentinelConfig在静态变量里设入得参数。
然后我们进入到MetricWriter的构造方法中:
MetricWriter
public MetricWriter(long singleFileSize, int totalFileCount) { if (singleFileSize <= 0 || totalFileCount <= 0) { throw new IllegalArgumentException(); } RecordLog.info( "[MetricWriter] Creating new MetricWriter, singleFileSize=" + singleFileSize + ", totalFileCount=" + totalFileCount); // /Users/luozhiyun/logs/csp/ this.baseDir = METRIC_BASE_DIR; File dir = new File(baseDir); if (!dir.exists()) { dir.mkdirs(); } long time = System.currentTimeMillis(); //转换成秒 this.lastSecond = time / 1000; //singleFileSize = 1024 * 1024 * 50 this.singleFileSize = singleFileSize; //totalFileCount = 6 this.totalFileCount = totalFileCount; try { this.timeSecondBase = df.parse("1970-01-01 00:00:00").getTime() / 1000; } catch (Exception e) { RecordLog.warn("[MetricWriter] Create new MetricWriter error", e); } }构造器里面主要是创建文件夹,设置单个文件大小,总文件个数,设置时间。
讲完了MetricTimerListener的静态属性,现在我们来讲MetricTimerListener的run方法。
MetricTimerListener#run
public void run() { //这个run方法里面主要是做定时的数据采集,然后写到log文件里去 Map<Long, List<MetricNode>> maps = new TreeMap<Long, List<MetricNode>>(); //遍历集群节点 for (Entry<ResourceWrapper, ClusterNode> e : ClusterBuilderSlot.getClusterNodeMap().entrySet()) { String name = e.getKey().getName(); ClusterNode node = e.getValue(); Map<Long, MetricNode> metrics = node.metrics(); aggregate(maps, metrics, name); } //汇总统计的数据 aggregate(maps, Constants.ENTRY_NODE.metrics(), Constants.TOTAL_IN_RESOURCE_NAME); if (!maps.isEmpty()) { for (Entry<Long, List<MetricNode>> entry : maps.entrySet()) { try { //写入日志中 metricWriter.write(entry.getKey(), entry.getValue()); } catch (Exception e) { RecordLog.warn("[MetricTimerListener] Write metric error", e); } } } }上面的run方法其实就是每秒把统计的数据写到日志里去。其中Constants.ENTRY_NODE.metrics()负责统计数据,我们下面分析以下这个方法。
Constants.ENTRY_NODE这句代码会实例化一个ClusterNode实例。
ClusterNode是继承StatisticNode,统计数据时在StatisticNode中实现的。
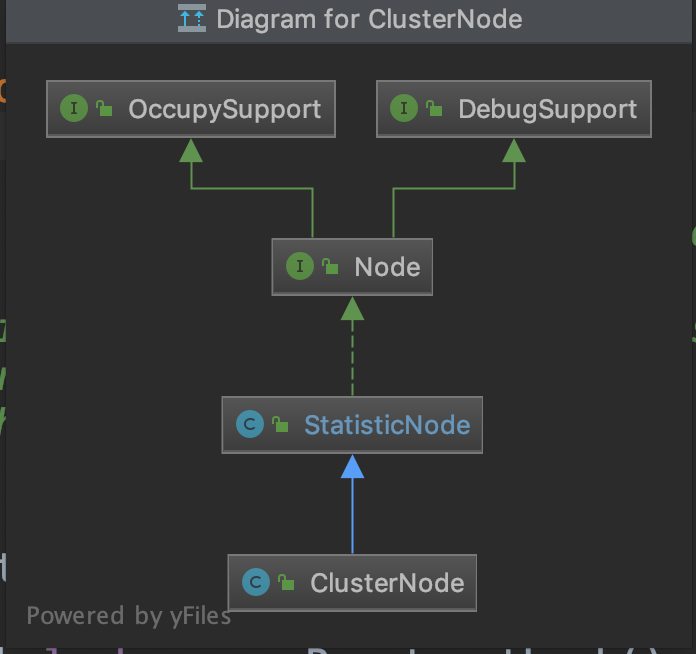
Metrics方法也是调用的StatisticNode方法。
我们先看看StatisticNode的全局变量
public class StatisticNode implements Node { //构建一个统计60s的数据,设置60个滑动窗口,每个窗口1s //这里创建的是BucketLeapArray实例来进行统计 private transient volatile Metric rollingCounterInSecond = new ArrayMetric(SampleCountProperty.SAMPLE_COUNT, IntervalProperty.INTERVAL); //上次统计的时间戳 private long lastFetchTime = -1; ..... }然后我们看看StatisticNode的metrics方法:
StatisticNode#metrics
public Map<Long, MetricNode> metrics() { // The fetch operation is thread-safe under a single-thread scheduler pool. long currentTime = TimeUtil.currentTimeMillis(); //获取当前时间的滑动窗口的开始时间 currentTime = currentTime - currentTime % 1000; Map<Long, MetricNode> metrics = new ConcurrentHashMap<>(); //获取滑动窗口里统计的数据 List<MetricNode> nodesOfEverySecond = rollingCounterInMinute.details(); long newLastFetchTime = lastFetchTime; // Iterate metrics of all resources, filter valid metrics (not-empty and up-to-date). for (MetricNode node : nodesOfEverySecond) { //筛选符合的滑动窗口的节点 if (isNodeInTime(node, currentTime) && isValidMetricNode(node)) { metrics.put(node.getTimestamp(), node); //选出符合节点里最大的时间戳数据赋值 newLastFetchTime = Math.max(newLastFetchTime, node.getTimestamp()); } } //设置成滑动窗口里统计的最大时间 lastFetchTime = newLastFetchTime; return metrics; }这个方法主要是调用rollingCounterInMinute进行数据的统计,然后筛选出有效的统计结果返回。
我们进入到rollingCounterInMinute是ArrayMetric的实例,所以我们进入到ArrayMetric的details方法中
ArrayMetric#details
public List<MetricNode> details() { List<MetricNode> details = new ArrayList<MetricNode>(); //调用BucketLeapArray data.currentWindow(); //列出统计结果 List<WindowWrap<MetricBucket>> list = data.list(); for (WindowWrap<MetricBucket> window : list) { if (window == null) { continue; } //对统计结果进行封装 MetricNode node = new MetricNode(); //代表一秒内被流量控制的请求数量 node.setBlockQps(window.value().block()); //则是一秒内业务本身异常的总和 node.setExceptionQps(window.value().exception()); // 代表一秒内到来到的请求 node.setPassQps(window.value().pass()); //代表一秒内成功处理完的请求; long successQps = window.value().success(); node.setSuccessQps(successQps); //代表一秒内该资源的平均响应时间 if (successQps != 0) { node.setRt(window.value().rt() / successQps); } else { node.setRt(window.value().rt()); } //设置统计窗口的开始时间 node.setTimestamp(window.windowStart()); node.setOccupiedPassQps(window.value().occupiedPass()); details.add(node); } return details; }这个方法首先会调用dat.currentWindow()设置当前时间窗口到窗口列表里去。然后调用data.list()列出所有的窗口数据,然后遍历不为空的窗口数据封装成MetricNode返回。
data是BucketLeapArray的实例,BucketLeapArray继承了LeapArray,主要的统计都是在LeapArray中进行的,所以我们直接看看LeapArray的currentWindow方法。
LeapArray#currentWindow
public WindowWrap<T> currentWindow(long timeMillis) { if (timeMillis < 0) { return null; } //通过当前时间判断属于哪个窗口 int idx = calculateTimeIdx(timeMillis); //计算出窗口开始时间 // Calculate current bucket start time. long windowStart = calculateWindowStart(timeMillis); while (true) { //获取数组里的老数据 WindowWrap<T> old = array.get(idx); if (old == null) { WindowWrap<T> window = new WindowWrap<T>(windowLengthInMs, windowStart, newEmptyBucket(timeMillis)); if (array.compareAndSet(idx, null, window)) { // Successfully updated, return the created bucket. return window; } else { // Contention failed, the thread will yield its time slice to wait for bucket available. Thread.yield(); } // 如果对应时间窗口的开始时间与计算得到的开始时间一样 // 那么代表当前即是我们要找的窗口对象,直接返回 } else if (windowStart == old.windowStart()) { return old; } else if (windowStart > old.windowStart()) { //如果当前的开始时间小于原开始时间,那么就更新到新的开始时间 if (updateLock.tryLock()) { try { // Successfully get the update lock, now we reset the bucket. return resetWindowTo(old, windowStart); } finally { updateLock.unlock(); } } else { // Contention failed, the thread will yield its time slice to wait for bucket available. Thread.yield(); } } else if (windowStart < old.windowStart()) { //一般来说不会走到这里 // Should not go through here, as the provided time is already behind. return new WindowWrap<T>(windowLengthInMs, windowStart, newEmptyBucket(timeMillis)); } } }这个方法里首先会传入一个timeMillis是当前的时间戳。然后调用calculateTimeIdx
private int calculateTimeIdx(/*@Valid*/ long timeMillis) { //计算当前时间能够落在array的那个节点上 long timeId = timeMillis / windowLengthInMs; // Calculate current index so we can map the timestamp to the leap array. return (int)(timeId % array.length()); }calculateTimeIdx方法用当前的时间戳除以每个窗口的大小,再和array数据取模。array数据是一个容量为60的数组,代表被统计的60秒分割的60个小窗口。
举例:
例如当前timeMillis = 1567175708975
timeId = 1567175708975/1000 = 1567175708
timeId % array.length() = 1567175708%60 = 8
也就是说当前的时间窗口是第八个。
然后调用calculateWindowStart计算当前时间开始时间
protected long calculateWindowStart(/*@Valid*/ long timeMillis) { //用当前时间减去窗口大小,计算出窗口开始时间 return timeMillis - timeMillis % windowLengthInMs; }接下来就是一个while循环:
在看while循环之前我们看一下array数组里面是什么样的对象
WindowWrap<T> window = new WindowWrap<T>(windowLengthInMs, windowStart, newEmptyBucket(timeMillis));
WindowWrap是一个时间窗口的包装对象,里面包含时间窗口的长度,这里是1000;窗口开始时间;窗口内的数据实体,是调用newEmptyBucket方法返回一个MetricBucket。
MetricBucket
public class MetricBucket { private final LongAdder[] counters; //默认4900 private volatile long minRt; public MetricBucket() { MetricEvent[] events = MetricEvent.values(); this.counters = new LongAdder[events.length]; for (MetricEvent event : events) { counters[event.ordinal()] = new LongAdder(); } //初始化minRt,默认是4900 initMinRt(); } ... }MetricEvent是一个枚举类:
public enum MetricEvent { PASS, BLOCK, EXCEPTION, SUCCESS, RT, OCCUPIED_PASS }也就是是MetricBucket为每个窗口通过一个内部数组counters统计了这个窗口内的所有数据。
接下来我们来讲一下while循环里所做的事情:
- 从array里获取bucket节点
- 如果节点已经存在,那么用CAS更新一个新的节点
- 如果节点是新的,那么直接返回
- 如果节点失效了,设置当前节点,清除所有失效节点
举例:
1. 如果array数据里面的bucket数据如下所示: B0 B1 B2 NULL B4 ||_______|_______|_______|_______|_______||___ 200 400 600 800 1000 1200 timestamp ^ time=888 正好当前时间所对应的槽位里面的数据是空的,那么就用CAS更新 2. 如果array里面已经有数据了,并且槽位里面的窗口开始时间和当前的开始时间相等,那么直接返回 B0 B1 B2 B3 B4 ||_______|_______|_______|_______|_______||___ 200 400 600 800 1000 1200 timestamp ^ time=888 3. 例如当前时间是1676,所对应窗口里面的数据的窗口开始时间小于当前的窗口开始时间,那么加上锁,然后设置槽位的窗口开始时间为当前窗口开始时间,并把槽位里面的数据重置 (old) B0 B1 B2 NULL B4 |_______||_______|_______|_______|_______|_______||___ ... 1200 1400 1600 1800 2000 2200 timestamp ^ time=1676所以上面的array数组大概是这样:
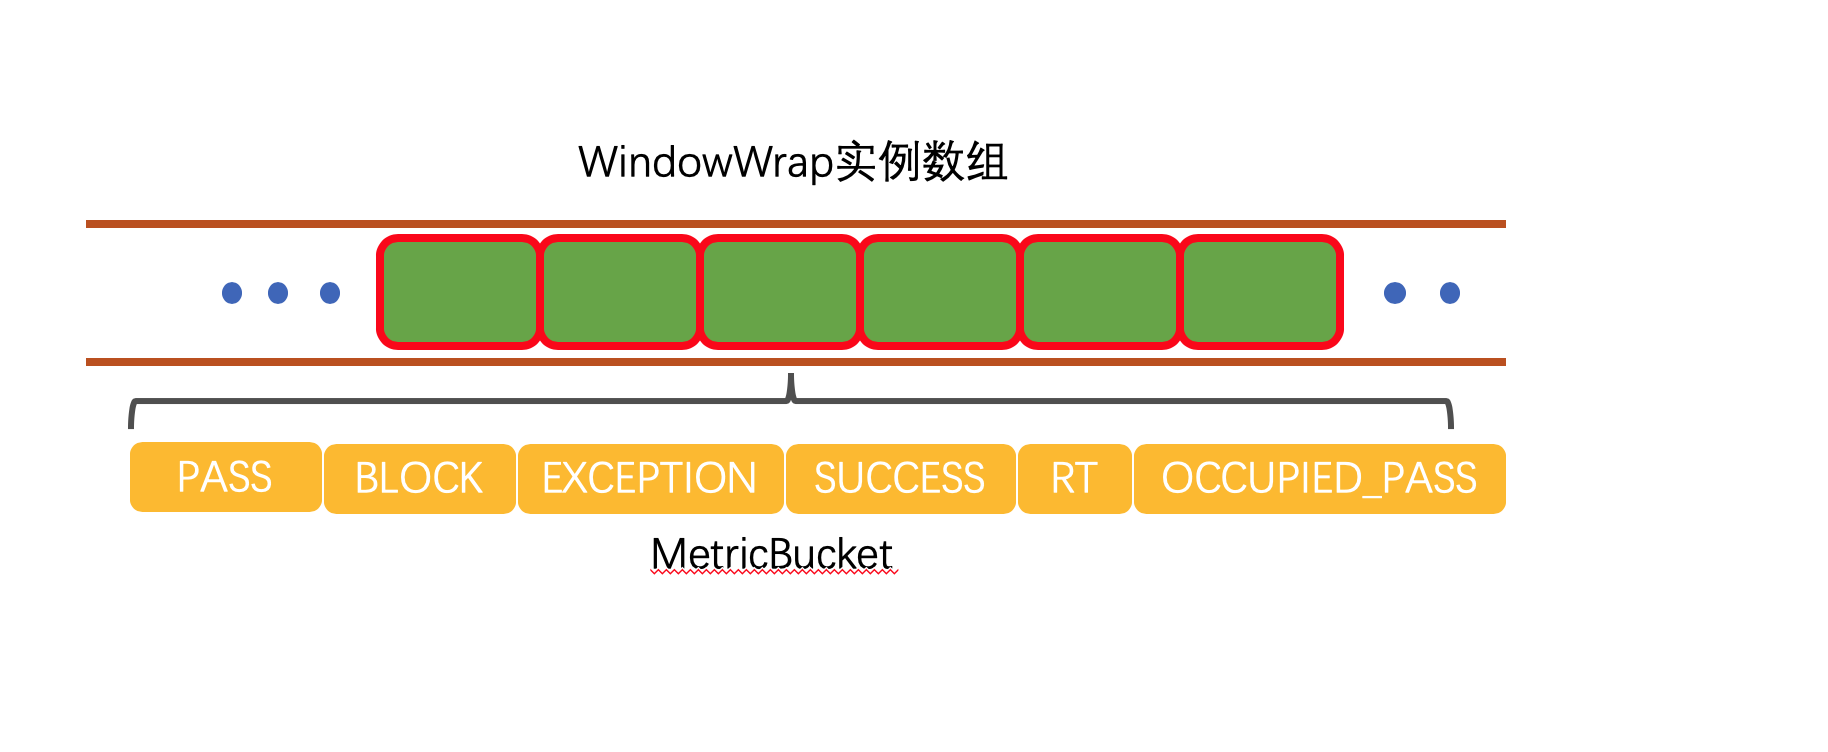
array数组由一个个的WindowWrap实例组成,WindowWrap实例里面由MetricBucket进行数据统计。
然后继续回到ArrayMetric的details方法,讲完了上面的data.currentWindow(),现在再来讲data.list()
list方法最后也会调用到LeapArray的list方法中:
LeapArray#list
public List<WindowWrap<T>> list(long validTime) { int size = array.length(); List<WindowWrap<T>> result = new ArrayList<WindowWrap<T>>(size); for (int i = 0; i < size; i++) { WindowWrap<T> windowWrap = array.get(i); //如果windowWrap节点为空或者当前时间戳比windowWrap的窗口开始时间大超过60s,那么就跳过 //也就是说只要60s以内的数据 if (windowWrap == null || isWindowDeprecated(validTime, windowWrap)) { continue; } result.add(windowWrap); } return result; }这个方法是用来把array里面都统计好的节点都找出来,并且是不为空,且是当前时间60秒内的数据。
最后Constants.ENTRY_NODE.metrics() 会返回所有符合条件的统计节点数据然后传入aggregate方法中,遍历为每个MetricNode节点设置Resource为TOTAL_IN_RESOURCE_NAME,封装好调用metricWriter.write进行写日志操作。
最后总结一下在初始化FlowRuleManager的时候做了什么:
- FlowRuleManager在初始化的时候会调用静态代码块进行初始化
- 在静态代码块内调用ScheduledExecutorService线程池,每隔1秒调用一次MetricTimerListener的run方法
- MetricTimerListener会调用
Constants.ENTRY_NODE.metrics()进行定时的统计- 调用StatisticNode进行统计,统计60秒内的数据,并将60秒的数据分割成60个小窗口
- 在设置当前窗口的时候如果里面没有数据直接设置,如果存在数据并且是最新的直接返回,如果是旧数据,那么reset原来的统计数据
- 每个小窗口里面的数据由MetricBucket进行封装
- 最后将统计好的数据通过metricWriter写入到log里去
FlowRuleManager加载规则
FlowRuleManager是调用loadRules进行规则加载的:
FlowRuleManager#loadRules
public static void loadRules(List<FlowRule> rules) { currentProperty.updateValue(rules); }currentProperty这个实例是在FlowRuleManager是在静态代码块里面进行加载的,上面我们讲过,生成的是DynamicSentinelProperty的实例。
我们进入到DynamicSentinelProperty的updateValue中:
public boolean updateValue(T newValue) { //判断新的元素和旧元素是否相同 if (isEqual(value, newValue)) { return false; } RecordLog.info("[DynamicSentinelProperty] Config will be updated to: " + newValue); value = newValue; for (PropertyListener<T> listener : listeners) { listener.configUpdate(newValue); } return true; }updateValue方法就是校验一下是不是已经存在相同的规则了,如果不存在那么就直接设置value等于新的规则,然后通知所有的监听器更新一下规则配置。
currentProperty实例里面的监听器会在FlowRuleManager初始化静态代码块的时候设置一个FlowPropertyListener监听器实例,FlowPropertyListener是FlowRuleManager的内部类:
private static final class FlowPropertyListener implements PropertyListener<List<FlowRule>> { @Override public void configUpdate(List<FlowRule> value) { Map<String, List<FlowRule>> rules = FlowRuleUtil.buildFlowRuleMap(value); if (rules != null) { flowRules.clear(); //这个map的维度是key是Resource flowRules.putAll(rules); } RecordLog.info("[FlowRuleManager] Flow rules received: " + flowRules); } .... }configUpdate首先会调用FlowRuleUtil.buildFlowRuleMap()方法将所有的规则按resource分类,然后排序返回成map,然后将FlowRuleManager的原来的规则清空,放入新的规则集合到flowRules中去。
FlowRuleUtil#buildFlowRuleMap
这个方法最后会调用到FlowRuleUtil的另一个重载的方法:
public static <K> Map<K, List<FlowRule>> buildFlowRuleMap(List<FlowRule> list, Function<FlowRule, K> groupFunction, Predicate<FlowRule> filter, boolean shouldSort) { Map<K, List<FlowRule>> newRuleMap = new ConcurrentHashMap<>(); if (list == null || list.isEmpty()) { return newRuleMap; } Map<K, Set<FlowRule>> tmpMap = new ConcurrentHashMap<>(); for (FlowRule rule : list) { //校验必要字段:资源名,限流阈值, 限流阈值类型,调用关系限流策略,流量控制效果等 if (!isValidRule(rule)) { RecordLog.warn("[FlowRuleManager] Ignoring invalid flow rule when loading new flow rules: " + rule); continue; } if (filter != null && !filter.test(rule)) { continue; } //应用名,如果没有则会使用default if (StringUtil.isBlank(rule.getLimitApp())) { rule.setLimitApp(RuleConstant.LIMIT_APP_DEFAULT); } //设置拒绝策略:直接拒绝、Warm Up、匀速排队,默认是DefaultController TrafficShapingController rater = generateRater(rule); rule.setRater(rater); //获取Resource名字 K key = groupFunction.apply(rule); if (key == null) { continue; } //根据Resource进行分组 Set<FlowRule> flowRules = tmpMap.get(key); if (flowRules == null) { // Use hash set here to remove duplicate rules. flowRules = new HashSet<>(); tmpMap.put(key, flowRules); } flowRules.add(rule); } //根据ClusterMode LimitApp排序 Comparator<FlowRule> comparator = new FlowRuleComparator(); for (Entry<K, Set<FlowRule>> entries : tmpMap.entrySet()) { List<FlowRule> rules = new ArrayList<>(entries.getValue()); if (shouldSort) { // Sort the rules. Collections.sort(rules, comparator); } newRuleMap.put(entries.getKey(), rules); } return newRuleMap; }这个方法首先校验传进来的rule集合不为空,然后遍历rule集合。对rule的必要字段进行校验,如果传入了过滤器那么校验过滤器,然后过滤resource为空的rule,最后相同的resource的rule都放到一起排序后返回。
注意这里默认生成的rater是DefaultController。
到这里FlowRuleManager已经分析完毕了,比较长。
