SpringBoot 源码解析 (一)—– SpringBoot核心原理入门
- 2019 年 11 月 14 日
- 笔记
Spring Boot 概述
Build Anything with Spring Boot:Spring Boot is the starting point for building all Spring-based applications. Spring Boot is designed to get you up and running as quickly as possible, with minimal upfront configuration of Spring.
上面是引自官网的一段话,大概是说: Spring Boot 是所有基于 Spring 开发的项目的起点。Spring Boot 的设计是为了让你尽可能快的跑起来 Spring 应用程序并且尽可能减少你的配置文件。
什么是 Spring Boot
- 它使用 “习惯优于配置” (项目中存在大量的配置,此外还内置一个习惯性的配置,让你无须手动配置)的理念让你的项目快速运行起来。
- 它并不是什么新的框架,而是默认配置了很多框架的使用方式,就像 Maven 整合了所有的 jar 包一样,Spring Boot 整合了所有框架
使用 Spring Boot 有什么好处
回顾我们之前的 SSM 项目,搭建过程还是比较繁琐的,需要:
- 1)配置 web.xml,加载 spring 和 spring mvc
- 2)配置数据库连接、配置日志文件
- 3)配置家在配置文件的读取,开启注解
- 4)配置mapper文件
- …..
而使用 Spring Boot 来开发项目则只需要非常少的几个配置就可以搭建起来一个 Web 项目,并且利用 IDEA 可以自动生成生成
- 划重点:简单、快速、方便地搭建项目;对主流开发框架的无配置集成;极大提高了开发、部署效率。
Spring Boot HelloWorld
导入依赖spring boot相关的依赖
<?xml version="1.0" encoding="UTF-8"?> <project xmlns="http://maven.apache.org/POM/4.0.0" xmlns:xsi="http://www.w3.org/2001/XMLSchema-instance" xsi:schemaLocation="http://maven.apache.org/POM/4.0.0 http://maven.apache.org/xsd/maven-4.0.0.xsd"> <modelVersion>4.0.0</modelVersion> <groupId>cn.chenhao</groupId> <artifactId>springboot</artifactId> <version>1.0.0-SNAPSHOT</version> <packaging>jar</packaging> <name>springboot</name> <description>Demo project for Spring Boot</description> <parent> <groupId>org.springframework.boot</groupId> <artifactId>spring-boot-starter-parent</artifactId> <version>2.0.1.RELEASE</version> <relativePath/> </parent> <dependencies> <dependency> <groupId>org.springframework.boot</groupId> <artifactId>spring-boot-starter-web</artifactId> </dependency> </dependencies> <build> <plugins> <plugin> <groupId>org.springframework.boot</groupId> <artifactId>spring-boot-maven-plugin</artifactId> </plugin> </plugins> </build> </project>
编写主程序
/** * @SpringBootApplication来标注一个主程序类,说明这是一个SpringBoot应用 */ @SpringBootApplication public class HelloWorldMainApplication { public static void main(String[] args) { //Spring应用启动 SpringApplication.run(HelloWorldMainApplication.class, args); } }
编写Controller、Service
@RestController public class HelloController { @RequestMapping("/hello") public String hello(){ return "Hello world"; } }
运行主程序测试
使用maven打包命令将其打包成jar包后,直接使用命令:
java -jar xxx.jar
Hello World探究
POM文件
父项目
<parent> <groupId>org.springframework.boot</groupId> <artifactId>spring-boot-starter-parent</artifactId> <version>2.0.1.RELEASE</version> <relativePath/> </parent>
其父项目是
<parent> <groupId>org.springframework.boot</groupId> <artifactId>spring-boot-dependencies</artifactId> <version>2.0.1.RELEASE</version> <relativePath>../../spring-boot-dependencies</relativePath> </parent>
该父项目是真正管理Spring Boot应用里面的所有依赖的版本:Spring Boot的版本仲裁中心,所以以后导入的依赖默认是不需要版本号。如下

还有很多版本号没有截图出来
启动器
<dependency> <groupId>org.springframework.boot</groupId> <artifactId>spring-boot-starter-web</artifactId> </dependency>
spring-boot-starter : spring boot场景启动器;帮助导入web模块正常运行所依赖的组件;
Spring Boot将所有的功能场景抽取出来,做成一个个的starter(启动器),只需要在项目中引入这些starter,那么相关的场景的所有依赖都会导入进项目中。要用什么功能就导入什么场景的启动器。
<dependency> <groupId>org.springframework.boot</groupId> <artifactId>spring-boot-starter-tomcat</artifactId> </dependency> <dependency> <groupId>org.springframework</groupId> <artifactId>spring-web</artifactId> </dependency> <dependency> <groupId>org.springframework</groupId> <artifactId>spring-webmvc</artifactId> </dependency>
添加了 spring-boot-starter-web 依赖,会自动添加 Tomcat 和 Spring MVC 的依赖
spring-boot-starter-web中又引入了spring-boot-starter-tomcat
主程序类(主入口类)
@SpringBootApplication public class HelloWorldMainApplication { public static void main(String[] args) { //Spring应用启动 SpringApplication.run(HelloWorldMainApplication.class, args); } }
@SpringBootApplication
- Spring Boot应用标注在某个类上,说明这个类是SpringBoot的主配置类,SpringBoot就应该运行这个类的main方法来启动SpringBoot应用。
注解定义如下:
@SpringBootConfiguration @EnableAutoConfiguration @ComponentScan(excludeFilters = { @Filter(type = FilterType.CUSTOM, classes = TypeExcludeFilter.class), @Filter(type = FilterType.CUSTOM, classes = AutoConfigurationExcludeFilter.class) }) public @interface SpringBootApplication {}
@SpringBootConfiguration
- Spring Boot的配置类
- 标注在某个类上,表示这是一个Spring Boot的配置类
注解定义如下:
@Configuration public @interface SpringBootConfiguration {}
其实就是一个Configuration配置类,意思是HelloWorldMainApplication最终会被注册到Spring容器中
@EnableAutoConfiguration
- 开启自动配置功能
- 以前使用Spring需要配置的信息,Spring Boot帮助自动配置;
- @EnableAutoConfiguration通知SpringBoot开启自动配置功能,这样自动配置才能生效。
注解定义如下:
@AutoConfigurationPackage @Import(EnableAutoConfigurationImportSelector.class) public @interface EnableAutoConfiguration {}
@AutoConfigurationPackage
- 自动配置包注解
@Import(AutoConfigurationPackages.Registrar.class) public @interface AutoConfigurationPackage {}
@Order(Ordered.HIGHEST_PRECEDENCE) static class Registrar implements ImportBeanDefinitionRegistrar, DeterminableImports { @Override public void registerBeanDefinitions(AnnotationMetadata metadata, BeanDefinitionRegistry registry) { //默认将会扫描@SpringBootApplication标注的主配置类所在的包及其子包下所有组件 register(registry, new PackageImport(metadata).getPackageName()); } @Override public Set<Object> determineImports(AnnotationMetadata metadata) { return Collections.<Object>singleton(new PackageImport(metadata)); } }
@Import(EnableAutoConfigurationImportSelector.class)
EnableAutoConfigurationImportSelector: 导入哪些组件的选择器,将所有需要导入的组件以全类名的方式返回,这些组件就会被添加到容器中。
1 //EnableAutoConfigurationImportSelector的父类:AutoConfigurationImportSelector 2 @Override 3 public String[] selectImports(AnnotationMetadata annotationMetadata) { 4 if (!isEnabled(annotationMetadata)) { 5 return NO_IMPORTS; 6 } 7 try { 8 AutoConfigurationMetadata autoConfigurationMetadata = AutoConfigurationMetadataLoader 9 .loadMetadata(this.beanClassLoader); 10 AnnotationAttributes attributes = getAttributes(annotationMetadata); 11 List<String> configurations = getCandidateConfigurations(annotationMetadata, attributes); 12 configurations = removeDuplicates(configurations); 13 configurations = sort(configurations, autoConfigurationMetadata); 14 Set<String> exclusions = getExclusions(annotationMetadata, attributes); 15 checkExcludedClasses(configurations, exclusions); 16 configurations.removeAll(exclusions); 17 configurations = filter(configurations, autoConfigurationMetadata); 18 fireAutoConfigurationImportEvents(configurations, exclusions); 19 return configurations.toArray(new String[configurations.size()]); 20 } 21 catch (IOException ex) { 22 throw new IllegalStateException(ex); 23 } 24 }
我们主要看第11行List<String> configurations = getCandidateConfigurations(annotationMetadata, attributes);会给容器中注入众多的自动配置类(xxxAutoConfiguration),就是给容器中导入这个场景需要的所有组件,并配置好这些组件。我们跟进去看看
protected List<String> getCandidateConfigurations(AnnotationMetadata metadata, AnnotationAttributes attributes) { List<String> configurations = SpringFactoriesLoader.loadFactoryNames( getSpringFactoriesLoaderFactoryClass(), getBeanClassLoader()); //... return configurations; } protected Class<?> getSpringFactoriesLoaderFactoryClass() { return EnableAutoConfiguration.class; } public static final String FACTORIES_RESOURCE_LOCATION = "META-INF/spring.factories"; public static List<String> loadFactoryNames(Class<?> factoryClass, ClassLoader classLoader) { String factoryClassName = factoryClass.getName(); try { //从类路径的META-INF/spring.factories中加载所有默认的自动配置类 Enumeration<URL> urls = (classLoader != null ? classLoader.getResources(FACTORIES_RESOURCE_LOCATION) : ClassLoader.getSystemResources(FACTORIES_RESOURCE_LOCATION)); List<String> result = new ArrayList<String>(); while (urls.hasMoreElements()) { URL url = urls.nextElement(); Properties properties = PropertiesLoaderUtils.loadProperties(new UrlResource(url)); //获取EnableAutoConfiguration指定的所有值,也就是EnableAutoConfiguration.class的值 String factoryClassNames = properties.getProperty(factoryClassName); result.addAll(Arrays.asList(StringUtils.commaDelimitedListToStringArray(factoryClassNames))); } return result; } catch (IOException ex) { throw new IllegalArgumentException("Unable to load [" + factoryClass.getName() + "] factories from location [" + FACTORIES_RESOURCE_LOCATION + "]", ex); } }
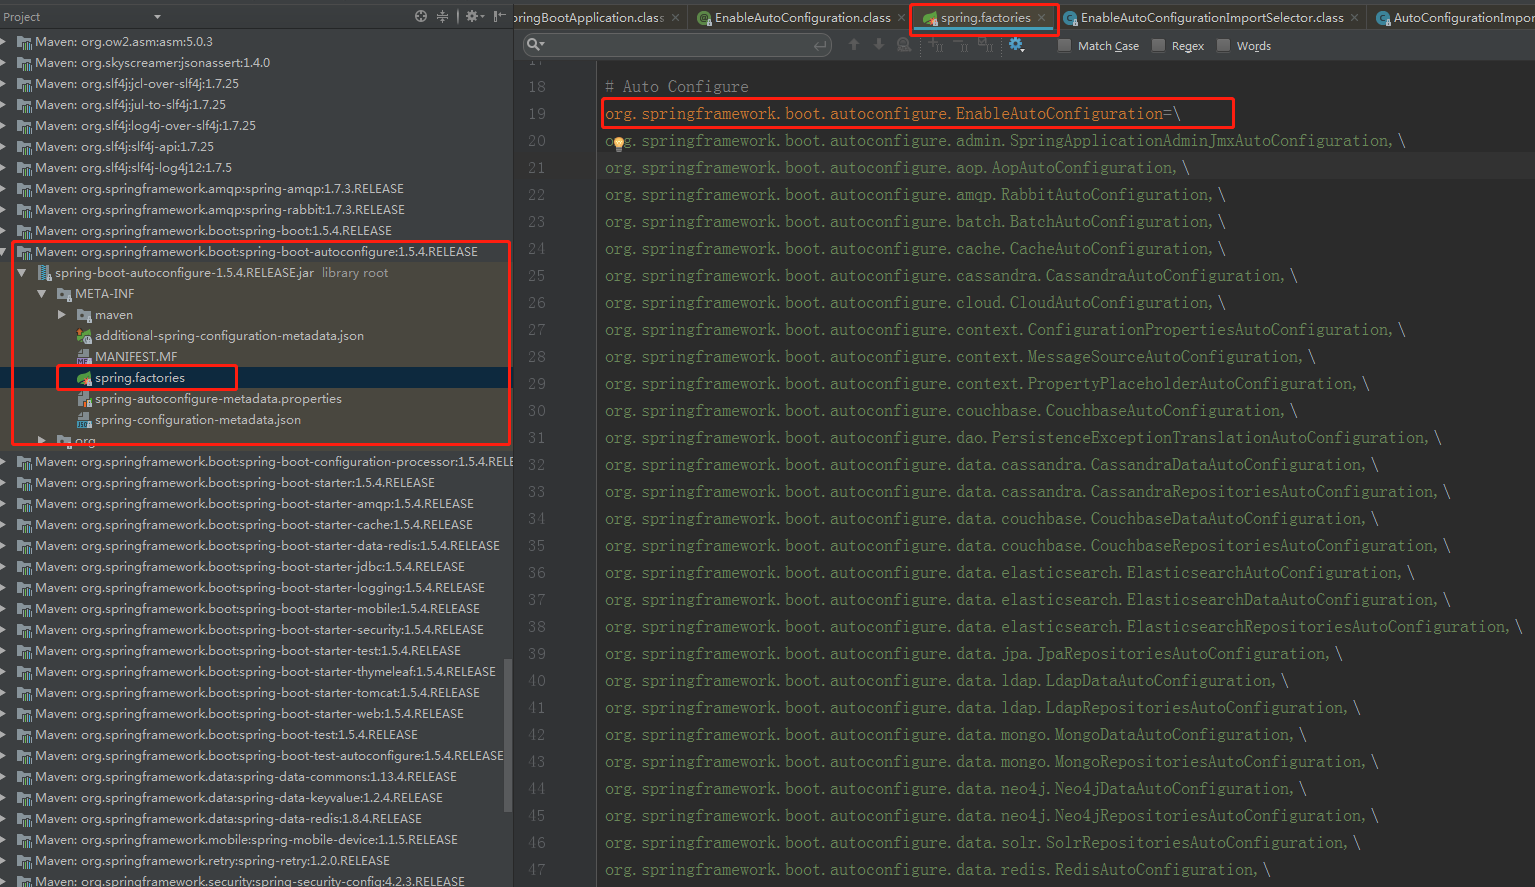
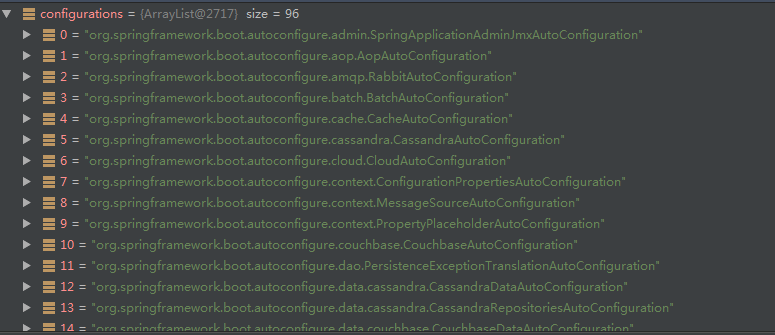
最终有96个自动配置类被加载并注册进Spring容器中
J2EE的整体整合解决方案和自动配置都在spring-boot-autoconfigure-xxx.jar中。在这些自动配置类中会通过@ConditionalOnClass等条件注解判断是否导入了某些依赖包,从而通过@Bean注册相应的对象进行自动配置。后面我们会有单独文章讲自动配置的内容