盘点Linux运维常用工具(二)-web篇之nginx
- 2020 年 3 月 11 日
- 筆記
1.nginx的概述
1、nginx是一个开源的、支持高性能、高并发的WWW服务和代理服务软件 2、是由俄罗斯人Igor Sysoev开发的,具有高并发、占用系统资源少等特性 3、官网:http://nginx.org
#特点
1、支持高并发:能支持几万并发连接 2、资源消耗少:在3万并发连接下,开启10个nginx进程消耗的内存不到200MB 3、开源做HTTP反向代理及加速缓存,即负载均衡 4、具备Squid等专业缓存软件等的缓存功能 5、支持异步网络I/O时间模型epoll(Linux2.6+ 内核)
#扩展:异步网络和同步网络
#异步网络:将数据发送到缓冲区就返回,发送成功的消息是通过事件通知的 #同步网络:收发数据,等到数据真正发送出去或者接收到,才返回
#nginx的企业应用
1、作为Web服务软件 2、反向代理或负载均衡 3、前端业务数据缓存服务 可通过proxy_cache模块进行缓存
#nginx的应用场景
1、使用nginx运行HTML、JS、CSS、小图片等静态数据 2、nginx结合FastCGI运行PHP等动态程序 3、nginx结合Tomcat/Resin等支持Java动态程序
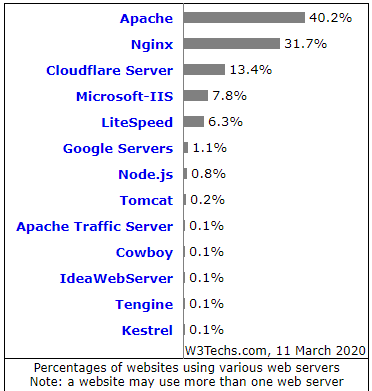
#nginx软件使用排名
#查看地址:https://w3techs.com/technologies/overview/web_server/all
#2020年的使用排名
2.nginx的安装
1.编译安装 2.rpm安装
1.rpm安装
[root@ctos2 ~]# wget -q http://mirrors.ustc.edu.cn/fedora/epel/6/x86_64/epel-release-6-8.noarch.rpm [root@ctos2 ~]# rpm -ivh epel-release-6-8.noarch.rpm [root@ctos2 ~]# yum install nginx -y #安装 [root@ctos2 ~]# rpm -qa nginx #查看软件是否安装 nginx-1.16.1-1.el7.x86_64
2.编译安装
[root@ctos3 ~]# yum install gcc pcre pcre-devel wget openssl openssl-devel.x86_64 -y #安装相关依赖包 [root@ctos3 ~]# useradd nginx -s /sbin/nologin -M [root@ctos3 ~]# mkdir -p /home/demo/tools/ [root@ctos3 ~]# cd /home/demo/tools/ [root@ctos3 tools]# wget http://nginx.org/download/nginx-1.16.0.tar.gz [root@ctos3 tools]# tar xf nginx-1.16.0.tar.gz [root@ctos3 tools]# cd nginx-1.16.0/ [root@ctos3 nginx-1.16.0]# ./configure --user=nginx --group=nginx --prefix=/application/nginx --with-http_stub_status_module --with-http_ssl_module [root@ctos3 nginx-1.16.0]# make -j 2 && make instal #安装 [root@ctos3 nginx]# /application/nginx/sbin/nginx -t #查看语法有误错误 nginx: the configuration file /application/nginx/conf/nginx.conf syntax is ok nginx: configuration file /application/nginx/conf/nginx.conf test is successful [root@ctos3 nginx]# /application/nginx/sbin/nginx #启动服务 [root@ctos3 nginx]# ss -untpl | grep 80 #查看服务是否启动 [root@ctos3 ~]# /application/nginx/sbin/nginx -V #安装完后查看版本 nginx version: nginx/1.16.0 built by gcc 4.8.5 20150623 (Red Hat 4.8.5-39) (GCC) built with OpenSSL 1.0.2k-fips 26 Jan 2017 TLS SNI support enabled configure arguments: --user=nginx --group=nginx --prefix=/application/nginx --with-http_stub_status_module --with-http_ssl_module
#参数介绍
1.yum install openssl-devel #是为了支持SSL 2.可以使用./configure --help查看相关参数的帮助 3. --prefix=PATH #设置安装路径 4. --user=USER #进程用户权限 5. --group=GROUP #进程用户组权限 6. --with-http-stub_status_module #激活状态信息 7. --with-http_ssl_module #激活ssl功能 8. /application/nginx/sbin/nginx -t #语法检查 9. /application/nginx/sbin/nginx #启动服务 10. /application/nginx/sbin/nginx -s reload #重启
#查看配置编译后的配置文件信息
[root@ctos3 ~]# tree /application/nginx/ /application/nginx/ ├── client_body_temp ├── conf #配置文件目录 │ ├── fastcgi.conf │ ├── fastcgi.conf.default │ ├── fastcgi_params │ ├── fastcgi_params.default │ ├── koi-utf │ ├── koi-win │ ├── mime.types │ ├── mime.types.default │ ├── nginx.conf #主配置文件 │ ├── nginx.conf.default │ ├── scgi_params │ ├── scgi_params.default │ ├── uwsgi_params │ ├── uwsgi_params.default │ └── win-utf ├── fastcgi_temp ├── html │ ├── 50x.html │ └── index.html ├── logs │ ├── access.log │ ├── error.log │ └── nginx.pid ├── proxy_temp ├── sbin │ └── nginx ├── scgi_temp └── uwsgi_temp
#提示:
#1.temp结尾的文件是临时文件
#2.default结尾的文件是备份文件
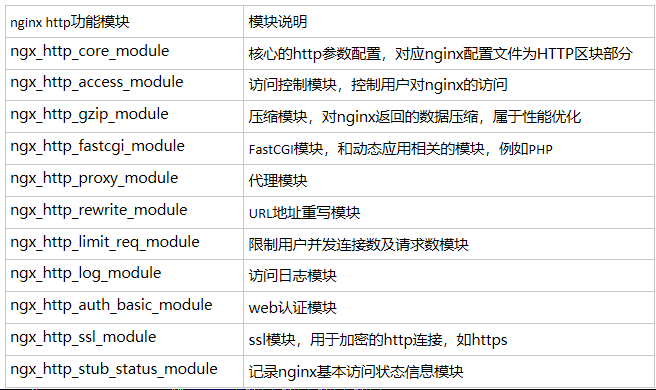
3.nginx的常用模块
4.nginx的虚拟主机
1、虚拟主机就是一个独立的站点,这个站点对应独立的域名、或者使IP或端口,也有独立的程序和资源目录 2、由一定的格式标签段标记,Apache使用<VirtualHost></VirtualHost>,nginx使用server{} 来标签一个虚拟主机,也支持多个虚拟主机 3、虚拟主机的官网配置文档:http://Nginx.org/en/docs/http/request_processing.html
#虚拟主机的类型
1.基于域名的虚拟主机 2.基于端口的虚拟主机 3.基于IP的虚拟主机
#配置不同类型的虚拟主机
#1.配置基于域名的虚拟主机
[root@ctos3 ~]# cd /application/nginx/conf/ [root@ctos3 conf]# grep -Ev '^$|#' nginx.conf.default > nginx.conf [root@ctos3 conf]# cat nginx.conf http { server { listen 80; server_name www.guoke.com; location / { root html; index index.html index.htm; } } server { listen 80; server_name bbs.guoke.com; location / { root html/bbs; index index.html index.htm; } } }
#2.配置基于端口的虚拟主机
只需将端口改成不同的就可以了
#3.配置基于IP的虚拟主机
本地有多个IP,然后listen监听改成是地址,server_name也相应的修改一下
#总结配置虚拟主机的步骤
1、增加一个完整的server标签段,要放再http里面 2、更改server_name及root根目 录 3、创建index.html文件 4、检查语法然后重启服务 5、访问
5.nginx的反向代理
反向代理:接收用户请求代替用户去后端访问
#反向代理的重要参数

#例子:为10.1.1.1做域名www.guoke.com的代理,当访问www.guoke.com就会访问到10.1.1.1服务器上,也可以写upstream服务器池
Server { Listen 80; Server_name www.guoke.com; Location / { Proxy_pass http://10.1.1.1; Proxy_set_header Host $host; } }
6.nginx的负载均衡
可以对用户的访问请求进行调度处理,对用户的访问请求进行压力分担
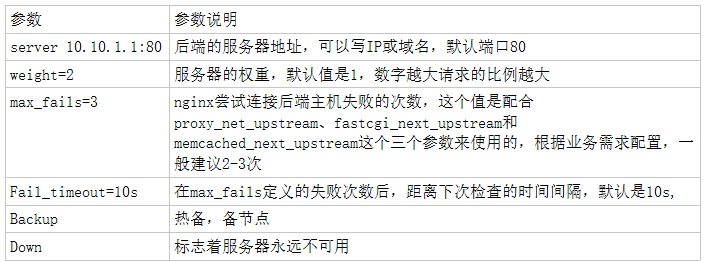
#关键参数upstream
#upstream的相关参数说明
server 10.10.1.1:80 weight=2 max_fails=3 fail_timeout=10 backup;
#配置例子:为www.guoke.com域名做负载均衡调度
http { upstream server{ server 192.168.226.146:80; server 192.168.226.147:80; } server { listen 80; server_name www.guoke.com; #access_log logs/host.access.log main; location / { root html; index index.html index.htm; proxy_pass http://server; } }
#附加负载均衡有关的面试题
nginx有哪几种调度算法,这几种区别是什么 常用的有3种调度算法(轮询,ip hash,权重) 轮询是默认的,每个请求按时间顺序逐一分配都不同的后端服务,如果后端某台服务器死机就会自动剔除故障系统,让用户访问不受影响 权重:权重的值越大,访问的概率就越高 iphash:请求按访问的IP的哈希结果分配,使来自同一个IP的访客固定访问一台后端服务器,可以解决会话问题
7.nginx的其他相关功能
7.1.别名
别名就是为虚拟主机设置除了主域名以外的一个或多个域名名字 配置方法 在原有的域名上添加server_name www.baidu.com baidu.com 应用场景 多数企业网站希望访问www.baidu.com和baidu.com,所浏览的事一个页面
7.2.状态信息功能
Nginx status介绍 模块为ngx_http_stub_status_module,主要是记录nginx的基本访问状态信息,如果想要添加,在编译的时候就加入http_stub_status_module 配置:在location / { stub_status on }
7.3.错误日志
#常见的日志级别:[debug|info|notice|warn|error|crit|alert|emerg],级别越高,记录的信息越少 #error_log的默认值为 #default: error_log logs/error.log error; #参考资料:http://nginx.org/en/docs/ngx_core_module.html#error_log #配置 error_log logs/error.log;
7.4.访问日志
#access_log logs/access.log main;
7.5.日志轮询切割
默认情况下nginx会把所有的访问日志生成到一个指定日志文件access.log中,但是如果时间长了日志文件会很大,不利于分析和处理,所以又必要对日志按天或按小时进行切割 #切割脚本 [root@ctos3 script]# pwd /script [root@ctos3 script]# cat cut_ng_log.sh #!/bin/bash Dateformat=`date +%Y%m%d` #定义时间格式 Basedir="application/nginx" #目录名 Nginxlogdir="$Basedir/logs" #日志目录 Logname="access_www" #日志的名字 [ -d $Nginxlogdir ] && cd $Nginxlogdir exit 1 [ -f ${Logname}.log ] exit 1 /bin/mv ${Logname}.log ${Dateformat}_${Logname}.log #放访问的日志更名,加上时间 $Basedir/sbin/nginx -s reload #重启服务 #然后将脚本放进定时任务里面,每天的00:00执行 [root@ctos3 ~]# cat /etc/crontab 00 00 * * * /bin/sh /script/cut_ng_log.sh > /dev/null
7.6.location
location指令的作用是根据用户请求的URI来执行不同的应用
语法:location [=|~|~*|^~] uri{...}
7.7.rewrite
Nginx rewrite的主要功能是实现URL地址重写
指令语法:rewrite regex replacement[flag];  #例子:      server {          listen       80;          server_name  guoke.com;          rewrite ^/ (*.)http://www.guoke.com/$1 permanent;
#参数介绍
  rewrite为固定关键字
  regex匹配正则表达式
  $1:取前面regex部分括号里的内容
  permanent:301永久跳转
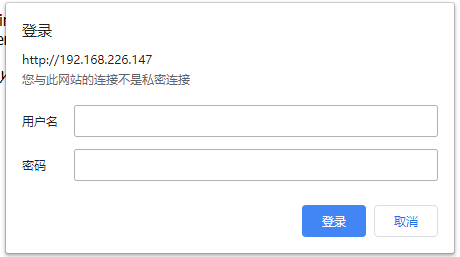
7.8.访问认证
通常我们会为网站设置一些访问认证,设置需要用户认证访问的,一般主要应用在企业内部人员的访问地址上,例如企业网站后台
#例子:
#配置基本用户认证 [root@ctos3 conf]# cat nginx.conf server { listen 80; server_name localhost; location / { root html; index index.html index.htm; auth_basic "guoke"; auth_basic_user_file /application/nginx/conf/htpasswd; } } #提示:默认没有htpasswd这个命令,需要安装httpd才有 [root@ctos3 conf]# yum install httpd -y [root@ctos3 conf]# which htpasswd /usr/bin/htpasswd #创建用户和密码 [root@ctos3 conf]# htpasswd -bc /application/nginx/conf/htpasswd guoke guoke123 Adding password for user guoke [root@ctos3 conf]# chmod 400 /application/nginx/conf/htpasswd #修改权限 [root@ctos3 conf]# chown nginx /application/nginx/conf/htpasswd [root@ctos3 conf]# /application/nginx/sbin/nginx -t #检查语法 nginx: the configuration file /application/nginx/conf/nginx.conf syntax is ok nginx: configuration file /application/nginx/conf/nginx.conf test is successful
#访问效果
#参数讲解:
auth_basic:设置认证提示字符串 auth_basic_user_file:用于设置认证的密码文件


