Netty+WebSocket整合STOMP協議
- 2022 年 9 月 6 日
- 筆記
1.STOMP協議簡介
常用的WebSocket協議定義了兩種傳輸資訊類型:文本資訊和二進位資訊。類型雖然被確定,但是他們的傳輸體是沒有規定的,也就是說傳輸體可以自定義成什麼樣的數據格式都行,只要客戶端和服務端約定好,得到數據後能夠按照約定的語義解析數據就好。相較於Http協議約定好了必須有請求頭、請求體這類語義,接收到數據後先要解析頭資訊,WebSocket協議為了節省頻寬和減輕伺服器的負擔,只要建立了ws連接,雙方需要採用提前定義好的傳輸體格式(比如JSON格式)去解析數據,沒有了Http協議那些頭資訊的解析工作和傳輸,也就提升了通訊效率。
直接使用WebSocket因為沒有高層級的協議,所以需要我們定義應用之間所發送消息的語義,還要確保聯機的兩端都能遵循。因此Stomp作為文本定向消息協議常常作為子協議用於集成WebSocket,用來定義消息的語義。請求和響應數據格式類似,STOMP幀由命令、一個或多個頭資訊以及負載所組成。
下圖是測試使用Stomp協議從服務端主動推送給客戶端資訊,這整個消息被稱為「幀」,其中:
- MESSAGE代表命令幀,表明此幀的為那種類型操作。Stomp的命令幀還包括:CONNECT\CONNECTED\SUBSCRIBE\SEND等;
- message-id、subscription、content-length、content-type都是作為頭資訊,用於攜帶簡單的資訊內容;
- 負載則是服務端具體發送給客戶端的詳細資訊,具體格式可以由開發人員隨意設置;
<<< MESSAGE  #命令
message-id:6834f845-49dd-480e-8b94-84d31372d744 #頭資訊
subscription:sub-0 #頭資訊
content-length:136 #頭資訊
content-type:application/json #頭資訊

{"content":"此條內容為發送的消息--你好,世界!"} # 負載
由此可以看出Stomp既沒有Http協議那樣包含了太多的頭資訊而佔用過多的網路頻寬,又能提供比較豐富的格式語義方便雙方的通訊。
2.Netty整合STOMP存在的問題
「即便Netty提供了STOMP編輯碼器,但STOMP 是為消息中間件而設計的一種消息傳遞協議,而Netty 提供的是非同步的、事件驅動的網路應用程式框架,並非作為消息代理,因此從功能契合的意義上說Netty不支援 STOMP協議。」———— Apache ActiveMQ 開發人員 Justin Bertram
不過實際開發中如果只是單純的採用Netty+WebSocket會導致通訊形式層級過低從而導致通訊缺乏可靠性,所以Spring社區就提倡將Stomp作為WebSocket子協議增強通訊的消息語義,《Spring實戰》也給出了如何通集成Spring、WebSocket、Stomp如何進行集成開發。但是Netty+WebSocket如何將Stomp作為子協議,本人搜索了Google、Stack Overflow後並沒有具體的範例,直至後面在Netty的GitHub社區中看到了簡單的範例說明,因此特意記錄下來希望幫助到有需要的人。
具體程式碼可參考://github.com/1148973713/whales-netty
3.Netty消息通訊的握手原理
在集成STOMP協議過程中,最重要的是官方提供的WebSocketServerProtocolHandler處理器(程式碼3-1):
    protected void initChannel(SocketChannel channel) throws Exception {
        channel.pipeline()
               .addLast(new HttpServerCodec())
               .addLast(new HttpObjectAggregator(65536))
               .addLast(StompWebSocketClientPageHandler.INSTANCE)
               .addLast(new WebSocketServerProtocolHandler(chatPath, StompVersion.SUB_PROTOCOLS))
               .addLast(stompWebSocketProtocolCodec);
    }
讓我們進入WebSocketServerProtocolHandler類中發現此處需要傳入的兩個參數分別是:websocketPath--websocket地址、subprotocols--附加的子協議。
    public WebSocketServerProtocolHandler(String websocketPath, String subprotocols) {
        this(websocketPath, subprotocols, 10000L);
    }
此方法最終調用的是(程式碼3-2):
public WebSocketServerProtocolHandler(String websocketPath, String subprotocols, boolean checkStartsWith,
                                      boolean dropPongFrames, long handshakeTimeoutMillis,
                                      WebSocketDecoderConfig decoderConfig) {
    this(WebSocketServerProtocolConfig.newBuilder()
        .websocketPath(websocketPath)
        .subprotocols(subprotocols)
        .checkStartsWith(checkStartsWith)
        .handshakeTimeoutMillis(handshakeTimeoutMillis)
        .dropPongFrames(dropPongFrames)
        .decoderConfig(decoderConfig)
        .build());
}
其中WebSocketServerProtocolConfig.build()是將前面的各種配置參數傳入,最後創建一個WebSocketServerProtocolConfig實體類:
        public WebSocketServerProtocolConfig build() {
            return new WebSocketServerProtocolConfig(
                websocketPath,
                subprotocols,
                checkStartsWith,
                handshakeTimeoutMillis,
                forceCloseTimeoutMillis,
                handleCloseFrames,
                sendCloseFrame,
                dropPongFrames,
                decoderConfigBuilder == null ? decoderConfig : decoderConfigBuilder.build()
            );
        }
此處為了讀者能理解後續的程式碼執行流程先插入一個知識點,ChannelHandler 回調方法的執行順序:
- 連接請求,handlerAdded () -> channelRegistered () -> channelActive () -> channelRead () -> channelReadComplete ();
- 數據請求,channelRead () -> channelReadComplete ();
- 通道被關閉,channelInactive () -> channelUnregistered () -> handlerRemoved ();
handlerAdded ()、channelRegistered ()、channelActive ()只會在生命周期執行一次,後面便不會再被執行。
具體可以查看鏈接://book.itxueyuan.com/b2A7/ZGGQg
在Netty的ChannelHandler生命周期中handlerAdded()方法的執行是在檢測到新請求連接時添加一個handler處理器到鏈表之中。經過WebSocketServerProtocolConfig.build()後,ChannelHandler會觸發handlerAdded()方法[註:以下程式碼也是存在與WebSocketServerProtocolHandler類中](程式碼3-3)
     @Override
	public void handlerAdded(ChannelHandlerContext ctx) {
        ChannelPipeline cp = ctx.pipeline();
        if (cp.get(WebSocketServerProtocolHandshakeHandler.class) == null) {
            // Add the WebSocketHandshakeHandler before this one.
            cp.addBefore(ctx.name(), WebSocketServerProtocolHandshakeHandler.class.getName(),
                    new WebSocketServerProtocolHandshakeHandler(serverConfig));
        }
       if (serverConfig.decoderConfig().withUTF8Validator() && cp.get(Utf8FrameValidator.class) == null) {
            // Add the UFT8 checking before this one.
            cp.addBefore(ctx.name(), Utf8FrameValidator.class.getName(),
                    new Utf8FrameValidator(serverConfig.decoderConfig().closeOnProtocolViolation()));
        }
    }
在上述程式碼中因為handlerAdded中判斷第一次連接時,Pipeline管道內不存在WebSocketServerProtocolHandshakeHandler(WebSocket伺服器協議握手處理程式),就會通過addBefore()方法將WebSocketServerProtocolHandshakeHandler添加在WebSocketServerProtocolHandler前。
最終形成WebSocketServerProtocolHandshakeHandler------>Utf8FrameValidator(道理和上面一樣)----->WebSocketServerProtocolHandler
我們先不管Utf8FrameValidator,著重分析WebSocketServerProtocolHandshakeHandler處理器內部程式碼(程式碼3-4):
 	@Override
    public void channelRead(final ChannelHandlerContext ctx, Object msg) throws Exception {
        final HttpObject httpObject = (HttpObject) msg;

        if (httpObject instanceof HttpRequest) {
            //獲取當前請求資訊
            final HttpRequest req = (HttpRequest) httpObject;
            //進行比對請求路徑,驗證協議
            isWebSocketPath = isWebSocketPath(req);
            if (!isWebSocketPath) {
                ctx.fireChannelRead(msg);
                return;
            }

            try {
                ... ...

                //創建握手工廠,從參數可以看出:webSocketURL--webSocket的路徑地址、subprotocols--添加的自定義子協議、decoderConfig解碼設置
                final WebSocketServerHandshakerFactory wsFactory = new WebSocketServerHandshakerFactory(
                        getWebSocketLocation(ctx.pipeline(), req, serverConfig.websocketPath()),
                        serverConfig.subprotocols(), serverConfig.decoderConfig());
                ////創建一個握手處理器
                final WebSocketServerHandshaker handshaker = wsFactory.newHandshaker(req);
                //握手回調
                final ChannelPromise localHandshakePromise = handshakePromise;
                if (handshaker == null) {
                    WebSocketServerHandshakerFactory.sendUnsupportedVersionResponse(ctx.channel());
                } else {
                    //設置處理器
                    WebSocketServerProtocolHandler.setHandshaker(ctx.channel(), handshaker);
                    ctx.pipeline().remove(this);

  //ChannelFuture的作用是用來保存Channel非同步操作的結果。在Netty中所有的I/O操作都是非同步的。ChannelFuture代表了非同步計算的結果,這個介面的主要方法就是檢查計算是否已完成,等待計算然後返回計算結果。
                    final ChannelFuture handshakeFuture = handshaker.handshake(ctx.channel(), req);
                    //進行結果監聽
                    handshakeFuture.addListener(new ChannelFutureListener() {
                        @Override
                        public void operationComplete(ChannelFuture future) {
                            ... ...
                                //如果發送成功情況,保持兼容性觸發事件
                                localHandshakePromise.trySuccess();
								//如果發送成功情況,則觸發握手成功事件
                                ctx.fireUserEventTriggered(
                                        new WebSocketServerProtocolHandler.HandshakeComplete(
                                                req.uri(), req.headers(), handshaker.selectedSubprotocol()));
                        }
                    });
                    applyHandshakeTimeout();
                }
            }
    }
以下是筆者先用SpirngBoot+WebSocket整合Stomp協議做了基本模板,我們可以看到在相應頭中存在sec-websocket-protocol屬性,其意義就是所攜帶的STOMP協議和其版本資訊:
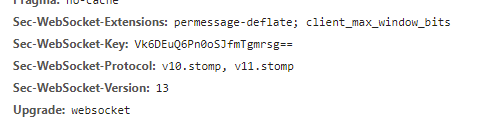
如本文開頭所說,STOMP協議意在讓WebSocket協議變得可靠一些,通過客戶端與服務端達成的語義相互確認後才進行連接通訊。因此如何獲取客戶端請求中的子協議資訊並讓服務端匹配確認,這一步驟在握手環節過程中是非常重要的。
所以,在上述程式碼中wsFactory.newHandshaker(req) 、handshaker.handshake(ctx.channel(), req)兩個方法實現了我們想要的效果。
首先是newHandshaker方法,它是屬於WebSocketServerHandshakerFactory類中的方法(程式碼3-5):
public WebSocketServerHandshaker newHandshaker(HttpRequest req) {

        //獲取頭資訊中sec-websocket-protocol屬性的值
        CharSequence version = req.headers().get(HttpHeaderNames.SEC_WEBSOCKET_VERSION);
        if (version != null) {
            //尋常的websocket協議版本
		  ... ...
        } else {
            //因為我們是附加了STOMP子協議,所以返回的是WebSocketServerHandshaker00
            return new WebSocketServerHandshaker00(webSocketURL, subprotocols, decoderConfig);
        }
    }
WebSocketServerHandshaker00()主要是構建一個自定義的握手方式,其中字元串參數subprotocols便是由開發人員自定義的協議,它在先前WebSocketServerHandshakerFactory對象創建之前就被傳入(具體可以看程式碼3-4)。隨後subprotocols將會被分割形成保存自定義協議名稱的數組。
之後的handshaker.handshake(ctx.channel(), req)方法將會開始處理握手,因為其中傳入參數req正式客戶端發過來的請求,所以此方法部分作用就是用來比對客戶端攜帶的sec-websocket-protocol屬性值是否與服務端自定義屬性相對應,如果是則返回握手成功的結果(程式碼3-6):
public ChannelFuture handshake(Channel channel, FullHttpRequest req) {
   return handshake(channel, req, null, channel.newPromise());
}


public final ChannelFuture handshake(Channel channel, FullHttpRequest req,
                                            HttpHeaders responseHeaders, final ChannelPromise promise) {
	   ... ...
        FullHttpResponse response = newHandshakeResponse(req, responseHeaders);
        ... ...
        return promise;
}
newHandshakeResponse由WebSocketServerHandshaker00類自身實現,它主要的作用就是用來判斷匹配並在匹配成功後設置由服務端返回給客戶端的響應內容(程式碼3-7):
    @Override
    protected FullHttpResponse newHandshakeResponse(FullHttpRequest req, HttpHeaders headers) {

        // 服務WebSocket握手請求
        if (!req.headers().containsValue(HttpHeaderNames.CONNECTION, HttpHeaderValues.UPGRADE, true)
                || !HttpHeaderValues.WEBSOCKET.contentEqualsIgnoreCase(req.headers().get(HttpHeaderNames.UPGRADE))) {
            throw new WebSocketServerHandshakeException("not a WebSocket handshake request: missing upgrade", req);
        }

        // Hixie 75不包含這些報頭,而Hixie 76包含
        //查詢頭資訊中是否包含sec-websocket-key1屬性與sec-websocket-key2屬性
        boolean isHixie76 = req.headers().contains(HttpHeaderNames.SEC_WEBSOCKET_KEY1) &&
                            req.headers().contains(HttpHeaderNames.SEC_WEBSOCKET_KEY2);

        //獲取頭資訊Origin(起源)值
        String origin = req.headers().get(HttpHeaderNames.ORIGIN);
        ... ...
        if (isHixie76) {
            ... ...
        } else {
            //因為我們上面請求頭是不包含上面兩個屬性的,所以直接到這裡面了
            //添加頭屬性與對應值
            res.headers().add(HttpHeaderNames.WEBSOCKET_ORIGIN, origin);
            res.headers().add(HttpHeaderNames.WEBSOCKET_LOCATION, uri());
            //獲取sec-websocket-protocol屬性值
            String protocol = req.headers().get(HttpHeaderNames.WEBSOCKET_PROTOCOL);
            if (protocol != null) {
                //先對比,後設置sec-websocket-protocol
                res.headers().set(HttpHeaderNames.WEBSOCKET_PROTOCOL, selectSubprotocol(protocol));
            }
        }
        return res;
    }
在程式碼最後調用了selectSubprotocol(protocol),傳入的參數是客戶端發來的請求中攜帶的sec-websocket-protocol屬性值(程式碼3-8):
    protected String selectSubprotocol(String requestedSubprotocols) {
        ... ...
        //將sec-websocket-protocol屬性值進行分割
        String[] requestedSubprotocolArray = requestedSubprotocols.split(",");
        for (String p: requestedSubprotocolArray) {
            String requestedSubprotocol = p.trim();

            for (String supportedSubprotocol: subprotocols) {
                if (SUB_PROTOCOL_WILDCARD.equals(supportedSubprotocol)
                        || requestedSubprotocol.equals(supportedSubprotocol)) {
                    selectedSubprotocol = requestedSubprotocol;
                    return requestedSubprotocol;
                }
            }
        }
        return null;
    }
我們可以注意到if中進行了requestedSubprotocol.equals(supportedSubprotocol)判斷,其中requestedSubprotocol是請求中所攜帶的協議資訊,而supportedSubprotocol則是自定義的協議資訊,在(程式碼3-5)中已經隨著WebSocketServerHandshaker00創建賦予了值。
所以根據上述的流程,我們應當創建一個StompVersion和一個握手事件成功後觸發的處理器,分別用於握手前傳入WebSocketServerProtocolHandler()方法以及握手成功後返迴響應和對應的STOMP幀告訴客戶端連接成功可以進行通訊。
4.Netty如何兼容STOMP協議
根據上述程式碼流程我們可以發現,當確認握手成功建立連接後,就會觸發握手成功事件。因此我門只需要編寫事件觸發後接收事件的處理器,並添加到pipeline(返回看3-1程式碼)中(程式碼4-1):
public class StompWebSocketProtocolCodec extends MessageToMessageCodec<WebSocketFrame, StompSubframe> {

    private final StompChatHandler stompChatHandler = new StompChatHandler();
    private final StompWebSocketFrameEncoder stompWebSocketFrameEncoder = new StompWebSocketFrameEncoder();

    //userEventTriggered:當fireUserEventTriggered()方法觸發時候被調用。
    @Override
    public void userEventTriggered(ChannelHandlerContext ctx, Object evt) throws Exception {
        //當事件屬於HandshakeComplete(握手成功時),與上面new WebSocketServerProtocolHandler.HandshakeComplete對應
        if (evt instanceof HandshakeComplete) {
            //查找出STOMP協議版本
            StompVersion stompVersion = StompVersion.findBySubProtocol(((HandshakeComplete) evt).selectedSubprotocol());
            ctx.channel().attr(StompVersion.CHANNEL_ATTRIBUTE_KEY).set(stompVersion);
            ctx.pipeline()
                    .addLast(new WebSocketFrameAggregator(65536))
                    .addLast(new StompSubframeDecoder())
                    .addLast(new StompSubframeAggregator(65536))
                    .addLast(stompChatHandler)
                    .remove(StompWebSocketClientPageHandler.INSTANCE);
        } else {
            super.userEventTriggered(ctx, evt);
        }
    }

    @Override
    protected void encode(ChannelHandlerContext ctx, StompSubframe stompFrame, List<Object> out) throws Exception {
        System.out.println("---------------------->進行編碼");
        stompWebSocketFrameEncoder.encode(ctx, stompFrame, out);
    }

    @Override
    protected void decode(ChannelHandlerContext ctx, WebSocketFrame webSocketFrame, List<Object> out) {
        System.out.println("---------------------->進行解碼");
        if (webSocketFrame instanceof TextWebSocketFrame || webSocketFrame instanceof BinaryWebSocketFrame) {
            out.add(webSocketFrame.content().retain());
        } else {
            ctx.close();
        }
    }
}
在StompChatHandler處理器中(程式碼過長,直接下載文章開頭的勢力程式碼進行閱讀即可),我們根據STOMP官方規定的命令(CONNECT、SUBSCRIBE、SEND、UNSUBSCRIBE、DISCONNECT)進行判斷和對消息內容的處理。以下以SEND命令為例(程式碼4-2):
	private final ConcurrentMap<String, Set<StompSubscription>> chatDestinations =
            new ConcurrentHashMap<String, Set<StompSubscription>>();

	private void onSend(ChannelHandlerContext ctx, StompFrame inboundFrame) {
        //獲取目的地名稱
        String destination = inboundFrame.headers().getAsString(DESTINATION);

        if (destination == null) {
            sendErrorFrame("missed header", "required 'destination' header missed", ctx);
            return;
        }

        //根據目的地名稱獲取相應訂閱地址資訊
        Set<StompSubscription> subscriptions = chatDestinations.get(destination);

        for (StompSubscription subscription : subscriptions) {

            subscription.channel().writeAndFlush(transformToMessage(inboundFrame, subscription));
        }
    }

    private static StompFrame transformToMessage(StompFrame sendFrame, StompSubscription subscription) {

        Charset charset = StandardCharsets.UTF_8;

        //設置消息命令為MESSAGE,消息文本內容副本,並返回DefaultStompFrame類型
        StompFrame messageFrame = new DefaultStompFrame(StompCommand.MESSAGE, sendFrame.content().retainedDuplicate());
        String id = UUID.randomUUID().toString();
        //設置STOMP幀的頭資訊,具體參照文章開始STOMP幀格式
        messageFrame.headers()
                .set(MESSAGE_ID, id)
                .set(SUBSCRIPTION, subscription.id())
                .set(CONTENT_LENGTH, Integer.toString(messageFrame.content().readableBytes()));

        //獲取STOMP內容類型,默認未BYTEBUF
        CharSequence contentType = sendFrame.headers().get(CONTENT_TYPE);
        if (contentType != null) {
            //如果有,則也設置入頭中
            messageFrame.headers().set(CONTENT_TYPE, contentType);
        }
        //返回設置好的消息格式
        return messageFrame;
    }
進入DefaultStompFrame可知,我們需要發送的文本被轉化成ByteBuf類型。如果默認採用此類型而不加以設置會導致當內容為中文時產生亂碼。
    public DefaultStompFrame(StompCommand command, ByteBuf content) {
        this(command, content, null);
    }
如上問題,我們需要編寫一個編碼器StompWebSocketFrameEncoder(返回看程式碼4-1)對發送出去的消息進行編碼,其中比較重要的方法如下(程式碼4-3):
    @Override
    protected WebSocketFrame convertFullFrame(StompFrame original, ByteBuf encoded) {
        //如果content-type消息頭類型為text或則是application/json,則採用TextWebSocketFrame編碼方式
        if (isTextFrame(original)) {
            return new TextWebSocketFrame(encoded);
        }
        //否則採用BinaryWebSocketFrame(二進位)編碼方式
        return new BinaryWebSocketFrame(encoded);
    }

    private static boolean isTextFrame(StompHeadersSubframe headersSubframe) {
        //判斷STOMP幀是否攜帶content-type消息頭,並且對消息類型進行判斷
        String contentType = headersSubframe.headers().getAsString(StompHeaders.CONTENT_TYPE);
        return contentType != null && (contentType.startsWith("text") || contentType.startsWith("application/json"));
    }
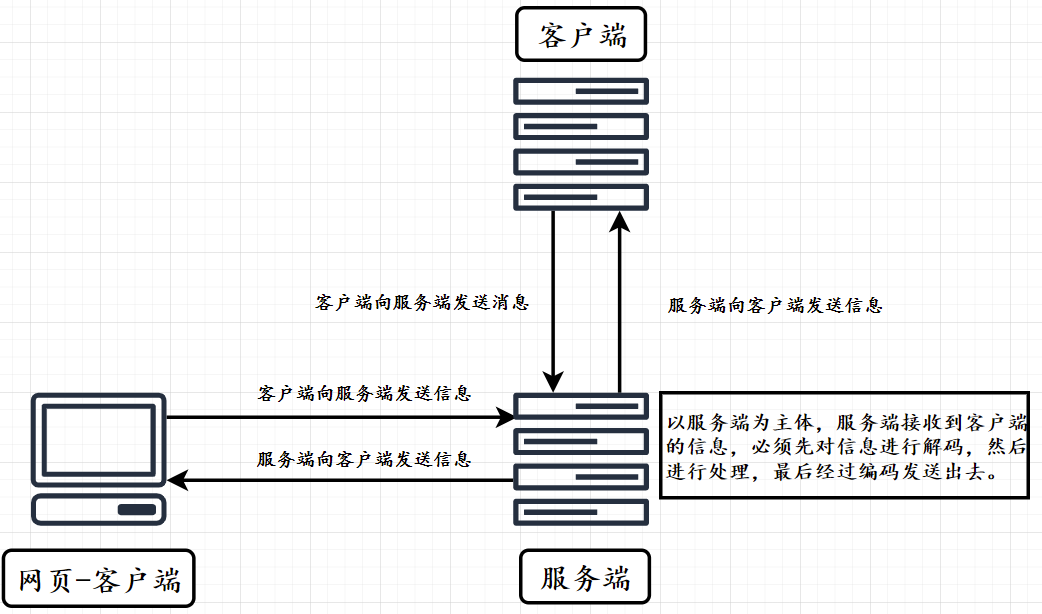
為什麼發送消息出去要用的編碼器而不是解碼器,我們以下面這流程圖為例:
5.編寫StompVersion
即使Spring官方推薦採用SockJS以兼容更多的瀏覽器,但考慮到目前主流的瀏覽器都可以支援WebSocket協議,因此筆者便放棄採用SockJS+ Stomp.over()創建客戶端,而是選用Stomp.client(url)。前者與後者區別主要在於Stomp.client(url)調用時採用的是瀏覽器自身所支援的不同的WebSocket協議,而不是教由SockJS統一實現。
根據源碼可以看到STOMP當的默認版本是['v10.stomp', 'v11.stomp'],因此要讓Netty兼容STOMP則必須讓服務端明白當前採用STOMP協議與其對應的版本,可以看到STOMP協議版本:v10.stomp、v11.stomp。
        client: function(url, protocols) {
            var klass, ws;
            if (protocols == null) {
                protocols = ['v10.stomp', 'v11.stomp'];
            }
            klass = Stomp.WebSocketClass || WebSocket;
            ws = new klass(url, protocols);
            return new Client(ws);
        }
還記得(程式碼3-1)與(程式碼4-1)中 我們需要傳遞附加的子協議嗎?這便是為什麼需要編寫StompVersion(程式碼5-1):
public enum StompVersion {

    STOMP_V11("1.1", "v11.stomp"),

    STOMP_V12("1.2", "v12.stomp");

    //獲取key為stomp_version的常量。如果沒有這樣的常量,將創建並返回一個新的常量。
    public static final AttributeKey<StompVersion> CHANNEL_ATTRIBUTE_KEY = AttributeKey.valueOf("stomp_version");
    public static final String SUB_PROTOCOLS;

    static {
        List<String> subProtocols = new ArrayList<String>(values().length);
        for (StompVersion stompVersion : values()) {
            subProtocols.add(stompVersion.subProtocol);
        }
        //將枚舉類型轉化為字元串格式: v11.stomp,v12.stomp
        SUB_PROTOCOLS = StringUtil.join(",", subProtocols).toString();
    }

    private final String version;
    private final String subProtocol;

    StompVersion(String version, String subProtocol) {
        this.version = version;
        this.subProtocol = subProtocol;
    }

    public String version() {
        return version;
    }

    public String subProtocol() {
        return subProtocol;
    }

    //根據subProtocol返回匹配上的枚舉
    public static StompVersion findBySubProtocol(String subProtocol) {
        if (subProtocol != null) {
            for (StompVersion stompVersion : values()) {
                if (stompVersion.subProtocol().equals(subProtocol)) {
                    return stompVersion;
                }
            }
        }
    }
在程式碼(程式碼4-1)中,即握手事件成功時,我們需要比對並獲取當前Stomp協議的版本,並將該版本資訊設置進CHANNEL_ATTRIBUTE_KEY中:
 StompVersion stompVersion = StompVersion.findBySubProtocol(((HandshakeComplete) evt).selectedSubprotocol());
 ctx.channel().attr(StompVersion.CHANNEL_ATTRIBUTE_KEY).set(stompVersion);
而當客戶端真正連接服務端,發送CONNECT命令時,就會觸發StompChatHandler程式碼中onSend方法(程式碼5-2):
 private static void onConnect(ChannelHandlerContext ctx, StompFrame inboundFrame) {
        String acceptVersions = inboundFrame.headers().getAsString(ACCEPT_VERSION);
        //獲取當前採用的STOMP協議版本
        StompVersion handshakeAcceptVersion = ctx.channel().attr(StompVersion.CHANNEL_ATTRIBUTE_KEY).get();
        StompFrame connectedFrame = new DefaultStompFrame(StompCommand.CONNECTED);
        //設置頭資訊
        connectedFrame.headers()
                .set(VERSION, handshakeAcceptVersion.version())
                .set(SERVER, "Netty-Server")
                .set(HEART_BEAT, "0,0");
        ctx.writeAndFlush(connectedFrame);
 }
這時候客戶端會接受到服務端發送來封裝好的幀,而這些幀正如HTTP中的頭資訊攜帶語義,可以讓客戶端得知當前連接成功以及開始後續其他操作:
<<< CONNECTED
version:1.1
server:Netty-Server
heart-beat:0,0
自此,整個Netty整合STOMP協議告一段落,因為除了Netty官網的示例外,暫時沒有看到有其他部落格對此有說明記錄,因此盡興了比較詳細的講解。內容或許過於分散,希望讀者跟著源碼進行閱讀理解。