搭建docker镜像仓库(二):使用harbor搭建本地镜像仓库
一.系统环境
| 服务器版本 | docker软件版本 | CPU架构 |
|---|---|---|
| CentOS Linux release 7.4.1708 (Core) | Docker version 20.10.12 | x86_64 |
二.前言
在使用Docker拉取镜像时,Docker首先默认从Docker Hub官方下载镜像,很多时候我们的镜像都是使用Dockerfile自定义私有镜像,不对外公开,而且为了安全起见,docker可能在内网环境下运行,所以我们有必要搭建一套docker本地私有镜像仓库,以供整个内网集群环境使用。
搭建镜像仓库主流的有两种方法,一种是使用docker官方提供的registry镜像搭建仓库,简单快捷,但是功能有限;另一种是使用harbor搭建本地镜像仓库,harbor功能更强,使用范围更广,这里介绍使用harbor搭建本地镜像仓库。
关于使用registry搭建本地镜像仓库请查看博客《搭建docker镜像仓库(一):使用registry搭建本地镜像仓库》//www.cnblogs.com/renshengdezheli/p/16646969.html。
三.Harbor
Harbor是由VMware公司开源的企业级的Docker镜像仓库管理项目,它包括权限管理(RBAC)、LDAP、日志审核、管理界面、自我注册、镜像复制和中文支持等功能。Harbor官网地址://github.com/goharbor/harbor
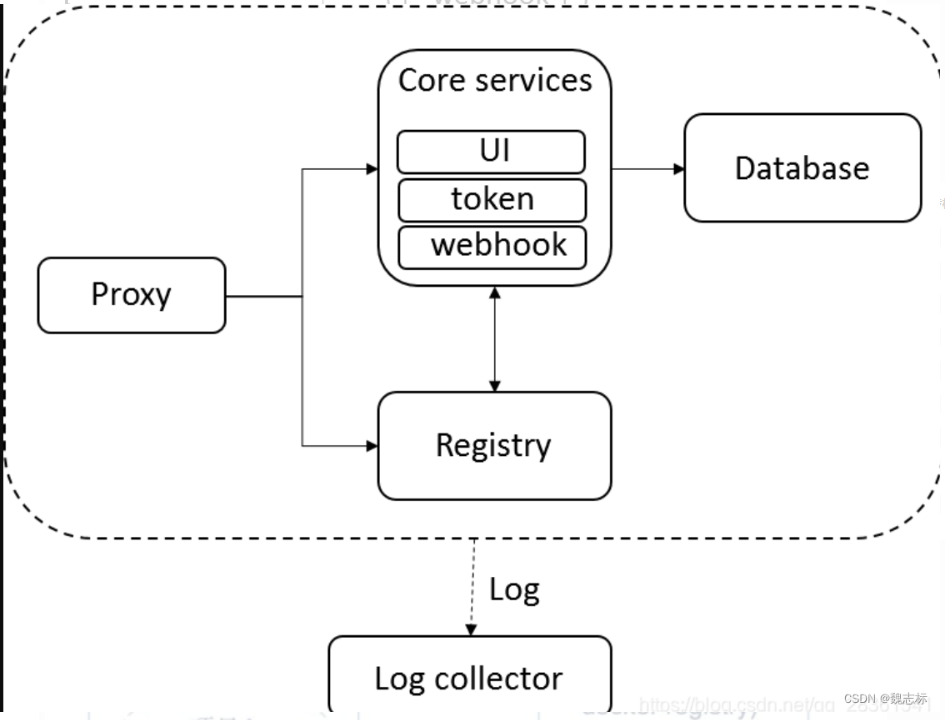
Harbor在架构上主要由6个组件构成:
Proxy:Harbor的registry, UI, token等服务,通过一个前置的反向代理统一接收浏览器、Docker客户端的请求,并将请求转发给后端不同的服务。
Registry: 负责储存Docker镜像,并处理docker push/pull 命令。由于我们要对用户进行访问控制,即不同用户对Docker image有不同的读写权限,Registry会指向一个token服务,强制用户的每次docker pull/push请求都要携带一个合法的token, Registry会通过公钥对token 进行解密验证。
Core services: 这是Harbor的核心功能,主要提供以下服务:
- UI:提供图形化界面,帮助用户管理registry上的镜像(image), 并对用户进行授权。
- webhook:为了及时获取registry 上image状态变化的情况, 在Registry上配置webhook,把状态变化传递给UI模块。
- token 服务:负责根据用户权限给每个docker push/pull命令签发token. Docker 客户端向Regiøstry服务发起的请求,如果不包含token,会被重定向到这里,获得token后再重新向Registry进行请求。
Database:为core services提供数据库服务,负责储存用户权限、审计日志、Docker image分组信息等数据。
Job Services:提供镜像远程复制功能,可以把本地镜像同步到其他Harbor实例中。
Log collector:为了帮助监控Harbor运行,负责收集其他组件的log,供日后进行分析。
各个组件之间的关系如下图所示:
四.使用harbor搭建私有镜像仓库
4.1 环境介绍
架构:k8smaster作为harbor镜像仓库,k8sworker1作为客户端
| 服务器 | 操作系统版本 | CPU架构 | 进程 | 功能描述 |
|---|---|---|---|---|
| k8smaster/192.168.110.137 | CentOS Linux release 7.4.1708 (Core) | x86_64 | harbor | harbor镜像仓库 |
| k8sworker1/192.168.110.138 | CentOS Linux release 7.4.1708 (Core) | x86_64 | docker | docker客户端 |
4.2 k8smaster节点安装配置harbor
4.2.1 安装harbor离线包
首先配置k8smaster节点,注释:harbor默认端口为80
由于harbor依赖于docker-compose,所以需要先安装docker-compose
[root@k8smaster ~]# yum -y install docker-compose
......
正在解决依赖关系
--> 正在检查事务
---> 软件包 docker-compose.noarch.0.1.18.0-4.el7 将被 安装
--> 正在处理依赖关系 python(abi) = 3.6,它被软件包 docker-compose-1.18.0-4.el7.noarch 需要
......
已安装:
  docker-compose.noarch 0:1.18.0-4.el7
......
完毕!
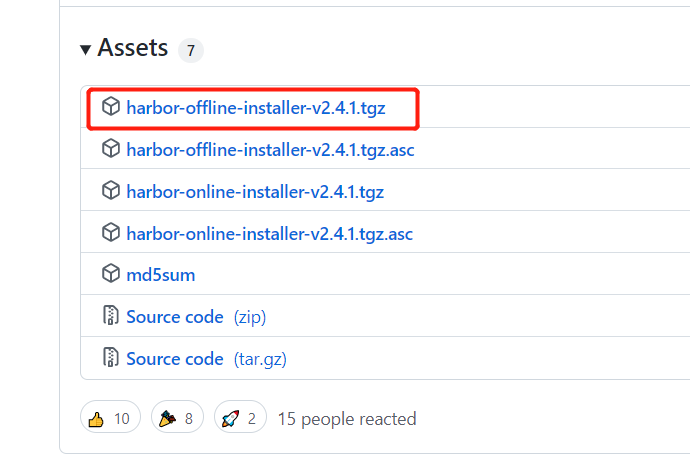
harbor下载:去网上//github.com/goharbor/harbor/releases/tag/v2.4.1下载harbor离线包:harbor-offline-installer-v2.4.1.tgz
解压harbor离线包
[root@k8smaster ~]# ll -t
总用量 1137380
-rw-r--r--  1 root root 612698835 1月   5 11:39 harbor-offline-installer-v2.4.1.tgz

[root@k8smaster ~]# tar xf harbor-offline-installer-v2.4.1.tgz

[root@k8smaster ~]# cd harbor

#harbor.v2.4.1.tar.gz这个压缩包里包含harbor所需的镜像
#harbor.yml.tmpl是harbor配置文件范例
[root@k8smaster harbor]# ls
common.sh  harbor.v2.4.1.tar.gz  harbor.yml.tmpl  install.sh  LICENSE  prepare
harbor.v2.4.1.tar.gz这个压缩包里包含harbor所需的镜像,加载镜像harbor.v2.4.1.tar.gz
[root@k8smaster harbor]# docker load -i harbor.v2.4.1.tar.gz
1e3f0dc884e2: Loading layer [==================================================>]  39.45MB/39.45MB
3fd9ccd5eeaa: Loading layer [==================================================>]  5.275MB/5.275MB
......
Loaded image: goharbor/prepare:v2.4.1
eb57d0945b2e: Loading layer [==================================================>]  7.192MB/7.192MB
dd9069fd53a8: Loading layer [==================================================>]  7.355MB/7.355MB
e779dab1d180: Loading layer [==================================================>]  1.754MB/1.754MB
Loaded image: goharbor/harbor-portal:v2.4.1
harbor.yml.tmpl是harbor配置文件范例,复制一份配置文件
[root@k8smaster harbor]#  ls
common.sh  harbor.v2.4.1.tar.gz  harbor.yml.tmpl  install.sh  LICENSE  prepare

[root@k8smaster harbor]# cp harbor.yml.tmpl harbor.yml
修改配置文件harbor.yml
[root@k8smaster harbor]# vim harbor.yml
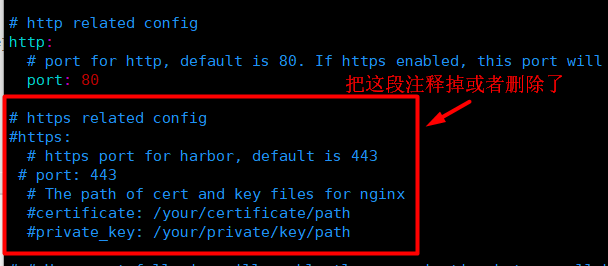
harbor配置文件harbor.yml修改内容如下:
#hostname修改为私有仓库所在的主机名
hostname: k8smaster
#https的配置直接删除或者注释掉
# https related config
#https:
# # https port for harbor, default is 443
# port: 443#
# The path of cert and key files for nginx
# certificate: /your/certificate/path
# private_key: /your/private/key/path
harbor的账号密码
#harbor的账号密码:
harbor_admin_password: Harbor12345
安装harbor
[root@k8smaster harbor]# ./prepare
prepare base dir is set to /root/harbor
WARNING:root:WARNING: HTTP protocol is insecure. Harbor will deprecate http protocol in the future. Please make sure to upgrade to https
Generated configuration file: /config/portal/nginx.conf
Generated configuration file: /config/log/logrotate.conf
Generated configuration file: /config/log/rsyslog_docker.conf
Generated configuration file: /config/nginx/nginx.conf
Generated configuration file: /config/core/env
Generated configuration file: /config/core/app.conf
Generated configuration file: /config/registry/config.yml
Generated configuration file: /config/registryctl/env
Generated configuration file: /config/registryctl/config.yml
Generated configuration file: /config/db/env
Generated configuration file: /config/jobservice/env
Generated configuration file: /config/jobservice/config.yml
Generated and saved secret to file: /data/secret/keys/secretkey
Successfully called func: create_root_cert
Generated configuration file: /compose_location/docker-compose.yml
Clean up the input dir

#安装
[root@k8smaster harbor]# ./install.sh

[Step 0]: checking if docker is installed ...

Note: docker version: 20.10.7

[Step 1]: checking docker-compose is installed ...

Note: docker-compose version: 1.18.0

[Step 2]: loading Harbor images ...
Loaded image: goharbor/registry-photon:v2.4.1
Loaded image: goharbor/notary-signer-photon:v2.4.1
......
Loaded image: goharbor/chartmuseum-photon:v2.4.1
Loaded image: goharbor/prepare:v2.4.1
Loaded image: goharbor/harbor-portal:v2.4.1


[Step 3]: preparing environment ...

[Step 4]: preparing harbor configs ...
prepare base dir is set to /root/harbor
WARNING:root:WARNING: HTTP protocol is insecure. Harbor will deprecate http protocol in the future. Please make sure to upgrade to https
Clearing the configuration file: /config/portal/nginx.conf
Clearing the configuration file: /config/log/logrotate.conf
Clearing the configuration file: /config/log/rsyslog_docker.conf
......
Creating harbor-jobservice ...
Creating nginx ...
✔ ----Harbor has been installed and started successfully.----
4.2.2 配置harbor用户信息,项目信息
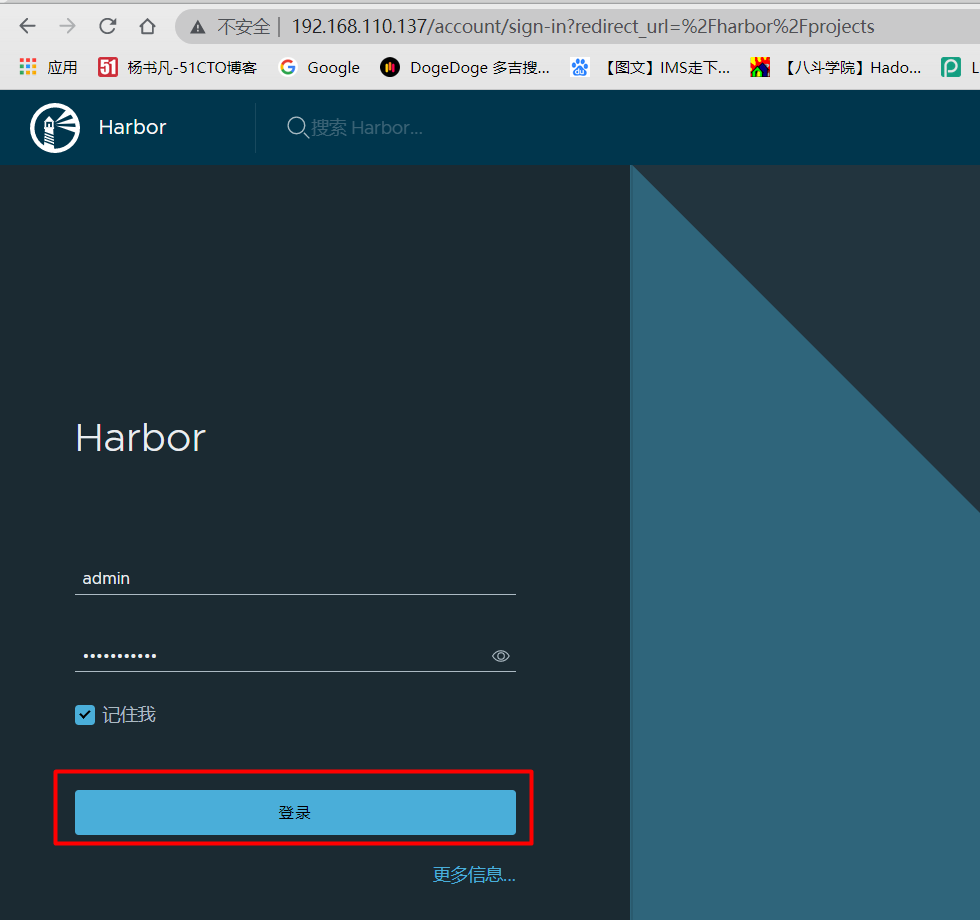
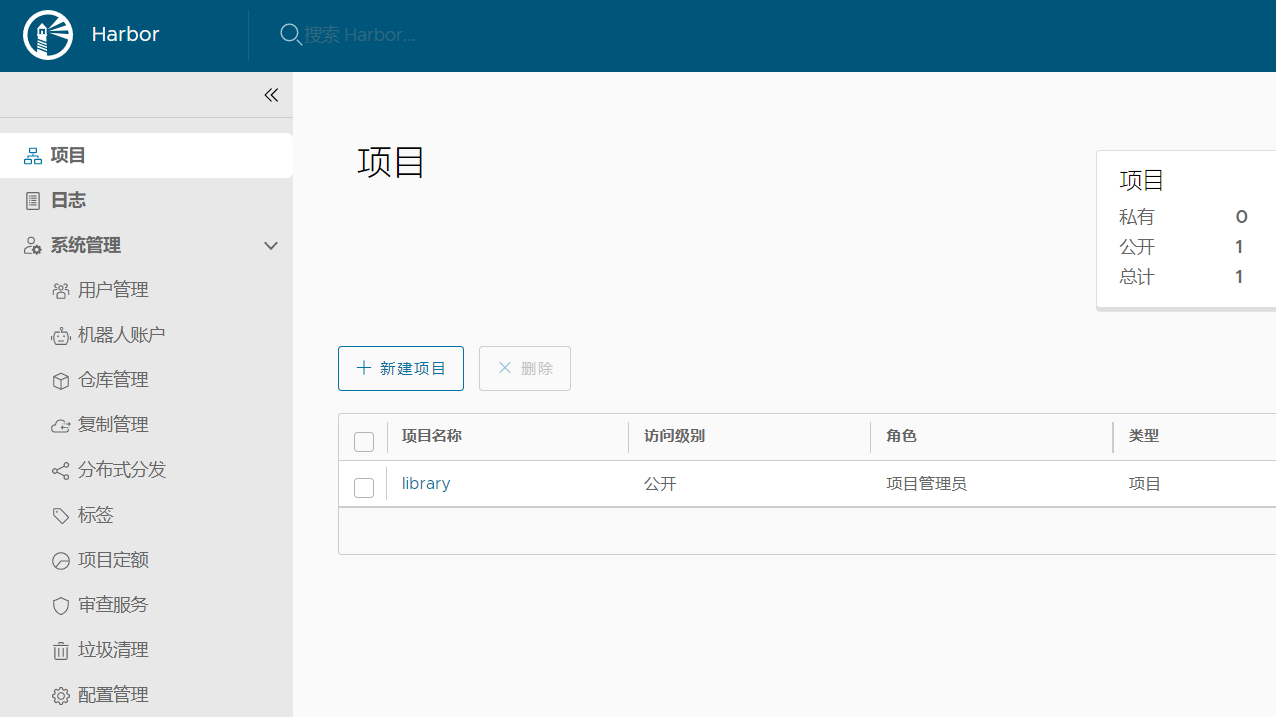
Harbor安装好之后在浏览器界面登录,直接在浏览器输入所在主机IP地址://192.168.110.137/,打开主页输入账号admin,密码:Harbor12345进行登录
harbor登录之后,主界面如下:
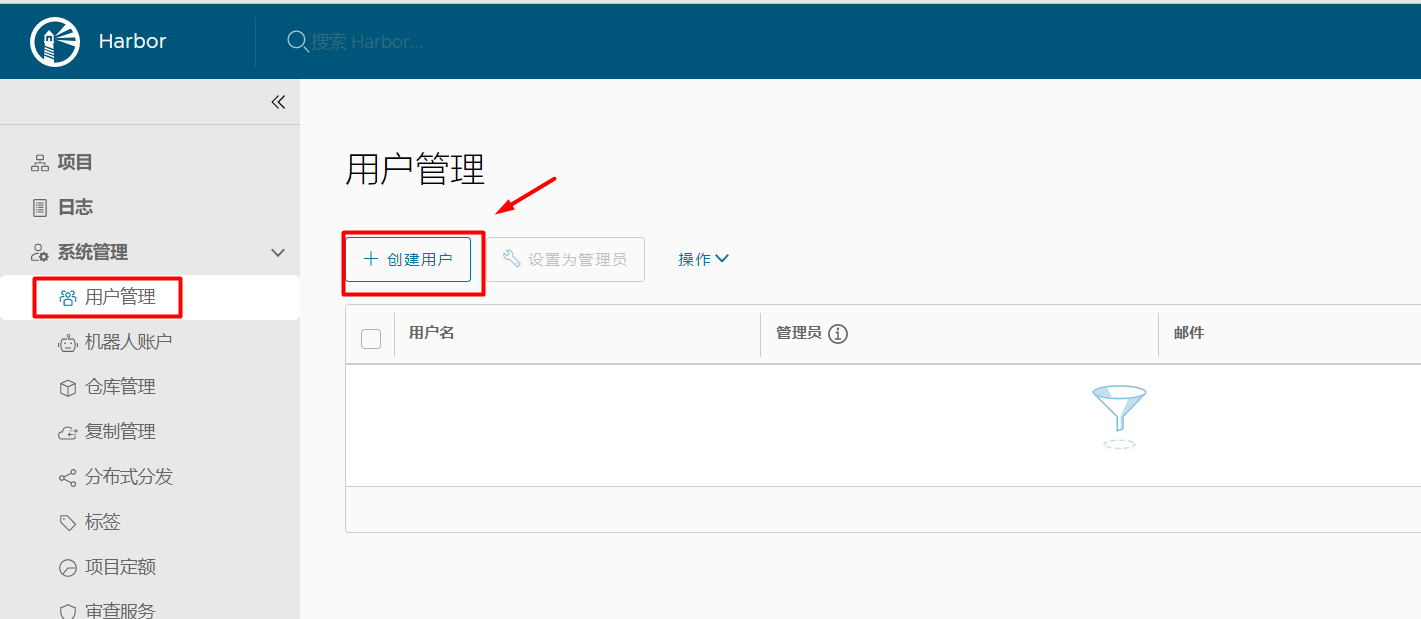
创建用户:点击用户管理–>创建用户
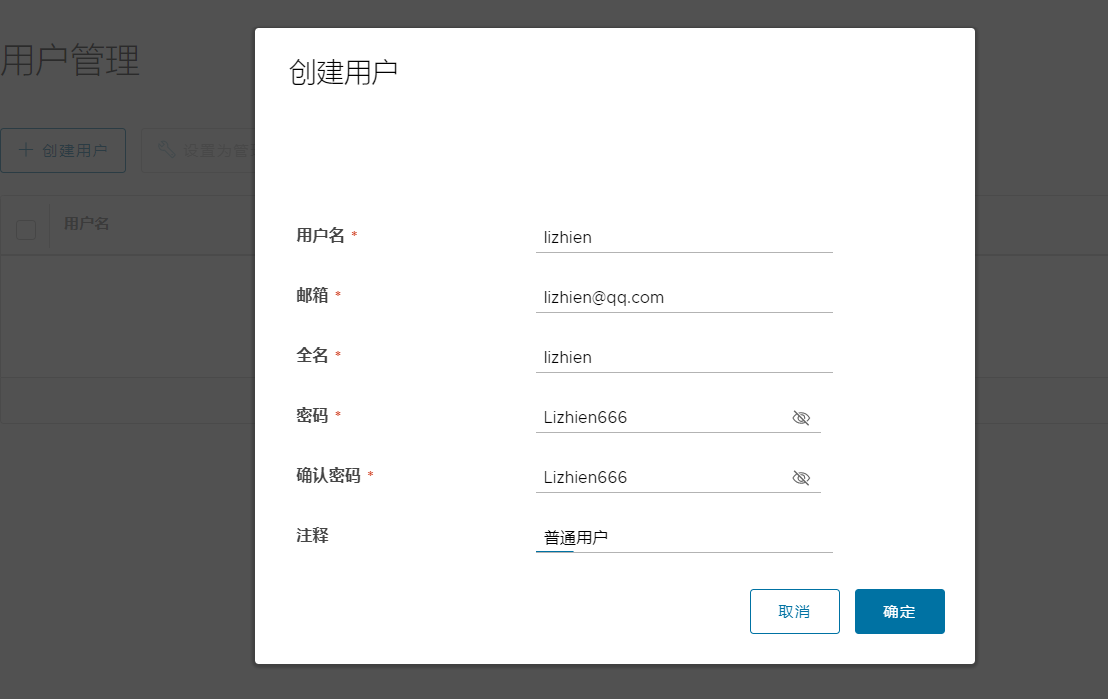
填写用户信息
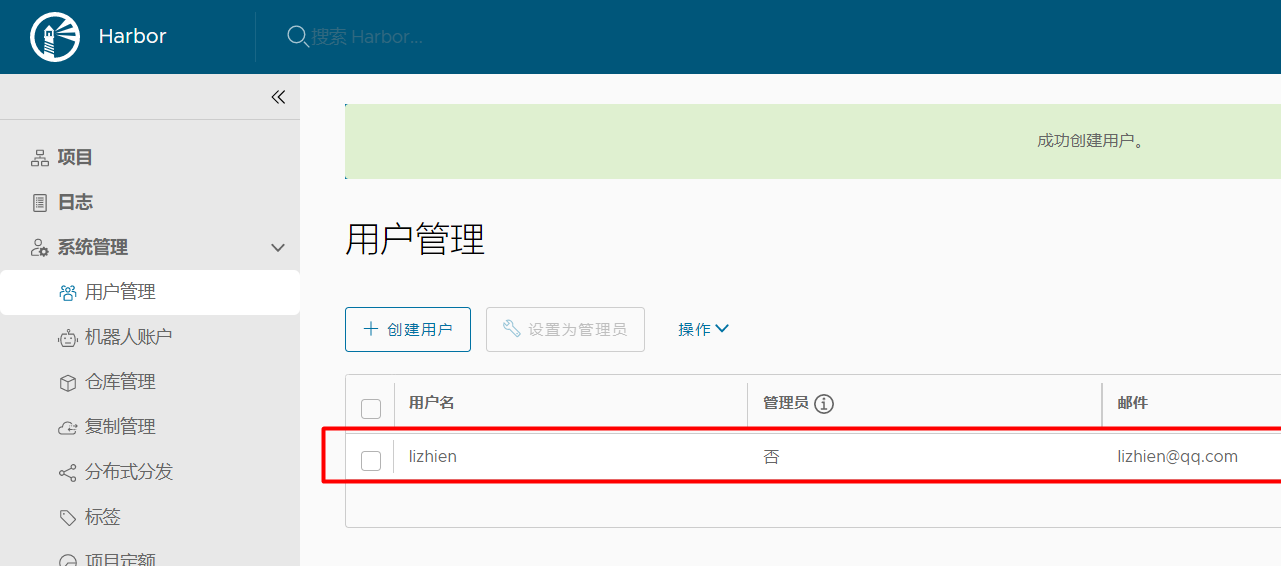
用户创建成功
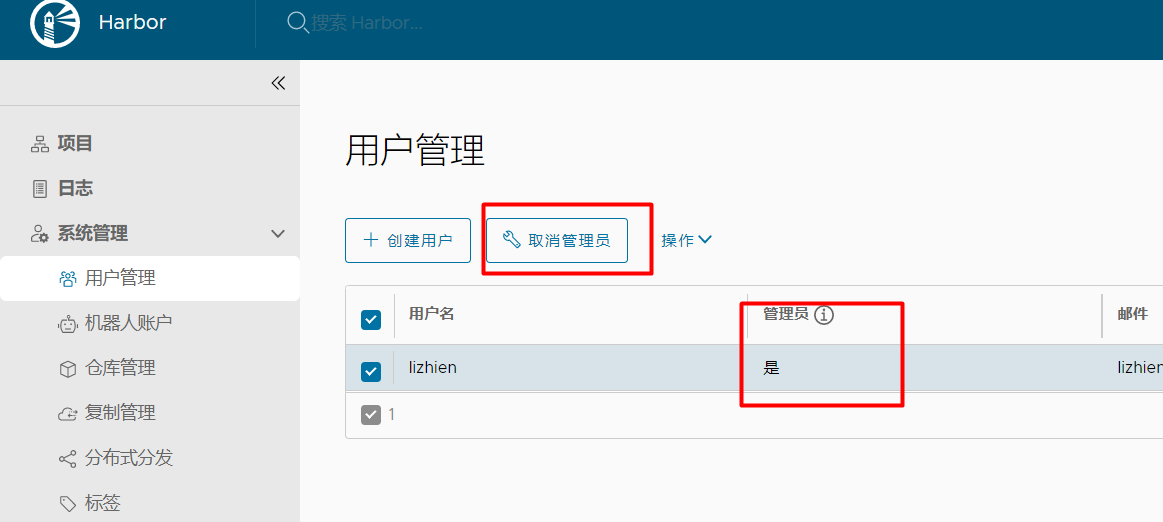
设置用户为管理员
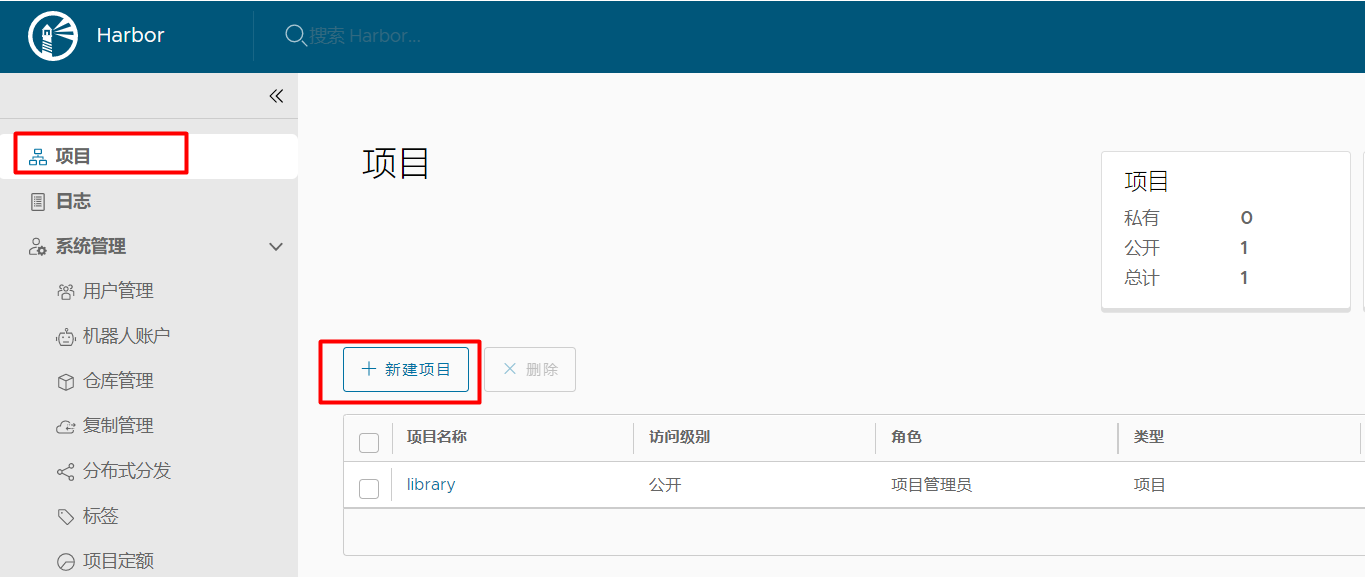
新建项目
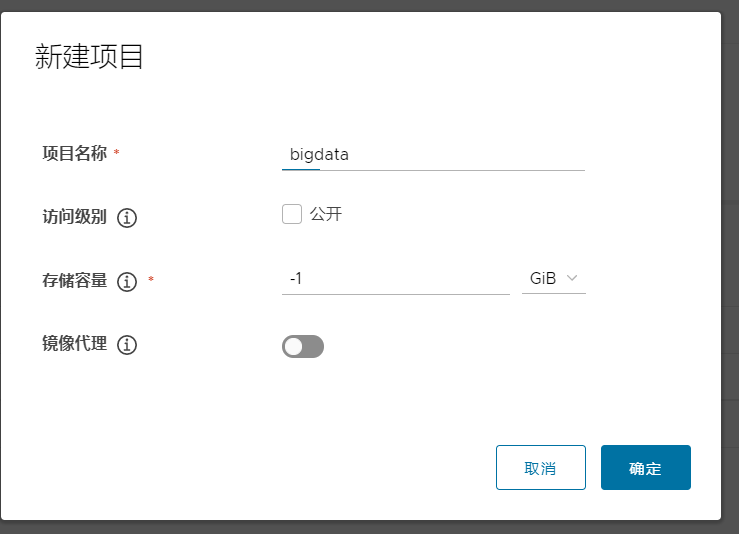
填写项目信息:访问级别不勾选公开则是私有,存储容量-1表示没有容量限制
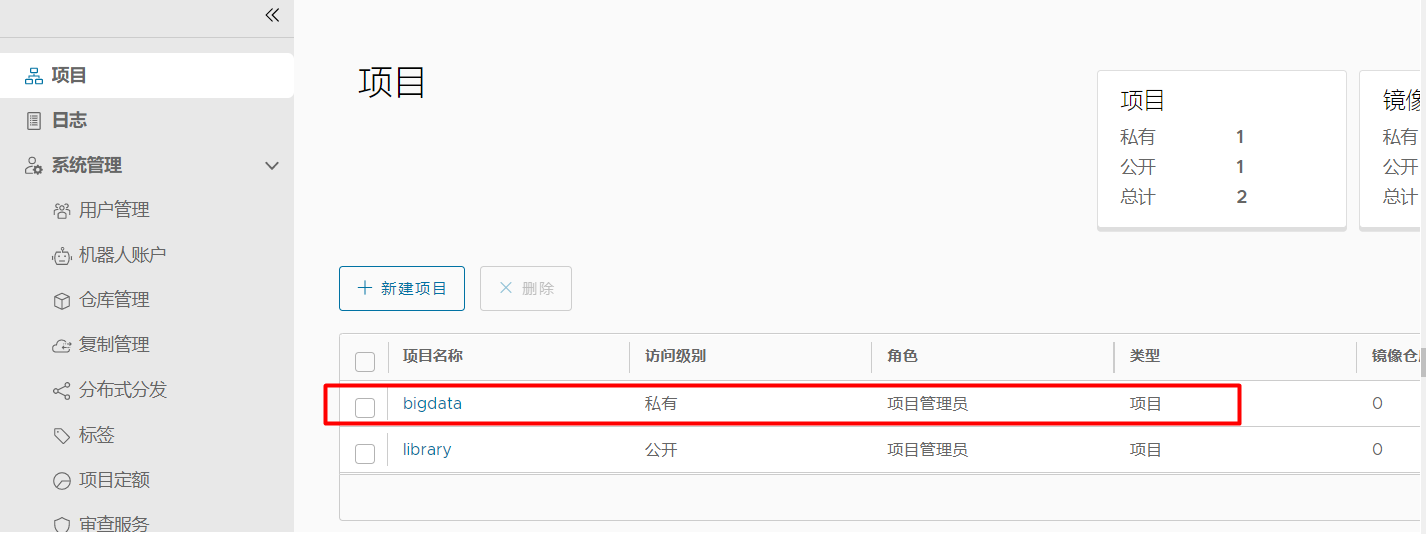
bigdata项目创建成功,点击bigdata进入项目
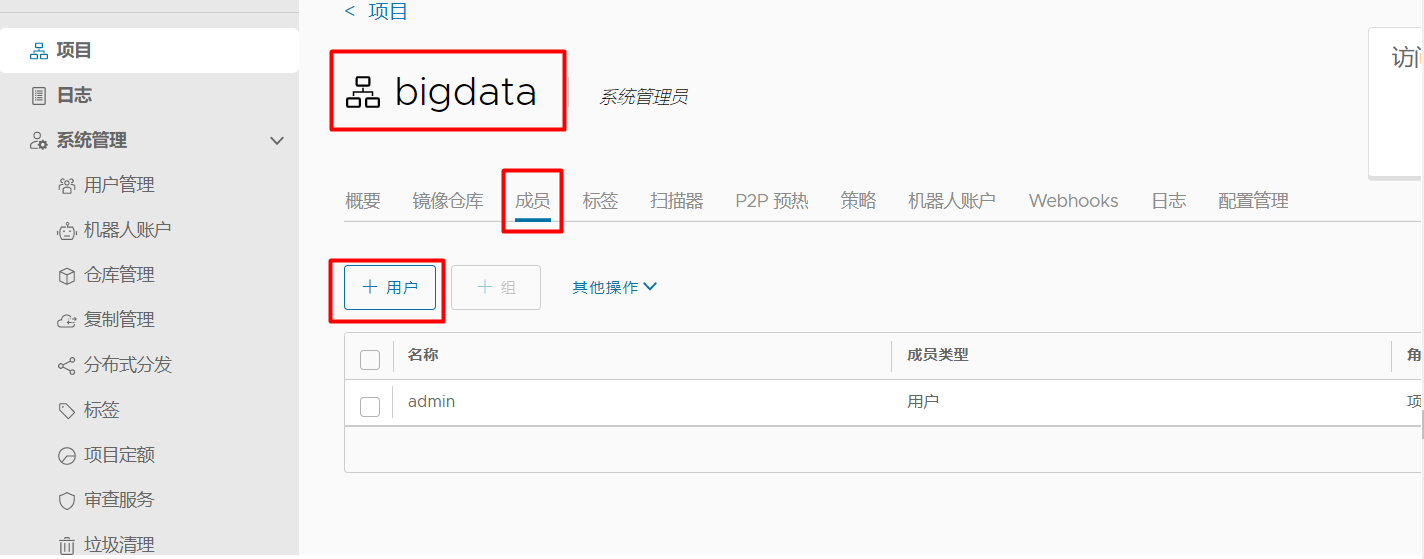
因为bigdata这个项目是私有的,需要把lizhien用户添加进来,不然lizhien没有权限拉取/推送镜像
把lizhien这个用户添加到bigdata项目里:点击成员–>+用户
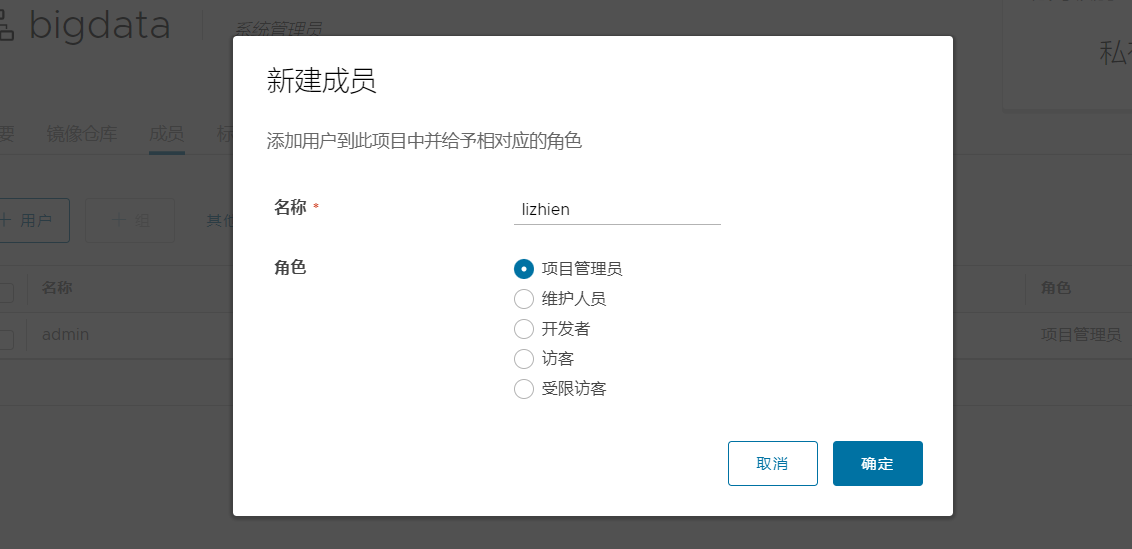
把lizhien添加进来
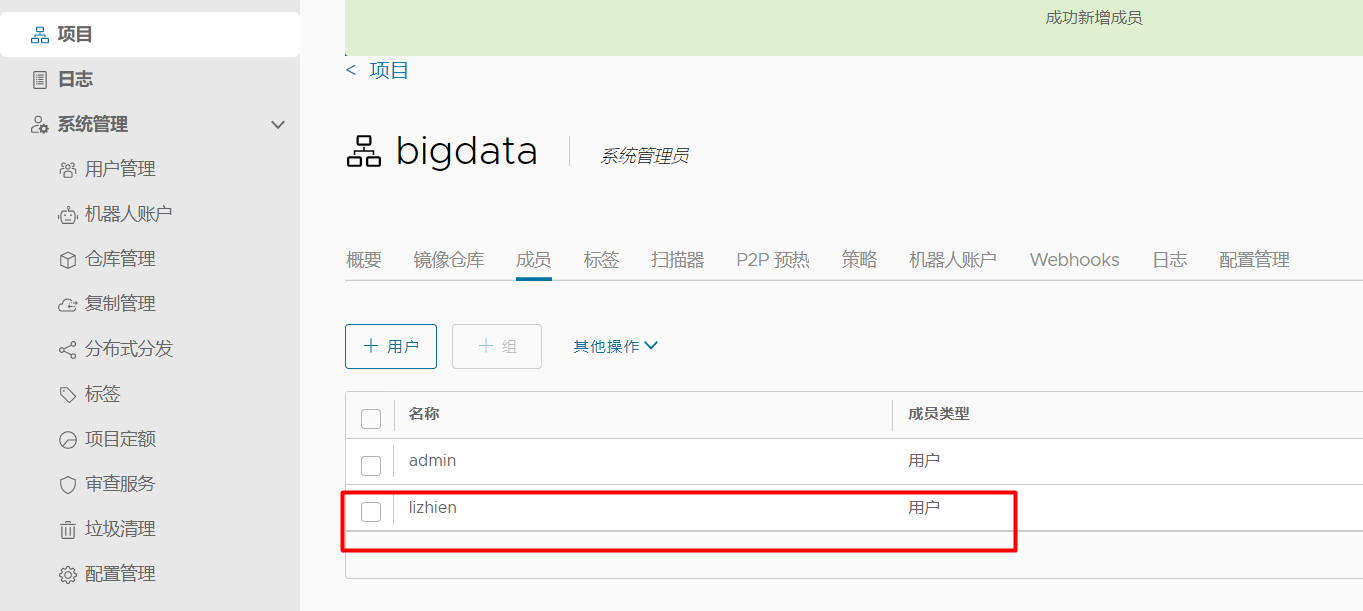
这时,用户lizhien就具有bigdata项目的权限了
4.3 k8sworker1节点配置从harbor私有仓库上传和拉取镜像
4.3.1 上传镜像到harbor私有仓库
配置docker客户端的harbor私有仓库地址
#由于harbor默认端口为80,所以修改/etc/docker/daemon.json的insecure-registries
[root@k8sworker1 ~]# cat /etc/docker/daemon.json
{
"registry-mirrors": ["//frz7i079.mirror.aliyuncs.com"],
"insecure-registries":["192.168.110.137"]
}
重启docker使配置文件生效
[root@k8sworker1 ~]# systemctl restart docker

[root@k8sworker1 ~]# systemctl status docker
● docker.service - Docker Application Container Engine
   Loaded: loaded (/usr/lib/systemd/system/docker.service; enabled; vendor preset: disabled)
   Active: active (running) since 三 2022-01-05 11:28:02 CST; 8s ago
     Docs: //docs.docker.com
 Main PID: 28037 (dockerd)
   Memory: 48.9M
   CGroup: /system.slice/docker.service
           └─28037 /usr/bin/dockerd -H fd:// --containerd=/run/containerd/containerd.sock
查看docker本地镜像,如果本地没有镜像,直接docker pull 拉取镜像即可
[root@k8sworker1 ~]# docker images
REPOSITORY                                                TAG       IMAGE ID       CREATED         SIZE
192.168.110.137:5000/boke/wordpress                       latest    dccaeccfba36   4 years ago     406MB
192.168.110.137:5000/web/tomcat                           v1        72d2be374029   4 years ago     292MB
nginx                                                     1.8       0d493297b409   5 years ago     133MB
修改镜像的别名
[root@k8sworker1 ~]# docker tag 192.168.110.137:5000/boke/wordpress:latest k8smaster/bigdata/wordpress:latest

[root@k8sworker1 ~]# docker tag 192.168.110.137:5000/web/tomcat:v1  k8smaster/bigdata/tomcat:v1

[root@k8sworker1 ~]# docker images
REPOSITORY                                                TAG       IMAGE ID       CREATED         SIZE
192.168.110.137:5000/boke/wordpress                       latest    dccaeccfba36   4 years ago     406MB
k8smaster/bigdata/wordpress                               latest    dccaeccfba36   4 years ago     406MB
192.168.110.137:5000/web/tomcat                           v1        72d2be374029   4 years ago     292MB
k8smaster/bigdata/tomcat                                  v1        72d2be374029   4 years ago     292MB
nginx                                                     1.8       0d493297b409   5 years ago     133MB
推送镜像到harbor仓库,发现推送到了docker.io/k8smaster/bigdata/wordpress,明显是不对的,推送失败
[root@k8sworker1 ~]# docker push k8smaster/bigdata/wordpress:latest
The push refers to repository [docker.io/k8smaster/bigdata/wordpress]
53e16fa1f104: Preparing
562dd11ed871: Preparing
6671cb9eb6b3: Preparing
4214911d5945: Preparing
fed26d7fe7b9: Preparing
c8c6d352c96e: Waiting
5a151fa4136e: Waiting
8747705a74d9: Waiting
adfd7c98cdf6: Waiting
354b4ef9664b: Waiting
2da371244fc1: Waiting
315db89f9acb: Waiting
3d2582fdede2: Waiting
53da01089a82: Waiting
0fd7a67d49b3: Waiting
f0c367fa8636: Waiting
ddd6dcab19ff: Waiting
2c40c66f7667: Waiting
^C
重新修改tag,把主机名修改为IP
[root@k8sworker1 ~]# docker tag 192.168.110.137:5000/boke/wordpress:latest 192.168.110.137/bigdata/wordpress:latest

[root@k8sworker1 ~]# docker tag 192.168.110.137:5000/web/tomcat:v1 192.168.110.137/bigdata/tomcat:v1

[root@k8sworker1 ~]# docker images
REPOSITORY                                                TAG       IMAGE ID       CREATED         SIZE
192.168.110.137/bigdata/wordpress                         latest    dccaeccfba36   4 years ago     406MB
192.168.110.137:5000/boke/wordpress                       latest    dccaeccfba36   4 years ago     406MB
k8smaster/bigdata/wordpress                               latest    dccaeccfba36   4 years ago     406MB
192.168.110.137/bigdata/tomcat                            v1        72d2be374029   4 years ago     292MB
192.168.110.137:5000/web/tomcat                           v1        72d2be374029   4 years ago     292MB
k8smaster/bigdata/tomcat                                  v1        72d2be374029   4 years ago     292MB
nginx                                                     1.8       0d493297b409   5 years ago     133MB
继续推送镜像,但是unauthorized,需要登录才能推送镜像
[root@k8sworker1 ~]# docker push 192.168.110.137/bigdata/wordpress:latest
The push refers to repository [192.168.110.137/bigdata/wordpress]
53e16fa1f104: Preparing
562dd11ed871: Preparing
6671cb9eb6b3: Preparing
4214911d5945: Preparing
fed26d7fe7b9: Waiting
c8c6d352c96e: Waiting
5a151fa4136e: Waiting
8747705a74d9: Waiting
adfd7c98cdf6: Waiting
354b4ef9664b: Waiting
2da371244fc1: Waiting
315db89f9acb: Waiting
3d2582fdede2: Waiting
53da01089a82: Waiting
0fd7a67d49b3: Waiting
f0c367fa8636: Waiting
ddd6dcab19ff: Waiting
2c40c66f7667: Waiting
unauthorized: unauthorized to access repository: bigdata/wordpress, action: push: unauthorized to access repository: bigdata/wordpress, action: push
登录harbor
#使用主机名登录失败
[root@k8sworker1 ~]# docker login k8smaster
Username: lizhien
Password:
Error response from daemon: Get //k8smaster/v2/: dial tcp 192.168.110.137:443: connect: connection refused

#使用IP登录成功,使用刚才创建的lizhien用户登录
[root@k8sworker1 ~]# docker login 192.168.110.137
Username: lizhien
Password:
WARNING! Your password will be stored unencrypted in /root/.docker/config.json.
Configure a credential helper to remove this warning. See
//docs.docker.com/engine/reference/commandline/login/#credentials-store

Login Succeeded

#此时家目录下会多了一个.docker/config.json 文件
[root@k8sworker1 ~]# ls .docker/
config.json
[root@k8sworker1 ~]# cat .docker/config.json
{
        "auths": {
                "192.168.110.137": {
                        "auth": "bGl6aGllbjpMaXpoaWVuNjY2"
                }
        }
}
再次推送镜像,此时推送镜像成功
[root@k8sworker1 ~]# docker push 192.168.110.137/bigdata/wordpress:latest
The push refers to repository [192.168.110.137/bigdata/wordpress]
53e16fa1f104: Pushed
562dd11ed871: Pushed
......
f0c367fa8636: Pushed
ddd6dcab19ff: Pushed
2c40c66f7667: Pushed
latest: digest: sha256:ca4cf4692b7bebd81f229942c996b1c4e6907d6733e977e93d671a54b8053a22 size: 4078

[root@k8sworker1 ~]# docker push 192.168.110.137/bigdata/tomcat:v1
The push refers to repository [192.168.110.137/bigdata/tomcat]
f79699072473: Pushed
8cb01d738d7e: Pushed
......
fe40be59465f: Pushed
cf4ecb492384: Pushed
v1: digest: sha256:6241d7435b5c4e9d54be7d61e834836a71b1934b5403e01eff8768f0e2bcf210 size: 3045
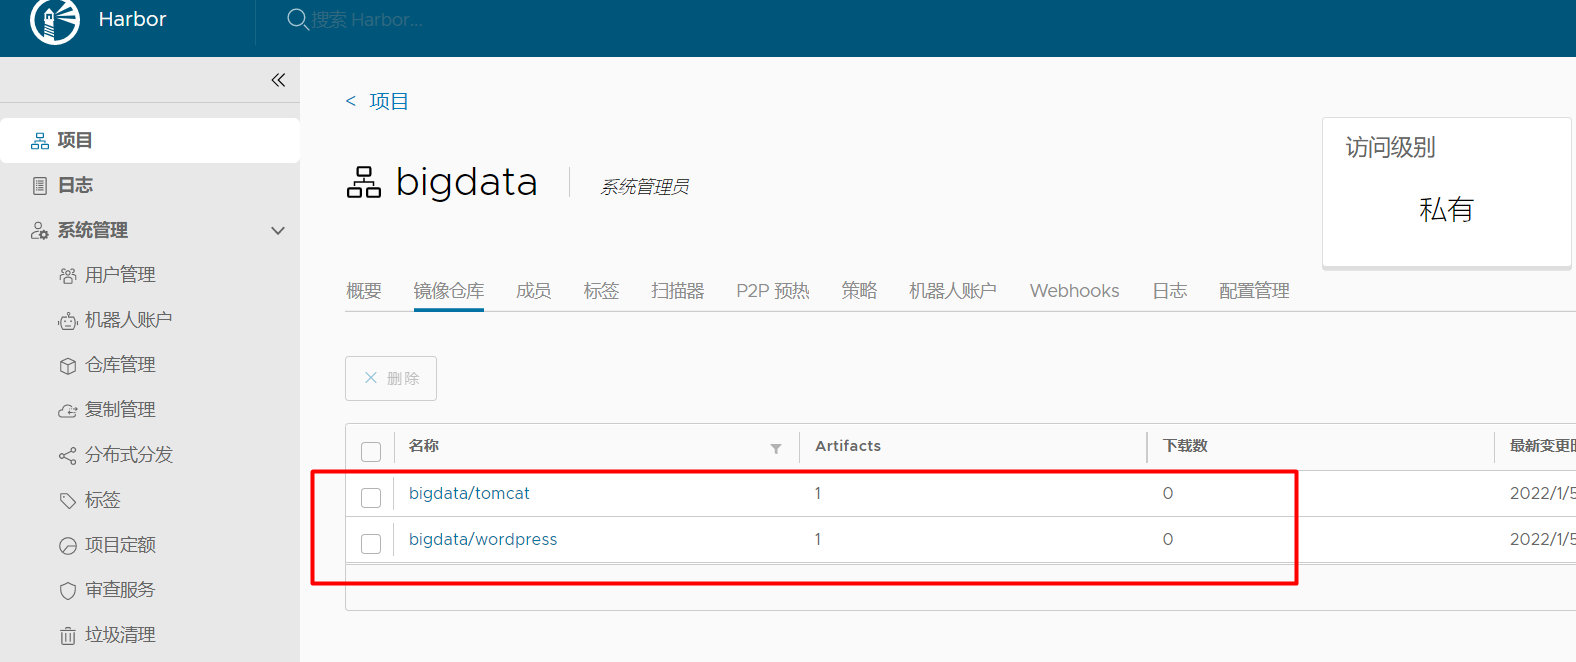
到harbor界面上查看,发现bigdata项目下已经存在镜像了
4.3.2 从harbor私有仓库里拉取镜像
首先删除本地镜像
[root@k8sworker1 ~]# docker rmi 192.168.110.137:5000/web/tomcat:v1 192.168.110.137:5000/boke/wordpress:latest 192.168.110.137/bigdata/wordpress:latest

[root@k8sworker1 ~]# docker images
REPOSITORY                                                TAG       IMAGE ID       CREATED         SIZE
从仓库拉取镜像,如果之前退出登录harbor了,则需要docker login 192.168.110.137登录仓库
[root@k8sworker1 ~]# docker pull 192.168.110.137/bigdata/tomcat:v1
v1: Pulling from bigdata/tomcat
a2149b3f2ac2: Pull complete
.....
321b0457f24e: Pull complete
0f83e948f35a: Pull complete
8dbb09972def: Pull complete
Digest: sha256:6241d7435b5c4e9d54be7d61e834836a71b1934b5403e01eff8768f0e2bcf210
Status: Downloaded newer image for 192.168.110.137/bigdata/tomcat:v1
192.168.110.137/bigdata/tomcat:v1

[root@k8sworker1 ~]# docker images
REPOSITORY                                                TAG       IMAGE ID       CREATED         SIZE
192.168.110.137/bigdata/wordpress                         latest    dccaeccfba36   4 years ago     406MB
192.168.110.137/bigdata/tomcat                            v1        72d2be374029   4 years ago     292MB
自此harbor仓库搭建完毕也可以正常上传和拉取镜像了

