Java I/O框架 - 總結概述
- 2021 年 11 月 1 日
- 筆記
- 測試開發 - Java, Java I/O
👇👇👇總結👇👇👇
以下需要重點掌握:
- 位元組流,以下讀取結束全部返回-1
- 位元組節點流-訪問文件 FileInputStream/FileOutputStream
- 可以讀取任意文件
- 可以複製圖片
- 讀取字元String類型會亂碼
- 位元組處理流-緩衝流 BufferedInputStream/BufferedOutputStream
- 需要節點流作為入參,即位元組的訪問文件流
- 寫入文件時,需要調用flush()方法,才能寫入文件中
- 位元組處理流-對象流(類) ObjectInputStream/ObjectOutputStream
- 對對象進行序列化和反序列化
- 序列化:對象輸出流,將數據寫入文件中
- 反序列化:對象輸入流,將文件中的數據寫入記憶體磁碟中
- 需要節點流作為入參,即位元組的訪問文件流
- 可以通過集合來序列化或反序列化多個對象
- 序列化和反序列化的對象需要繼承Serializable介面
- 位元組處理流-列印流PrintStream
- 位元組處理流-轉換流InputStreamReader/OutputStreamWriter
- 將位元組流轉換成字元流
- 可以選擇轉換成字元流的編碼格式
- 需要將位元組訪問文件作為節點流
- 位元組節點流-訪問文件 FileInputStream/FileOutputStream
- 字元流
- 字元節點流-訪問文件FileReader/FileWriter
- 讀取結束返回null
- 可以複製,寫入字元
- 不能複製圖片
- 字元處理流-緩衝流BufferedReader/BufferedWriter
- 讀取結束返回-1
- 字元緩衝輸入流支援一行一行讀取到記憶體,使用方法readLine()
- 字元緩衝輸出流支援使用newLine()的方法進行換行,其它字元流換行都是「\r\n」
- 需要將字元節點流-訪問文件作為節點流,進行入參
- 字元處理流-列印流 PrintWriter
- 常用於日誌生成
- 字元節點流-訪問文件FileReader/FileWriter
| 流知識點總結(按照單位分類) | |||||
| 位元組流 | 字元流 | ||||
| 分類 | 位元組輸入流 | 位元組輸出流 | 字元輸入流 | 字元輸出流 | |
| 抽象基類 | 抽象基類 | InputStream | OutputStream | Reader | Writer |
| 節點流 | 訪問文件 | FileInputStream | FileOutputStream | FileReader | FileWriter |
| 處理流 | 訪問數組 | ByteArrayInputStream | ByteArrayOutputStream | CharArrayReader | CharArrayWriter |
| 訪問管道 | PipedInputStream | PipedOutputStream | PipedReader | PipedWriter | |
| 訪問字元串 | StringReader | StringWriter | |||
| 緩衝流 | BufferedInputStream | BufferedOutputStream | BufferedReader | BufferedWriter | |
| 轉換流 | InputStreamReader | OutputStreamWriter | |||
| 對象流(類) | ObjectInputStream | ObjectOutputStream | |||
| 對象流(文件) | FileInputStream | FileOutputStream | FileReader | FileWriter | |
| 列印流 | PrintStream | PrintWriter | |||
| 退回輸入流 | PushbackInputStream | PushbackReader | |||
| 特殊流 | DataInputStream | DataOutputStream | |||
| 備註:藍底的均為需要相對應的節點流,進行入參 | |||||
👇👇👇概述👇👇👇
流的概念
-
概念:記憶體與存儲設備之間傳輸數據的通道。
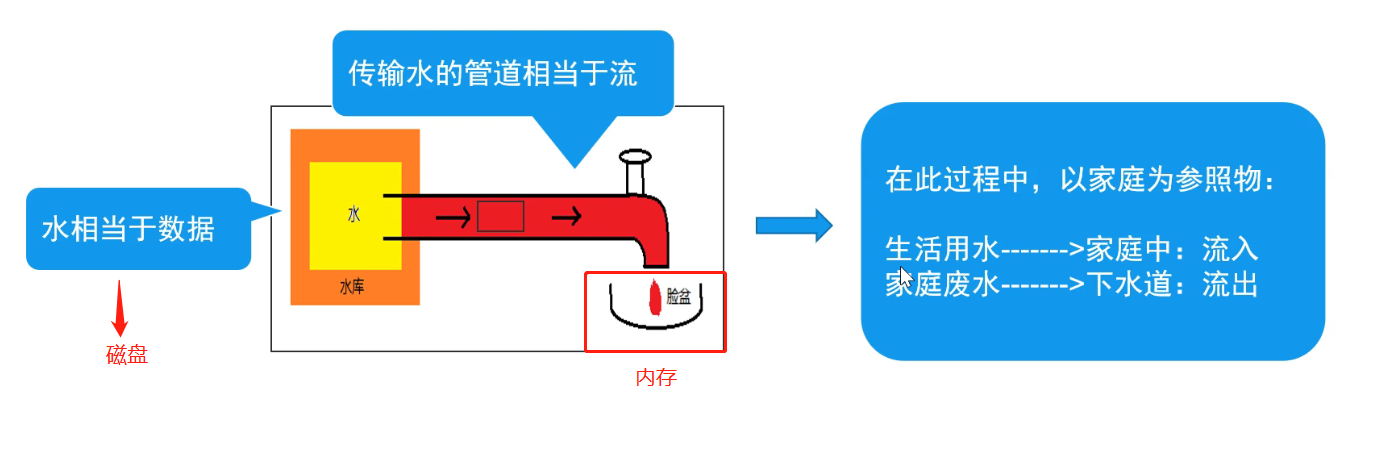
-
水藉助管道傳輸;數據藉助流傳輸。
流的分類
按方向【重點】
- 輸入流:將<存儲設備>中的內容讀入到<記憶體>中。
- 輸出流:將<記憶體>中的內容寫入到<存儲設備>中。

按單位
- 位元組流:以位元組為單位,可以讀寫所有數據。
- 字元流:以字元為單位,只能讀寫文本數據。
按功能
- 位元組流:具有實際傳輸數據的讀寫功能。
- 過濾流:在節點流的基礎之上增強功能。
👇下面將根據單位類型:位元組流、字元流,對I/O框架進行概述
位元組流

位元組流的父類(抽象類)
- InputStream位元組輸入流
public int read(){}public int read(byte[] b){}public int read(byte[] b,int off,int len){}
- OutputStream位元組輸出流
public void write(int n){}public void write(byte[] b){}public void write(byte[] b,int off,int len){}
位元組流的子類
文件位元組流
- FileInputStream
- 構造方法
- String:以路徑的方式初始一個輸入流;常用;比如:「D://javaTest.txt」
- File:以File實例初始一個輸入流 ;比如:new File(「D://javaTest.txt」)
- FileDescriptor:以FileDescriptor實例初始一個輸入流,FileDescriptor是一個文件描寫敘述符;使用的fdObj文件描述符來作為參數,文件描述符是指與電腦系統中的文件的連接,前面兩個方法的源碼中最後都是利用文件描述符來建立連接的
- 構造方法

-
- read方法重載
public int read()//從輸入流中讀取一個位元組數據,返回讀到的位元組數據,如果達到文件末尾,返回-1。public int read(byte[] b)//從輸入流中讀取位元組數組長度的位元組數據存入數組中,返回實際讀到的位元組數;如果達到文件的尾部,則返回-1。
- read方法重載
- FileOutputStream構造方法
- File、String:通過file對象或者文件路徑來創建文件流bu;從文件頭寫入文件
- File,boolean、String,boolean:創建文件流形式同上;當boolean為true時,對文件的寫入為「追加數據」,當boolean為false時,對文件的寫入為「覆蓋原有數據」
- FileDescriptor:使用的fdObj文件描述符來作為參數,來創建文件流

-
- write方法重載
public void write(int b)//將指定位元組寫入輸出流。public void write(bute[] b)//一次寫多個位元組,將b數組中所有位元組,寫入輸出流。
- write方法重載
 1 /**
 2  * 演示文件位元組輸入流的使用
 3  * FileInputStream
 4  */
 5 public class Demo01 {
 6     public static void main(String[] args) throws Exception{
 7         //1.創建FileInputStream,並指定文件路徑
 8         FileInputStream fis = new FileInputStream("D://javaText.txt");//文件內容為:a-z26個英文字母
 9
10         //2.讀取文件
11         //2.1 read()讀取單個位元組,一個位元組一個位元組讀
12         /*
13         int data = fis.read();
14         System.out.println((char) data);//強轉成char類型,默認的是ASCLL編碼格式
15         while ((data=fis.read()) != -1) {   //通過循環一個位元組一個位元組獲取全文內容,賦值給data
16             System.out.println((char) data);
17         }
18          */
19         //2.2 read(byte[] b);讀取多個位元組
20         //2.2.1 數組空間大於文件內容時,直接放
21         /*
22         byte[] b = new byte[1024];
23         int count=fis.read(b);//計數
24         System.out.println(count);
25         System.out.println(new String(b));
26          */
27         //2.2.2 數組空間小於文件內容時,使用循環去獲取
28         byte[] b =new byte[2];
29         int count =0;
30         while ((count=fis.read(b))!=-1){  //fis.read讀取的內容放到b中,讀取結束後,fis.read賦給計數參數count的值為-1
31             System.out.println(new String(b,0,count));//從0開始到count為-1之間,列印b中的字元串內容
32         }
33
34         //3.關閉流
35         fis.close();
36     }
37 }
 1 /**
 2  * 演示文件位元組輸出流的使用
 3  * FileOutputStream
 4  */
 5 public class Demo02 {
 6     public static void main(String[] args) throws Exception {
 7         //1.創建文件輸出流對象,沒有文件的會自動生成
 8         FileOutputStream fos = new FileOutputStream("D://javaText2.txt",true); //為true,不覆蓋原文件內容,不斷追加
 9
10         //2.輸出流,文件中寫入數據
11         //2.1 一個位元組一個位元組寫入
12         fos.write(97);//數字代表的時ASCLL碼對應的字元,97對應的是小寫的a
13         fos.write('b');
14         fos.write('c');
15         fos.write(66);
16         //2.2 通過字元串寫入
17         String string = "helloworld";
18         fos.write(string.getBytes());
19
20         //3.關閉輸出流
21         fos.close();
22
23
24     }
25 }
文件位元組流案例-複製操作
 1 /**
 2  * 使用文件位元組流複製文件
 3  */
 4 public class Demo03 {
 5     public static void main(String[] args) throws Exception{
 6         //創建輸入流,輸入到記憶體
 7         FileInputStream fis = new FileInputStream("D://test01.png");
 8         //創建輸出流,輸出到硬碟/文件
 9         FileOutputStream fos = new FileOutputStream("D://test02.png");
10
11         int count;//保存一次實際讀取的個數
12         byte[] b = new byte[1024];
13
14         while ((count=fis.read(b))!=-1){ //讀取文件資訊,存儲到數組b中,當讀取結束即計數cout=-1時,結束while循環
15             fos.write(b,0,count); //將數組b從0開始到-1的,寫入到fos對象的文件中
16         }
17
18         //關閉流
19         fis.close();
20         fos.close();
21
22     }
23 }
位元組緩衝流
-
緩衝流:BufferedInputStream/BufferedOutputStream
- 提高IO效率,減少訪問磁碟的次數;
- 數據存儲在緩衝區中。flush可以將快取區的內容寫入文件,也可以直接close。
 1 /**
 2  * 使用位元組緩衝流讀取
 3  * BufferedInputStream
 4  */
 5 public class Demo04 {
 6     public static void main(String[] args) throws Exception{
 7         //使用該輸入流每次會從硬碟讀入
 8         FileInputStream fis = new FileInputStream("D://javaText.txt");
 9         //緩衝流需要一個底層流
10         //緩衝流每次從緩衝區讀取
11         BufferedInputStream bis = new BufferedInputStream(fis);
12
13         //讀取
14         /*
15         int data;
16         while ((data=bis.read())!=-1){
17             System.out.println((char)data);
18         }
19          */
20
21         //我們也可以自己創建一個緩衝區;
22         //每次讀取從自己創建的緩衝區中讀取。
23         int count;
24         byte[] bytes = new byte[2];
25         while ((count=bis.read(bytes,0,bytes.length))!=-1){
26             System.out.println(new String(bytes,0,count));
27         }
28
29         bis.close();
30     }
31 }
 1 /**
 2  * 使用位元組緩衝流寫入文件
 3  * BufferedOutputStream
 4  */
 5 public class Demo05 {
 6     public static void main(String[] args) throws Exception{
 7         //緩衝流將數據寫入到緩衝區
 8         FileOutputStream fos = new FileOutputStream("D://javaText2.txt",true);
 9         BufferedOutputStream bos = new BufferedOutputStream(fos);
10
11         //寫入文件
12         String string = "Hello World";
13         bos.write(string.getBytes());
14         bos.write("  Hello Java".getBytes());
15
16         bos.flush();//相當於刷新,提交的功能
17         //最後close其實內部也會調用flush
18         bos.close();
19     }
20 }
 1 /*
 2  *使用位元組緩衝區進行複製操作
 3  */
 4 public class Demo06 {
 5     public static void main(String[] args) throws Exception{
 6
 7         //創建快取區-輸入流底層流
 8         FileInputStream fis = new FileInputStream("D://test01.png");
 9         //創建快取區輸入流
10         BufferedInputStream bis = new BufferedInputStream(fis);
11         //創建快取區-輸出流底層流
12         FileOutputStream fos = new FileOutputStream("D://test02.png");
13         //創建緩衝區輸出流
14         BufferedOutputStream bos = new BufferedOutputStream(fos);
15         //聲明計數變數
16         int count;
17         //bytes存儲數據
18         byte[] bytes = new byte[1024];
19         while ((count=bis.read(bytes,0,bytes.length))!=-1){//快取輸入流讀取數據存到數組中,當讀取結束,bis.read返回-1,退出循環
20             bos.write(bytes,0,count);//快取輸出流寫入數據到文件中,從0-cont
21         }
22         bos.close();
23         bis.close();
24     }
25 }
對象流
-
對象流:ObjectOutputStream/ObjectInputStream
- 增加了緩衝區功能。
- 增強了讀寫8種基本數據類型和字元串功能。
- 增強了讀寫對象的功能:
readObject()//從流中讀取一個對象。反序列化writeObject(Object obj)向流中寫入一個對象。序列化
使用流傳輸對象的過程稱為序列化、反序列化。
- 序列化:記憶體將對象寫入文件中
- 反序列化:將文件中對象讀到記憶體中
序列化
 1 /**
 2  * 學生類
 3  */
 4 public class Student {
 5     private String name;
 6     private int age;
 7
 8     public Student(String name, int age) {
 9         this.name = name;
10         this.age = age;
11     }
12
13     public String getName() {
14         return name;
15     }
16
17     public void setName(String name) {
18         this.name = name;
19     }
20
21     public int getAge() {
22         return age;
23     }
24
25     public void setAge(int age) {
26         this.age = age;
27     }
28
29     @Override
30     public String toString() {
31         return "Student{" +
32                 "name='" + name + '\'' +
33                 ", age=" + age +
34                 '}';
35     }
36 }
 1 /**
 2  * 使用ObjectOutputStream實現對象的序列化
 3  * 註:序列化的類必要要實現Serializable介面
 4  */
 5 public class Demo07 {
 6     public static void main(String[] args) throws Exception{
 7         //1.創建對象流
 8         //1.1 創建對象流底層流,基於FileOutputStream
 9         FileOutputStream fos = new FileOutputStream("D://stu.bin");
10         //1.2 創建對象流,fos為入參
11         ObjectOutputStream oos = new ObjectOutputStream(fos);
12
13         //2.序列化(寫入操作)
14         Student student = new Student("張三",20);
15         oos.writeObject(student);
16
17         //3.關閉
18         oos.close();
19         System.out.println("序列化完畢");
20     }
21 }
註:執行上述程式碼後IDE會拋出java.io.NotSerializableException,意思是Student類不能被序列化,需要實現Serializable介面。

1 //不需要實現任何方法,標記作用
2 public class Student implements Serializable {}
Serializable其實是一個標誌介面,用來標誌該類是否可以被序列化。我們進到該介面的源碼可以發現裡面不含任何屬性和抽象方法。

1 public interface Serializable {}
反序列化
 1 /**
 2  * 使用ObjectInputStream實現反序列化(讀取重構對象)
 3  */
 4 public class Demo08 {
 5     public static void main(String[] args) throws Exception{
 6         //1.創建對象流
 7         //1.1 創建對象流節點流,即底層流
 8         FileInputStream fis = new FileInputStream("D://stu.bin");
 9         //1.2 創建對象流,fis入參
10         ObjectInputStream ois = new ObjectInputStream(fis);
11
12         //2.讀取文件,定義參數student來接這個讀取的內容,讀取的內容是Student類型,所以需要強制轉換
13         Student student = (Student) ois.readObject();
14
15         //3.關閉
16         ois.close();
17         System.out.println("執行完畢");
18         System.out.println(student.toString());
19
20     }
21 }

序列化和反序列化注意事項
①序列化類必須實現Serializable介面,前文已經說過。
②序列化類中的對象屬性也要求實現Serializable介面。也就是說如果Student類中有一個Grad引用類型的屬性private Grad info;那麼Grad這個類也要實現Serializable介面。
③序列化類中可以添加序列化版本號ID,以保證序列化的類和被序列化的類是同一個類。在上面的程式碼中我並沒有添加序列號版本,雖然IDE沒有報錯,但是會顯示一個警告,提示我添加序列化版本號(串列版本標識)。我們可以在Student類中添加:
1 private static final long serialVersionUID = 66666L;
-
此時再運行Demo8就會報一個無效類的異常:

-
意思就是兩個類的serialVersionUID不一樣。可以看到之前雖然沒有顯式添加序列版本號,但它已經自動生成了一個。我們再運行一下Demo7序列化,再運行Demo8反序列化就可以正常執行了。
④使用transient(短暫的)修飾屬性,可以避免該屬性被序列化。用它來修飾age:
1 private transient int age;
-
把student這個對象序列化後再反序列化,這個對象的age屬性就變成了0。
⑤靜態屬性 static 不能被序列化。
⑥可以利用集合來序列化多個對象:
 1 /**
 2  * 使用ObjectOutputStream實現對象的序列化
 3  * 註:序列化的類必要要實現Serializable介面
 4  */
 5 public class Demo07 {
 6
 7     public static void main(String[] args) throws Exception{
 8         //1.創建對象流
 9         //1.1 創建對象流底層流,基於FileOutputStream
10         FileOutputStream fos = new FileOutputStream("D://stu.bin");
11         //1.2 創建對象流,fos為入參
12         ObjectOutputStream oos = new ObjectOutputStream(fos);
13
14         //2.序列化(寫入操作)
15         Student s1 = new Student("張三",20);
16         Student s2 = new Student("李四",20);
17
18         //使用集合來接對象
19         ArrayList<Student> student = new ArrayList<>();
20         student.add(s1);
21         student.add(s2);
22         oos.writeObject(student);
23
24         //3.關閉
25         oos.close();
26         System.out.println("序列化完畢");
27     }
28 }
 1 /**
 2  * 使用ObjectInputStream實現反序列化(讀取重構對象)
 3  */
 4 public class Demo08 {
 5     public static void main(String[] args) throws Exception{
 6         //1.創建對象流
 7         //1.1 創建對象流節點流,即底層流
 8         FileInputStream fis = new FileInputStream("D://stu.bin");
 9         //1.2 創建對象流,fis入參
10         ObjectInputStream ois = new ObjectInputStream(fis);
11
12         //2.讀取文件
13         ArrayList<Student> list =(ArrayList<Student>) ois.readObject();
14
15         //3.關閉
16         ois.close();
17         System.out.println("執行完畢");
18         System.out.println(list.toString());
19
20         //4.遍歷集合裡面的對象
21         ListIterator<Student> studentListIterator = list.listIterator();
22         while (studentListIterator.hasNext()){
23             System.out.println(studentListIterator.next());
24         }
25     }
26 }

編碼方式
-
IOS-8859-1
收錄除ASCII外,還包括西歐、希臘語、泰語、阿拉伯語、希伯來語對應的文字元號。採用1個位元組來表示,最多只能表示256個字元。
-
UTF-8
針對Unicode碼錶的可變長度字元編碼。國際上使用的編碼,也稱為「萬國碼」,收錄了幾乎所有國家的常用字元。採用1至3個位元組來表示一個字元。
-
GB2312
簡體中文,採用1個或2個位元組來表示字元,95年之前所採用的編碼。
-
GBK
簡體中文的擴充,GB2312的升級版本。
-
BIG5
台灣,繁體中文。
當編碼方式和解碼方式不一致時,會出現亂碼。假如Demo1中的文件內容不是字母而是「我愛中國」這樣的漢字,那麼讀取出來的資訊就是亂碼。因為位元組流按位元組輸入輸出,而這四個漢字佔了12個位元組,把一個漢字按一個一個位元組讀入自然會出現問題,這時就需要使用字元流。
字元流

字元流的父類(抽象類)
-
Reader:字元輸入流
-
public int read()從流中讀取單個字元,用整型來返回讀取的字元;當讀到流底部時返回-1。
-
public int read(char[] c)從流中讀取字元保存到c數組中,返回讀取的字元個數,當讀到流底部時返回-1。
-
public int read(char[] cbuf,int off,int len){}抽象方法。
-
-
Writer:字元輸出流
-
public void write(int n)寫入單個字元,只能寫入包含16位低階位元組的整型數值,16位高階位元組將會被忽略。
-
public void write(String str)寫入一個字元串。
-
public void write(char[] cbuf)寫入一個字元數組。
-

字元流的子類
-
FileReader:
-
public int read()繼承自InputStreamReader類。讀取單個字元,返回讀取的字元,當讀到流底部時返回-1。
-
public int read(char[] c)繼承自Reader類。
-
public int read(char[] cbuf,int offset,int length)繼承自InputStreamReader類。從流中讀取部分字元到cbuf中指定位置,返回讀取到的字元個數,當讀到流底部時返回-1。
-
 1 /*
 2  *使用FileReader讀取文件
 3  */
 4 public class Demo01 {
 5     public static void main(String[] args) throws Exception{
 6         //1.創建FileReader 文件字元輸入流
 7         //文件內容為:好好學習,天天向上Hello World
 8         FileReader fr = new FileReader("D://javaText.txt");
 9
10         //2.讀取
11         //2.1 單位元組讀取
12         /*
13         int count;
14         while ((count=fr.read())!=-1){
15             System.out.println((char)count);
16         }
17          */
18
19         //2.2 多個位元組讀取
20         char[] bytes = new char[4];
21         int conut;
22         while ((conut=fr.read(bytes,0,bytes.length))!=-1){
23             System.out.println(new String(bytes,0,conut));
24         }
25
26         //3. 關閉
27         fr.close();
28     }
29 }
這裡可能會遇到的一個問題:
上述程式碼執行後理應是正常輸出一段文字,但是出現了文字亂碼。打開JDK API查看FileReader類的描述:
Convenience class for reading character files. The constructors of this class assume that the default character encoding and the default byte-buffer size are appropriate. To specify these values yourself, construct an InputStreamReader on a FileInputStream.
大意就是該類的構造方法有一個默認的字元編碼格式和一個默認位元組緩衝區,並沒有指明這個編碼格式就是UTF-8。查看系統默認編碼,打開CMD輸入chcp,得到一個值為936的活動編碼頁,通過查詢得知該程式碼頁所對應的國家(地區)或語言為:中國 - 簡體中文(GB2312)。這與本地所保存的文本編碼UTF-8不一致,所以導致了文字亂碼的出現。而要指定編碼格式需要創建一個InputStreamReader或FileInputStream對象使用其構造方法。
如果遇到上述報錯,以下是能正常運行的程式碼:
 1 public class Demo1 {
 2     public static void main(String[] args) throws IOException {
 3         //指定編碼格式
 4         InputStreamReader inputStreamReader=new InputStreamReader(new FileInputStream("D://javaText.txt"),"UTF-8");
 5         int data;
 6         while((data=inputStreamReader.read())!=-1) {
 7             System.out.print((char)data);
 8         }
 9         inputStreamReader.close();
10     }
11 }
-
FileWriter:
-
public void write(int c)繼承自OutputStreamWriter類,寫入一個字元。
-
public void write(String str)繼承自Writer類。
-
public void Write(char[] cbuf)繼承自Writer類。
-
 1 /**
 2  * 使用FileWriter寫入文件
 3  */
 4 public class Demo02 {
 5     public static void main(String[] args) throws Exception{
 6         //1.創建FileWriter對象
 7         FileWriter fw = new FileWriter("D://javaText2.txt");
 8
 9         //2.寫入
10         for (int i = 0; i < 10; i++) {
11             fw.write("Hello World\r\n"); //  \r\n換行
12             fw.flush();  //刷新
13         }
14
15         //3.關閉
16         fw.close();
17     }
18 }
字元流案例-複製
 1 /**
 2  * 使用FileReader和FileWrite複製文本文件
 3  *  註:不能複製圖片或二進位文件,圖片使用位元組流複製,位元組流可以複製任意文件
 4  */
 5 public class Demo03 {
 6     public static void main(String[] args) throws Exception{
 7         FileReader fr = new FileReader("D://javaText.txt");
 8         FileWriter fw = new FileWriter("D://javaText2.txt");
 9         char[] bytes = new char[2];
10         int count;
11         while ((count=fr.read(bytes))!=-1){
12             fw.write(bytes);
13             fw.flush();
14         }
15         fr.close();
16         fw.close();
17     }
18 }
字元緩衝流
-
緩衝流:BufferedReader/BufferedWriter
- 高效讀寫
- 支援換行輸入符
- 可一次寫一行、讀一行。
 1 /**
 2  * 使用字元緩衝流讀取文件
 3  * BufferedReader
 4  */
 5 public class Demo04 {
 6     public static void main(String[] args) throws Exception{
 7         //1.創建緩衝流節點流FileReader
 8         FileReader fr = new FileReader("D://javaText.txt");
 9         //2.創建緩衝流
10         BufferedReader br = new BufferedReader(fr);
11
12         //3.讀取
13         //第一種方式讀取
14         //3.1 單字元讀取
15         /*
16         int count;
17         while ((count=br.read())!=-1){
18             System.out.println((char)count);
19         }
20          */
21         //3.2 自設定緩衝區,多個字元讀取
22         /*
23         char[] chars = new char[15];
24         int count;
25         while ((count=br.read(chars,0,chars.length))!=-1){
26             System.out.println(new String(chars,0,count));
27         }
28          */
29
30         //第二種方式讀取,一行一行讀取
31         String line;
32         while ((line=br.readLine())!=null){
33             System.out.println(line);
34         }
35
36         //4.關閉
37         br.close();
38     }
39 }
 1 /**
 2  * 使用字元緩衝流寫入文件
 3  * BufferedWriter
 4  */
 5 public class Demo05 {
 6     public static void main(String[] args) throws Exception{
 7         //1.創建節點流
 8         FileWriter fw = new FileWriter("D://javaText2.txt");
 9         //2.創建緩衝輸出流
10         BufferedWriter bw = new BufferedWriter(fw);
11         //3.寫入
12         for (int i = 0; i < 10; i++) {
13             bw.write("好好學習,天天向上");
14             bw.newLine();//寫入一個換行,windows種\r\n代表換行,Linux種\n代表換行
15             bw.flush();
16         }
17         //4.關閉
18         bw.close();
19     }
20 }
 1 /**
 2  * 使用字元緩衝流複製文件
 3  * BufferedWriter
 4  */
 5 public class Demo06 {
 6     public static void main(String[] args) throws Exception{
 7         //1.創建緩衝輸入節點流
 8         FileReader fr = new FileReader("D://javaText.txt");
 9
10         //2.創建緩衝輸入流
11         BufferedReader br = new BufferedReader(fr);
12
13         //3.創建緩衝輸出節點流
14         FileWriter fw = new FileWriter("D://javaText3.txt");
15
16         //4.創建緩衝輸出流
17         BufferedWriter bw = new BufferedWriter(fw);
18
19         //5.定義String變數用於接收br.readline數據
20         String line;
21
22         //6.讀取、寫入
23         while ((line=br.readLine())!=null){  //按行讀取,讀取內容存放在變數line種,直到讀到null為止
24             bw.write(line);  //緩衝區寫入
25             bw.newLine();    //換行
26             bw.flush();      //刷新
27         }
28
29         //7.關閉流
30         bw.close();
31         fw.close();
32         fr.close();
33         br.close();
34     }
35 }
列印流
-
PrintWriter:
- 封裝了print()/println()方法,支援寫入後換行。
- 支援數據原樣列印。列印到文件中,常用於日誌列印
 1 /**
 2  * PrintWriter的使用
 3  */
 4 public class Demo07 {
 5     public static void main(String[] args) throws Exception{
 6         PrintWriter pw = new PrintWriter("D://javaText.txt");
 7         pw.println(97); //97
 8         pw.println('a'); //a
 9         pw.println("hello"); //hello
10         pw.println(true); //true
11         pw.close();
12         System.out.println("執行完畢,已列印到指定文本");
13     }
14 }
轉換流
-
橋轉換流:InputStreamReader/OutputStreamWriter
- 可將位元組流轉換為字元流。
- 可設置字元的編碼方式。
 1 /**
 2  * 使用InputStreamReader讀取文件
 3  */
 4 public class Demo08 {
 5     public static void main(String[] args) throws Exception{
 6         //1.創建轉換流的節點流
 7         FileInputStream fis = new FileInputStream("D://javaText.txt");
 8         //2.創建轉換流
 9         InputStreamReader isr = new InputStreamReader(fis,"utf-8");//InputStreamReader可以選擇位元組轉換成字元的編碼格式
10
11         //3.讀取文件
12         //3.1 單個位元組轉換成字元讀取
13         /*
14         int count;
15         while ((count=isr.read())!=-1){
16             System.out.println((char) count);
17         }
18         fis.close();
19          */
20         //3.2 多個位元組轉換成字元讀取
21         char[] chars = new char[5];
22         int count;
23         while ((count=isr.read(chars,0,chars.length))!=-1){
24             System.out.println(new String(chars,0,count));
25         }
26
27         //4.關閉流
28         isr.close();
29     }
30 }
 1 /*
 2  *使用OutputStreamWriter寫入文件
 3  */
 4 public class Demo09 {
 5     public static void main(String[] args) throws Exception{
 6         //1.創建轉換輸出流的節點流
 7         FileOutputStream fos = new FileOutputStream("D://javaText2.txt");
 8         //2.創建轉換輸出流,選擇編碼格式
 9         OutputStreamWriter osw = new OutputStreamWriter(fos,"utf-8");
10         //3.寫入
11         for (int i = 0; i < 10; i++) {
12             osw.write("生命之所以有意義是因為它會停止\r\n");
13             osw.flush();
14         }
15         //4.關閉
16         osw.close();
17         fos.close();
18     }
19 }
File類
-
概念:代表物理盤符中的一個文件或者文件夾。
-
方法:
-
public boolean CreateNewFile()當且僅當指定的文件名不存在時創建一個指定的新的、空的文件。創建成功返回true,如果指定文件名已存在返回false。
-
public boolean mkdir()創建一個指定路徑名的文件夾。當且僅當文件夾被創建時返回true,否則返回false。
-
public boolean delete()刪除一個指定的文件或文件夾,文件夾必須為空才能被刪除。當且僅當指定的文件或文件夾被刪除時返回true,否則返回false。
-
public boolean exists()檢查指定的文件或文件夾是否存在。當且僅當指定的文件或者文件夾存在時返回true,否則返回false。
-
public File[] listFiles()列出目錄中的所有內容,返回一個指定路徑名中的文件數組,如果指定的路徑名不代表一個文件夾(目錄)就返回null。
-
public boolean renameTo(File dest)重命名一個路徑名所指定的文件。當且僅當修改操作成功時返回true,否則返回false。
-
分隔符
 1 /*
 2  *分隔符
 3  */
 4 public class Demo01 {
 5     public static void main(String[] args) {
 6         separator();
 7     }
 8
 9     public static void separator(){
10         System.out.println("路徑分隔符"+ File.pathSeparator);
11         System.out.println("名稱分隔符"+ File.separator);
12     }
13 }

文件操作
 1 /*
 2  *文件操作
 3  */
 4 public class Demo02 {
 5     public static void main(String[] args) throws IOException, InterruptedException {
 6         fileOp();
 7     }
 8     public static void fileOp() throws IOException, InterruptedException {
 9
10         //1.創建文件
11         //1.1 創建File對象
12         File file = new File("D://File_JavaTest//test01.txt");
13         //1.2 創建文件
14         if (!file.exists()){ //file.exists()判斷文件是否存在,存在返回True,因為是要對不存在創建,所以前面加了個!進行取反
15             boolean newFile = file.createNewFile();//創建文件,createNewFile()返回的是boolean類型,所以聲明一個變數,列印出來看看是否創建
16             System.out.println(newFile);
17         }
18
19         //2.刪除文件
20         //2.1 直接刪除
21         /*System.out.println("刪除結果"+file.delete());*/
22         //2.2 使用JVM退出時刪除(不是自己刪除)
23         file.deleteOnExit();
24         Thread.sleep(5000);//調用休眠程式觀察刪除操作
25
26         //3.獲取文件資訊
27         System.out.println("文件絕對路徑:"+file.getAbsolutePath());
28         System.out.println("獲取路徑:"+file.getParent());
29         System.out.println("獲取父目錄:"+file.getParent());
30         System.out.println("獲取文件名稱:"+file.getName());
31         System.out.println("獲取文件長度:"+file.length());
32         System.out.println("獲取文件創建時間:"+new Date(file.lastModified()).toLocaleString());
33
34         //4.判斷
35         System.out.println("是否可寫:"+file.canWrite());
36         System.out.println("是否可讀:"+file.canRead());
37         System.out.println("是否隱藏:"+file.isHidden());
38         System.out.println("是否是文件:"+file.isFile());
39         System.out.println("是否是文件夾:"+file.isDirectory());
40     }
41 }

文件夾操作
 1 /*
 2  *文件夾操作
 3  */
 4 public class Demo03 {
 5     public static void main(String[] args) {
 6         directorOp();
 7     }
 8     public static void directorOp(){
 9         //1.創建文件夾
10         File file = new File("D://aaaaa//bbbbb//ccccc");
11         if (!file.exists()){
12             //單級目錄創建mkdir
13             /*boolean mkdir = file.mkdir();    mkdir只能創建單級目錄*/
14             //多級目錄創建mkdirs
15             boolean mkdirs = file.mkdirs();
16             System.out.println(mkdirs);
17         }
18
19         //2.刪除文件夾
20         //2.1 直接刪除(必須為空目錄),只刪除最後一個目錄即ccccc
21         /*System.out.println("刪除結果:"+file.delete());*/
22         //2.2 使用jvm刪除
23         file.deleteOnExit();
24
25         //3.獲取文件夾資訊
26         System.out.println("獲取絕對路徑:"+file.getAbsolutePath());
27         System.out.println("獲取路徑:"+file.getPath());
28         System.out.println("獲取父目錄:"+file.getParent());
29         System.out.println("獲取創建時間:"+new Date(file.lastModified()).toString());
30         System.out.println("文件夾名稱:"+file.getName());
31
32         //4.判斷
33         System.out.println("是否隱藏:"+file.isHidden());
34         System.out.println("是否是文件:"+file.isFile());
35
36         //5.遍歷文件夾
37         File file1 = new File("D://");
38         String[] list = file1.list();
39         for (String string:list) {
40             System.out.println(string);
41         }
42     }
43 }

文件過濾器
-
FileFilter介面:
public interface FileFilterboolean accepte(File pathname)- 當調用File類中的listFiles()方法時,支援傳入FileFilter介面實現類,對獲取的文件進行過濾,只有滿足條件的文件才可以出現在listFiles()的返回值中。
public class Demo04 {
    public static void main(String[] args) {
        filerFitter();
    }

    public static void filerFitter() {
        File file = new File("D:\\aaaaa");


        File[] files = file.listFiles(new FileFilter() {
            @Override
            public boolean accept(File pathname) {
                if (pathname.getName().endsWith(".jpg")){
                    return true;
                }
                return false;
            }
        });

        for (File f:files) {
            System.out.println(f.getName());
        }
    }
}
文件操作案例-遞歸遍歷文件夾和遞歸刪除文件夾文件
 1 /*
 2  *遞歸遍歷文件夾
 3  */
 4 public class Demo05 {
 5     public static void main(String[] args) {
 6         listDir(new File("D://aaaaa")); //調用listDir方法,new一個file對象入參
 7     }
 8     public static void listDir(File dir){ //此時的dir已經是實例化的File對象
 9         File[] files = dir.listFiles(); //調用File類裡面的listFiles方法,得到的是一個File類型的數組,返回的是該目錄中的文件和目錄
10         System.out.println(dir.getAbsolutePath()); //列印dir的絕對路徑
11         if(files!=null&&files.length>0){   //判斷返回的內容有沒有數據
12             for (File f:files) {  //遍歷返回的數組內容
13                 if(f.isDirectory()){ //判斷是否是文件夾
14                     listDir(f); //遞歸自己,調用自己,對文件夾重新走一遍listDir方法
15                 }
16                 else{
17                     System.out.println(f.getAbsolutePath());//列印絕對路徑
18                 }
19             }
20         }
21     }
22 }
 1 /*
 2  *遞歸刪除文件夾
 3  */
 4 public class Demo06 {
 5     public static void main(String[] args) {
 6         deleteDir(new File("D://aaaaa"));
 7     }
 8     public static void deleteDir(File dir){
 9         File[] files = dir.listFiles();
10         System.out.println(dir.getAbsolutePath());
11         if(files!=null&&files.length>0){
12             for (File f:files) {
13                 if(f.isDirectory()){
14                     deleteDir(f);
15                 }
16                 else {
17                     f.delete();
18                 }
19             }
20         }
21     }
22 }
補充:Properties
-
Properties:屬性集合
-
特點:
-
存儲屬性名和屬性值(鍵值對)。
- 屬性名和屬性值都是字元串類型。
- 沒有泛型。
- 和流有關(所以沒有整理在集合裡面)。
-
方法:
-
public String getProperty(String key)根據key在屬性列表裡查找value,如果原始屬性列表找不到就去默認屬性列表找。返回key所對應的value。
-
public void list(PrintWriter out)將屬性列表列印在指定的輸出流上,在debug時很有用。
-
public Object setProperty(String key,String value)內部調用的是Hashtable的put方法,將key和value成對地保存在屬性列表中。返回這個key上一個對應的value,沒有就返回null。
Properties可以保存在一個流中或是從一個流中載入,屬性列表中的每個鍵值對都是一個字元串。一個屬性列表可以包括另一個第二屬性列表來作為它的默認值,如果在原始屬性列表中沒有找到key時就搜索第二屬性列表。
-
 1 /**
 2  * 演示集合properties的使用
 3  */
 4 public class Demo01 {
 5     public static void main(String[] args) throws IOException {
 6         //1.創建集合
 7         Properties properties = new Properties();
 8         //2.添加數據
 9         properties.setProperty("username","張三");
10         properties.setProperty("age","22");
11         System.out.println(properties.toString());
12         //3.遍歷
13         //遍歷
14         //3.1 keySet 略
15         //3.2 entrySet 略
16         //3.3 stringPropertyNames()
17         Set<String> set=properties.stringPropertyNames();
18         for (String string : set) {
19             System.out.println(string+" "+properties.getProperty(string));
20         }
21
22         //和流有關的方法
23         //list
24         PrintWriter printWriter=new PrintWriter("d:\\print.txt");
25         properties.list(printWriter);
26         printWriter.close();
27         //store保存
28         FileOutputStream fileOutputStream=new FileOutputStream("d:\\s.properties");
29         properties.store(fileOutputStream, "NOTES");
30         fileOutputStream.close();
31         //load載入
32         Properties properties2=new Properties();
33         FileInputStream fileInputStream=new FileInputStream("d:\\s.properties");
34         properties2.load(fileInputStream);
35         fileInputStream.close();
36         System.out.println(properties2.toString());
37     }
38 }

