mongoose基础使用
mongoose与mongodb
首先,要明确mongoose和mongodb是什么?
mongodb是一种文档数据库;而mongoose是一种能在node环境中优雅地操作mongodb的对象模型工具库,它提供了类型转换、验证、查询等等各种便捷能力。
其次,要了解mongoose和mongodb的一些基础概念,及其之间的联系。
mongodb中的基础概念
mongodb将数据记录存储为文档(documents),这些文档会收集在集合(collections)中,而一个数据库(database)会存储一个或者多个集合,如下图:
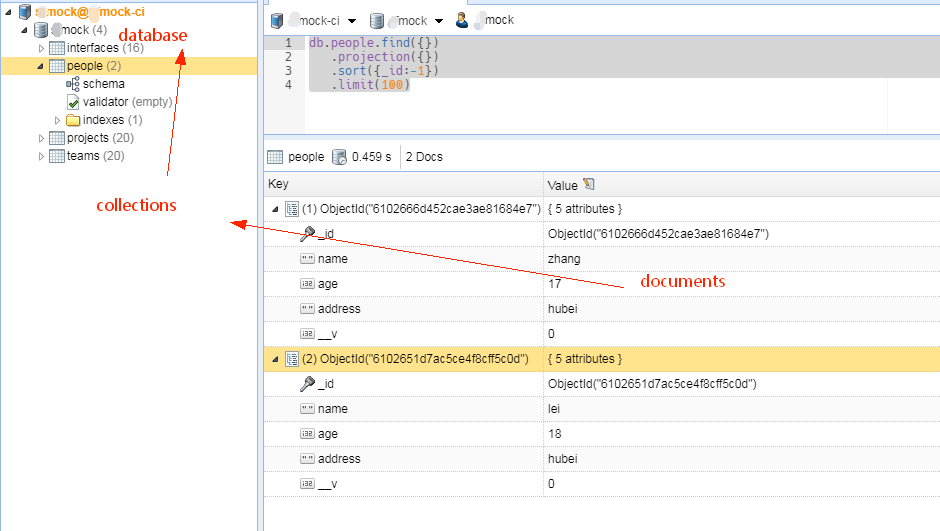
可以看到,数据是以一个个document的形式保存的。
mongoose中的基础概念
mongoose作为操作mongodb的工具库,可以理解为就是在操作documents。它入门的概念是Schema ,是用来定义collections中的documents的形状;通过Schema可以生成一个构造函数Models,它对应的就是collections,而它的实例也称为Documents,对应的就是mongodb中的documents。
执行Documents的相关 Api 就能把数据写到mongodb的database中。
    // 创建Schema,描述文档的形状
    const personSchema = new Schema({
      name: String,
      age: Number,
      address: String,
    });

    // 创建Model,对应的是database中的 persons集合
    const Person = model('Person', personSchema);

    // 生成document,内容要和定义的Schema保持一致
    const person = new Person({
      name: 'zhang',
      age: 17,
      address: 'hubei',
    });

    // 保存此文档到mongodb
    await person.save();
同时Models提供了一些CRUD的辅助函数,这些辅助函数能便捷地进行增删改查操作,比如Model.find({}),它们会返回Query,可以通过传入一个规则对象,或者链式调用来组合一组操作。然后触发执行,之后就会在mongodb中执行对应的操作,触发执行有多种方式。
    // 触发方式一,直接传入callback
    // 或者先创建Query对象,然后通过 .exec() 传入callback 触发执行

    Person.find(
      // 查询规则
      {
        age: {
          $gt: 17,
        },
      }, function(err, person) {
        if (err) return console.log(err);

        console.log(person);
      });

    // 触发查询方式二 触发 .then()

    // 传入查询规则,query为一个 Query对象
    const query = Person.find({
      age: {
        $gt: 17,
      },
    });

    // 通过await 触发 .then()
    const doc = await query;

    console.log(doc);

    // 都会打印输出
    [
      {
        _id: 6102651d7ac5ce4f8cff5c0d,
        name: 'lei',
        age: 18,
        address: 'hubei',
        __v: 0
      }
    ]
  }
总之,增删改查都是从Model着手,通过相关API创建对应操作,然后触发操作执行,实际写入到mongodb。
mongoose常用语法
这里记录一些 mongoose 常用语法
连接数据库
mongoose.connect
mongoose.connect创建默认连接,即 mongoose.connection ,使用mongoose.model创建模型时也是默认使用此连接。
mongoose.connect('mongodb://username:password@host:port/database?options', [, options]);,options详情,在创建与mongodb连接的过程中,会发出多种事件。
连接副本集时,传入地址列表 mongoose.connect('mongodb://[username:password@]host1[:port1][,host2[:port2],...[,hostN[:portN]]][/[database][?options]]' [, options]);,还可以指定副本集名称选项(replicaSet)。
/*testMongoose.js*/
'use strict';
const mongoose = require('mongoose');

// 监听事件
mongoose.connection.on('connecting', () => {
  console.log('mongoose 开始进行连接');
});

mongoose.connection.on('connected', () => {
  console.log('mongoose 连接成功');
});

mongoose.connection.on('error', err => {
  console.log('mongoose connnect失败', err);
});

// 创建副本集连接
mongoose.connect('mongodb://url1:24000,url2:24000,url3:24000/myDatabase?replicaSet=myReplicaSet',
  {
    useNewUrlParser: true,
    authSource: 'admin',
    useFindAndModify: false,
    useUnifiedTopology: true,
  }
);


/*demo.js*/
const mongoose = require('mongoose');

const { model } = mongoose;

// 使用默认连接创建模型
const Person = model('Person', personSchema);
mongoose.createConnection
当需要连接到多个数据库时,可以使用mongoose.createConnection(),它的参数和mongoose.connect()一样,会返回一个Connection对象,注意要保留对此对象的引用,以便用它来创建Model
/*testMongoose.js*/
// 创建连接
const conn = mongoose.createConnection(
  'mongodb://url1:24000,url2:24000,url3:24000/myDatabase?replicaSet=myReplicaSet',
  {
    useNewUrlParser: true,
    authSource: 'admin',
    useFindAndModify: false,
    useUnifiedTopology: true,
  }
);

conn.on('connected', () => {
  console.log('mongoose 连接成功');
});

// 导出connection对象
module.exports = conn;


/*demo.js */
const conn = require('../utils/testMongoose');
// 使用指定的connection对象创建连接
const Person = conn.model('Person', personSchema);

const person = new Person({
  name: 'qian',
  age: 31,
  address: 'beijing',
});

// 保存此文档到mongodbs
await person.save();
定义Schema
const schema = new Schema({...}, options);
在mongoose中的所有操作都是从定义Schema开始的,mongoose提供了丰富的属性来定义Schema,可以指定类型,是否必须,校验规则,是否自动转换,索引方式等等。除此之外,还可以给Schema定义各种方法、虚拟属性、别名等等,可以辅助查询、转换数据,在定义Schema时还有多种配置项
还提供了增加定义 schema.add({...}) 和移除定义 schema.remove(Name) 等等API
另外,还可以通过Schema定义中间件,在函数执行过程中,会触发对应的中间件,多用于编写插件。
const mongoose = require('mongoose');

const { Schema } = mongoose;
// 创建Schema,描述文档的形状
const personSchema = new Schema({
  n: {
    type: String, // 类型
    required: true, // 校验规则 - 必须
    alias: 'name', // 别名 数据库中存放的是 n, 但是在程序中可以使用name来访问和赋值,但是find查询时不能使用别名
    lowercase: true, // 自动转换为全小写
  },
  age: {
    type: Number,
    default: 18, // 默认值
    min: [ 10, '年龄不能小于10' ], // 校验规则
    validate: { // 自定义校验方法
      validator(v) {
        return v <= 100;
      },
      message: '{VALUE} 必须小于等于100',
    },
  },
  address: {
    type: String,
    enum: { // 校验规则
      values: [ 'hubei', 'guangzhou' ],
      message: '{VALUE} is not supported',
    },
  },
}, {
  toObject: { // 属性配置 - 转换成对象时会被调用
    virtuals: true, // 允许虚拟属性
    transform(doc, ret) { // 对返回对象做处理
      ret.id = ret._id;

      delete ret._id;
      delete ret.__v;
    },
  },
});

personSchema.virtual('Age').get(function() { // 定义虚拟属性
  return this.age + '岁';
});

personSchema.statics.findByAge = function(num) { // 定义静态函数,可以封装一些便捷功能
  return this.find({
    age: num,
  });
};

// 定义中间件
personSchema.post('validate', function(doc) {
  console.log('%s has been validated (but not saved yet)', doc._id);
});
通过以下例子,说明上面配置的作用
// 不符合规则的数据
const person1 = new Person({
  name: 'Test',
  age: 9,
  address: 'beijing',
});

// 数据保存时会根据Schema规则进行校验
await person1.save();
// 抛出错误 nodejs.ValidationError: Person validation failed: age: 年龄不能小于10, address: beijing is not supported
// 符合规则的数据
const person2 = new Person({
  name: 'TestLei',
  age: 16,
  address: 'hubei',
});

// 数据保存时会根据Schema规则进行校验
await person2.save();

// 触发中间件  61090d88a848e3acf4113dda has been validated (but not saved yet)

console.log(person);
// {
//   age: 16,
//   n: 'testlei',    -> 自动进行小写转换
//   address: 'hubei',
//   name: 'testlei', -> 别名 注意此处是因为是在toObject中进行了相关配置
//   Age: '16岁',  -> 虚拟属性 注意此处是因为是在toObject中进行了相关配置
//   id: 61090d88a848e3acf4113dda -> toObject进行的数据处理
// }
    // 使用自定义的方法进行查询
    const p1 = await Person.findByAge(16);

    console.log(p1);
    // [
    //   {
    //     age: 16,
    //     n: 'testlei',
    //     address: 'hubei',
    //     name: 'testlei',
    //     Age: '16岁',
    //     id: 61090d88a848e3acf4113dda
    //   }
    // ]
创建Model
定义好Schema之后,就可以用来创建对应的Model。
model('CollectionName', Schema)
mongoose会使用第一个参数的全小写、复数格式到mongodb中找collection(eg: collectionnames)
在连接数据库的时候,已经有创建Model的示例,需要注意的就是,使用mongoose.model()创建时使用的是默认连接,额外创建的连接,需要使用对应的Connection.model()
  // 使用默认连接创建模型
  const Person = model('Person', personSchema);

  const conn = mongoose.createConnection({...});
  // 使用指定的connection对象创建连接
  const Person = conn.model('Person', personSchema);
增删改查
新增
通过构造函数Model生成实例(Document)
    // 通过 Model 创建 Document
    // //mongoosejs.com/docs/api/model.html#model_Model
    const person = new Person({
      name: 'TestLei',
      age: 16,
      address: 'hubei',
    });

    // 写入到database中
    person.save();
可一次新增多条数据
    // 新增一条数据
    await Person.create({
      name: 'zhao',
      age: 16,
      address: 'hubei',
    });

    // 新增多条数据
    await Person.create([
      {
        name: 'qian',
        age: 17,
        address: 'hubei',
      },
      {
        name: 'qian',
        age: 18,
        address: 'hubei',
      },
    ]);
此方法新增多条数据比create效率更高
  await Person.insertMany([
    {
      name: 'zhou',
      age: 17,
      address: 'hubei',
    },
    {
      name: 'zhou',
      age: 18,
      address: 'hubei',
    },
  ]);
查询
Model.find
Model.find( [过滤规则] , [返回字段]) , [配置项] , callback)
返回字段 可以指定需要返回哪些字段,或者指定不需要哪些字段
配置项可以限制返回条数,排序规则,跳过文档数量(分页)等等。
find中传入的所有参数都有对应的工具函数,而且Model.find返回的是一个Query对象,Query原型上的工具函数都是返回this,所以可以链式调用
以上两种思路是等价的
    const p1 = await Person.find({
      age: {
        $gte: 12, // age大于等于12
      },
      n: {
        $in: [ 'zhao', 'qian' ], // n是[ 'zhao', 'qian' ]中的一个
      },
    },
    'n age -_id', // 返回 n age字段,不返回 _id
    {
      sort: { // 按age降序排序
        age: -1,
      },
      limit: 2, // 只返回两条数据
    });

    console.log(p1);
    // [ { age: 18, n: 'qian' }, { age: 17, n: 'qian' } ]

    // 以下是通过工具函数的等价写法

    const p2 = await Person
      .find({})
      .gte('age', 12)
      .where('n')
      .in([ 'zhao', 'qian' ])
      .select('n age -_id')
      .limit(2)
      .sort({
        age: -1,
      });

    console.log(p2);
    // [ { age: 18, n: 'qian' }, { age: 17, n: 'qian' } ]
查询常用的过滤规则及对应的工具函数如下:
| 工具函数 | 过滤操作符 | 含义 | 使用方式 |
|---|---|---|---|
| eq() | $eq | 与指定值相等 | { <field>: { $eq: <value> } } |
| ne() | $ne | 与指定值不相等 | { <field>: { $ne: <value> } } |
| gt() | $gt | 大于指定值 | {field: {$gt: value} } |
| gte() | $gte | 大于等于指定值 | {field: {$gte: value} } |
| lt() | $lt | 小于指定值 | {field: {$lt: value} } |
| lte() | $lte | 小于等于指定值 | {field: {$lte: value} } |
| in() | $in | 与查询数组中指定的值中的任何一个匹配 | { field: { $in: [<value1>, <value2>, ... <valueN> ] } } |
| nin() | $nin | 与查询数组中指定的值中的任何一个都不匹配 | { field: { $nin: [ <value1>, <value2> ... <valueN> ]} } |
| and() | $and | 满足数组中指定的所有条件 | { $and: [ { <expression1> }, { <expression2> } , ... , { <expressionN> } ] } |
| nor() | $nor | 不满足数组中指定的所有条件 | { $nor: [ { <expression1> }, { <expression2> }, ... { <expressionN> } ] } |
| or() | $or | 满足数组中指定的条件的其中一个 | { $or: [ { <expression1> }, { <expression2> }, ... , { <expressionN> } ] } |
| not() | $not | 反转查询,返回不满足指定条件的文档 | { field: { $not: { <operator-expression> } } } |
| regex() | $regex | 可以被指定正则匹配 | { <field>: { $regex: /pattern/, $options: '<options>' } } { <field>: { $regex: 'pattern', $options: '<options>' } } { <field>: { $regex: /pattern/<options> } } |
| exists() | $exists | 匹配存在指定字段的文档 | { field: { $exists: <boolean> } } |
| type() | $type | 返回字段属于指定类型的文档 | { field: { $type: <BSON type> } } |
| size() | $size | 数组字段的长度与指定值一致 | { <field>: { $size: <value> } } |
| all() | $all | 数组中包含所有的指定值 | { <field>: { $all: [ <value1> , <value2> ... ] } } |
Model.findOne | Model.findById()
findOne的使用方式和find一样,适用于只查询一条数据
    const p3 = await Person.findOne({
      age: {
        $gte: 12,
      },
      n: {
        $in: [ 'zhao', 'qian' ],
      },
    }, 'n age -_id', {
      sort: {
        age: -1,
      },
    });

    console.log(p3);
    // { age: 18, n: 'qian' }
如果过滤条件是 _id,可以使用 findById
const p4 = await Person.findById('61090d4287e3a9a69c50c842', 'n age -_id');
更新
更新数据有两种思路:
- 查询数据,然后修改,再通过
save保存 - 使用
update系列 API
第一种思路写法复杂,效率不高,但是会触发完整的校验和中间件;
    // 查询
    const p4 = await Person.findById('61090d4287e3a9a69c50c842');

    // 赋值
    // 不符合ShameType的数据
    p4.address = 'guizhou';

    // 保存
    await p4.save();

    // 校验报错
    // Person validation failed: address: guizhou is not supported
第二种 写法默认不会触发校验(通过配置项可以设置校验),只会触发特定的中间件;
    // 没有触发校验
    wait Person.updateOne({
      _id: ObjectId('61090d4287e3a9a69c50c842'),
    }, {
      address: 'guizhou',
    });

    // 增加配置项 {runValidators: true,} 可触发校验
update系列的方法主要有
updateOne和updateMany的使用方式基本一致,只是一个只会更新第一条数据,一个会更新所有符合条件的数据。
updateXXX([过滤条件],[更新数据],[配置项],[callback])
过滤条件和find的规则一样
更新数据默认为$set操作符,即更新传入的字段,其他的操作符和mongodb保持一致,查看详情
配置项可配置是否进行校验,是否进行数据覆盖,是否能批量更新等等,不同的方法稍有不同,详见每个API的文档
findByIdAndUpdate 和 findOneAndUpdate 主要是会返回查询到的数据(更新之前的)。
    const a = await Person.findByIdAndUpdate({
      _id: '61090d4287e3a9a69c50c842',
    }, {
      address: 'hubei',
    });

    console.log(a);
  // {
  //   age: 16,
  //   _id: 61090d4287e3a9a69c50c842,
  //   n: 'testlei',
  //   address: 'guizhou', // 更新之前的数据
  //   __v: 0
  // }

    // 增加 {overwrite: true} 配置可进行数据覆盖
删除
remove系列的方法主要有
Model.remove()删除所有符合规则的数据Model.findOneAndRemove()删除符合规则的第一条Model.findByIdAndDelete()根据ID删除
findOneAndRemove(),Model.findByIdAndDelete() 除了会删除对应的数据,还会返回查询结果。
    const a = await Person.remove({
      _id: ObjectId('61090d4287e3a9a69c50c842'),
    });

    console.log(a.deletedCount);
    // 1

    // 删除Persons集合的所有数据
    await Person.remove({});


    const a = await Person.findOneAndRemove({
      n: 'zhao',
    });

    console.log(a);
    // {
    //   age: 16,
    //   _id: 6109121467d113aa2c3f4464,
    //   n: 'zhao',
    //   address: 'hubei',
    //   __v: 0
    // }
表填充
mongoose还提供了一个便捷能力,可以在文档中引用其他集合的文档,称之为Populate
const workerSchema = new Schema({
  job: String,
  person: { // person字段,引用Persons表中的文档,通过 _id 进行关联
    type: Schema.Types.ObjectId,
    ref: 'Person', // 指定集合名称
  },
  workYear: Number,
});

const Worker = model('Worker', workerSchema);
在创建文档时,需要写入所关联数据的 _id
  const person = new Person({
    name: 'lei',
    age: 28,
    address: 'hubei',
  });

  await person.save();

  const worker = await new Worker({
    job: 'banzhuan',
    workYear: 6,
    person: person._id, // 写入_id
  });

  await worker.save();

  console.log(worker);
  // {
  //   _id: 610a85c10aec8ad374de9c29,
  //   job: 'banzhuan',
  //   workYear: 6,
  //   person: 610a85c00aec8ad374de9c28, // 对应person文档的 _id
  //   __v: 0
  // }
使用 Query.prototype.populate(),就可以在查询数据时,便捷地取到所填充文档的数据。还可以通过配置,对关联文档进行过滤,指定返回字段,排序规则等等。
    const a = await Worker.find({
      job: 'banzhuan',
    }).populate('person');

    // [
    //   {
    //     _id: 610a85c10aec8ad374de9c29,
    //     job: 'banzhuan',
    //     workYear: 6,
    //     person: { // Persons中文档的数据
    //       age: 28,
    //       _id: 610a85c00aec8ad374de9c28,
    //       n: 'lei',
    //       address: 'hubei',
    //       __v: 0
    //     },
    //     __v: 0
    //   }
    // ]

    const b = await Worker.find({
      job: 'banzhuan',
    }).populate({
      path: 'person', // 指定路径,即字段名
      match: { age: { $gte: 28 } }, // 对填充文档的过滤条件,和find的过滤规则一致
      select: 'age n -_id', // 指定需要返回的字段,和find的写法一致
    });

    // [
    //   {
    //     _id: 610a85c10aec8ad374de9c29,
    //     job: 'banzhuan',
    //     workYear: 6,
    //     person: { age: 28, n: 'lei' },
    //     __v: 0
    //   }
    // ]


