TensorFlow讀取數據的三種方法
- 2019 年 10 月 3 日
- 筆記
tensortlfow數據讀取有三種方式
- placehold feed_dict:從記憶體中讀取數據,佔位符填充數據
- queue隊列:從硬碟讀取數據
- Dataset:同時支援記憶體和硬碟讀取數據
placehold-feed_dict
先用placehold 佔位數據,在Graph中讀取數據,數據直接內嵌到Graph中,然後當Graph傳入Session是,用feed_dict喂補數據。當數據量比較大的時候,Graph的傳輸會遇到效率底下問題,特別是數據轉換。
import tensorflow as tf import librosa # 把數據載入在Graph中 x1 = librosa.load("temp_1.wav", sr=16000) x2 = librosa.load("temp_2.wav", sr=16000) y = tf.add(x1, x2) with tf.Session() as sess: print(sess.run(y))
queue隊列
如果我們的數據讀取演算法沒有設計多執行緒的話(即單執行緒),由於讀取數據和處理數據在同一個進程是有先後關係的,意味著數據處理完後必須花時間讀取數據,然後才能進行計算處理。這樣的一來GPU並沒有高效的專一做一件事情,從而大大的降低的效率,queue創建多執行緒徹底的解決了這個問題。
tensorflow中為了充分的利用時間,減少GPU等待的空閑時間,使用了兩個執行緒(文件名隊列和記憶體隊列)分別執行數據讀入和數據計算。文件名隊列源源不斷的將硬碟中的圖片數據,記憶體隊列負責給GPU送數據,所需數據直接從記憶體隊列中獲取。兩個執行緒之間互不干擾,同時運行。
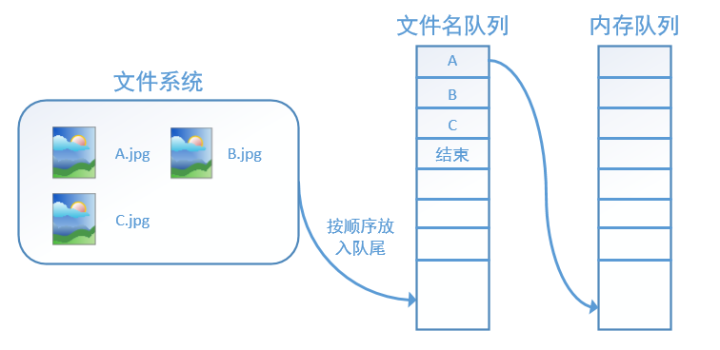
因此 tensorflow 在記憶體隊列之前,還要使用tf.train.slice_input_producer函數,創建一個文件名隊列,文件名隊列存放的是參與訓練的文件名,要訓練N個epoch,則文件名隊列中就含有N個批次的所有文件名。
tf.train.slice_in put_producer()
使用到 tf.train.slice_input_producer 函數創建文件名隊列。在N個epoch的文件名最後是一個結束標誌,當tf讀到這個結束標誌的時候,會拋出一個OutofRange 的異常,外部捕獲到這個異常之後就可以結束程式了。
slice_input_producer(tensor_list, num_epochs=None, shuffle=True, seed=None, capacity=32, shared_name=None, name=None)
返回tensor生成器,作用是按照設定,每次從一個tensor_list中按順序或者隨機抽取出一個tensor放入文件名隊列。
參數:
- tensor_list:tensor的列表,表中tensor的第一維度的值必須相等,即個數必須相等,有多少個影像,就應該有多少個對應的標籤
- num_epochs: 迭代的次數,num_epochs=None,生成器可以無限次遍歷tensor列表;num_epochs=N,生成器只能遍歷tensor列表N次
- shuffle: bool,是否打亂樣本的順序。一般情況下,如果shuffle=True,生成的樣本順序就被打亂了,在批處理的時候不需要再次打亂樣本,使用 tf.train.batch函數就可以了;如果shuffle=False,就需要在批處理時候使用 tf.train.shuffle_batch函數打亂樣本
- seed: 生成隨機數的種子,shuffle=True的情況下才有用
- capacity:隊列容量的大小,為整數
- shared_name:可選參數,如果設置一個"shared_name",則在不同的上下文Session中可以通過這個名字共享生成的tensor
- name:設置操作的名稱
如果tensor_list=[data, lable],其中data.shape=(4000,10),label.shape=[4000,2],則生成器生成的第一個隊列
input_quenue[0].shape=(10,)
input_quenue[1].shape=(2,)
要真正將文件放入文件名隊列,還需要調用tf.train.start_queue_runners 函數來啟動執行文件名隊列填充的執行緒,之後計算單元才可以把數據讀出來,否則文件名隊列為空的,計算單元就會處於一直等待狀態,導致系統阻塞。
import tensorflow as tf images = ["img1", "img2", "img3", "img4", "img5"] labels = [1, 2, 3, 4, 5] epoch_num = 8 # 文件名隊列 input_queue = tf.train.slice_input_producer([images, labels], num_epochs=None, shuffle=False) with tf.Session() as sess: sess.run(tf.global_variables_initializer()) coord = tf.train.Coordinator() # 創建一個協調器,管理執行緒 # 啟動QueueRunner, 執行文件名隊列的填充 threads = tf.train.start_queue_runners(sess=sess, coord=coord) for i in range(epoch_num): k = sess.run(input_queue) print(i, k) # 0[b'img1', 1] # 1[b'img2', 2] # 2[b'img3', 3] # 3[b'img4', 4] # 4[b'img5', 5] # 5[b'img1', 1] # 6[b'img2', 2] # 7[b'img3', 3] coord.request_stop() coord.join(threads)
tf.train.batch & tf.train.shuffle_batch()
tf.train.batch( tensors_list, batch_size, num_threads=1, capacity=32, enqueue_many=False, shapes=None, dynamic_pad=False, allow_smaller_final_batch=False, shared_name=None, name=None )
tf.train.batch & tf.train.shuffle_batch()這兩個函數的參數是一樣的,下面我以tf.train.batch講解為例
tf.train.batch是一個tensor隊列生成器,作用是按照給定的tensor順序,把batch_size個tensor推送到文件隊列,作為訓練一個batch的數據,等待tensor出隊執行計算。
- tensors:一個列表或字典的tensor用來進行入隊
- batch_size: 每次從隊列中獲取出隊數據的數量
- num_threads:用來控制入隊tensors執行緒的數量,如果num_threads大於1,則batch操作將是非確定性的,輸出的batch可能會亂序
- capacity: 設置隊列中元素的最大數量
- enqueue_many: 在第一個參數tensors中的tensor是否是單個樣本
- shapes: 可選,每個樣本的shape,默認是tensors的shape
- dynamic_pad: Boolean值;允許輸入變數的shape,出隊後會自動填補維度,來保持與batch內的shapes相同
- allow_smaller_final_batch: 設置為True,表示在tensor隊列中剩下的tensor數量不夠一個batch_size的情況下,允許最後一個batch的數量少於batch_size進行出隊, 設置為False,小於batch_size的樣本不會做出隊處理
- shared_name: 可選參數,設置生成的tensor序列在不同的Session中的共享名稱;
- name: 操作的名稱;
以下舉例: 一共有5個樣本,設置迭代次數是2次,每個batch中含有3個樣本,不打亂樣本順序:
import tensorflow as tf import numpy as np sample_num = 5 # 樣本個數 epoch_num = 2 # 設置迭代次數 batch_size = 3 # 設置一個批次中包含樣本個數 batch_total = int(sample_num / batch_size) + 1 # 計算每一輪epoch中含有的batch個數 # 生成4個數據和標籤 def generate_data(sample_num=sample_num): labels = np.asarray(range(0, sample_num)) images = np.random.random([sample_num, 224, 224, 3]) print("image size {}, label size: {}".format(images.shape, labels.shape)) # image size (5, 224, 224, 3), label size: (5,) return images, labels def get_batch_data(batch_size=batch_size): images, label = generate_data() images = tf.cast(images, tf.float32) # 數據類型轉換為tf.float32 label = tf.cast(label, tf.int32) # 數據類型轉換為tf.int32 # 從tensor列表中按順序或隨機抽取一個tensor,主要程式碼 input_queue = tf.train.slice_input_producer([images, label], shuffle=False) image_batch, label_batch = tf.train.batch(input_queue, batch_size=batch_size, num_threads=1, capacity=64) return image_batch, label_batch image_batch, label_batch = get_batch_data(batch_size=batch_size) with tf.Session() as sess: coord = tf.train.Coordinator() threads = tf.train.start_queue_runners(sess, coord) try: for i in range(epoch_num): # 每一輪迭代 print(" ** ** ** ** ** ** ") for j in range(batch_total): # 遍歷每一個batch # 獲取每一個batch中batch_size個樣本和標籤 image_batch_v, label_batch_v = sess.run([image_batch, label_batch]) # for k in print(image_batch_v.shape, label_batch_v) # ** ** ** ** ** ** # (3, 224, 224, 3) [0 1 2] # (3, 224, 224, 3) [3 4 0] # ** ** ** ** ** ** # (3, 224, 224, 3) [1 2 3] # (3, 224, 224, 3) [4 0 1] except tf.errors.OutOfRangeError: print("done") finally: coord.request_stop() coord.join(threads)
與tf.train.batch函數相對的還有一個tf.train.shuffle_batch函數,兩個函數作用一樣,都是生成一定數量的tensor,組成訓練一個batch需要的數據集,區別是tf.train.shuffle_batch會打亂樣本順序。
下面這段程式碼和上面想表達的相同,但是如果tf.train.slice_input_producer中設置了epoch,則後面訓練的時候,不需要for循環epoch,只需要設置coord.should_stop。
import numpy as np import tensorflow as tf def next_batch(): datasets = np.asarray(range(0, 20)) input_queue = tf.train.slice_input_producer([datasets], shuffle=False, num_epochs=1) data_batchs = tf.train.batch(input_queue, batch_size=5, num_threads=1, capacity=20, allow_smaller_final_batch=False) return data_batchs if __name__ == "__main__": data_batchs = next_batch() sess = tf.Session() sess.run(tf.initialize_local_variables()) coord = tf.train.Coordinator() # 創建一個協調器,管理執行緒 threads = tf.train.start_queue_runners(sess, coord) # 啟動執行緒 try: while not coord.should_stop(): data = sess.run([data_batchs]) print(data) # [array([0, 1, 2, 3, 4])] # [array([5, 6, 7, 8, 9])] # [array([10, 11, 12, 13, 14])] # [array([15, 16, 17, 18, 19])] # complete except tf.errors.OutOfRangeError: print("complete") finally: coord.request_stop() coord.join(threads) sess.close()
注意:tf.train.batch這個函數的實現是使用queue,需要使用tf.initialize_local_variables(),如果使用tf.global_varialbes_initialize()時,會報: Attempting to use uninitialized value 。並不是tf.initialize_local_variables()替換了tf.global_varialbes_initialize(),而是他們有不同的功能,並要的時候都要使用
batch的使用方法,實現感知機。


import tensorflow as tf import scipy.io as sio def get_Batch(data, label, batch_size): print(data.shape, label.shape) input_queue = tf.train.slice_input_producer([data, label], num_epochs=1, shuffle=True, capacity=32) x_batch, y_batch = tf.train.batch(input_queue, batch_size=batch_size, num_threads=1, capacity=32, allow_smaller_final_batch=False) return x_batch, y_batch data = sio.loadmat('data.mat') train_x = data['train_x'] train_y = data['train_y'] test_x = data['test_x'] test_y = data['test_y'] x = tf.placeholder(tf.float32, [None, 10]) y = tf.placeholder(tf.float32, [None, 2]) w = tf.Variable(tf.truncated_normal([10, 2], stddev=0.1)) b = tf.Variable(tf.truncated_normal([2], stddev=0.1)) pred = tf.nn.softmax(tf.matmul(x, w) + b) loss = tf.reduce_mean(-tf.reduce_sum(y * tf.log(pred), reduction_indices=[1])) optimizer = tf.train.AdamOptimizer(2e-5).minimize(loss) correct_prediction = tf.equal(tf.argmax(y, 1), tf.argmax(pred, 1)) accuracy = tf.reduce_mean(tf.cast(correct_prediction, tf.float32), name='evaluation') x_batch, y_batch = get_Batch(train_x, train_y, 1000) # 訓練 with tf.Session() as sess: # 初始化參數 sess.run(tf.global_variables_initializer()) sess.run(tf.local_variables_initializer()) # 開啟協調器 coord = tf.train.Coordinator() # 使用start_queue_runners 啟動隊列填充 threads = tf.train.start_queue_runners(sess, coord) epoch = 0 try: while not coord.should_stop(): # 獲取訓練用的每一個batch中batch_size個樣本和標籤 data, label = sess.run([x_batch, y_batch]) sess.run(optimizer, feed_dict={x: data, y: label}) train_accuracy = accuracy.eval({x: data, y: label}) test_accuracy = accuracy.eval({x: test_x, y: test_y}) print("Epoch %d, Training accuracy %g, Testing accuracy %g" % (epoch, train_accuracy, test_accuracy)) epoch = epoch + 1 except tf.errors.OutOfRangeError: # num_epochs 次數用完會拋出此異常 print("---Train end---") finally: # 協調器coord發出所有執行緒終止訊號 coord.request_stop() print('---Programm end---') coord.join(threads) # 把開啟的執行緒加入主執行緒,等待threads結束
tf.data.Dataset
官方推薦用tf.data.Dateset,看到這個是不是有點心累,哈哈哈。
Tensorflow中之前主要用的數據讀取方式主要有:
1、建立placeholder,然後使用feed_dict將數據feed進placeholder進行使用。使用這種方法十分靈活,可以一下子將所有數據讀入記憶體,然後分batch進行feed;也可以建立一個Python的generator,一個batch一個batch的將數據讀入,並將其feed進placeholder。這種方法很直觀,用起來也比較方便靈活jian,但是這種方法的效率較低,難以滿足高速計算的需求。
2、使用TensorFlow的QueueRunner,通過一系列的Tensor操作,將磁碟上的數據分批次讀入並送入模型進行使用。這種方法效率很高,但因為其牽涉到Tensor操作,不夠直觀,也不方便調試,所有有時候會顯得比較困難。使用這種方法時,常用的一些操作包括tf.TextLineReader,tf.FixedLengthRecordReader以及tf.decode_raw等等。如果需要循環,條件操作,還需要使用TensorFlow的tf.while_loop,tf.case等操作。
3、上面的方法我覺得已經要被tensorflow放棄了,現在官方推薦用tf.data.Dataset模組,使其數據讀入的操作變得更為方便,而支援多執行緒(進程)的操作,也在效率上獲得了一定程度的提高。
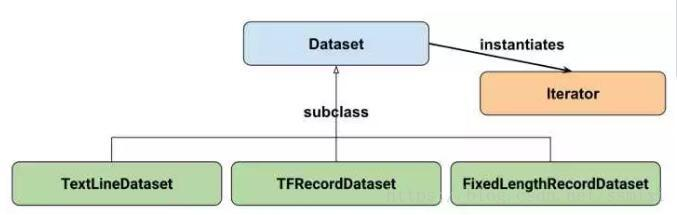
tf.data.Dataset.from_tensor_slices
創建了一個dataset,這個dataset中含有5個元素[1.0, 2.0, 3.0, 4.0, 5.0],為了將5個元素取出,方法是從Dataset中示例化一個iterator,然後對iterator進行迭代。
import tensorflow as tf import numpy as np dataset = tf.data.Dataset.from_tensor_slices(np.array([1.0, 2.0, 3.0, 4.0, 5.0])) iterator = dataset.make_one_shot_iterator() # 從dataset中實例化一個iterator,只能從頭到尾取一次,指名了順序 one_element = iterator.get_next() # 從iterator中取一個元素 with tf.Session() as sess: try: for i in range(5): print(sess.run(one_element)) except tf.errors.OutOfRangeError: # iterator迭代完會拋出此異常 print("數據迭代完了")
dataset = tf.data.Dataset.from_tensor_slices(np.random.uniform(size=(5, 2)))
數據的第一維度是個數,這個函數會切分第一維度,最後生成的dataset中含有5個元素,每個元素的形狀是(2,)
dataset = tf.data.Dataset.from_tensor_slices( { "a": np.array([1.0, 2.0, 3.0, 4.0, 5.0]), "b": np.random.uniform(size=(5, 2)) })
tf.data.Dataset.from_tensor_slices的參數,可以是列表也可以是字典,{"image": "image_tensor", "label": "label_tensor"}
Trainformation
Dataset支援一類特殊的操作Trainformation,即一個Dataset通過Trainformation變成一個新的Dataset,可以理解為數據變換,對Dataset中的元素做變換(打亂、生成epoch...等操作)。
常用的Trainformation有:
- map
- batch
- shuffle
- repeat
1、dataset.map
這個函數很重要也經常用到,他接收一個函數,Dataset中的每一個元素都會被當做這個函數的輸入,並將函數返回值作為新的Dataset,
例如:對dataset中每一個元素的值加1
dataset = tf.data.Dataset.from_tensor_slices(np.array([1.0, 2.0, 3.0, 4.0, 5.0])) dataset = dataset.map(lambda x: x + 1) # 2.0, 3.0, 4.0, 5.0, 6.0
2、dataset.batch
batch就是將多個元素組合成batch,如下面的程式將dataset中的每個元素組成了大小為6的batch:
# 創建0-10的數據集,每個6個數取一個batch。 dataset = tf.data.Dataset.range(10).batch(6) iterator = dataset.make_one_shot_iterator() next_element = iterator.get_next() with tf.Session() as sess: for i in range(2): value = sess.run(next_element) print(value) # [0 1 2 3 4 5] # [6 7 8 9]
tensorflow很好的幫我們自動處理最後的一個batch,但是,上面的for循環次數超過2,會報錯,超過範圍了,沒值可取。
4、datasets.repeat
repeat的功能就是將整個序列重複多次,主要用來處理機器學習中的epoch,假設原先的數據是一個epoch,使用repeat(5)就可以將之變成5個epoch,當for循環取值超過一個epoch的時候,會開始下一個epoch。
dataset = tf.data.Dataset.range(10).batch(6) dataset = dataset.repeat(2) iterator = dataset.make_one_shot_iterator() next_element = iterator.get_next() with tf.Session() as sess: for i in range(4): value = sess.run(next_element) print(value) # [0 1 2 3 4 5] # [6 7 8 9] # [0 1 2 3 4 5] # [6 7 8 9]
repeat只是將數據集重複了指定的次數,但是如果for循環大於4還是會報錯,所以簡單的方法是repeat不設次數,生成的序列就會無限重複下去,沒有結束,因此也不會拋出tf.errors.OutOfRangeError異常:dataset = dataset.repeat()
dataset = tf.data.Dataset.range(10).batch(6) dataset = dataset.repeat() iterator = dataset.make_one_shot_iterator() next_element = iterator.get_next() with tf.Session() as sess: for i in range(6): value = sess.run(next_element) print(value) # [0 1 2 3 4 5] # [6 7 8 9] # [0 1 2 3 4 5] # [6 7 8 9] # [0 1 2 3 4 5] # [6 7 8 9]
3、dataset.shuffle
打亂dataset中的元素,它有一個參數buffer_size表示打亂順序,buffer_size=1表示不打亂順序,buffer_size越大,打亂程度越大,不設置會報錯:
dataset = dataset.shuffle(buffer_size=10000)
shuffle打亂順序很重要,建議先打亂順序,再batch取值,因為如果是先執行batch操作的話,那麼此時就只是對batch進行shuffle,而batch裡面的數據順序依舊是有序的,那麼隨機程度會減弱。
建議:dataset = tf.data.Dataset.range(10).shuffle(10).batch(6)
讀入磁碟圖片與對應label
我們可以來考慮一個簡單,但同時也非常常用的例子:讀入磁碟中的圖片和圖片相應的label,並將其打亂,組成batch_size=32的訓練樣本。在訓練時重複10個epoch。
# 函數的功能時將filename對應的圖片文件讀進來,並縮放到統一的大小 def _parse_function(filename, label): image_string = tf.read_file(filename) image_decoded = tf.image.decode_image(image_string) image_resized = tf.image.resize_images(image_decoded, [28, 28]) return image_resized, label # 圖片文件的列表 filenames = tf.constant(["/var/data/image1.jpg", "/var/data/image2.jpg", ...]) # label[i]就是圖片filenames[i]的label labels = tf.constant([0, 37, ...]) # filename是圖片的文件名,label是圖片對應的標籤 dataset = tf.data.Dataset.from_tensor_slices((filenames, labels)) # 將filename對應的圖片讀入,並縮放為28x28的大小, dataset = dataset.map(_parse_function) # 在每個epoch內將圖片打亂組成大小為32的batch,並重複10次。 # image_resized_batch(32, 28, 28, 3),label_batch(32, ) dataset = dataset.shuffle(buffer_size=1000).batch(32).repeat(10)
Dataset的其他創建方法
除了tf.data.Dataset.from_tensor_slices外,目前Dataset API還提供了另外三種創建Dataset的方式:
- tf.data.TextLineDataset():這個函數的輸入是一個文件的列表,輸出是一個dataset。dataset中的每一個元素就對應了文件中的一行。可以使用這個函數來讀入CSV文件。
- tf.data.FixedLengthRecordDataset():這個函數的輸入是一個文件的列表和一個record_bytes,之後dataset的每一個元素就是文件中固定位元組數record_bytes的內容。通常用來讀取以二進位形式保存的文件,如CIFAR10數據集就是這種形式。
- tf.data.TFRecordDataset():顧名思義,這個函數是用來讀TFRecord文件的,dataset中的每一個元素就是一個TFExample。
iterator
在非Eager模式下,最簡單的創建Iterator的方法就是通過dataset.make_one_shot_iterator()來創建一個one_shot_iterator。除了這種iterator外,還有三個更複雜的Iterator,即:
- make_initializable_iterator
- make_reinitializable_iterator
- make_feedable_iterator
initializable_iterator必須要在使用前通過sess.run()來初始化。使用initializable iterator,可以將placeholder-feed_dict代入Iterator中,這可以方便我們通過參數快速定義新的Iterator。一個簡單的initializable_iterator使用示例:
limit = tf.placeholder(dtype=tf.int32, shape=[]) # 此時的limit相當於一個“可變參數”,它規定了Dataset中數的“上限”。 dataset = tf.data.Dataset.from_tensor_slices(tf.range(start=0, limit=limit)) iterator = dataset.make_initializable_iterator() next_element = iterator.get_next() with tf.Session() as sess: # 初始化並feed initializable_iterator sess.run(iterator.initializer, feed_dict={limit: 10}) for i in range(10): value = sess.run(next_element) assert i == value
initializable_iterator還有一個功能:讀入較大的數組。
在使用tf.data.Dataset.from_tensor_slices(array)時,實際上發生的事情是將array作為一個tf.constants保存到了計算圖中。當array很大時,會導致計算圖變得很大,給傳輸、保存帶來不便。這時,我們可以用一個placeholder取代這裡的array,並使用initializable_iterator,只在需要時將array傳進去,這樣就可以避免把大數組保存在圖裡,示例程式碼為(來自官方常式):
# 讀取numpy數據 with np.load("/var/data/training_data.npy") as data: features = data["features"] labels = data["labels"] # 查看影像和標籤維度是否保持一致 assert features.shape[0] == labels.shape[0] # 創建placeholder features_placeholder = tf.placeholder(features.dtype, features.shape) labels_placeholder = tf.placeholder(labels.dtype, labels.shape) # 創建dataset dataset = tf.data.Dataset.from_tensor_slices((features_placeholder, labels_placeholder)) # 批量讀取,打散數據,repeat() dataset = dataset.shuffle(20).batch(5).repeat() # [Other transformations on `dataset`...] dataset_other = ... iterator = dataset.make_initializable_iterator() data_element = iterator.get_nex() sess = tf.Session() # 注意迭代器要在循環語句之前初始化 sess.run(iterator.initializer, feed_dict={features_placeholder: features, labels_placeholder: labels}) for e in range(EPOCHS): for step in range(num_batches): x_batch, y_batch = sess.run(data_element) y_pred = model(x_batch) ... ... sess.close()
自定義方法
上面幾種方法,都是官方可調用的方法,如果大家想自定義可以參考我的程式碼,這段程式碼是從tensorflow教程中偷來的。程式碼太長我的摺疊起來了哈,這段程式碼大家可以直接拿去用(親測可用)。
import numpy as np from tensorflow.contrib.learn.python.learn.datasets import base from tensorflow.python.framework import dtypes class DataSet(object): def __init__(self, datapoints, labels, fake_data=False, one_hot=False, dtype=dtypes.float32): """Construct a DataSet. one_hot arg is used only if fake_data is true. `dtype` can be either `uint8` to leave the input as `[0, 255]`, or `float32` to rescale into `[0, 1]`. """ dtype = dtypes.as_dtype(dtype).base_dtype if dtype not in (dtypes.uint8, dtypes.float32): raise TypeError('Invalid image dtype %r, expected uint8 or float32' % dtype) if labels is None: labels = np.zeros((len(datapoints),)) if fake_data: self._num_examples = 10000 self.one_hot = one_hot else: assert datapoints.shape[0] == labels.shape[0], ( 'datapoints.shape: %s labels.shape: %s' % (datapoints.shape, labels.shape)) self._num_examples = datapoints.shape[0] self._datapoints = datapoints self._labels = labels self._epochs_completed = 0 self._index_in_epoch = 0 @property def datapoints(self): return self._datapoints @property def labels(self): return self._labels @property def num_examples(self): return self._num_examples @property def epochs_completed(self): return self._epochs_completed def next_batch(self, batch_size, fake_data=False, shuffle=True): """Return the next `batch_size` examples from this data set.""" if fake_data: fake_image = [1] * 784 if self.one_hot: fake_label = [1] + [0] * 9 else: fake_label = 0 return [fake_image for _ in range(batch_size)], [ fake_label for _ in range(batch_size) ] start = self._index_in_epoch # Shuffle for the first epoch if self._epochs_completed == 0 and start == 0 and shuffle: perm0 = np.arange(self._num_examples) np.random.shuffle(perm0) self._datapoints = self.datapoints[perm0] self._labels = self.labels[perm0] # Go to the next epoch if start + batch_size > self._num_examples: # 如果初始epoch+batch_size(0+128)>樣本總數 # Finished epoch self._epochs_completed += 1 # Get the rest examples in this epoch rest_num_examples = self._num_examples - start datapoints_rest_part = self._datapoints[start:self._num_examples] labels_rest_part = self._labels[start:self._num_examples] # Shuffle the data if shuffle: perm = np.arange(self._num_examples) np.random.shuffle(perm) self._datapoints = self.datapoints[perm] self._labels = self.labels[perm] # Start next epoch start = 0 self._index_in_epoch = batch_size - rest_num_examples end = self._index_in_epoch datapoints_new_part = self._datapoints[start:end] labels_new_part = self._labels[start:end] return np.concatenate((datapoints_rest_part, datapoints_new_part), axis=0), np.concatenate( (labels_rest_part, labels_new_part), axis=0) else: self._index_in_epoch += batch_size end = self._index_in_epoch return self._datapoints[start:end], self._labels[start:end]
想要真正弄懂建議自己寫一個,雖然上面那個已經寫的非常完美了。
- 要求1:每一個epoch之後都要shuff數據,
- 要求2:訓練數據集不用去batch_size的整數。
打亂順序
def shuffle_set(train_image, train_label, test_image, test_label): train_row = range(len(train_label)) random.shuffle(train_row) train_image = train_image[train_row] train_label = train_label[train_row] test_row = range(len(test_label)) random.shuffle(test_row) test_image = test_image[test_row] test_label = test_label[test_row] return train_image, train_label, test_image, test_label
取下一個batch
def get_batch(image, label, batch_size, now_batch, total_batch): if now_batch < total_batch-1: image_batch = image[now_batch*batch_size:(now_batch+1)*batch_size] label_batch = label[now_batch*batch_size:(now_batch+1)*batch_size] else: image_batch = image[now_batch*batch_size:] label_batch = label[now_batch*batch_size:] return image_batch, label_batch
epoch、 iteration和batchsize的區別:epoch是周期的意思,代表要重複訓練epoch次,每個epoch包括樣本數/batch個iteration
總結
本文主要介紹了tensortlfow三種讀取數據方式的,placehold-feed_dict,queue隊列還介紹了Dataset API的基本架構:Dataset類和Iterator類,以及它們的基礎使用方法。
在非Eager模式下,Dataset中讀出的一個元素一般對應一個batch的Tensor,我們可以使用這個Tensor在計算圖中構建模型。
在Eager模式下,Dataset建立Iterator的方式有所不同,此時通過讀出的數據就是含有值的Tensor,方便調試。