day87:luffy:結算頁面積分&支付寶介面
- 2020 年 11 月 11 日
- 筆記
- Python全棧31期-筆記, PythonS31-筆記
目錄
1.積分
1.關於積分的表結構
1.在user表中添加credit欄位 + 設計一個積分的表結構
user/models.py
class User(AbstractUser):
    phone = models.CharField(max_length=16,null=True,blank=True)
    wechat = models.CharField(max_length=16,null=True,blank=True)

    # 為用戶表添加積分欄位 每個用戶都有自己積分
    credit = models.IntegerField(default=0, blank=True, verbose_name="貝里")


class Credit(BaseModel):
    """積分流水"""
    OPERA_OPION = (
        (1, "賺取"),
        (2, "消費"),
    )
    user = models.ForeignKey("User", related_name="user_credit", on_delete=models.CASCADE, verbose_name="用戶")
    opera = models.SmallIntegerField(choices=OPERA_OPION,verbose_name="操作類型")
    number = models.SmallIntegerField(default=0, verbose_name="積分數值")

    class Meta:
        db_table = 'ly_credit'
        verbose_name = '積分流水'
        verbose_name_plural = verbose_name

    def __str__(self):
        return "%s %s %s 貝殼" % ( self.user.username, self.OPERA_OPION[self.opera][1], self.number )
2.設置積分和現金的兌換比例
constant.py
CREDIT_MONEY = 10 # 10積分頂一塊錢
1.登錄成功 給前端回復除了[用戶名 id token],也要把[積分和計算公式]回復給前端
user/utils.py
def jwt_response_payload_handler(token, user=None, request=None):
    return {
        'token': token,
        'username': user.username,
        'id':user.id,

         # 登錄成功將積分和兌換比例也要返回給前端
        'credit':user.credit,
        'credit_to_money':contains.CREDIT_MONEY,
    }
2.前端將積分存起來
login.vue
 if (this.remember){
              localStorage.token = res.data.token;
              localStorage.username = res.data.username;
              localStorage.id = res.data.id;

              // 前端將積分存起來
              localStorage.credit = res.data.credit;
              localStorage.credit_to_money = res.data.credit_to_money;
              sessionStorage.removeItem('token');
              sessionStorage.removeItem('username');
              sessionStorage.removeItem('id');
              sessionStorage.removeItem('credit');
              sessionStorage.removeItem('credit_to_money');

            }else {
              sessionStorage.token = res.data.token;
              sessionStorage.username = res.data.username;
              sessionStorage.id = res.data.id;

              // 前端將積分存起來
              sessionStorage.credit = res.data.credit;
              sessionStorage.credit_to_money = res.data.credit_to_money;
              localStorage.removeItem('token');
              localStorage.removeItem('username');
              localStorage.removeItem('id');
              localStorage.removeItem('credit');
              localStorage.removeItem('credit_to_money');
            }
order.vue
<!-- html -->
<p class="discount-num2" v-else><span>總積分:xxxx,
    <el-input-number v-model="num" @change="handleChange" :min="0" :max="10000" label="描述文字"></el-input-number>,已抵扣xxx元,本次花費xxx積分</span></p>
// js
handleChange(value){
        // 如果用戶在積分輸入框中沒有輸入值,那麼默認使用了0個積分
        if (!value){
          this.num = 0
        }
        console.log(value);

      },
order.vue
get_credit(){
    // 從前端拿取積分和兌換比例
    this.credit = localStorage.getItem('credit') || sessionStorage.getItem('credit')
    this.credit_to_money = localStorage.getItem('credit_to_money') || sessionStorage.getItem('credit_to_money')
      },
order.vue
<!-- html -->
<p class="discount-num2" v-else><span>總積分:{{credit}},
order.vue
max_credit(){

    // 計算此課程能使用的最大積分數:比如100元的課程最多能使用1000積分
    let a = parseFloat(this.total_price) * parseFloat(this.credit_to_money);

    // 如果此課程能使用的最大積分數[1000]小於你的總積分數[1500]:那麼你能使用的最大積分數就是[1000]
    if (this.credit >= a){
        return a
    // 如果此課程能使用的最大積分數[1000]大於你的總積分數[600],那麼你能使用的最大積分數就是你剩餘的積分數[600]
    }else {
        return parseFloat(this.credit)
    }
order.vue
payhander(){
        let token = localStorage.token || sessionStorage.token;
        this.$axios.post(`${this.$settings.Host}/order/add_money/`,{
              "pay_type":this.pay_type,
              "coupon":this.current_coupon,
              "credit":this.num, // 將積分提交給後端,讓後端對積分做校驗

        },{
          headers:{
              'Authorization':'jwt ' + token
            }
        }).then((res)=>{
          this.$message.success('訂單已經生成,馬上跳轉支付頁面')

        }).catch((error)=>{
          this.$message.error(error.response.data.msg);
        })


      }
order/serializers.py
def validate(self, attrs):

    # 獲取前端發過來的積分
    credit = attrs.get('credit')

    # 查詢用戶所擁有的的所有積分
    user_credit = self.context['request'].user.credit

    # 如果前端積分大於用戶積分,拋出異常
    if credit > user_credit:
        raise serializers.ValidationError('積分超上限了,別亂搞')

    return attrs

def create(self, validated_data):

    # 積分判斷
    credit = float(validated_data.get('credit',0)) # 獲取前端發過來的驗證之後的積分
    if credit > constants.CREDIT_MONEY * total_real_price: # 如果使用積分超過你此課程能使用的最大積分
        transaction.savepoint_rollback(sid) # 回滾到斷點處
        raise serializers.ValidationError('使用積分超過了上線,別高事情')

    # 積分計算
    total_real_price -= credit / contains.CREDIT_MONEY
2.支付
1.準備工作
pip install python-alipay-sdk --upgrade
python3 manage.py startapp payment
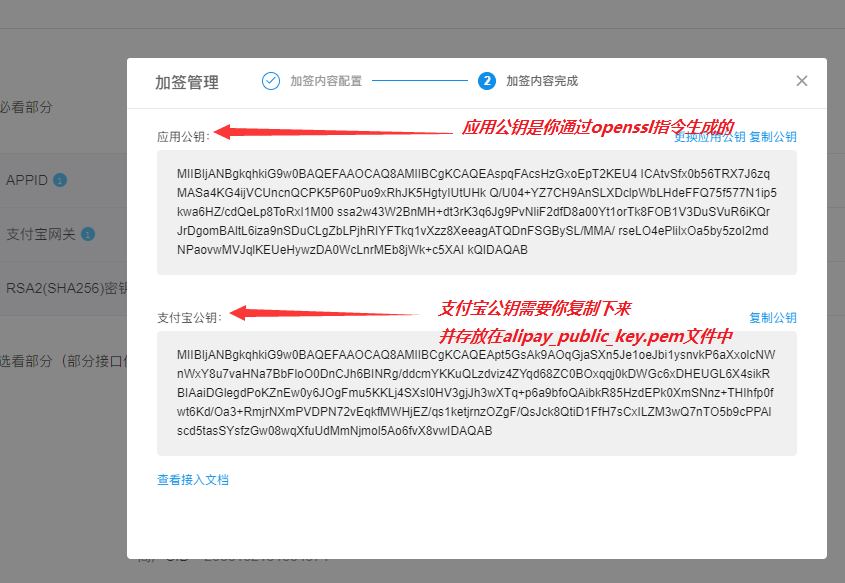
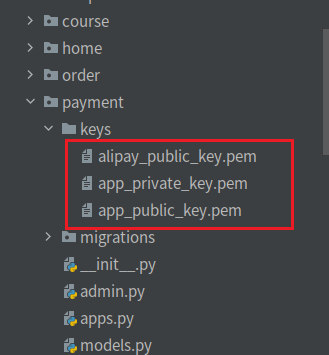
openssl
OpenSSL> genrsa -out app_private_key.pem 2048   # 生成私鑰到指定文件中
2.
openssl
OpenSSL> rsa -in app_private_key.pem -pubout -out app_public_key.pem  # 導出公鑰
3.
4.
from django.urls import path,re_path
from . import views

urlpatterns = [
    path('alipay/',views.AlipayView.as_view(),),

]
4.視圖
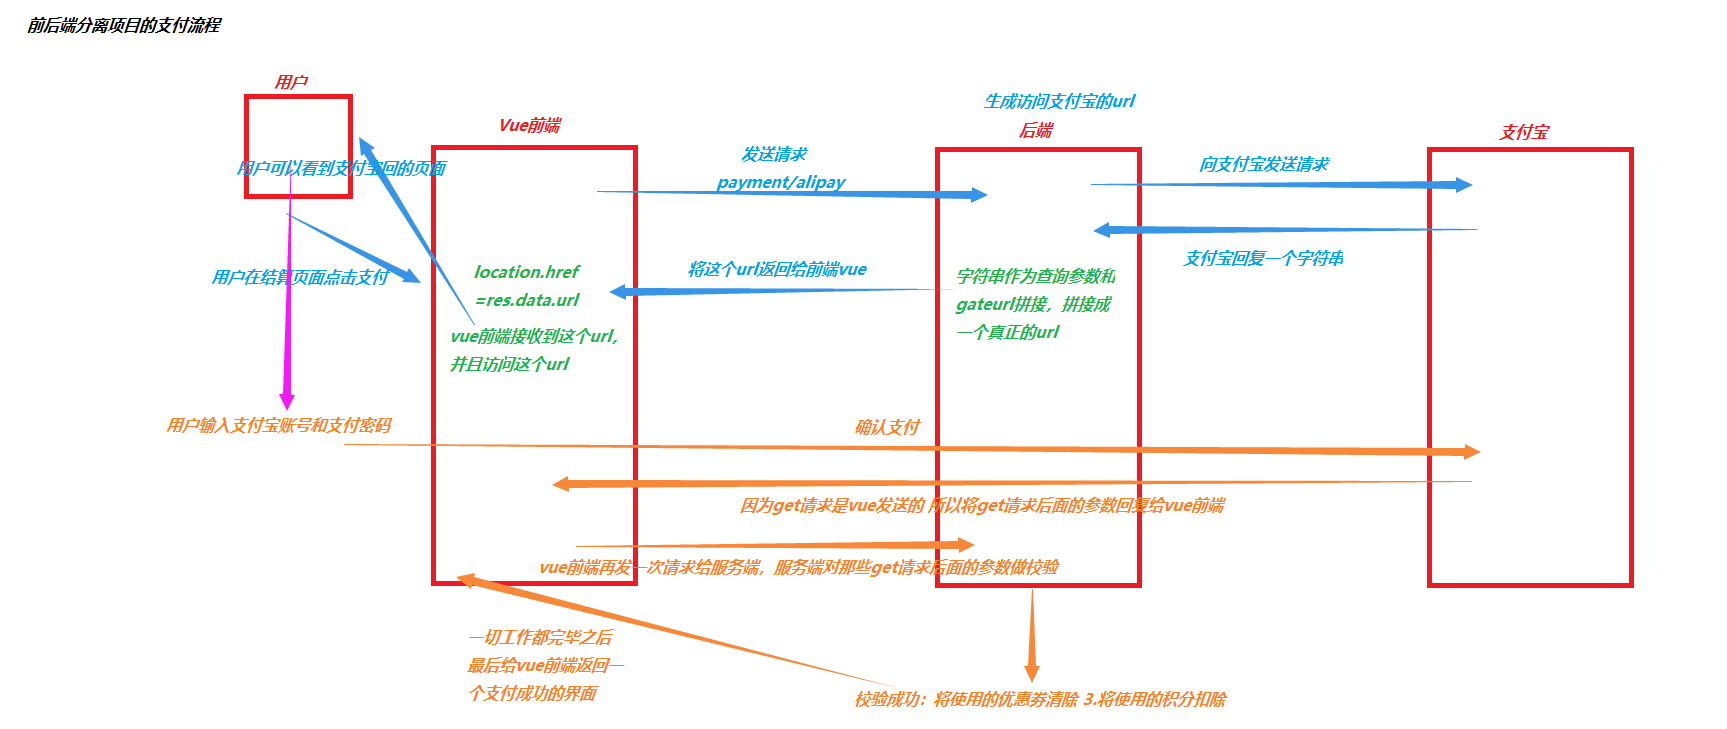
payment/views.py
from alipay import AliPay, DCAliPay, ISVAliPay
from alipay.utils import AliPayConfig


class AlipayView(APIView):

    def get(self,request):
        order_number = request.query_params.get('order_number')
        order_obj = Order.objects.get(order_number=order_number)


        alipay = AliPay(
            appid=settings.ALIAPY_CONFIG['appid'],
            app_notify_url=None,  # 默認回調url
            app_private_key_string=open(settings.ALIAPY_CONFIG['app_private_key_path']).read(),
            # 支付寶的公鑰,驗證支付寶回傳消息使用,不是你自己的公鑰,
            alipay_public_key_string=open(settings.ALIAPY_CONFIG['alipay_public_key_path']).read(),
            sign_type=settings.ALIAPY_CONFIG['sign_type'],  # RSA 或者 RSA2
            debug = settings.ALIAPY_CONFIG['debug'],  # 默認False
        )

        order_string = alipay.api_alipay_trade_page_pay(
            out_trade_no=order_obj.order_number,
            total_amount=float(order_obj.real_price),
            subject=order_obj.order_title,
            return_url=settings.ALIAPY_CONFIG['return_url'],
            notify_url=settings.ALIAPY_CONFIG['notify_url'] # 可選, 不填則使用默認notify url
        )

        url = settings.ALIAPY_CONFIG['gateway_url'] + order_string

        return Response({'url': url})
5.支付寶配置資訊
dev.py
# 支付寶配置資訊
ALIAPY_CONFIG = {
    "gateway_url": "//openapi.alipaydev.com/gateway.do?",  # 沙箱支付寶網關地址
    "appid": "2016093000633754",  # 沙箱中那個應用id
    "app_notify_url": None,
    "app_private_key_path": os.path.join(BASE_DIR, "apps/payment/keys/app_private_key.pem"),

    "alipay_public_key_path": os.path.join(BASE_DIR, "apps/payment/keys/alipay_public_key.pem"),
    "sign_type": "RSA2",
    "debug": False,
    "return_url": "//www.lycity.com:8080/payment/result",  # 同步回調地址
    "notify_url": "//www.lyapi.com:8001/payment/result",  # 非同步結果通知
payhander(){

        this.$axios.post(`${this.$settings.Host}/order/add_money/`,{

        }).then((res)=>{
          this.$message.success('訂單已經生成,馬上跳轉支付頁面')
          let order_number = res.data.order_number

          this.$axios.get(`${this.$settings.Host}/payment/alipay/?order_number=${order_number}`)
            .then((res)=>{
              // res.data :  alipay.trade...?a=1&b=2....
              location.href = res.data.url;

            })

        }).catch((error)=>{
          this.$message.error(error.response.data.msg);
        })


      }
7.支付成功的頁面-初始化
Success.vue


<template> <div class="success"> <Header/> <div class="main"> <div class="title"> <!-- <img src="../../static/images/right.svg" alt="">--> <div class="success-tips"> <p class="tips1">您已成功購買 1 門課程!</p> <p class="tips2">你還可以加入QQ群 <span>747556033</span> 學習交流</p> </div> </div> <div class="order-info"> <p class="info1"><b>付款時間:</b><span>2019/04/02 10:27</span></p> <p class="info2"><b>付款金額:</b><span >0</span></p> <p class="info3"><b>課程資訊:</b><span><span>《Pycharm使用秘籍》</span></span></p> </div> <div class="wechat-code"> <!-- <img src="../../static/image/server.cf99f78.png" alt="" class="er">--> <!-- <p><img src="../../static/image/tan.svg" alt="">重要!微信掃碼關注獲得學習通知&課程更新提醒!否則將嚴重影響學習進度和課程體驗!</p>--> </div> <div class="study"> <span>立即學習</span> </div> </div> <Footer/> </div> </template> <script> import Header from "./common/Header" import Footer from "./common/Footer" export default{ name:"Success", data(){ return { current_page:0, }; }, created(){ // 把地址欄上面的支付結果,轉發給後端 }, components:{ Header, Footer, } } </script> <style scoped> .success{ padding-top: 80px; } .main{ height: 100%; padding-top: 25px; padding-bottom: 25px; margin: 0 auto; width: 1200px; background: #fff; } .main .title{ display: flex; -ms-flex-align: center; align-items: center; padding: 25px 40px; border-bottom: 1px solid #f2f2f2; } .main .title .success-tips{ box-sizing: border-box; } .title img{ vertical-align: middle; width: 60px; height: 60px; margin-right: 40px; } .title .success-tips{ box-sizing: border-box; } .title .tips1{ font-size: 22px; color: #000; } .title .tips2{ font-size: 16px; color: #4a4a4a; letter-spacing: 0; text-align: center; margin-top: 10px; } .title .tips2 span{ color: #ec6730; } .order-info{ padding: 25px 48px; padding-bottom: 15px; border-bottom: 1px solid #f2f2f2; } .order-info p{ display: -ms-flexbox; display: flex; margin-bottom: 10px; font-size: 16px; } .order-info p b{ font-weight: 400; color: #9d9d9d; white-space: nowrap; } .wechat-code{ display: flex; -ms-flex-align: center; align-items: center; padding: 25px 40px; border-bottom: 1px solid #f2f2f2; } .wechat-code>img{ width: 100px; height: 100px; margin-right: 15px; } .wechat-code p{ font-size: 14px; color: #d0021b; display: -ms-flexbox; display: flex; -ms-flex-align: center; align-items: center; } .wechat-code p>img{ width: 16px; height: 16px; margin-right: 10px; } .study{ padding: 25px 40px; } .study span{ display: block; width: 140px; height: 42px; text-align: center; line-height: 42px; cursor: pointer; background: #ffc210; border-radius: 6px; font-size: 16px; color: #fff; } </style>
註冊Success組件
{
      path: '/payment/result/',
      component: Success
    },

