用python實現對元素的長截圖
- 2019 年 11 月 13 日
- 筆記
一.目標
瀏覽網頁的時候,看見哪個元素,就能截取哪個元素當圖片,不管那個元素有多長

二.所用工具和第三方庫
python ,PIL,selenium
pycharm
三.程式碼部分
長截圖整體思路:
1.獲取元素
2.移動,截圖,移動,截圖,直到抵達元素的底部
3.把截圖按照元素所在位置切割,在所有圖片中只保留該元素
4.拼接
如果driver在環境變數中,那麼不用指定路徑
b=webdriver.Chrome(executable_path=r"C:UsersDesktopchromedriver.exe")#指定一下driver b.get("https://www.w3school.com.cn/html/html_links.asp") b.maximize_window()#最大化窗口
打開網站
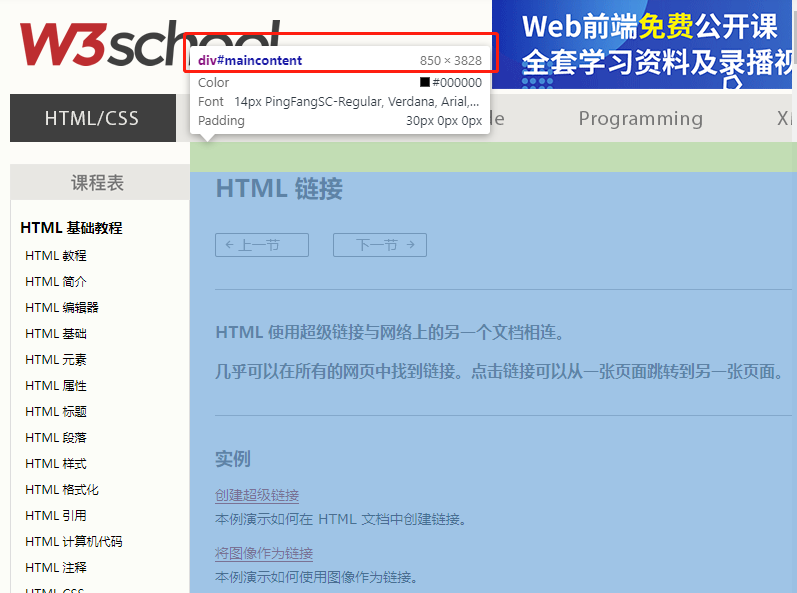
我們可以看見一個ID為maincontent的元素,寬度為850PX,長度為3828PX,這個長度必須使用才能長截圖才能完整截下來
el=b.find_element_by_id("maincontent")#找到元素
我們還需要一個重要的參數,就是你電腦一次能截取多高的像素
先用下圖程式碼獲取一個圖片
#fp為存放圖片的地址 b.get_screenshot_as_file(fp)

也就是說用我電腦上截圖的默認高度為614像素
所以我設置一個變數:
sc_hight=614
然後設置一下其他變數
count = int(el.size["height"] / sc_hight) # 元素的高度除以你每次截多少就是次數 start_higth = el.location["y"] # 元素的初始高度 max_px = start_higth + (count - 1) * sc_hight # for循環中最大的px last_px = el.size["height"] + start_higth - sc_hight # 元素最底部的位置 surplus_px = last_px - max_px # 剩餘的邊的高度 img_path = [] # 用來存放圖片地址
注釋:
1.count為元素的高度/每次截取的高度,比如這次實例中元素高度為3828PX,我每次截614px,需要6.2次,int之後變成6,也就是截6次,還剩一點,那一點後面再說
2.start_higth為初始高度,這個沒有什麼可說的
3.max_px為循環結束後,到達的高度
4.last_px為元素最底部的高度
5.surplus_px就是移動6次後,還沒有截取的高度
螢幕每次移動,移動sc_hight個像素,初始位置為(0,元素的Y值)
for i in range(0, count): js = "scrollTo(0,%s)" % (start_higth + i * sc_hight) # 用於移動滑輪,每次移動614px,初始值是元素的初始高度 b.execute_script(js) # 執行js time.sleep(0.5) fp = r"C:UserswdjDesktop%s.png" % i # 圖片地址,運行的話,改一下 b.get_screenshot_as_file(fp) # 螢幕截圖,這裡是截取是完整的網頁圖片,你可以打斷點看一下圖片 img = Image.open(fp=fp) img2 = img.crop((el.location["x"], 0, el.size["width"] + el.location["x"], sc_hight)) # 剪切圖片 img2.save(fp) # 保存圖片,覆蓋完整的網頁圖片 img_path.append(fp) # 添加圖片路徑 time.sleep(0.5) print(js) else: js = "scrollTo(0,%s)" % last_px # 滾動到最後一個位置 b.execute_script(js) fp = r"C:UserswdjDesktoplast.png" b.get_screenshot_as_file(fp) img = Image.open(fp=fp) print((el.location["x"], sc_hight - surplus_px, el.size["width"] + el.location["x"], sc_hight)) img2 = img.crop((el.location["x"], sc_hight - surplus_px, el.size["width"] + el.location["x"], sc_hight)) img2.save(fp) img_path.append(fp) print(js)
上面是把該元素的在頁面都截完,並且剪切,把圖片保存的路徑放入img_path
最後一步:把所有截圖都貼到新創建的圖片中
new_img = Image.new("RGB", (el.size["width"], el.size["height"])) # 創建一個新圖片,大小為元素的大小 k = 0 for i in img_path: tem_img = Image.open(i) new_img.paste(tem_img, (0, sc_hight * k)) # 把圖片貼上去,間隔一個截圖的距離 k += 1 else: new_img.save(r"C:UserswdjDesktoptest.png") # 保存
運行效果圖:
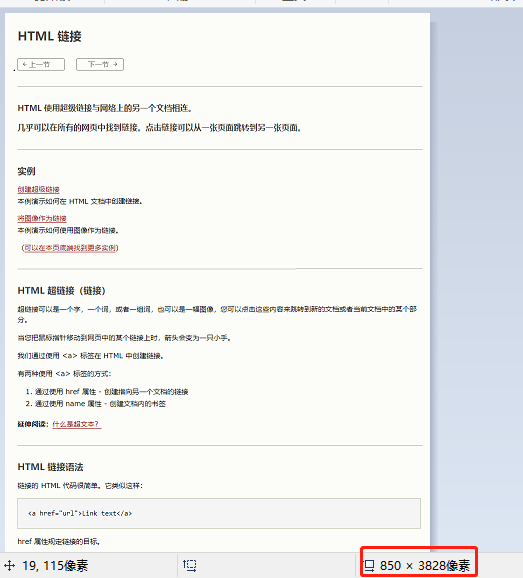
說明完整的截取下來了
補充優化:
如果是個小元素怎麼辦,不用長截圖就能截取的那種
因為很簡單我就直接貼程式碼了
start_higth = el.location["y"] js = "scrollTo(0,%s)" % (start_higth) b.execute_script(js) # 執行js time.sleep(0.5) fp = r"C:UserswdjDesktoptest.png" # 圖片地址,運行的話,改一下 b.get_screenshot_as_file(fp) img = Image.open(fp=fp) img2 = img.crop((el.location["x"], 0, el.size["width"] + el.location["x"], el.size["height"])) # 剪切圖片 img2.save(fp)
效果如下:

完整程式碼:


from selenium import webdriver from PIL import Image import time def short_sc(el,b): start_higth = el.location["y"] js = "scrollTo(0,%s)" % (start_higth) b.execute_script(js) # 執行js time.sleep(0.5) fp = r"C:UserswdjDesktoptest.png" # 圖片地址,運行的話,改一下 b.get_screenshot_as_file(fp) img = Image.open(fp=fp) img2 = img.crop((el.location["x"], 0, el.size["width"] + el.location["x"], el.size["height"])) # 剪切圖片 img2.save(fp) def long_sc(el,b): count = int(el.size["height"] / sc_hight) # 元素的高度除以你每次截多少就是次數 start_higth = el.location["y"] # 元素的初始高度 max_px = start_higth + (count - 1) * sc_hight # for循環中最大的px last_px = el.size["height"] + start_higth - sc_hight # 元素最底部的位置 surplus_px = last_px - max_px # 剩餘的邊的高度 img_path = [] # 用來存放圖片地址 for i in range(0, count): js = "scrollTo(0,%s)" % (start_higth + i * sc_hight) # 用於移動滑輪,每次移動614px,初始值是元素的初始高度 b.execute_script(js) # 執行js time.sleep(0.5) fp = r"C:UserswdjDesktop%s.png" % i # 圖片地址,運行的話,改一下 b.get_screenshot_as_file(fp) # 螢幕截圖,這裡是截取是完整的網頁圖片,你可以打斷點看一下圖片 img = Image.open(fp=fp) img2 = img.crop((el.location["x"], 0, el.size["width"] + el.location["x"], sc_hight)) # 剪切圖片 img2.save(fp) # 保存圖片,覆蓋完整的網頁圖片 img_path.append(fp) # 添加圖片路徑 time.sleep(0.5) print(js) else: js = "scrollTo(0,%s)" % last_px # 滾動到最後一個位置 b.execute_script(js) fp = r"C:UserswdjDesktoplast.png" b.get_screenshot_as_file(fp) img = Image.open(fp=fp) print((el.location["x"], sc_hight - surplus_px, el.size["width"] + el.location["x"], sc_hight)) img2 = img.crop((el.location["x"], sc_hight - surplus_px, el.size["width"] + el.location["x"], sc_hight)) img2.save(fp) img_path.append(fp) print(js) new_img = Image.new("RGB", (el.size["width"], el.size["height"])) # 創建一個新圖片,大小為元素的大小 k = 0 for i in img_path: tem_img = Image.open(i) new_img.paste(tem_img, (0, sc_hight * k)) # 把圖片貼上去,間隔一個截圖的距離 k += 1 else: new_img.save(r"C:UserswdjDesktoptest.png") # 保存 b=webdriver.Chrome(executable_path=r"C:UserswdjDesktopchromedriver.exe")#指定一下driver b.get("https://www.w3school.com.cn/html/html_links.asp") b.maximize_window()#最大化窗口 # b.get_screenshot_as_file(fp) sc_hight=614#你螢幕截圖默認的大小,可以去截一張,去畫圖裡面看看是多少像素,我這裡是614像素 # b.switch_to.frame(b.find_element_by_xpath('//*[@id="intro"]/iframe')) el=b.find_element_by_id("maincontent")#找到元素 if el.size["height"]>sc_hight: long_sc(el,b) else: short_sc(el,b)
PS:
有些特殊情況,比如截取的元素在iframe中,直接用driver.switch_to.frame(iframe元素)即可
或者不是iframe,但是元素有overflow屬性,直接用JS把他的overflow去掉就行
