UWP 带左右滚动按钮的横向ListView———仿NetFlix首页河的设计
- 2019 年 11 月 11 日
- 筆記
1. 需求
也是之前写的控件了,模仿NetFlix的河的设计。
大体要求如下:
1. 横向的ListView
2. 左右按钮,可以左右移动河卡片,左右的滚动条不可见
3. 左右按钮仅在鼠标Hover事件中可见
大家可以看下NetFlix uwp版,国内爱奇艺也是这样设计的,芒果TV之前是,但是新版去掉了这种风格。

其实我也是一个菜鸟,一开始纠结怎么写这个控件,怎么传递ItemsSource,而且还在SO上发起了提问
How to customize a horizontal listview with left/right button on uwp?
很遗憾,uwp几乎灭绝,没有人回答我的问题。于是各种寻找,终于发现了大神  Pieter Nijs
写的文章https://blog.pieeatingninjas.be/2016/01/17/custom-uwp-control-step-through-listview/
大神的需求和我的类似,见图

于是膜拜文章,写下了适合我自己的控件见图:

2. 实现
?好了,下面开始撸代码,先新建一个用户控件,名字叫 StepThroughListView ,看看Xaml的布局,
<Grid> <ListView x:Name="ListViewRiver" HorizontalAlignment="Stretch" SingleSelectionFollowsFocus="True" ScrollViewer.VerticalScrollBarVisibility="Hidden" ScrollViewer.HorizontalScrollBarVisibility="Hidden" ScrollViewer.VerticalScrollMode="Disabled" ScrollViewer.HorizontalScrollMode="Disabled" > <ListView.ItemsPanel> <ItemsPanelTemplate> <VirtualizingStackPanel Orientation="Horizontal"/> </ItemsPanelTemplate> </ListView.ItemsPanel> </ListView> <Button x:Name="ButtonLeft"/> <Button x:Name="ButtonRight" HorizontalAlignment="Right"/> </Grid>
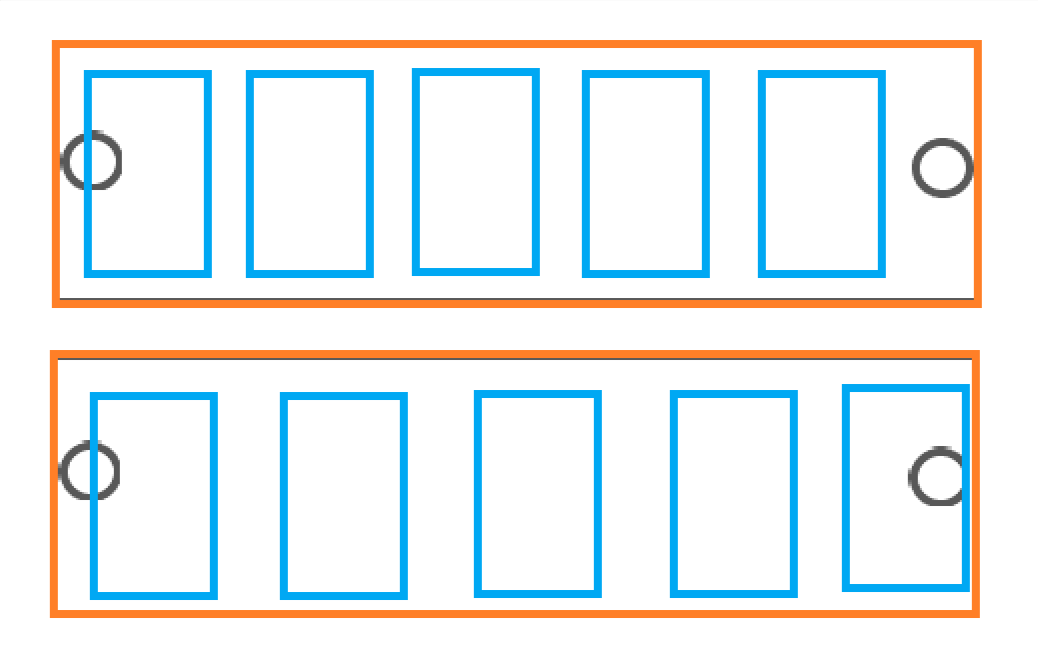
这样大体创建了一个这样的横向的ListView,橙色矩形为ListView,灰色圆圈是左右按钮Button,蓝色是ListViewItem
按钮是默认垂直居中
然后我们需要给ListView赋值ItemsSource、SelectedItem、ItemTemplate,这些需要在C#代码中使用依赖属性来完成。
public IEnumerable ItemsSource { get { return (IEnumerable)GetValue(ItemsSourceProperty); } set { SetValue(ItemsSourceProperty, value); RaisePropertyChanged(); } } public static readonly DependencyProperty ItemsSourceProperty = DependencyProperty.Register(nameof(ItemsSource), typeof(IEnumerable), typeof(StepThroughListView), new PropertyMetadata(DependencyProperty.UnsetValue)); public DataTemplate ItemTemplate { get { return (DataTemplate)GetValue(ItemTemplateProperty); } set { SetValue(ItemTemplateProperty, value); RaisePropertyChanged(); } } public static readonly DependencyProperty ItemTemplateProperty = DependencyProperty.Register(nameof(ItemTemplate), typeof(DataTemplate), typeof(StepThroughListView), new PropertyMetadata(DependencyProperty.UnsetValue)); public object SelectedItem { get { return GetValue(SelectedItemProperty); } set { if (SelectedItem != value) { SetValue(SelectedItemProperty, value); RaisePropertyChanged(); } } } public static readonly DependencyProperty SelectedItemProperty = DependencyProperty.Register(nameof(SelectedItem), typeof(object), typeof(StepThroughListView), new PropertyMetadata(DependencyProperty.UnsetValue));
然后在Xaml中,需要给ListView做双向绑定,
ItemsSource="{Binding ItemsSource, ElementName=root}" SelectedItem="{x:Bind SelectedItem, Mode=TwoWay}" ItemTemplate="{x:Bind ItemTemplate, Mode=TwoWay}"
接下来就可以处理左右按钮的响应事件了,因为横向的ListView左右滚动事件被我们禁用了,所以需要手动控制。
首先定义一个私有变量
ScrollViewer _InternalListScrollViewer;
在ListView的Loaded事件中,通过VisualTreeHelper查找?ListView内部的ScrollViewer。
private void ListView_Loaded(object sender, RoutedEventArgs e) { _InternalListScrollViewer = TreeHelper.FindVisualChild<ScrollViewer>((DependencyObject)sender); }
public static TChild FindVisualChild<TChild>(DependencyObject obj) where TChild : DependencyObject { if (obj == null) return null; for (int i = 0; i < VisualTreeHelper.GetChildrenCount(obj); i++) { DependencyObject child = VisualTreeHelper.GetChild(obj, i); if (child != null && child is TChild found) return found; else { TChild childOfChild = FindVisualChild<TChild>(child); if (childOfChild != null) return childOfChild; } } return null; }
左右按钮的Tapped事件,左按钮和右按钮的的方向正好相反。所以合并一下
private void ButtonRight_Tapped(object sender, TappedRoutedEventArgs e) { ScrollList(shouldScrollDown: true); } private void ButtonLeft_Tapped(object sender, TappedRoutedEventArgs e) { ScrollList(shouldScrollDown: false); } private void ScrollList(bool shouldScrollDown) { SelectedItem = null; var step = Math.Floor(Window.Current.Bounds.Width / 400); if (!shouldScrollDown) step *= -1; //_InternalListScrollViewer.ScrollToVerticalOffset( // _InternalListScrollViewer.VerticalOffset + height); System.Diagnostics.Debug.WriteLine(_InternalListScrollViewer.ScrollableWidth); _InternalListScrollViewer.ChangeView(_InternalListScrollViewer.HorizontalOffset + step, null, null); }
上面的变量step,我用的是根据窗体大小宽度来决定步长。不过你也可以用自己的一个固定值,比如2。
然后我又加了一个属性,叫AlwaysShowButton。如果设置Visible,那么左右按钮一直可见。
设置为Collapse的话,只有当鼠标移动到ListView上,才会显示左右按钮。
3. 源码&用法
好了,啰嗦那么多,控件的代码奉上:
https://github.com/hupo376787/StepThroughListView
用法也很简单:
<ctl:StepThroughListView AlwaysShowButton="Collapsed" ItemsSource="{x:Bind product}" Tapped="StepThroughListView_Tapped"> </ctl:StepThroughListView> private void StepThroughListView_Tapped(object sender, TappedRoutedEventArgs e) { var item = (sender as Controls.StepThroughListView).SelectedItem as ProductItem; if (item != null) { //TODO... } }
4. 结语
特别感谢 Pieter Nijs 。
OK,下班!!!