mybatis 源码分析(一)框架结构概览
- 2019 年 10 月 3 日
- 筆記
本篇博客将主要对 mybatis 整体介绍,包括 mybatis 的项目结构,执行的主要流程,初始化流程,API 等各模块进行简单的串联,让你能够对 mybatis 有一个整体的把握。另外在 mybatis 源码的阅读过程中,如果不想写 demo 可以直接使用项目中的单元测试;
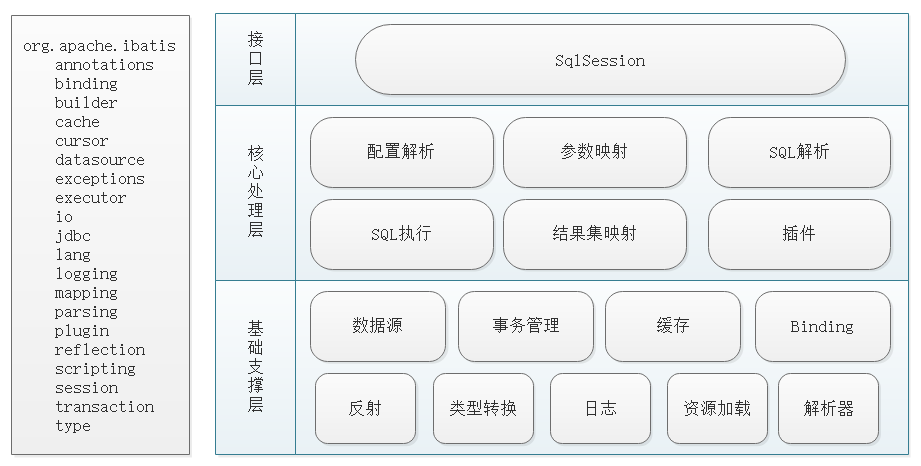
一、mybatis 结构介绍
mybatis的主要功能和使用 demo,在网上已经有很多了我就不再啰嗦了,同时 官方文档 也非常的详细;另外 mybatis 中使用了多种设计模式,包括建造者、动态代理、策略、装饰器模式等,在查看源码的时候,最好先对这些设计模式有一定的了解;
其中 mybatis 的模块结构如下:
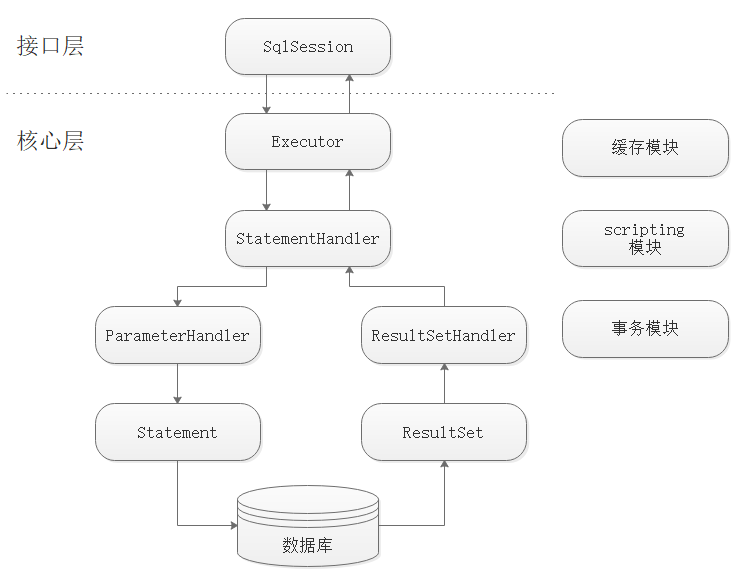
mybatis 的执行流程如下:
- 首先通过 Java API 或者 XML 配置完成初始化,最终所有的配置都在 Configuration 类中维护;
- 然后通过 SqlSessionFactory 得到 SqlSession,这里 SqlSession 就是 mybatis 的顶层 API 了,主要通过他完成数据库的增删改查等操作;
- 然后 SqlSession 将具体的操作委托给 Executor 执行,Executor 就是 mybatis 的调度核心了,主要职责有 SQL 语句生成、一二级缓存维护和事务的相关操作;
- 然后 Executor 将数据库相关的操作委托给 StatementHandler,StatementHandler 中完成了 mybatis 最核心的工作,包括参数绑定,指定 SQL 语句,结果集映射等;
具体过程如图所示:
二、初始化
mybatis 中包含了很多的配置项,具体每一项的讲解 官网 也很详细,其结构大致如下:(另外正如上面说的 mybatis 的配置项最后都由 Configuration 类维护,这其实就是外观模式)
configuration(配置) properties(属性) settings(设置) typeAliases(类型别名) typeHandlers(类型处理器) objectFactory(对象工厂) plugins(插件) environments(环境配置) environment(环境变量) transactionManager(事务管理器) dataSource(数据源) mappers(映射器)1. Java API 初始化
Java API 初始化的方式虽然不常用,但是相较于 XML 的方式可以更清楚的看到 Configuration 的构成,其示例如下:
PooledDataSource dataSource = new PooledDataSource(); dataSource.setDriver("com.mysql.cj.jdbc.Driver"); dataSource.setUrl("jdbc:mysql://localhost:3306/mybatis?serverTimezone=GMT"); dataSource.setUsername("root"); dataSource.setPassword("root"); TransactionFactory transactionFactory = new JdbcTransactionFactory(); Environment environment = new Environment("development", transactionFactory, dataSource); Configuration configuration = new Configuration(environment); configuration.addMapper(UserMapper.class); sqlSessionFactory = new SqlSessionFactoryBuilder().build(configuration);2. XML 配置初始化
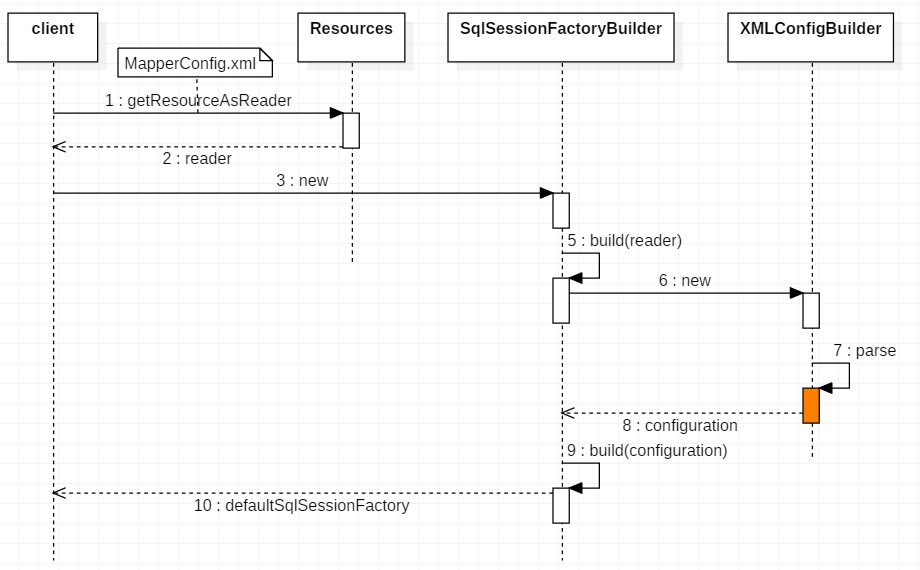
相交于 Java API 的方式,XML 配置初始化,必然会多出 XML 的解析部分;代码如下:
String resource = "org/apache/ibatis/builder/MapperConfig.xml"; Reader reader = Resources.getResourceAsReader(resource); SqlSessionFactory sqlSessionFactory = new SqlSessionFactoryBuilder().build(reader); SqlSession sqlSession = sqlSessionFactory.openSession();下面是一个相对完整的配置示例:
<?xml version="1.0" encoding="UTF-8" ?> <!DOCTYPE configuration PUBLIC "-//mybatis.org//DTD Config 3.0//EN" "http://mybatis.org/dtd/mybatis-3-config.dtd"> <configuration> <properties resource="org/apache/ibatis/databases/blog/blog-derby.properties"/> <settings> <setting name="cacheEnabled" value="true"/> <setting name="lazyLoadingEnabled" value="false"/> ... </settings> <typeAliases> <typeAlias alias="Author" type="org.apache.ibatis.domain.blog.Author"/> <typeAlias alias="Blog" type="org.apache.ibatis.domain.blog.Blog"/> ... </typeAliases> <typeHandlers> <typeHandler javaType="String" jdbcType="VARCHAR" handler="org.apache.ibatis.builder.CustomStringTypeHandler"/> </typeHandlers> <objectFactory type="org.apache.ibatis.builder.ExampleObjectFactory"> <property name="objectFactoryProperty" value="100"/> </objectFactory> <plugins> <plugin interceptor="org.apache.ibatis.builder.ExamplePlugin"> <property name="pluginProperty" value="100"/> </plugin> </plugins> <environments default="development"> <environment id="development"> <transactionManager type="JDBC"> <property name="" value=""/> </transactionManager> <!--<dataSource type="UNPOOLED">--> <dataSource type="POOLED"> <property name="driver" value="${driver}"/> <property name="url" value="${url}"/> <property name="username" value="${username}"/> <property name="password" value="${password}"/> </dataSource> </environment> </environments> <mappers> <mapper resource="org/apache/ibatis/builder/AuthorMapper.xml"/> <mapper resource="org/apache/ibatis/builder/BlogMapper.xml"/> ... </mappers> </configuration>其解析的流程如下:
主要代码如下:
public SqlSessionFactory build(InputStream inputStream, String environment, Properties properties) { try { XMLConfigBuilder parser = new XMLConfigBuilder(inputStream, environment, properties); return build(parser.parse()); } catch (Exception e) { throw ExceptionFactory.wrapException("Error building SqlSession.", e); } finally { ErrorContext.instance().reset(); try { inputStream.close(); } catch (IOException e) { } } } public SqlSessionFactory build(Configuration config) { return new DefaultSqlSessionFactory(config); }从上面的代码和流程图中可以看到,XML 初始化的主要流程被封装到了 XMLConfigBuilder 当中;主要的代码逻辑如下:
public Configuration parse() { if (parsed) { throw new BuilderException("Each XMLConfigBuilder can only be used once."); } parsed = true; parseConfiguration(parser.evalNode("/configuration")); return configuration; } private void parseConfiguration(XNode root) { try { //issue #117 read properties first propertiesElement(root.evalNode("properties")); Properties settings = settingsAsProperties(root.evalNode("settings")); loadCustomVfs(settings); loadCustomLogImpl(settings); typeAliasesElement(root.evalNode("typeAliases")); pluginElement(root.evalNode("plugins")); objectFactoryElement(root.evalNode("objectFactory")); objectWrapperFactoryElement(root.evalNode("objectWrapperFactory")); reflectorFactoryElement(root.evalNode("reflectorFactory")); settingsElement(settings); // read it after objectFactory and objectWrapperFactory issue #631 environmentsElement(root.evalNode("environments")); databaseIdProviderElement(root.evalNode("databaseIdProvider")); typeHandlerElement(root.evalNode("typeHandlers")); mapperElement(root.evalNode("mappers")); } catch (Exception e) { throw new BuilderException("Error parsing SQL Mapper Configuration. Cause: " + e, e); } }三、SqlSession 使用方式
1. 直接指定 MappedStatement
try (SqlSession session = sqlMapper.openSession()) { Author author = session.selectOne("org.apache.ibatis.domain.blog.mappers.AuthorMapper.selectAuthor", new Author(101)); }这种方式通过 namespace + sqlId 的方式直接指定 MappedStatement;这种方式因为直接编写字符串和强类型转换,既不安全也稍显麻烦,所以现在已经不推荐使用了;
@Override public <T> Cursor<T> selectCursor(String statement, Object parameter, RowBounds rowBounds) { try { MappedStatement ms = configuration.getMappedStatement(statement); Cursor<T> cursor = executor.queryCursor(ms, wrapCollection(parameter), rowBounds); registerCursor(cursor); return cursor; } catch (Exception e) { throw ExceptionFactory.wrapException("Error querying database. Cause: " + e, e); } finally { ErrorContext.instance().reset(); } }2. 动态代理 Mapper 的方式
try (SqlSession session = sqlMapper.openSession()) { AuthorMapper mapper = session.getMapper(AuthorMapper.class); Author author = mapper.selectAuthor(500); }这种方式不经避免了以上的问题,同时也能够使用注解的方式编写 sql,而且可以使用 IDE 提示;现在一般都推荐使用这种方式;但是其最终也是调用了上面的接口;
首先在初始化的时候通过 bindMapperForNamespace,注册对应的 Mapper(要求namespace和Mapper的全限定名保持一致);
// XMLMapperBuilder private void bindMapperForNamespace() { String namespace = builderAssistant.getCurrentNamespace(); if (namespace != null) { Class<?> boundType = null; try { boundType = Resources.classForName(namespace); } catch (ClassNotFoundException e) { //ignore, bound type is not required } if (boundType != null) { if (!configuration.hasMapper(boundType)) { configuration.addLoadedResource("namespace:" + namespace); configuration.addMapper(boundType); } } } } // MapperRegistry public <T> void addMapper(Class<T> type) { if (type.isInterface()) { if (hasMapper(type)) { throw new BindingException("Type " + type + " is already known to the MapperRegistry."); } boolean loadCompleted = false; try { knownMappers.put(type, new MapperProxyFactory<>(type)); // 添加代理工厂 MapperAnnotationBuilder parser = new MapperAnnotationBuilder(config, type); parser.parse(); loadCompleted = true; } finally { if (!loadCompleted) { knownMappers.remove(type); } } } }使用的时候,通过 class 类名获取 MapperProxyFactory 代理工厂,制造一个新的 Mapper 代理(注意这里时每次都要生成一个代理类,因为其中包含了 SqlSession,而 SqlSession 是线程不安全的所以不能缓存,但是我觉得这里任然是可以优化的,有兴趣你可以自己尝试一下);
try (SqlSession session = sqlMapper.openSession()) { AuthorMapper mapper = session.getMapper(AuthorMapper.class); // 代理类 } // MapperRegistry public <T> T getMapper(Class<T> type, SqlSession sqlSession) { final MapperProxyFactory<T> mapperProxyFactory = (MapperProxyFactory<T>) knownMappers.get(type); if (mapperProxyFactory == null) { throw new BindingException("Type " + type + " is not known to the MapperRegistry."); } try { return mapperProxyFactory.newInstance(sqlSession); // 创建代理对象 } catch (Exception e) { throw new BindingException("Error getting mapper instance. Cause: " + e, e); } } // MapperProxyFactory public T newInstance(SqlSession sqlSession) { final MapperProxy<T> mapperProxy = new MapperProxy<>(sqlSession, mapperInterface, methodCache); return newInstance(mapperProxy); } // MapperProxy public Object invoke(Object proxy, Method method, Object[] args) throws Throwable { try { if (Object.class.equals(method.getDeclaringClass())) { // 从Object中继承的方法 return method.invoke(this, args); } else if (method.isDefault()) { // 有默认实现的接口方法 return invokeDefaultMethod(proxy, method, args); } } catch (Throwable t) { throw ExceptionUtil.unwrapThrowable(t); } final MapperMethod mapperMethod = cachedMapperMethod(method); return mapperMethod.execute(sqlSession, args); // 然后由 MapperMethod 执行,这里使用策略模式,后面还会详细讲解 }总结
-
SqlSession 是线程不安全的,所以在示例代码中每次使用都会将其关闭?
在 mybatis 中还有一个类 SqlSessionManager 里面有一个 ThreadLocal 用来管理 SqlSession,在 Spring 中也同样是用 SqlSessionHolder 来管理的,所以并不会每次都创建一个新的 SqlSession;
-
以上内容只是大致将了 mybatis 的主要结构,后面的章节还会分模块进行讲解;
另外本文主要参考了《MyBatis技术内幕》,有兴趣的可以自行查看;
