YOLOV3剪枝方法匯總
1. 前言
上一篇推文如何讓你的YOLOV3模型更小更快? 給大家介紹了一下利用BN層的\gamma參數對YOLOV3檢測模型進行剪枝,最終獲得了2倍的速度增漲。但需要注意的是,這個剪枝有一些缺點,例如剪枝剪得不夠極限,可能還有一些冗餘通道存在,另外和shortcut層相鄰的卷積層以及上取樣層前的卷積層並沒有剪枝。並且剪枝之後模型的通道數會變成一些奇怪的數字例如$23$,這在推理過程中會浪費一部分硬體的記憶體,並對模型的推理速度產生影響。最後,很多人在簡單的檢測場景中(例如一個類別的檢測)傾向使用YOLOV3-Tiny這個小模型,我們可以通過剪枝使得這個模型更小,但上次的項目是不支援的。基於上面的需求,coldlarry開發了一個完整的YOLOV3剪枝庫,可以滿足剛剛提高的所有需求,程式碼地址如下://github.com/coldlarry/YOLOv3-complete-pruning。
2. 項目整體把握
這個項目仍然是基於U版的YOLOV3,並且可以載入DarkNet(無論是官方版本還是AlexeyAB版本)YOLOV3權重,所以使用起來非常方便,下面我們來看看這個項目裡面的一些文件或者文件夾是在做什麼吧。

關於Dorefa量化以及低比特量化後面我會單獨講,這篇文章主要講一下這個工程中的4種剪枝方法,這裡先看一下這4種剪枝方法的特點:

3. 正常剪枝&規整剪枝
正常剪枝在昨天的推文中已經介紹過了,請移步如何讓你的YOLOV3模型更小更快? ,程式碼實現在utils/prune_utils.py中,和昨天講解的程式碼完全一樣。我們重點看一下規整剪枝是什麼意思?
在工程根目錄下的regular_prune.py實現了規整剪枝,程式碼地址為://github.com/coldlarry/YOLOv3-complete-pruning/blob/master/regular_prune.py ,它的程式碼和上篇推文講到的正常剪枝幾乎完全一致,只是多了一個限制條件,程式碼解析如下:
# 記錄了每個CBL層最少需要保留的通道數,都是2^n
filter_switch=[8,16,32,64,128,256,512,1024]

def prune_and_eval(model, sorted_bn, percent=.0):
    model_copy = deepcopy(model)
    thre_index = int(len(sorted_bn) * percent)
    #獲得α參數的閾值,小於該值的α參數對應的通道,全部裁剪掉
    thre = sorted_bn[thre_index]

    print(f'Channels with Gamma value less than {thre:.4f} are pruned!')

    remain_num = 0
    for idx in prune_idx:

        bn_module = model_copy.module_list[idx][1]

        mask = obtain_bn_mask(bn_module, thre)
        mask_cnt=int(mask.sum())
        # mask_cnt=0代表這一個CBL中所有的BN層權重都小於閾值,本來該全部剪掉,但因為是規整剪枝,所以保留權重最大的8個通道
        if mask_cnt==0:
            this_layer_sort_bn=bn_module.weight.data.abs().clone()
            sort_bn_values= torch.sort(this_layer_sort_bn)[0]
            bn_cnt=bn_module.weight.shape[0]
            this_layer_thre=sort_bn_values[bn_cnt-8]
            mask = obtain_bn_mask(bn_module, this_layer_thre)
        else:
            # 如果剪枝的通道數<這一層預設的規整通道數,就少剪枝一些通道,使得其通道恰好為預設的規整通道數
            for i in range(len(filter_switch)):
                if mask_cnt<=filter_switch[i]:
                    mask_cnt=filter_switch[i]
                    break
            this_layer_sort_bn=bn_module.weight.data.abs().clone()
            sort_bn_values= torch.sort(this_layer_sort_bn)[0]
            bn_cnt=bn_module.weight.shape[0]
            this_layer_thre=sort_bn_values[bn_cnt-mask_cnt]
            mask = obtain_bn_mask(bn_module, this_layer_thre)


        remain_num += int(mask.sum())
        bn_module.weight.data.mul_(mask)

    with torch.no_grad():
        mAP = eval_model(model_copy)[1].mean()

    print(f'Number of channels has been reduced from {len(sorted_bn)} to {remain_num}')
    print(f'Prune ratio: {1-remain_num/len(sorted_bn):.3f}')
    print(f'mAP of the pruned model is {mAP:.4f}')

    return thre
因此,規整剪枝就是讓網路層的通道數剪枝之後仍然是預先設定的$2^n$這種形式,有利於模型的推理速度提升以及記憶體佔用降低。
4. 極限剪枝
我們知道在正常剪枝和規整剪枝時它們都沒有對shortcut層前的卷積層以及上取樣層前的卷積層進行剪枝,下面的程式碼展示了常規/規整剪枝忽略了哪些層如下:
def parse_module_defs(module_defs):

    CBL_idx = []#Conv+BN+ReLU
    Conv_idx = []#Conv
    for i, module_def in enumerate(module_defs):
        if module_def['type'] == 'convolutional':
            if module_def['batch_normalize'] == '1':
                CBL_idx.append(i)
            else:
                Conv_idx.append(i)

    ignore_idx = set()#哪些層不需要剪枝
    for i, module_def in enumerate(module_defs):
        # 忽略shortcut層前面鄰接的卷積層
        if module_def['type'] == 'shortcut':
            ignore_idx.add(i-1)
            identity_idx = (i + int(module_def['from']))
            if module_defs[identity_idx]['type'] == 'convolutional':
                ignore_idx.add(identity_idx)
            elif module_defs[identity_idx]['type'] == 'shortcut':
                ignore_idx.add(identity_idx - 1)
	# 忽略上取樣層
    ignore_idx.add(84)
    ignore_idx.add(96)

    prune_idx = [idx for idx in CBL_idx if idx not in ignore_idx]
    # 返回CBL組件的id,單獨的Conv層的id,以及需要被剪枝的層的id
    return CBL_idx, Conv_idx, prune_idx
因此,常規剪枝是剪得是不夠"極限"的,因此在極限剪枝這個方法裡面僅僅忽略上取樣層前面卷積層(一共$2$個),shortcut相鄰的卷積層全部參與剪枝,即實現了極限的YOLOV3剪枝,程式碼如下:
#short-cut剪枝

class opt():
    model_def = "cfg/yolov3-hand.cfg"
    data_config = "data/oxfordhand.data"
    model = 'weights/last.pt'


#指定GPU
#torch.cuda.set_device(2)

if __name__ == '__main__':

    device = torch.device("cuda" if torch.cuda.is_available() else "cpu")
    model = Darknet(opt.model_def).to(device)

    if opt.model:
        if opt.model.endswith(".pt"):
            model.load_state_dict(torch.load(opt.model, map_location=device)['model'])
        else:
            _ = load_darknet_weights(model, opt.model)


    data_config = parse_data_cfg(opt.data_config)

    valid_path = data_config["valid"]
    class_names = load_classes(data_config["names"])

    eval_model = lambda model:test(model=model,cfg=opt.model_def, data=opt.data_config)
    obtain_num_parameters = lambda model:sum([param.nelement() for param in model.parameters()])

    #這個不應該注釋掉,等會要恢復
    with torch.no_grad():
        origin_model_metric = eval_model(model)
    origin_nparameters = obtain_num_parameters(model)

    '''
    module_defs是一個列表,列表的每一項都是一個字典.貯存的只是並不生效的網路結構資訊
    例如{'type': 'convolutional', 'batch_normalize': '1', 'filters': '32', 'size': '3', 'stride': '1', 'pad': '1', 'activation': 'leaky'}
    module_list是一個列表,列表的每一項都是一個列表,例如:
    Sequential(
      (conv_0): Conv2d(3, 32, kernel_size=(3, 3), stride=(1, 1), padding=(1, 1), bias=False)
      (batch_norm_0): BatchNorm2d(32, eps=1e-05, momentum=0.1, affine=True, track_running_stats=True)
      (leaky_0): LeakyReLU(negative_slope=0.1, inplace)
    )
    此時對列表索引0,結果為:Conv2d(3, 32, kernel_size=(3, 3), stride=(1, 1), padding=(1, 1), bias=False)
             索引1,結果為:BatchNorm2d(32, eps=1e-05, momentum=0.1, affine=True, track_running_stats=True)
    需要注意的是,module_list的數據類型其實是nn.ModuleList(),是可以真正訪問的網路結構,通過訪問該list,可以獲得權重偏置等數據
    '''
    #{3: 1, 7: 5, 10: 7, 14: 12, 17: 14, 20: 17, 23: 20, 26: 23, 29: 26, 32: 29, 35: 32, 39: 37, 42: 39, 45: 42, 48: 45, 51: 48, 54: 51, 57: 54, 60: 57, 64: 62, 67: 64, 70: 67, 73: 70}
    CBL_idx, Conv_idx, prune_idx,shortcut_idx,shortcut_all= parse_module_defs2(model.module_defs)


    sort_prune_idx=[idx for idx in prune_idx if idx not in shortcut_idx]

    #將所有要剪枝的BN層的α參數,拷貝到bn_weights列表
    bn_weights = gather_bn_weights(model.module_list, sort_prune_idx)

    #torch.sort返回二維列表,第一維是排序後的值列表,第二維是排序後的值列表對應的索引
    sorted_bn = torch.sort(bn_weights)[0]


    #避免剪掉所有channel的最高閾值(每個BN層的gamma的最大值的最小值即為閾值上限)
    highest_thre = []
    for idx in sort_prune_idx:
        #.item()可以得到張量里的元素值
        highest_thre.append(model.module_list[idx][1].weight.data.abs().max().item())
    highest_thre = min(highest_thre)

    # 找到highest_thre對應的下標對應的百分比
    percent_limit = (sorted_bn==highest_thre).nonzero().item()/len(bn_weights)

    print(f'Threshold should be less than {highest_thre:.4f}.')
    print(f'The corresponding prune ratio is {percent_limit:.3f}.')


    # 該函數有很重要的意義:
    # ①先用深拷貝將原始模型拷貝下來,得到model_copy
    # ②將model_copy中,BN層中低於閾值的α參數賦值為0
    # ③在BN層中,輸出y=α*x+β,由於α參數的值被賦值為0,因此輸入僅加了一個偏置β
    # ④很神奇的是,network slimming中是將α參數和β參數都置0,該處只將α參數置0,但效果卻很好:其實在另外一篇論文中,已經提到,可以先將β參數的效果移到
    # 下一層卷積層,再去剪掉本層的α參數

    # 該函數用最簡單的方法,讓我們看到了,如何快速看到剪枝後的效果


    def prune_and_eval(model, sorted_bn, percent=.0):
        model_copy = deepcopy(model)
        thre_index = int(len(sorted_bn) * percent)
        #獲得α參數的閾值,小於該值的α參數對應的通道,全部裁剪掉
        thre1 = sorted_bn[thre_index]

        print(f'Channels with Gamma value less than {thre1:.6f} are pruned!')

        remain_num = 0
        idx_new=dict()
        for idx in prune_idx:

            if idx not in shortcut_idx:

                bn_module = model_copy.module_list[idx][1]

                mask = obtain_bn_mask(bn_module, thre1)
                #記錄剪枝後,每一層卷積層對應的mask
                # idx_new[idx]=mask.cpu().numpy()
                idx_new[idx]=mask
                remain_num += int(mask.sum())
                bn_module.weight.data.mul_(mask)
                #bn_module.bias.data.mul_(mask*0.0001)
            else:

                bn_module = model_copy.module_list[idx][1]


                mask=idx_new[shortcut_idx[idx]]
                idx_new[idx]=mask


                remain_num += int(mask.sum())
                bn_module.weight.data.mul_(mask)

            #print(int(mask.sum()))

        with torch.no_grad():
            mAP = eval_model(model_copy)[0][2]

        print(f'Number of channels has been reduced from {len(sorted_bn)} to {remain_num}')
        print(f'Prune ratio: {1-remain_num/len(sorted_bn):.3f}')
        print(f'mAP of the pruned model is {mAP:.4f}')

        return thre1

    percent = 0.5
    threshold = prune_and_eval(model, sorted_bn, percent)


    #****************************************************************
    #雖然上面已經能看到剪枝後的效果,但是沒有生成剪枝後的模型結構,因此下面的程式碼是為了生成新的模型結構並拷貝舊模型參數到新模型
    #%%
    def obtain_filters_mask(model, thre, CBL_idx, prune_idx):

        pruned = 0
        total = 0
        num_filters = []
        filters_mask = []
        idx_new=dict()
        #CBL_idx存儲的是所有帶BN的卷積層(YOLO層的前一層卷積層是不帶BN的)
        for idx in CBL_idx:
            bn_module = model.module_list[idx][1]
            if idx in prune_idx:
                if idx not in shortcut_idx:

                    mask = obtain_bn_mask(bn_module, thre).cpu().numpy()
                    idx_new[idx]=mask
                    remain = int(mask.sum())
                    pruned = pruned + mask.shape[0] - remain

                    # if remain == 0:
                    #     print("Channels would be all pruned!")
                    #     raise Exception

                    # print(f'layer index: {idx:>3d} \t total channel: {mask.shape[0]:>4d} \t '
                    #     f'remaining channel: {remain:>4d}')
                else:
                    mask=idx_new[shortcut_idx[idx]]
                    idx_new[idx]=mask
                    remain= int(mask.sum())
                    pruned = pruned + mask.shape[0] - remain

                if remain == 0:
                    print("Channels would be all pruned!")
                    raise Exception

                print(f'layer index: {idx:>3d} \t total channel: {mask.shape[0]:>4d} \t '
                        f'remaining channel: {remain:>4d}')
            else:
                mask = np.ones(bn_module.weight.data.shape)
                remain = mask.shape[0]

            total += mask.shape[0]
            num_filters.append(remain)
            filters_mask.append(mask.copy())

        #因此,這裡求出的prune_ratio,需要裁剪的α參數/cbl_idx中所有的α參數
        prune_ratio = pruned / total
        print(f'Prune channels: {pruned}\tPrune ratio: {prune_ratio:.3f}')

        return num_filters, filters_mask

    num_filters, filters_mask = obtain_filters_mask(model, threshold, CBL_idx, prune_idx)


    #CBLidx2mask存儲CBL_idx中,每一層BN層對應的mask
    CBLidx2mask = {idx: mask for idx, mask in zip(CBL_idx, filters_mask)}

    def update_activation(i, pruned_model, activation, CBL_idx):
        next_idx = i + 1
        if pruned_model.module_defs[next_idx]['type'] == 'convolutional':
            next_conv = pruned_model.module_list[next_idx][0]
            conv_sum = next_conv.weight.data.sum(dim=(2, 3))
            offset = conv_sum.matmul(activation.reshape(-1, 1)).reshape(-1)
            if next_idx in CBL_idx:
                next_bn = pruned_model.module_list[next_idx][1]
                next_bn.running_mean.data.sub_(offset)
            else:
                next_conv.bias.data.add_(offset)


    def prune_model_keep_size2(model, prune_idx, CBL_idx, CBLidx2mask):

        pruned_model = deepcopy(model)
        activations = []
        for i, model_def in enumerate(model.module_defs):

            if model_def['type'] == 'convolutional':
                activation = None
                if i in prune_idx:
                    mask = torch.from_numpy(CBLidx2mask[i]).cuda()
                    bn_module = pruned_model.module_list[i][1]
                    bn_module.weight.data.mul_(mask)
                    activation = F.leaky_relu((1 - mask) * bn_module.bias.data, 0.1)
                    update_activation(i, pruned_model, activation, CBL_idx)
                    bn_module.bias.data.mul_(mask)
                activations.append(activation)

            if model_def['type'] == 'shortcut':
                actv1 = activations[i - 1]
                from_layer = int(model_def['from'])
                actv2 = activations[i + from_layer]
                activation = actv1 + actv2
                update_activation(i, pruned_model, activation, CBL_idx)
                activations.append(activation)


            if model_def['type'] == 'route':
                from_layers = [int(s) for s in model_def['layers'].split(',')]
                if len(from_layers) == 1:
                    activation = activations[i + from_layers[0]]
                    update_activation(i, pruned_model, activation, CBL_idx)
                else:
                    actv1 = activations[i + from_layers[0]]
                    actv2 = activations[from_layers[1]]
                    activation = torch.cat((actv1, actv2))
                    update_activation(i, pruned_model, activation, CBL_idx)
                activations.append(activation)

            if model_def['type'] == 'upsample':
                activation = torch.zeros(int(model.module_defs[i - 1]['filters'])).cuda()
                activations.append(activation)

            if model_def['type'] == 'yolo':
                activations.append(None)

        return pruned_model


    pruned_model = prune_model_keep_size2(model, prune_idx, CBL_idx, CBLidx2mask)


    with torch.no_grad():
        mAP = eval_model(pruned_model)[0][2]
    print('after prune_model_keep_size map is {}'.format(mAP))


    #獲得原始模型的module_defs,並修改該defs中的卷積核數量
    compact_module_defs = deepcopy(model.module_defs)
    for idx, num in zip(CBL_idx, num_filters):
        assert compact_module_defs[idx]['type'] == 'convolutional'
        compact_module_defs[idx]['filters'] = str(num)

    # for item_def in compact_module_defs:
    #     print(item_def)

    compact_model = Darknet([model.hyperparams.copy()] + compact_module_defs).to(device)
    compact_nparameters = obtain_num_parameters(compact_model)

    init_weights_from_loose_model(compact_model, pruned_model, CBL_idx, Conv_idx, CBLidx2mask)


    random_input = torch.rand((16, 3, 416, 416)).to(device)

    def obtain_avg_forward_time(input, model, repeat=200):

        model.eval()
        start = time.time()
        with torch.no_grad():
            for i in range(repeat):
                output = model(input)
        avg_infer_time = (time.time() - start) / repeat

        return avg_infer_time, output

    pruned_forward_time, pruned_output = obtain_avg_forward_time(random_input, pruned_model)
    compact_forward_time, compact_output = obtain_avg_forward_time(random_input, compact_model)


    # 在測試集上測試剪枝後的模型, 並統計模型的參數數量
    with torch.no_grad():
        compact_model_metric = eval_model(compact_model)


    # 比較剪枝前後參數數量的變化、指標性能的變化
    metric_table = [
        ["Metric", "Before", "After"],
        ["mAP", f'{origin_model_metric[0][2]:.6f}', f'{compact_model_metric[0][2]:.6f}'],
        ["Parameters", f"{origin_nparameters}", f"{compact_nparameters}"],
        ["Inference", f'{pruned_forward_time:.4f}', f'{compact_forward_time:.4f}']
    ]
    print(AsciiTable(metric_table).table)


    # 生成剪枝後的cfg文件並保存模型
    pruned_cfg_name = opt.model_def.replace('/', f'/prune_{percent}_')

    #由於原始的compact_module_defs將anchor從字元串變為了數組,因此這裡將anchors重新變為字元串

    for item in compact_module_defs:
        if item['type']=='yolo':
            item['anchors']='10,13,  16,30,  33,23,  30,61,  62,45,  59,119,  116,90,  156,198,  373,326'


    pruned_cfg_file = write_cfg(pruned_cfg_name, [model.hyperparams.copy()] + compact_module_defs)
    print(f'Config file has been saved: {pruned_cfg_file}')

    compact_model_name = 'weights/yolov3_hand_shortcut_pruning_'+str(percent)+'percent.weights'

    save_weights(compact_model, path=compact_model_name)
    print(f'Compact model has been saved: {compact_model_name}')
對上面的程式碼還有疑問的請移步前一個推文,有逐行的程式碼詳解,通過極限剪枝,理論上可以剪枝掉YOLOV3更多的參數獲得進一步加速。
5. Tiny剪枝
這就沒什麼好說的了,和YOLOV3剪枝只有解析模型的時候有一點差別,即生成CBL_idx,Conv_idx,prune_idx的函數針對YOLOV3-Tiny的模型結構做了一個小變化,程式碼如下:
def parse_module_defs(module_defs):

    CBL_idx = []
    Conv_idx = []
    for i, module_def in enumerate(module_defs):
        if module_def['type'] == 'convolutional':
            if module_def['batch_normalize'] == '1':
                CBL_idx.append(i)
            else:
                Conv_idx.append(i)

    ignore_idx = set()
	# 只用忽略唯一一個上取樣層前面的卷積層即可
    ignore_idx.add(18)


    prune_idx = [idx for idx in CBL_idx if idx not in ignore_idx]

    return CBL_idx, Conv_idx, prune_idx
YOLOV3-Tiny的模型結構如下所示,可以幫助理解:
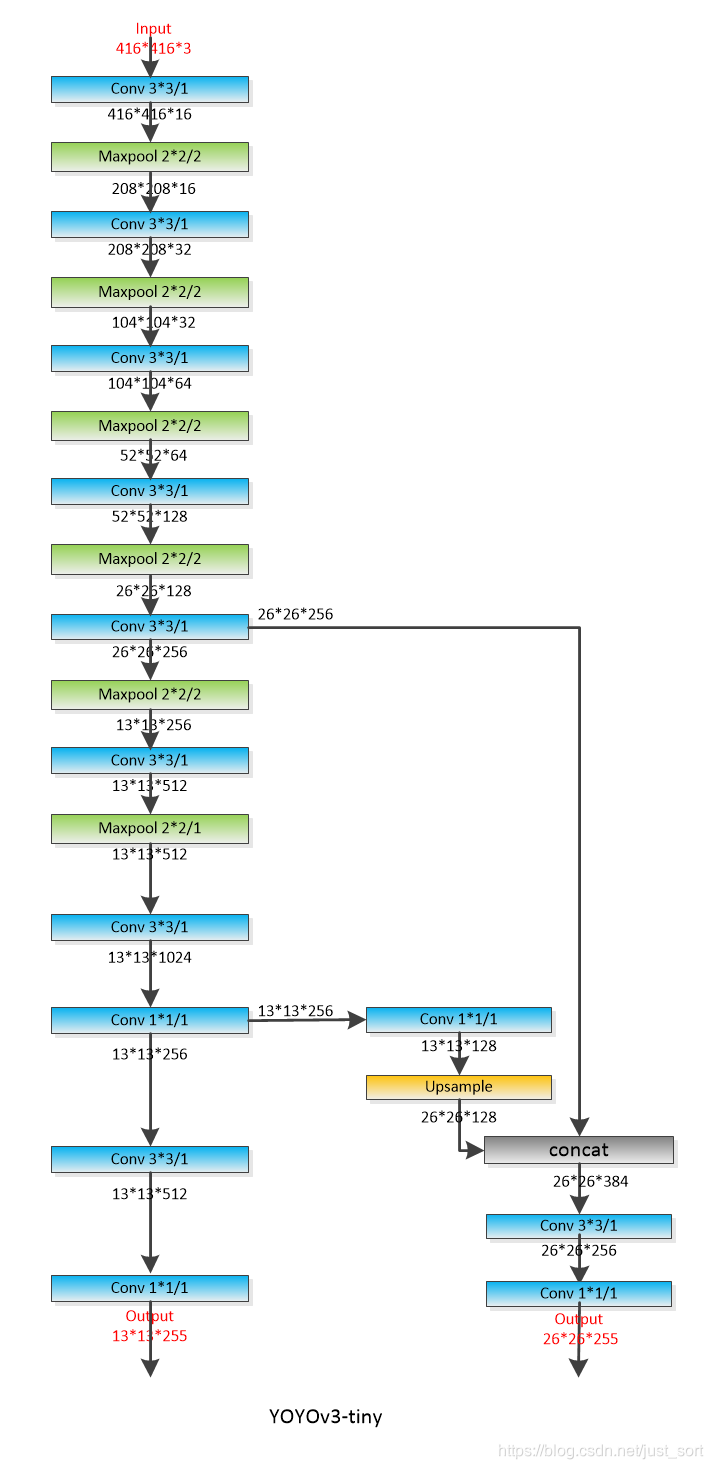
但建議慎重對YOLOV3-Tiny進行剪枝,筆者在手上的數據集實測過,對於一個類別訓練出的YOLOV3模型不影響準確率的情況下基本不能剪掉任何參數,所以需要自己實測來判斷自己的數據集是否剪枝後會對模型的準確率造成較大損害。
6. 結果
這些剪枝方法,獲得的評價指標以及耗時情況如下圖所示,仍然是基於Oxfard人手數據集:
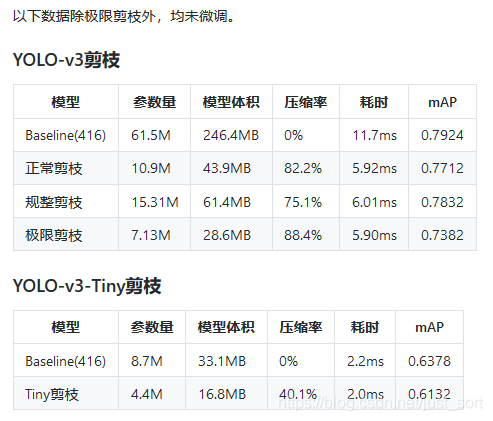
可以看到對YOLOV3-Tiny的剪枝意義不大,耗時雖然少了一點,但map降得比較多,猜測是因為YOLOV3-Tiny模型容量較小,BN的權重都偏大導致的。
歡迎關注GiantPandaCV, 在這裡你將看到獨家的深度學習分享,堅持原創,每天分享我們學習到的新鮮知識。( • ̀ω•́ )✧
有對文章相關的問題,或者想要加入交流群,歡迎添加BBuf微信:

為了方便讀者獲取資料以及我們公眾號的作者發布一些Github工程的更新,我們成立了一個QQ群,二維碼如下,感興趣可以加入。