【JDK】JDK源碼分析-AbstractQueuedSynchronizer(3)
- 2019 年 10 月 3 日
- 筆記
概述
前文「JDK源碼分析-AbstractQueuedSynchronizer(2)」分析了 AQS 在獨佔模式下獲取資源的流程,本文分析共享模式下的相關操作。
其實二者的操作大部分是類似的,理解了前面對獨佔模式的分析,再分析共享模式就相對容易了。
共享模式
方法概述
與獨佔模式類似,共享模式下也有與之類似的相應操作,分別如下:
1. acquireShared(int arg): 以共享模式獲取資源,忽略中斷;
2. acquireSharedInterruptibly(int arg): 以共享模式獲取資源,響應中斷;
3. tryAcquireSharedNanos(int arg, long nanosTimeout): 以共享模式獲取資源,響應中斷,且有超時等待;
4. releaseShared(int arg): 釋放資源,喚醒後繼節點,並確保傳播。
它們的操作與獨佔模式也比較類似,下面具體分析。
方法分析
1. 共享模式獲取資源(忽略中斷)
acquireShared:
public final void acquireShared(int arg) { // 返回值小於 0,表示獲取失敗 if (tryAcquireShared(arg) < 0) doAcquireShared(arg); } // 嘗試以共享模式獲取資源(返回值為 int 類型) protected int tryAcquireShared(int arg) { throw new UnsupportedOperationException(); }
與獨佔模式的 tryAcquire 方法類似,tryAcquireShared 方法在 AQS 中也拋出異常,由子類實現其邏輯。
不同的地方在於,tryAcquire 方法的返回結果是 boolean 類型,表示獲取成功與否;而 tryAcquireShared 的返回結果是 int 類型,分別為:
1) 負數:表示獲取失敗;
2) 0:表示獲取成功,但後續共享模式的獲取會失敗;
3) 正數:表示獲取成功,後續共享模式的獲取可能會成功(需要進行檢測)。
若 tryAcquireShared 獲取成功,則直接返回;否則執行 doAcquireShared 方法:
private void doAcquireShared(int arg) { // 把當前執行緒封裝成共享模式的 Node 節點,插入主隊列末尾 final Node node = addWaiter(Node.SHARED); boolean failed = true; try { // 中斷標誌位 boolean interrupted = false; for (;;) { final Node p = node.predecessor(); // 若前驅節點為頭節點,則嘗試獲取資源 if (p == head) { int r = tryAcquireShared(arg); // 這裡表示當前執行緒成功獲取到了資源 if (r >= 0) { // 設置頭節點,並傳播狀態(注意這裡與獨佔模式不同) setHeadAndPropagate(node, r); p.next = null; // help GC if (interrupted) selfInterrupt(); failed = false; return; } } // 是否應該休眠(與獨佔模式相同,不再贅述) if (shouldParkAfterFailedAcquire(p, node) && parkAndCheckInterrupt()) interrupted = true; } } finally { if (failed) // 取消操作(與獨佔模式相同) cancelAcquire(node); } }
doAcquireShared 方法會把當前執行緒封裝成一個共享模式(SHARED)的節點,並插入主隊列末尾。addWaiter(Node mode) 方法前文已經分析過,不再贅述。
該方法與 acquireQueued 方法的區別在於 setHeadAndPropagate 方法,把當前節點設置為頭節點之後,還會有傳播(propagate)行為:
private void setHeadAndPropagate(Node node, int propagate) { // 記錄舊的頭節點 Node h = head; // Record old head for check below // 將 node 設置為頭節點 setHead(node); /* * Try to signal next queued node if: * Propagation was indicated by caller, * or was recorded (as h.waitStatus either before * or after setHead) by a previous operation * (note: this uses sign-check of waitStatus because * PROPAGATE status may transition to SIGNAL.) * and * The next node is waiting in shared mode, * or we don't know, because it appears null * * The conservatism in both of these checks may cause * unnecessary wake-ups, but only when there are multiple * racing acquires/releases, so most need signals now or soon * anyway. */ if (propagate > 0 || h == null || h.waitStatus < 0 || (h = head) == null || h.waitStatus < 0) { Node s = node.next; // 後繼節點為空或共享模式喚醒 if (s == null || s.isShared()) doReleaseShared(); } }
doReleaseShared:
private void doReleaseShared() { /* * Ensure that a release propagates, even if there are other * in-progress acquires/releases. This proceeds in the usual * way of trying to unparkSuccessor of head if it needs * signal. But if it does not, status is set to PROPAGATE to * ensure that upon release, propagation continues. * Additionally, we must loop in case a new node is added * while we are doing this. Also, unlike other uses of * unparkSuccessor, we need to know if CAS to reset status * fails, if so rechecking. */ for (;;) { // 這裡的頭節點已經是上面設置後的頭節點了 Node h = head; // 由於該方法有兩個入口(setHeadAndPropagate 和 releaseShared),需考慮並發控制 if (h != null && h != tail) { int ws = h.waitStatus; if (ws == Node.SIGNAL) { if (!compareAndSetWaitStatus(h, Node.SIGNAL, 0)) continue; // loop to recheck cases // 喚醒後繼節點 unparkSuccessor(h); } else if (ws == 0 && !compareAndSetWaitStatus(h, 0, Node.PROPAGATE)) continue; // loop on failed CAS } // 若頭節點不變,則跳出循環;否則繼續循環 if (h == head) // loop if head changed break; } }
該方法與獨佔模式下的獲取方法 acquire 大體相似,不同在於該方法中,節點獲取資源後會傳播狀態,即,有可能會繼續喚醒後繼節點。值得注意的是:該方法有兩個入口 setHeadAndPropagate 和 releaseShared,可能有多個執行緒操作,需考慮並發控制。
此外,本人對於將節點設置為 PROPAGATE 狀態的理解還不是很清晰,網上說法也不止一種,待後續研究明白再補充。
2. 以共享模式獲取資源(響應中斷)
該方法與 acquireShared 類似:
public final void acquireSharedInterruptibly(int arg) throws InterruptedException { if (Thread.interrupted()) throw new InterruptedException(); if (tryAcquireShared(arg) < 0) doAcquireSharedInterruptibly(arg); }
tryAcquireShared 方法前面已分析,若獲取資源失敗,則會執行 doAcquireSharedInterruptly 方法:
private void doAcquireSharedInterruptibly(int arg) throws InterruptedException { // 把當前執行緒封裝成共享模式節點,並插入主隊列 final Node node = addWaiter(Node.SHARED); boolean failed = true; try { for (;;) { final Node p = node.predecessor(); if (p == head) { int r = tryAcquireShared(arg); if (r >= 0) { setHeadAndPropagate(node, r); p.next = null; // help GC failed = false; return; } } // 與 doAcquireShared 相比,區別在於這裡拋出了異常 if (shouldParkAfterFailedAcquire(p, node) && parkAndCheckInterrupt()) throw new InterruptedException(); } } finally { if (failed) cancelAcquire(node); } }
從程式碼可以看到,acquireSharedInterruptibly 方法與 acquireShared 方法幾乎完全一樣,不同之處僅在於前者會拋出 InterruptedException 異常響應中斷;而後者僅記錄標誌位,獲取結束後才響應。
3. 以共享模式獲取資源(響應中斷,且有超時)
程式碼如下(該方法可與前文獨佔模式下的超時獲取方法比較分析):
public final boolean tryAcquireSharedNanos(int arg, long nanosTimeout) throws InterruptedException { if (Thread.interrupted()) throw new InterruptedException(); return tryAcquireShared(arg) >= 0 || doAcquireSharedNanos(arg, nanosTimeout); }
doAcquireSharedNanos:
private boolean doAcquireSharedNanos(int arg, long nanosTimeout) throws InterruptedException { if (nanosTimeout <= 0L) return false; final long deadline = System.nanoTime() + nanosTimeout; final Node node = addWaiter(Node.SHARED); boolean failed = true; try { for (;;) { final Node p = node.predecessor(); if (p == head) { int r = tryAcquireShared(arg); if (r >= 0) { setHeadAndPropagate(node, r); p.next = null; // help GC failed = false; return true; } } nanosTimeout = deadline - System.nanoTime(); if (nanosTimeout <= 0L) return false; if (shouldParkAfterFailedAcquire(p, node) && nanosTimeout > spinForTimeoutThreshold) LockSupport.parkNanos(this, nanosTimeout); if (Thread.interrupted()) throw new InterruptedException(); } } finally { if (failed) cancelAcquire(node); } }
該方法可與獨佔模式下的超時等待方法 tryAcquireNanos(int arg, long nanosTimeout) 進行對比,二者操作基本一致,不再詳細分析。
4. 釋放資源,喚醒節點,傳播狀態
如下:
public final boolean releaseShared(int arg) { if (tryReleaseShared(arg)) { doReleaseShared(); return true; } return false; }
tryReleaseShared:
protected boolean tryReleaseShared(int arg) { throw new UnsupportedOperationException(); }
doReleaseShared() 方法前面已經分析過了。本方法與獨佔模式的 release 方法類似,不同的地方在於“傳播”二字。
場景分析
為了便於理解獨佔模式和共享模式下隊列和節點的狀態,下面簡要舉例分析。
場景如下:有 T0~T4 共 5 個執行緒按先後順序獲取資源,其中 T2 和 T3 為共享模式,其他均為獨佔模式。
就此場景分析:T0 先獲取到資源(假設佔用時間較長),而後 T1~T4 再獲取則失敗,會依次進入主隊列。此時主隊列中各個節點的狀態示意圖如下:

之後,T0 操作完畢並釋放資源,會將 T1 喚醒。T1(獨佔模式) 會從 acquireQueued(final Node node, int arg) 方法的循環中繼續獲取資源,這時會獲取成功,並將 T1 設置為頭節點(T 被移除)。此時主隊列節點示意圖如下:

此時,T1 獲取到資源並進行相關操作。
而後,T1 操作完釋放資源,並喚醒下一個節點 T2,T2(共享模式) 繼續從 doAcquireShared(int) 方法的循環中執行。此時 T2 獲取資源成功,將自身設為頭節點(T1 被移除),由於後繼節點 T3 也是共享模式,因此 T1 會繼續喚醒 T3;T3 喚醒後的操作與 T2 相同,但後繼節點 T4 不是共享模式,因此不再繼續喚醒。此時隊列節點狀態示意圖如下:
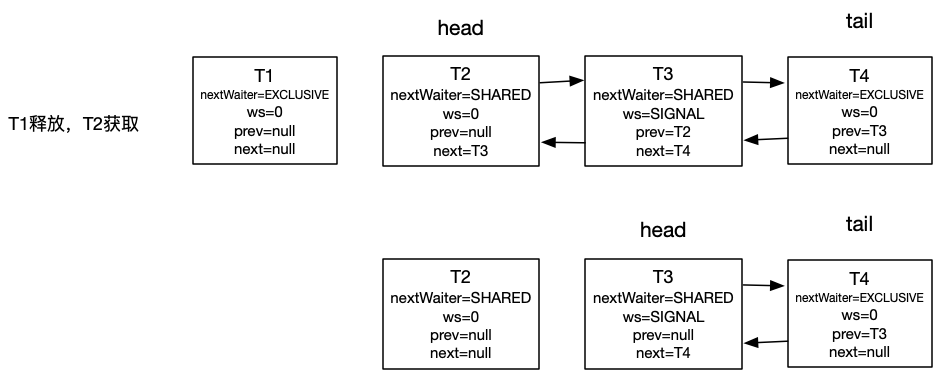
此時,T2 和 T3 同時獲取到資源。
之後,當二者都釋放資源後會喚醒 T4:

T4 獲取資源的與 T1 類似。
PS: 該場景僅供參考,只為便於理解,若有不當之處敬請指正。
小結
本文分析了以共享模式獲取資源的三種方式,以及釋放資源的操作。分別為:
1. acquireShared: 共享模式獲取資源,忽略中斷;
2. acquireSharedInterruptibly: 共享模式獲取資源,響應中斷;
3. tryAcquireSharedNanos: 共享模式獲取資源,響應中斷,有超時;
4. releaseShared: 釋放資源,喚醒後繼節點,並確保傳播。
並簡要分析一個場景下主隊列中各個節點的狀態。此外,AQS 中還有嵌套類 ConditionObject 及條件隊列的相關操作,後面涉及到的時候再進行分析。
單獨去分析 AQS 的源碼比較枯燥,後文會結合 ReentrantLock、CountdownLatch 等常用並發工具類的源碼進行分析。
上述解析是參考其他資料及個人理解,若有不當之處歡迎指正。
相關閱讀:
JDK源碼分析-AbstractQueuedSynchronizer(2)
JDK源碼分析-AbstractQueuedSynchronizer(1)
Stay hungry, stay foolish.

PS: 本文首發於微信公眾號【WriteOnRead】。