Ansible常用模块实例
- 2019 年 12 月 12 日
- 筆記
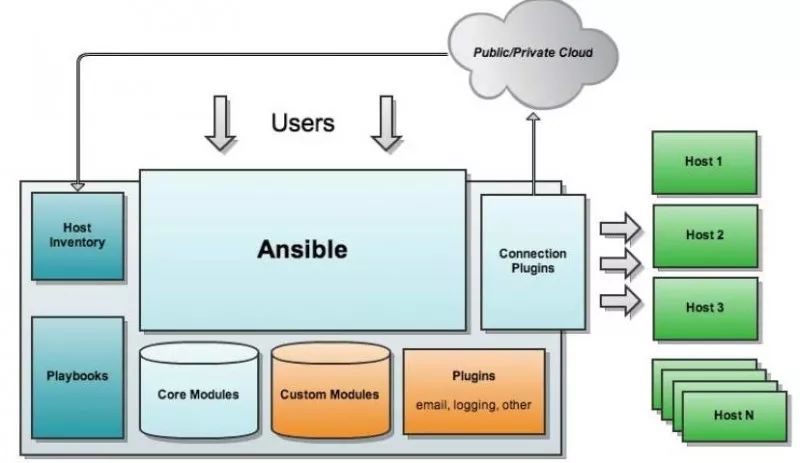
ansible主要文件

(/etc/ansible/ansible.cfg)
ansible主配置文件。
(/etc/ansible/hosts)
主机清单,保存管理的主机信息。
(/etc/ansible/roles)
公共角色,主要在自动化部署多台主机时应用。
ansible命令集
ansible
定义并运行简单任务。
ansible-config
查看、编辑、管理ansible配置。
ansible-doc
文档查看工具。
ansible-galaxy
共享和下载roles的工具。
ansible-inventory
查看inventory的信息。
ansible-playbook
执行playbook。
ansible-pull
从仓库中拉去playbook。
ansible-vault
文件加密工具。
ansible-console
repl控制台执行ansible任务。
配置SSH免秘钥访问
为了避免ansible每次下发指令都要输入目标主机密码,所以这里使用(ssh-keygen)在控制主机创建一对秘钥,使用(ssh-copy-id)来下发生成的公钥。
[root@master ~]# ssh-keygen Generating public/private rsa key pair. Enter file in which to save the key (/root/.ssh/id_rsa): (回车) Created directory '/root/.ssh'. Enter passphrase (empty for no passphrase):(回车) Enter same passphrase again:(回车) Your identification has been saved in /root/.ssh/id_rsa. Your public key has been saved in /root/.ssh/id_rsa.pub. The key fingerprint is: e8:2b:a7:a2:6b:19:87:0b:b5:4e:fc:46:5b:9e:3d:7b root@master The key's randomart image is: +--[ RSA 2048]----+ | . . | | o.. . S | |.o+.... | |.o=o +.o | | +o = +.o E | |+o o.+. .+ | +-----------------+
在/root/.ssh/下生产一对秘钥,其中(id_rsa)为私钥,(id_rsa.pub)为公钥.
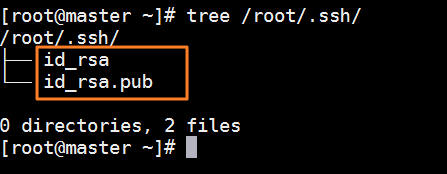
[root@master ~]# tree /root/.ssh/ /root/.ssh/ ├── id_rsa └── id_rsa.pub
控制主机把公钥(id_rsa.pub)下发到被管节点上用户下的.ssh目录,并重命名为authorized_key,权限制为400,这里使用秘钥拷贝工具(ssh-copy-id)把公钥文件(id_rsa.pub)拷贝到被管节点。
[root@master ~]# ssh-copy-id -i /root/.ssh/id_rsa.pub [email protected] The authenticity of host '192.168.1.111 (192.168.1.111)' can't be established. ECDSA key fingerprint is 75:5c:83:a1:b4:cc:bf:28:71:a5:d5:d1:94:35:3c:9a. Are you sure you want to continue connecting (yes/no)? yes /usr/bin/ssh-copy-id: INFO: attempting to log in with the new key(s), to filter out any that are already installed /usr/bin/ssh-copy-id: INFO: 1 key(s) remain to be installed -- if you are prompted now it is to install the new keys [email protected]'s password: Number of key(s) added: 1 Now try logging into the machine, with: "ssh '[email protected]'" and check to make sure that only the key(s) you wanted were added.
公钥分发后,需要验证SSH无密码登录,如下为成功。
[root@master ~]# ssh [email protected] Last login: Wed Jul 17 23:13:35 2018 from master [root@slave ~]#
如果有多台节点分发公钥和上面一样,或者写一个简单的脚本分发。
主机连通性测试
[root@master ~]# cat >>/etc/ansible/hosts <<EOF > [cluster_host] > 192.168.1.111 > EOF [root@master ~]# ansible cluster_host -m command -a 'uptime' 192.168.1.111 | SUCCESS | rc=0 >> 09:58:17 up 1:03, 2 users, load average: 0.01, 0.04, 0.05
常用模块解析
查询某个模块请执行:(ansible-doc -s 模块名)
查询更多模块请执行:(ansible-doc -l)
(setup)模块
#查看目标主机的一些信息
示例:
[root@master ~]# ansible cluster_host -m setup 192.168.1.111 | SUCCESS => { "ansible_facts": { "ansible_all_ipv4_addresses": [ "172.16.1.15", "192.168.1.111" ], "ansible_all_ipv6_addresses": [ "fe80::20c:29ff:fe91:ce86", "fe80::20c:29ff:fe91:ce7c" ], "ansible_apparmor": { "status": "disabled" }
(ping)模块
#测试目标主机的运行状态
示例:
[root@master ~]# ansible cluster_host -m ping 192.168.1.111 | SUCCESS => { "changed": false, "ping": "pong" }
(file)模块
#对目标主机的文件进行操作
参数如下:
force
在两种情况下强制创建软链接
1.源文件不存在但之后会建立的情况下;
2.目标软连接已经存在,需要取消之前的软链接,然后创建洗的软连接,有两个选项:yes|no;
group
定义文件/目标的属组。
mode
定义文件/目录的权限。
owenr
定义文件/目录的属主。
path
必选项,定义文件/目录的路径。
recurse
递归的设置文件的属性,只对目录有效。
src
要被链接的源文件的路径,只应用于state=link的情况。
dest
被链接到的路径,只应用于state=link的情况。
file
即使文件不存在,也不会被创建。
link
创建软连接。
hard
创建硬链接。
touch
如果文件不存在,则会创建一个新的文件,如果文件或目录已存在,则更新其最后修改时间。
absent
删除目录、文件或者取消链接文件。
示例:
#创建远程文件符号链接 [root@master ~]# ansible cluster_host -m file -a "src=/etc/resolv.conf dest=/tmp/resolv.conf state=link" 192.168.1.111 | SUCCESS => { "changed": true, "dest": "/tmp/resolv.conf", "gid": 0, "group": "root", "mode": "0777", "owner": "root", "size": 16, "src": "/etc/resolv.conf", "state": "link", "uid": 0 } [root@master ~]# #远程文件信息查看 [root@master ~]# ansible cluster_host -m command -a "ls -la /tmp/resolv.conf" 192.168.1.111 | SUCCESS | rc=0 >> lrwxrwxrwx 1 root root 16 7月 18 10:21 /tmp/resolv.conf -> /etc/resolv.conf #删除远程文件符号链接 [root@master ~]# ansible cluster_host -m file -a "path=/tmp/resolv.conf state=absent" 192.168.1.111 | SUCCESS => { "changed": true, "path": "/tmp/resolv.conf", "state": "absent" } #远程文件信息查看 [root@master ~]# ansible cluster_host -m command -a "ls -la /tmp/resolv.conf" 192.168.1.111 | FAILED | rc=2 >> ls: 无法访问/tmp/resolv.conf: 没有那个文件或目录non-zero return code
(copy)模块
#进行远程复制
参数如下:
src
被复制到远程主机的本地对象文件或者文件夹,可以是绝对路径,也可以是相对路径。
dest
被复制到远程主机的本地对象文件或者文件夹。
mode
复制对象的设定权限。
backup
在文件存在的时候可以选择覆盖之前,将源文件备份.设定值:yes/no 缺省为yes。
force
是否强制覆盖.设定值:yes/no 缺省为no。
示例:
#将本地文件/etc/ansible/ansible.cfg复制到目标机器/tmp/ansible.cfg [root@master ~]# ansible cluster_host -m copy -a "src=/etc/ansible/ansible.cfg dest=/tmp/ansible.cfg owner=root group=root mode=0644" 192.168.1.111 | SUCCESS => { "changed": true, "checksum": "4cb7c9f51f91d0c5895c2ae5bca18b4904ed407e", "dest": "/tmp/ansible.cfg", "gid": 0, "group": "root", "md5sum": "1f7011f69060831cfcd3b04136c2be6a", "mode": "0644", "owner": "root", "size": 19549, "src": "/root/.ansible/tmp/ansible-tmp-1531881922.82-138288626316266/source", "state": "file", "uid": 0 } #查看目标主机的/tmp/ansible.cfg文件 [root@master ~]# ansible cluster_host -m command -a "ls -la /tmp/ansible.cfg" 192.168.1.111 | SUCCESS | rc=0 >> -rw-r--r-- 1 root root 19549 7月 18 10:45 /tmp/ansible.cfg [root@master ~]#
(command)模块
#在远程主机上执行命令
参数如下:
chdiiv
在执行命令之前,通过cd命令进入指定目录中。
creates
定义一个文件是否存在,如果不存在运行相应命令;如果存在跳过此步骤。
executable
改变shell使用command进行执行,并且执行时要使用绝对路径。
free_form
命令模块采用自由形式命令组合;即可以输入任意linux命令。
removes
定义一^文件是否存在,如果存在运行相应命令;如果不存在跳过此步骤。
warn
如果ansible配置文件中定义了命令警告,如果参数设置了no/false将不会警告此行命令。
示例:
[root@master ~]# ansible cluster_host -m command -a "pwd" 192.168.1.111 | SUCCESS | rc=0 >> /root [root@master ~]# ansible cluster_host -m command -a "who" 192.168.1.111 | SUCCESS | rc=0 >> root pts/0 2018-07-18 09:13 (10.0.0.1) root pts/1 2018-07-18 10:58 (10.0.0.5)
(shell)模块
#切换到某个shell执行指定命令,参数与command模块相同
示例:
#本地创建一个shell脚本 [root@master ~]# vim /tmp/test.sh #!/bin/bash date +%F_%H.%M.%S :wq [root@master ~]# chmod +x /tmp/test.sh #将创建的脚本分发到目标主机 [root@master ~]# ansible cluster_host -m copy -a "src=/tmp/test.sh dest=/tmp/test.sh owner=root group=root mode=0755" 7192.168.1.111 | SUCCESS => { "changed": true, "checksum": "eccafd201f4a61757facc4a34e67e955b4f8a03f", "dest": "/tmp/test.sh", "gid": 0, "group": "root", "md5sum": "f027af9860d5c4548220b09bfa042b57", "mode": "0755", "owner": "root", "size": 30, "src": "/root/.ansible/tmp/ansible-tmp-1531883311.27-270962148668548/source", "state": "file", "uid": 0 } #目标主机执行 [root@master ~]# ansible cluster_host -m shell -a "/tmp/test.sh" 192.168.1.111 | SUCCESS | rc=0 >> 2018-07-18_11.09.31
更多模块
service
系统服务管理
cron
计划任务管理
yum
yum软件包安装管理
synchronize
使用rsync同步文件
user
系统用户管理
group
系统用户组管理