Spring Security 自定义登录认证(二)
- 2019 年 10 月 14 日
- 筆記
一、前言
本篇文章将讲述Spring Security自定义登录认证校验用户名、密码,自定义密码加密方式,以及在前后端分离的情况下认证失败或成功处理返回json格式数据
温馨小提示:Spring Security中有默认的密码加密方式以及登录用户认证校验,但小编这里选择自定义是为了方便以后业务扩展,比如系统默认带一个超级管理员,当认证时识别到是超级管理员账号登录访问时给它赋予最高权限,可以访问系统所有api接口,或在登录认证成功后存入token以便用户访问系统其它接口时通过token认证用户权限等
Spring Security入门学习可参考之前文章:
SpringBoot集成Spring Security入门体验(一)
二、Spring Security 自定义登录认证处理
基本环境
- spring-boot 2.1.8
- mybatis-plus 2.2.0
- mysql
- maven项目
数据库用户信息表t_sys_user
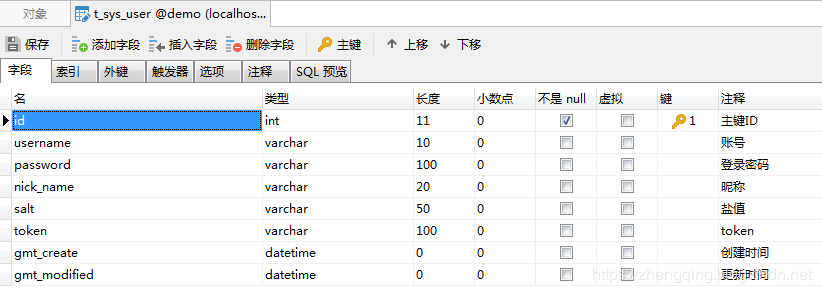
案例中关于对该
t_sys_user用户表相关的增删改查代码就不贴出来了,如有需要可参考文末提供的案例demo源码
1、Security 核心配置类
配置用户密码校验过滤器
@Configuration @EnableWebSecurity @EnableGlobalMethodSecurity(prePostEnabled = true) public class SecurityConfig extends WebSecurityConfigurerAdapter { /** * 用户密码校验过滤器 */ private final AdminAuthenticationProcessingFilter adminAuthenticationProcessingFilter; public SecurityConfig(AdminAuthenticationProcessingFilter adminAuthenticationProcessingFilter) { this.adminAuthenticationProcessingFilter = adminAuthenticationProcessingFilter; } /** * 权限配置 * @param http * @throws Exception */ @Override protected void configure(HttpSecurity http) throws Exception { ExpressionUrlAuthorizationConfigurer<HttpSecurity>.ExpressionInterceptUrlRegistry registry = http.antMatcher("/**").authorizeRequests(); // 禁用CSRF 开启跨域 http.csrf().disable().cors(); // 登录处理 - 前后端一体的情况下 // registry.and().formLogin().loginPage("/login").defaultSuccessUrl("/").permitAll() // // 自定义登陆用户名和密码属性名,默认为 username和password // .usernameParameter("username").passwordParameter("password") // // 异常处理 // .failureUrl("/login/error").permitAll() // // 退出登录 // .and().logout().permitAll(); // 标识只能在 服务器本地ip[127.0.0.1或localhost] 访问`/home`接口,其他ip地址无法访问 registry.antMatchers("/home").hasIpAddress("127.0.0.1"); // 允许匿名的url - 可理解为放行接口 - 多个接口使用,分割 registry.antMatchers("/login", "/index").permitAll(); // OPTIONS(选项):查找适用于一个特定网址资源的通讯选择。 在不需执行具体的涉及数据传输的动作情况下, 允许客户端来确定与资源相关的选项以及 / 或者要求, 或是一个服务器的性能 registry.antMatchers(HttpMethod.OPTIONS, "/**").denyAll(); // 自动登录 - cookie储存方式 registry.and().rememberMe(); // 其余所有请求都需要认证 registry.anyRequest().authenticated(); // 防止iframe 造成跨域 registry.and().headers().frameOptions().disable(); // 自定义过滤器认证用户名密码 http.addFilterAt(adminAuthenticationProcessingFilter, UsernamePasswordAuthenticationFilter.class); } }2、自定义用户密码校验过滤器
@Slf4j @Component public class AdminAuthenticationProcessingFilter extends AbstractAuthenticationProcessingFilter { /** * @param authenticationManager: 认证管理器 * @param adminAuthenticationSuccessHandler: 认证成功处理 * @param adminAuthenticationFailureHandler: 认证失败处理 */ public AdminAuthenticationProcessingFilter(CusAuthenticationManager authenticationManager, AdminAuthenticationSuccessHandler adminAuthenticationSuccessHandler, AdminAuthenticationFailureHandler adminAuthenticationFailureHandler) { super(new AntPathRequestMatcher("/login", "POST")); this.setAuthenticationManager(authenticationManager); this.setAuthenticationSuccessHandler(adminAuthenticationSuccessHandler); this.setAuthenticationFailureHandler(adminAuthenticationFailureHandler); } @Override public Authentication attemptAuthentication(HttpServletRequest request, HttpServletResponse response) throws AuthenticationException { if (request.getContentType() == null || !request.getContentType().contains(Constants.REQUEST_HEADERS_CONTENT_TYPE)) { throw new AuthenticationServiceException("请求头类型不支持: " + request.getContentType()); } UsernamePasswordAuthenticationToken authRequest; try { MultiReadHttpServletRequest wrappedRequest = new MultiReadHttpServletRequest(request); // 将前端传递的数据转换成jsonBean数据格式 User user = JSONObject.parseObject(wrappedRequest.getBodyJsonStrByJson(wrappedRequest), User.class); authRequest = new UsernamePasswordAuthenticationToken(user.getUsername(), user.getPassword(), null); authRequest.setDetails(authenticationDetailsSource.buildDetails(wrappedRequest)); } catch (Exception e) { throw new AuthenticationServiceException(e.getMessage()); } return this.getAuthenticationManager().authenticate(authRequest); } }3、自定义认证管理器
@Component public class CusAuthenticationManager implements AuthenticationManager { private final AdminAuthenticationProvider adminAuthenticationProvider; public CusAuthenticationManager(AdminAuthenticationProvider adminAuthenticationProvider) { this.adminAuthenticationProvider = adminAuthenticationProvider; } @Override public Authentication authenticate(Authentication authentication) throws AuthenticationException { Authentication result = adminAuthenticationProvider.authenticate(authentication); if (Objects.nonNull(result)) { return result; } throw new ProviderNotFoundException("Authentication failed!"); } }4、自定义认证处理
这里的密码加密验证工具类PasswordUtils可在文末源码中查看
@Component public class AdminAuthenticationProvider implements AuthenticationProvider { @Autowired UserDetailsServiceImpl userDetailsService; @Autowired private UserMapper userMapper; @Override public Authentication authenticate(Authentication authentication) throws AuthenticationException { // 获取前端表单中输入后返回的用户名、密码 String userName = (String) authentication.getPrincipal(); String password = (String) authentication.getCredentials(); SecurityUser userInfo = (SecurityUser) userDetailsService.loadUserByUsername(userName); boolean isValid = PasswordUtils.isValidPassword(password, userInfo.getPassword(), userInfo.getCurrentUserInfo().getSalt()); // 验证密码 if (!isValid) { throw new BadCredentialsException("密码错误!"); } // 前后端分离情况下 处理逻辑... // 更新登录令牌 - 之后访问系统其它接口直接通过token认证用户权限... String token = PasswordUtils.encodePassword(System.currentTimeMillis() + userInfo.getCurrentUserInfo().getSalt(), userInfo.getCurrentUserInfo().getSalt()); User user = userMapper.selectById(userInfo.getCurrentUserInfo().getId()); user.setToken(token); userMapper.updateById(user); userInfo.getCurrentUserInfo().setToken(token); return new UsernamePasswordAuthenticationToken(userInfo, password, userInfo.getAuthorities()); } @Override public boolean supports(Class<?> aClass) { return true; } }其中小编自定义了一个UserDetailsServiceImpl类去实现UserDetailsService类 -> 用于认证用户详情
和自定义一个SecurityUser类实现UserDetails类 -> 安全认证用户详情信息
@Service("userDetailsService") public class UserDetailsServiceImpl implements UserDetailsService { @Autowired private UserMapper userMapper; /*** * 根据账号获取用户信息 * @param username: * @return: org.springframework.security.core.userdetails.UserDetails */ @Override public UserDetails loadUserByUsername(String username) throws UsernameNotFoundException { // 从数据库中取出用户信息 List<User> userList = userMapper.selectList(new EntityWrapper<User>().eq("username", username)); User user; // 判断用户是否存在 if (!CollectionUtils.isEmpty(userList)){ user = userList.get(0); } else { throw new UsernameNotFoundException("用户名不存在!"); } // 返回UserDetails实现类 return new SecurityUser(user); } }安全认证用户详情信息
@Data @Slf4j public class SecurityUser implements UserDetails { /** * 当前登录用户 */ private transient User currentUserInfo; public SecurityUser() { } public SecurityUser(User user) { if (user != null) { this.currentUserInfo = user; } } @Override public Collection<? extends GrantedAuthority> getAuthorities() { Collection<GrantedAuthority> authorities = new ArrayList<>(); SimpleGrantedAuthority authority = new SimpleGrantedAuthority("admin"); authorities.add(authority); return authorities; } @Override public String getPassword() { return currentUserInfo.getPassword(); } @Override public String getUsername() { return currentUserInfo.getUsername(); } @Override public boolean isAccountNonExpired() { return true; } @Override public boolean isAccountNonLocked() { return true; } @Override public boolean isCredentialsNonExpired() { return true; } @Override public boolean isEnabled() { return true; } }5、自定义认证成功或失败处理方式
- 认证成功处理类实现
AuthenticationSuccessHandler类重写onAuthenticationSuccess方法 - 认证失败处理类实现
AuthenticationFailureHandler类重写onAuthenticationFailure方法
在前后端分离情况下小编认证成功和失败都返回json数据格式
认证成功后这里小编只返回了一个token给前端,其它信息可根据个人业务实际处理
@Component public class AdminAuthenticationSuccessHandler implements AuthenticationSuccessHandler { @Override public void onAuthenticationSuccess(HttpServletRequest httpServletRequest, HttpServletResponse response, Authentication auth) throws IOException, ServletException { User user = new User(); SecurityUser securityUser = ((SecurityUser) auth.getPrincipal()); user.setToken(securityUser.getCurrentUserInfo().getToken()); ResponseUtils.out(response, ApiResult.ok("登录成功!", user)); } }认证失败捕捉异常自定义错误信息返回给前端
@Slf4j @Component public class AdminAuthenticationFailureHandler implements AuthenticationFailureHandler { @Override public void onAuthenticationFailure(HttpServletRequest httpServletRequest, HttpServletResponse response, AuthenticationException e) throws IOException, ServletException { ApiResult result; if (e instanceof UsernameNotFoundException || e instanceof BadCredentialsException) { result = ApiResult.fail(e.getMessage()); } else if (e instanceof LockedException) { result = ApiResult.fail("账户被锁定,请联系管理员!"); } else if (e instanceof CredentialsExpiredException) { result = ApiResult.fail("证书过期,请联系管理员!"); } else if (e instanceof AccountExpiredException) { result = ApiResult.fail("账户过期,请联系管理员!"); } else if (e instanceof DisabledException) { result = ApiResult.fail("账户被禁用,请联系管理员!"); } else { log.error("登录失败:", e); result = ApiResult.fail("登录失败!"); } ResponseUtils.out(response, result); } }温馨小提示:
前后端一体的情况下可通过在Spring Security核心配置类中配置异常处理接口然后通过如下方式获取异常信息
AuthenticationException e = (AuthenticationException) request.getSession().getAttribute("SPRING_SECURITY_LAST_EXCEPTION"); System.out.println(e.getMessage());三、前端页面
这里2个简单的html页面模拟前后端分离情况下登陆处理场景
1、登陆页
login.html
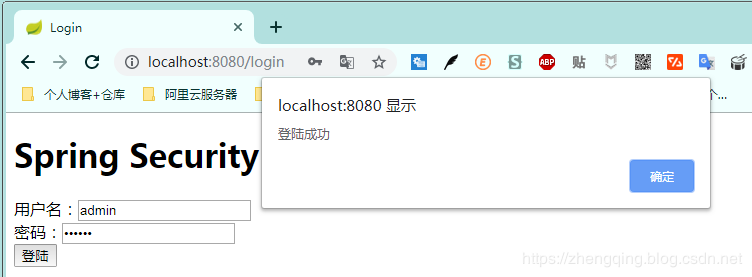
<!DOCTYPE html> <html lang="en"> <head> <meta charset="UTF-8"> <title>Login</title> </head> <body> <h1>Spring Security</h1> <form method="post" action="" onsubmit="return false"> <div> 用户名:<input type="text" name="username" id="username"> </div> <div> 密码:<input type="password" name="password" id="password"> </div> <div> <!-- <label><input type="checkbox" name="remember-me" id="remember-me"/>自动登录</label>--> <button onclick="login()">登陆</button> </div> </form> </body> <script src="http://libs.baidu.com/jquery/1.9.0/jquery.js" type="text/javascript"></script> <script type="text/javascript"> function login() { var username = document.getElementById("username").value; var password = document.getElementById("password").value; // var rememberMe = document.getElementById("remember-me").value; $.ajax({ async: false, type: "POST", dataType: "json", url: '/login', contentType: "application/json", data: JSON.stringify({ "username": username, "password": password // "remember-me": rememberMe }), success: function (result) { console.log(result) if (result.code == 200) { alert("登陆成功"); window.location.href = "../home.html"; } else { alert(result.message) } } }); } </script> </html>2、首页
home.html
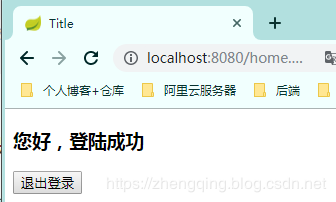
<!DOCTYPE html> <html lang="en"> <head> <meta charset="UTF-8"> <title>Title</title> </head> <body> <h3>您好,登陆成功</h3> <button onclick="window.location.href='/logout'">退出登录</button> </body> </html>四、测试接口
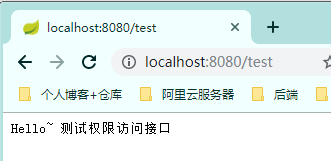
@Slf4j @RestController public class IndexController { @GetMapping("/") public ModelAndView showHome() { return new ModelAndView("home.html"); } @GetMapping("/index") public String index() { return "Hello World ~"; } @GetMapping("/login") public ModelAndView login() { return new ModelAndView("login.html"); } @GetMapping("/home") public String home() { String name = SecurityContextHolder.getContext().getAuthentication().getName(); log.info("登陆人:" + name); return "Hello~ " + name; } @GetMapping(value ="/admin") // 访问路径`/admin` 具有`crud`权限 @PreAuthorize("hasPermission('/admin','crud')") public String admin() { return "Hello~ 管理员"; } @GetMapping("/test") // @PreAuthorize("hasPermission('/test','t')") public String test() { return "Hello~ 测试权限访问接口"; } /** * 登录异常处理 - 前后端一体的情况下 * @param request * @param response */ @RequestMapping("/login/error") public void loginError(HttpServletRequest request, HttpServletResponse response) { AuthenticationException e = (AuthenticationException) request.getSession().getAttribute("SPRING_SECURITY_LAST_EXCEPTION"); log.error(e.getMessage()); ResponseUtils.out(response, ApiResult.fail(e.getMessage())); } }五、测试访问效果
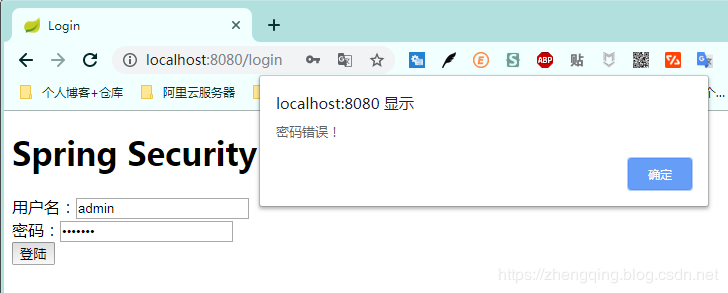
数据库账号:admin 密码:123456
1. 输入错误用户名提示该用户不存在

2. 输入错误密码提示密码错误
3. 输入正确用户名和账号,提示登陆成功,然后跳转到首页
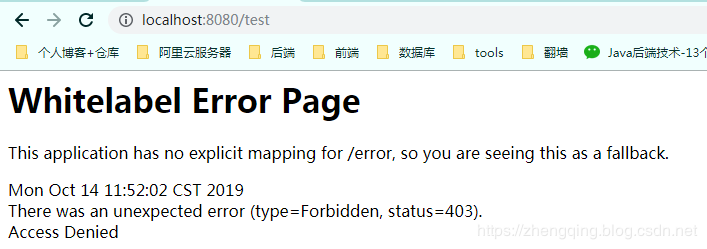
登陆成功后即可正常访问其他接口,如果是未登录情况下将访问不了
温馨小提示:这里在未登录时或访问未授权的接口时,后端暂时没有做处理,相关案例将会放在后面的权限控制案例教程中讲解
六、总结
- 在
Spring Security核心配置类中设置自定义的用户密码校验过滤器(AdminAuthenticationProcessingFilter) - 在自定义的用户密码校验过滤器中配置
认证管理器(CusAuthenticationManager)、认证成功处理(AdminAuthenticationSuccessHandler)和认证失败处理(AdminAuthenticationFailureHandler)等 - 在自定义的认证管理器中配置自定义的
认证处理(AdminAuthenticationProvider) - 然后就是在认证处理中实现自己的相应业务逻辑等
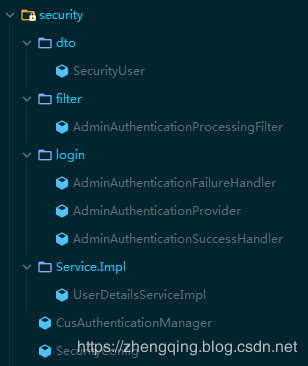
Security相关代码结构:
本文案例源码
https://gitee.com/zhengqingya/java-workspace