曹工雜談:我們的應用,啟動就要去其他服務拉數據,那其他服務掛了,我們就起不來了?
- 2020 年 4 月 10 日
- 筆記
曹工雜談:我們的應用,啟動就要去其他服務拉數據,那其他服務掛了,我們就起不來了?
前言
在大家的項目中,想必都有那種,啟動時候要去其他服務拉一些數據的情況,如果我們啟動時,其他服務沒啟動,按豈不是就起不來了嗎,如果這段拉數據的程式碼,並不是核心業務,那你這就有點說不過去了:不能因為對方沒啟動,我們也不能啟動吧?
經過一些思考後,我覺得可以這樣,啟動的時候:
- 啟動一個定時的執行緒池,讓它去執行拉數據的任務,如果任務執行失敗,會過一段時間後再次執行
- 我們希望,一旦某一次執行任務,成功後,就不要再去拉數據了,浪費網路流量和cpu
我這邊可以大概就大家演示下。
示例程式碼
服務端
隨便寫了個spring boot服務端,監聽本機8082埠。模擬第三方服務
@RestController @Slf4j public class BusinessController { @GetMapping("/") public String test() { return "success"; } } @SpringBootApplication @Slf4j public class WebDemoApplicationServer { public static void main(String[] args) { ConfigurableApplicationContext context = SpringApplication.run(WebDemoApplicationServer.class, args); } } 客戶端
客戶端程式,依賴第三方服務,啟動時,要去上面的服務端拉數據。
程式碼和上面差不多,唯一是在啟動時,會執行以下邏輯:
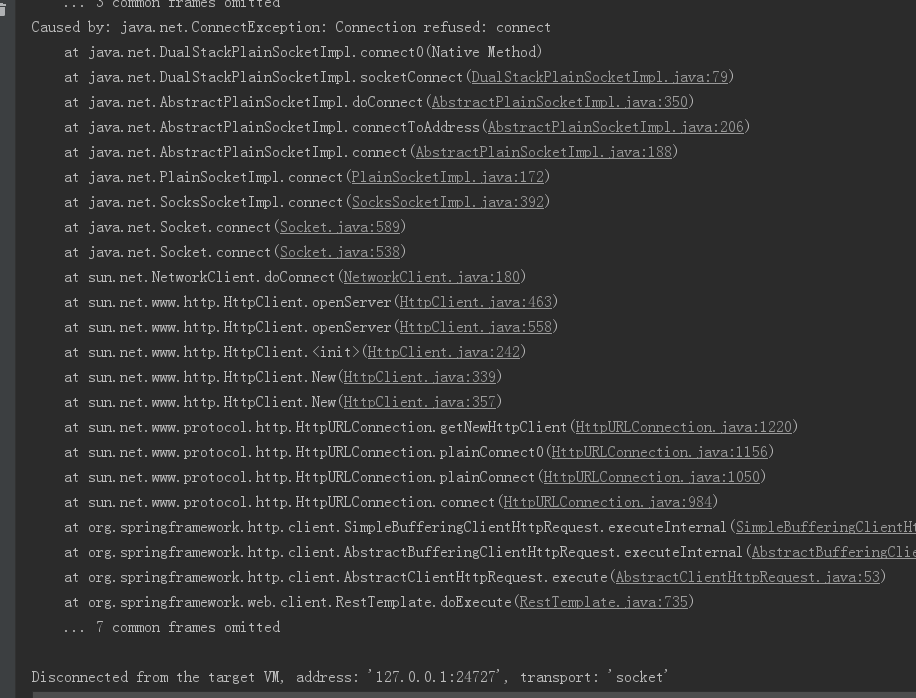
@Component public class InitRunner implements CommandLineRunner{ private static final Logger log = LoggerFactory.getLogger(InitRunner.class); @Autowired private RestTemplate restTemplate; @Override public void run(String... args) throws Exception { ResponseEntity<String> entity = restTemplate.getForEntity("http://localhost:8082", String.class); String s = entity.toString(); log.info("get data:{}",s); } } 在上面的服務沒啟動的時候,這個客戶端是起不來的。
怎麼解決呢,很簡單。
方案1
public class InitRunnerV2 implements CommandLineRunner { @Autowired private RestTemplate restTemplate; // 1 ScheduledThreadPoolExecutor scheduledThreadPoolExecutor = new ScheduledThreadPoolExecutor(1, new NamedThreadFactory("init-data-from-third-sys")); @Override public void run(String... args) { //2 TestTask task = new TestTask(restTemplate); //3 ScheduledFuture<?> scheduledFuture = scheduledThreadPoolExecutor.scheduleAtFixedRate(task, 0, 10, TimeUnit.SECONDS); // 4 task.setScheduledFuture(scheduledFuture); } } -
1處,new了一個執行緒池,ScheduledThreadPoolExecutor類型,可周期執行某個任務
-
2處,new了一個任務,這個任務會執行我們的拉數據邏輯。
這個任務的程式碼如下:
@Slf4j public class TestTask implements Runnable{ private RestTemplate restTemplate; private volatile ScheduledFuture<?> scheduledFuture; public TestTask(RestTemplate restTemplate) { this.restTemplate = restTemplate; } ... public void setScheduledFuture(ScheduledFuture<?> scheduledFuture) { this.scheduledFuture = scheduledFuture; } }其實很簡單,就是定義了2個欄位,一個是RestTemplate,請求數據時要用;另一個是ScheduledFuture<?>類型,這個欄位在上面的
InitRunnerV2程式碼的第三處被賦值。 -
3處,讓這個任務循環執行,每10s一次。
-
4處,給task的
ScheduledFuture賦值,注意的是,在task中,這個欄位我們定義為volatile,保證執行緒可見。
下面是任務程式碼的剖析:
@Override public void run() { try { ResponseEntity<String> entity = restTemplate.getForEntity("http://localhost:8082", String.class); String s = entity.toString(); log.info("get data:{}",s); } catch (Exception e) { // log.error("e:{}",e); log.error("error"); return; } /** * 1 有可能任務執行太快,future還沒被賦值 */ if (scheduledFuture != null) { scheduledFuture.cancel(true); } } 唯一有什麼要說的,就是1處,如果成功了,我們就會調用scheduledFuture.cancel(true);,這樣,這個scheduled 任務就不會繼續執行了,也就達到了我們的目的,經濟實惠。
到此,程式碼基本就這樣了,詳細程式碼見:
不成熟方案2
因為上面的方案挺簡單實用,但感覺沒啥乾貨,於是我想著是否可以自己來實現一個訂製的執行緒池,把這些事情給自動化了。
希望實現的最終效果如下,給future增加一個回調,需要在任務執行成功時,該回調自動被調用:
public class InitRunnerV3 implements CommandLineRunner { @Autowired private RestTemplate restTemplate; CustomScheduledThreadPoolExecutor scheduledThreadPoolExecutor = new CustomScheduledThreadPoolExecutor(1, new NamedThreadFactory("init-data-from-third-sys")); @Override public void run(String... args) { // 1 TestTaskV3 task = new TestTaskV3(restTemplate); // 2 CustomScheduledFuture<?> scheduledFuture = scheduledThreadPoolExecutor.scheduleAtFixedRate(task, 0, 10, TimeUnit.SECONDS); // 3 scheduledFuture.setCustomFutureCallBack(new CustomFutureCallBack() { @Override public void onSuccess(CustomScheduledFuture customScheduledFuture) { log.info("onSuccess"); // 4 customScheduledFuture.cancel(true); } @Override public void onException(Throwable throwable) { log.error("e:{}",throwable); } }); } -
1處,執行任務,任務內部如下,去除了設置future的邏輯,和取消的邏輯
@Slf4j public class TestTaskV3 implements Runnable{ private RestTemplate restTemplate;public TestTaskV3(RestTemplate restTemplate) { this.restTemplate = restTemplate; } @Override public void run() { try { ResponseEntity<String> entity = restTemplate.getForEntity("http://localhost:8082", String.class); String s = entity.toString(); log.info("get data:{}",s); } catch (Exception e) { // log.error("e:{}",e); log.error("error"); throw e; } } } -
2處,循環執行任務,這裡的scheduled執行緒池,是我們自定義的,回頭再說;獲取其返回的future
-
3處,給future增加回調,在回調中,如果成功,則取消該任務。
@Override public void onSuccess(CustomScheduledFuture customScheduledFuture) { log.info("onSuccess"); // 4 customScheduledFuture.cancel(true); }
尋找擴展點
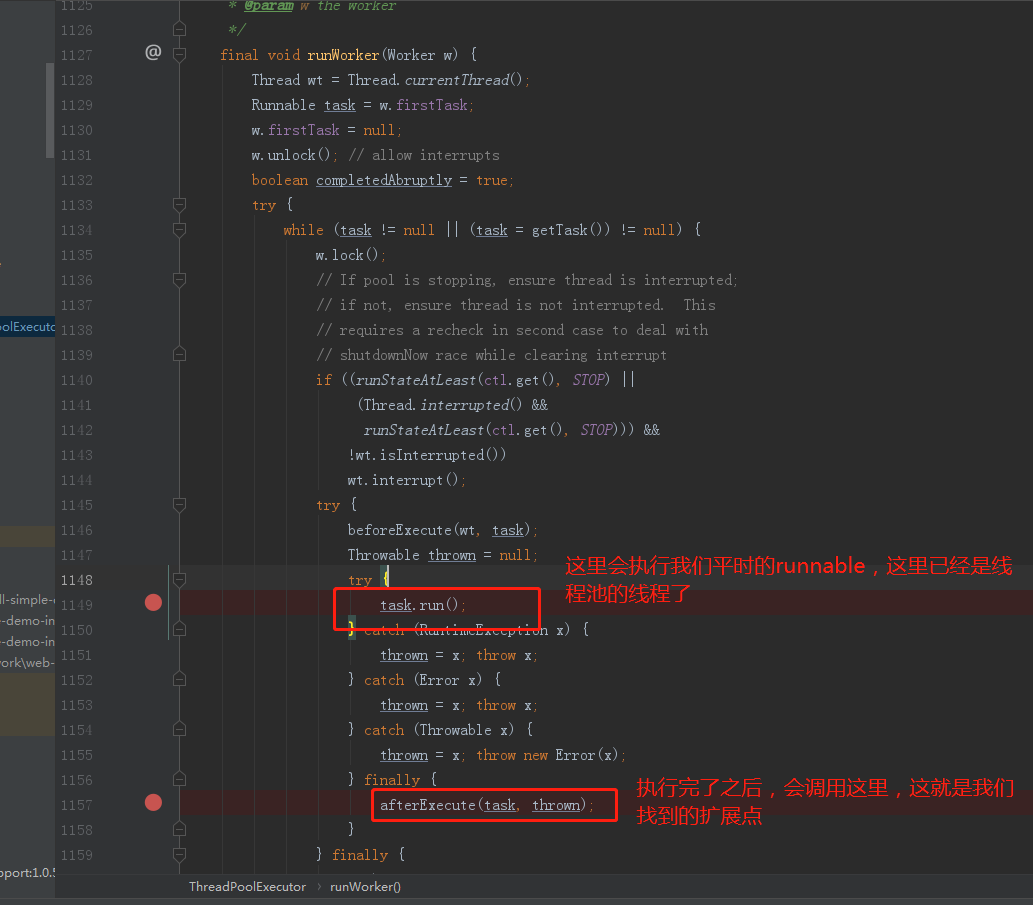
這裡,afterExecute是個空實現,就是留給子執行緒池擴展用的:
protected void afterExecute(Runnable r, Throwable t) { } 那我們可以考慮下,要怎麼才能實現我們的目標呢,我們要在這個方法內,通過傳進來的Runnable r,獲取到下面這個future才能實現目的:
CustomScheduledFuture<?> scheduledFuture = scheduledThreadPoolExecutor.scheduleAtFixedRate(task, 0, 10, TimeUnit.SECONDS); 獲取到future,就能拿到在future上設置的callback對象,就能調用callback,所以,現在問題是,要在傳進來的Runnable中,獲取到scheduledFuture。
所以,我們就得包裝一下,傳進來的runnable,我們定義了如下的Runnable:
@Data public class CustomDecoratedRunnable implements Runnable { Runnable runnable; CustomScheduledFuture customScheduledFuture; public CustomDecoratedRunnable(Runnable runnable,CustomScheduledFuture customScheduledFuture) { this.runnable = runnable; this.customScheduledFuture = customScheduledFuture; } @Override public void run() { this.runnable.run(); } } 訂製執行緒池
我們具體看看,我們訂製的執行緒池對象,我們的執行緒池,直接繼承了ScheduledThreadPoolExecutor:
public class CustomScheduledThreadPoolExecutor<V> extends ScheduledThreadPoolExecutor { public CustomScheduledThreadPoolExecutor(int corePoolSize, ThreadFactory threadFactory) { super(corePoolSize, threadFactory); } ... } 其scheduleAtFixedRate方法,我們進行了重寫:
@Override public CustomScheduledFuture<V> scheduleAtFixedRate(Runnable command, long initialDelay, long period, TimeUnit unit) { /** * 1 */ CustomScheduledFuture customScheduledFuture = new CustomScheduledFuture(); // 2 將future設置到task中 CustomDecoratedRunnable customDecoratedRunnable = new CustomDecoratedRunnable(command,customScheduledFuture); // 3 ScheduledFuture<?> scheduledFuture = super.scheduleAtFixedRate(customDecoratedRunnable, initialDelay, period, unit); /** * 4 將返回的future,設置到我們包裝過的future */ customScheduledFuture.setScheduledFuture((RunnableScheduledFuture) scheduledFuture); return customScheduledFuture; } -
1處,新建一個自定義的future
-
2處,將自定義的future,設置到上面說的task中
-
3處,把包裝過的task,丟給執行緒池
-
4處,返回一個訂製的future,這個future,包裝了原有的future,同時,支援設置callback
public class CustomScheduledFuture<V> implements RunnableScheduledFuture<V> { /** * 其實是下面這種類型: * {@link java.util.concurrent.ScheduledThreadPoolExecutor.ScheduledFutureTask * */ RunnableScheduledFuture<V> scheduledFuture; // 設置callback時,賦值 CustomFutureCallBack customFutureCallBack; Runnable runnable; }
丟給訂製執行緒池的task
本來,我以為,丟給執行緒池什麼Runnable對象,在afterExecute就能拿到什麼樣的Runnable對象,結果:
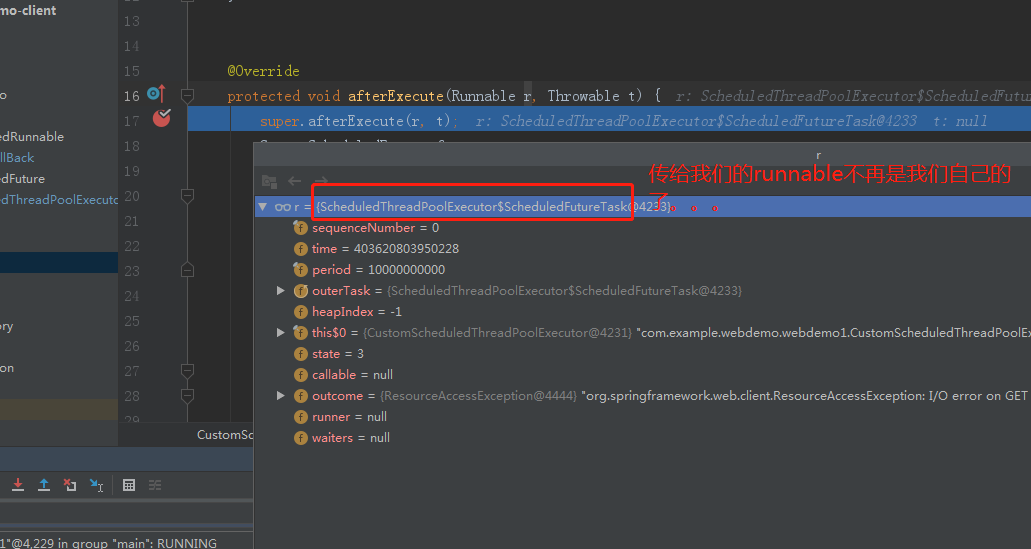
發現,傳進來的,已經被包裝過了,應該是為了支援周期執行。
所以,沒辦法,看起來路被堵死了,通過這個傳進來的Runnable,也拿不到我們原始的Runnable。
後邊找了半天,找到下面這個點:
#java.util.concurrent.ScheduledThreadPoolExecutor#scheduleAtFixedRate public ScheduledFuture<?> scheduleAtFixedRate(Runnable command, long initialDelay, long period, TimeUnit unit) { if (command == null || unit == null) throw new NullPointerException(); if (period <= 0) throw new IllegalArgumentException(); ScheduledFutureTask<Void> sft = new ScheduledFutureTask<Void>(command, null, triggerTime(initialDelay, unit), unit.toNanos(period)); // 1 RunnableScheduledFuture<Void> t = decorateTask(command, sft); sft.outerTask = t; delayedExecute(t); return t; } -
1處,會調用decorateTask來包裝task,默認實現,就是如下:
protected <V> RunnableScheduledFuture<V> decorateTask( Runnable runnable, RunnableScheduledFuture<V> task) { return task; }這裡的task,就是前面那個程式碼里的
ScheduledFutureTask<Void> sft:ScheduledFutureTask<Void> sft = new ScheduledFutureTask<Void>(command, null, triggerTime(initialDelay, unit), unit.toNanos(period)); // 1 RunnableScheduledFuture<Void> t = decorateTask(command, sft);
所以,我們得想辦法重載這個方法:
@Override protected <V> RunnableScheduledFuture<V> decorateTask(Runnable runnable, RunnableScheduledFuture<V> task) { CustomScheduledFuture<V> future = new CustomScheduledFuture<>(); future.setRunnable(runnable); future.setScheduledFuture(task); return future; } 這裡,利用CustomScheduledFuture,封裝了task和runnable兩個對象。
同時,我們自定義的這個CustomScheduledFuture,也是實現了這個方法的返回值,指定的介面:
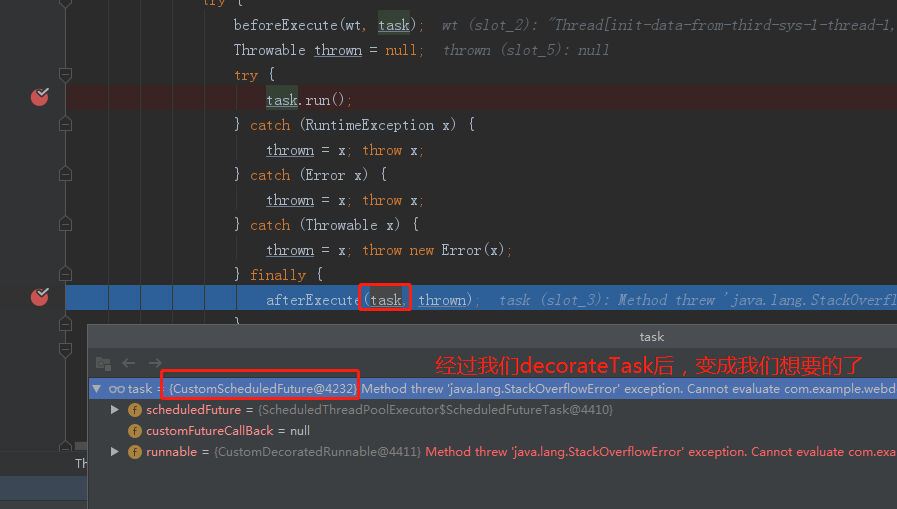
@Data public class CustomScheduledFuture<V> implements RunnableScheduledFuture<V> 目前為止,經過包裝後,在afterExecute處,拿到的Runnable如下:
afterExecute的邏輯,調用回調
@Override protected void afterExecute(Runnable r, Throwable t) { super.afterExecute(r, t); CustomScheduledFuture future; CustomDecoratedRunnable runnable = null; if (r instanceof CustomScheduledFuture) { future = (CustomScheduledFuture) r; // 1 runnable = (CustomDecoratedRunnable) future.getRunnable(); } // 2 CustomScheduledFuture customScheduledFuture = runnable.getCustomScheduledFuture(); // 3 CustomFutureCallBack customFutureCallBack = customScheduledFuture.getCustomFutureCallBack(); if (customFutureCallBack != null) { if (t != null) { customFutureCallBack.onException(t); } else { // 4 customFutureCallBack.onSuccess(customScheduledFuture); } } } - 1處,獲取runnable
- 2處,根據runnable,獲取我們的future
- 3處,通過future,獲取回調
- 4處,調用回調
效果展示
2020-04-10 09:45:28.068 INFO 14456 --- [ main] No active profile set, falling back to default profiles: default 2020-04-10 09:45:28.822 INFO 14456 --- [ main] Started WebDemoApplication in 1.153 seconds (JVM running for 1.805) 2020-04-10 09:45:36.933 ERROR 14456 --- [init-data-from-third-sys-1-thread-1] error 2020-04-10 09:48:48.975 INFO 14456 --- [init-data-from-third-sys-1-thread-1] onSuccess 可以看到,任務執行失敗了,但為啥會調用onSuccess呢;另外,大家可以看到,都是在執行緒池的執行緒中執行的。
為啥會error了,還執行success呢,我發現,即使我在task中拋出了異常,但是上層沒捕獲。
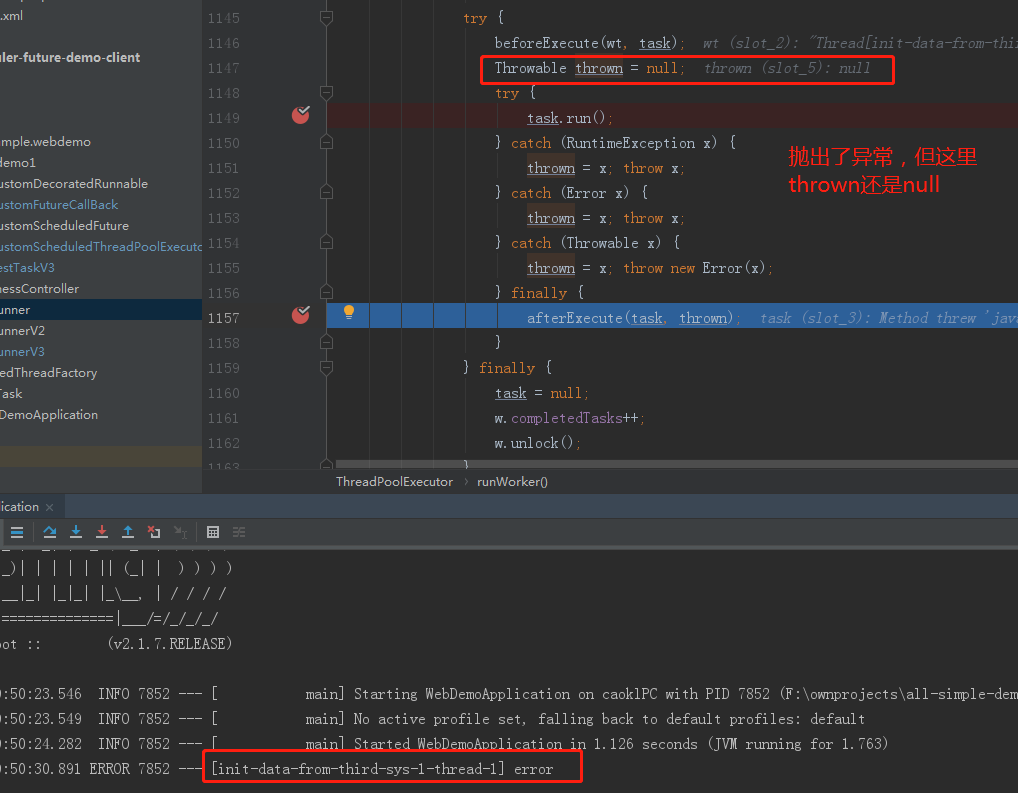
我猜測,是因為:
public interface Runnable { /** * When an object implementing interface <code>Runnable</code> is used * to create a thread, starting the thread causes the object's * <code>run</code> method to be called in that separately executing * thread. * <p> * The general contract of the method <code>run</code> is that it may * take any action whatsoever. * * @see java.lang.Thread#run() */ public abstract void run(); } 這裡沒有拋出異常,所以,即使實現的runnable中拋了,上層也不管。
具體還要驗證。
注意點
另一個點是,執行失敗了,等了10s,並沒有再次執行,猜測是我的訂製task,導致了周期執行的問題。這個待驗證和解決。
但,一個簡單的回調,我們已經實現了。
總結
大家使用方案1 就可以了;後面的方案,是折騰著玩的。希望對大家有幫助。
全部程式碼都在: