大型Java進階專題(五) 設計模式之單例模式
- 2020 年 4 月 1 日
- 筆記
前言
今天開始我們專題的第四課了,最近公司項目忙,沒時間寫,今天抽空繼續。上篇文章對工廠模式進行了詳細的講解,想必大家對設計模式合理運用的好處深有感觸。本章節將介紹:單例模式與原型模式。本章節參考資料書籍《Spring 5核心原理》中的第一篇 Spring 內功心法(Spring中常用的設計模式)(沒有電子檔,都是我取其精華並結合自己的理解,一個字一個字手敲出來的)。
單例模式
單例模式的應用場景
單例模式(Singleton Pattern)是指確保一個類在任何情況下都絕對只有一個實例,並提供一個全局訪問點。單例模式是創建型模式。單例模式在現實生活中應用也非常廣泛。例如,國家主席、公司CEO、部門經理等。在 J2EE 標準中,ServletContext、ServletContextConfig等;在Spring框架應用中ApplicationContext;資料庫的連接池也都是單例形式。
餓漢式單例
先看下單例模式的類結構圖:
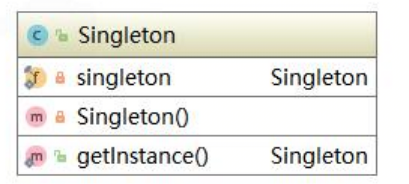
餓漢式單例是在類載入的時候就立即初始化,並且創建單例對象。絕對執行緒安全,在執行緒還沒出現以前就是實例化了,不可能存在訪問安全問題。
優點:沒有加任何的鎖、執行效率比較高,在用戶體驗上來說,比懶漢式更好。
缺點:類載入的時候就初始化,不管用與不用都占著空間,浪費了記憶體,有可能占著茅坑不拉屎。
Spring中IOC容器ApplicationContext本身就是典型的餓漢式單例。接下來看一段程式碼:
public class HungrySingleton { //類載入順序:先靜態、後動態 //先屬性、後方法 //先上後下 private static final HungrySingleton HUNGRY_SINGLETON = new HungrySingleton(); private HungrySingleton() { } public static HungrySingleton getInstance() { return HUNGRY_SINGLETON; } } 調用過程:當你第一次調用HungrySingleton.getInstance()時,類載入器會載入改對象,會先初始化心態屬性,也就是執行了新建一個HungrySingleton對象,再載入靜態方法getInstance(),返回的就是剛剛新建的對象。只有再調用都會直接返回了。
此外還有另外一種寫法,使用靜態程式碼塊:
public class HungrySingleton { //類載入順序:靜態程式碼塊=》靜態屬性=》靜態方法 private static final HungrySingleton HUNGRY_SINGLETON; static { HUNGRY_SINGLETON = new HungrySingleton(); } private HungrySingleton() { } public static HungrySingleton getInstance() { return HUNGRY_SINGLETON; } } 這兩種寫法都非常的簡單,也非常好理解,餓漢式適用在單例對象較少的情況。下面我們來看性能更優的寫法。
懶漢式單例
懶漢式單例的特點是:被外部類調用的時候內部類才會載入,下面看懶漢式單例的簡單實現LazySimpleSingleton:
//當外部使用時才會實例化 public class LazySimpleSingleton { //靜態塊,公共記憶體區域 private static LazySimpleSingleton LAZY_SINGLETON; public static LazySimpleSingleton getInstance() { if (LAZY_SINGLETON == null) { LAZY_SINGLETON = new LazySimpleSingleton(); } return LAZY_SINGLETON; } private LazySimpleSingleton() { } } 創建執行緒類:
public class ExectorThread implements Runnable{ @Override public void run() { LazySimpleSingleton singleton = LazySimpleSingleton.getInstance(); System.out.println(Thread.currentThread().getName() + ":" + singleton); } } 客戶端測試程式碼:
public class LazySimpleSingletonTest { public static void main(String[] args) { Thread t1 = new Thread(new ExectorThread()); Thread t2 = new Thread(new ExectorThread()); t1.start(); t2.start(); System.out.println("End"); } } 調用結果:
End Thread-1:com.study.demo.LazySimpleSingleton@20cf7200 Thread-0:com.study.demo.LazySimpleSingleton@39b6c48f 一定幾率出現創建兩個不同結果的情況,意味著上面的單例存在執行緒安全隱患。這是因為兩個執行緒同時執行的了,調用方法發現實例都還沒來得及創建,兩個執行緒就分別都創建了一個實例。有時,我們得到的運行結果可能是相同的兩個對象,實際上是被後面執行的執行緒覆蓋了,我們看到了一個假象,執行緒安全隱患依舊存在。那麼,我們如何來優化程式碼,使得懶漢式單例在執行緒環境下安全呢?來看下面的程式碼,給getInstance()加上synchronized關鍵字,是這個方法變成執行緒同步方法:
//當外部使用時才會實例化 public class LazySimpleSingleton { //靜態塊,公共記憶體區域 private static LazySimpleSingleton LAZY_SINGLETON; public synchronized static LazySimpleSingleton getInstance() { if (LAZY_SINGLETON == null) { LAZY_SINGLETON = new LazySimpleSingleton(); } return LAZY_SINGLETON; } private LazySimpleSingleton() { } } 這時候,我們再來調試。當我們將其中一個執行緒執行並調用getInstance()方法時,另一個執行緒在調用getInstance()方法,執行緒的狀態由RUNNING變成了MONITOR,出現阻塞。直到第一個執行緒執行完,第二個執行緒才恢復RUNNING狀態繼續調用getInstance()方法。
完美的展現了synchronized監視鎖的運行狀態,執行緒安全的問題便解決了。但是,用synchronized加鎖,在執行緒數量比較多情況下,如果CPU分配壓力上升,會導致大批量執行緒出現阻塞,從而導致程式運行性能大幅下降。那麼,有沒有一種更好的方式,既兼顧執行緒安全又提升程式性能呢?答案是肯定的。我們來看雙重檢查鎖的單例模式:
//當外部使用時才會實例化 public class LazySimpleSingleton { //靜態塊,公共記憶體區域 private static LazySimpleSingleton LAZY_SINGLETON; //1.分配記憶體給這個對象 //2.初始化對象 //3.設置 lazy 指向剛分配的記憶體地址 public static LazySimpleSingleton getInstance() { if (LAZY_SINGLETON == null) { synchronized (LazySimpleSingleton.class) { if (LAZY_SINGLETON == null) { LAZY_SINGLETON = new LazySimpleSingleton(); } } } return LAZY_SINGLETON; } private LazySimpleSingleton() { } } 當第一個執行緒調用getInstance()方法時,第二個執行緒也可以調用getInstance()。當第一個執行緒執行到synchronized時會上鎖,第二個執行緒就會變成MONITOR狀態,出現阻塞。此時,阻塞並不是基於整個LazySimpleSingleton類的阻塞,而是在getInstance()方法內部阻塞,只要邏輯不是太複雜,對於調用者而言感知不到。但是,用到synchronized關鍵字,總歸是要上鎖,對程式性能還是存在一定影響的。難道就真的沒有更好的方案嗎?當然是有的。我們可以從類初始化角度來考慮,看下面的程式碼,採用靜態內部類的方式:
//這種形式兼顧餓漢式的記憶體浪費,也兼顧 synchronized 性能問題 //完美地屏蔽了這兩個缺點 public class LazyInnerSingleton { private LazyInnerSingleton() { } //每一個關鍵字都不是多餘的 //static 是為了使單例的空間共享 //fin保證這個方法不會被重寫,重載 public static final LazyInnerSingleton getInstance() { //在返回結果以前,一定會先載入內部類 return LazyHolder.INNER_SINGLETON; } //如果沒使用的話,內部類是不載入的 private static class LazyHolder{ private static final LazyInnerSingleton INNER_SINGLETON = new LazyInnerSingleton(); } } 這種形式兼顧餓漢式的記憶體浪費,也兼顧synchronized性能問題。內部類一定是要在方法調用之前初始化,巧妙地避免了執行緒安全問題。
反射破壞單例
大家有沒有發現,上面介紹的單例模式的構造方法除了加上private以外,沒有做任何處理。如果我們使用反射來調用其構造方法,然後,再調用getInstance()方法,應該就會兩個不同的實例。現在來看一段測試程式碼,LazyInnerClassSingleton為例:
public class LazyInnerClassSingletonTest { public static void main(String[] args) { try{ //很無聊的情況下,進行破壞 Class<?> clazz = LazyInnerClassSingleton.class; //通過反射拿到私有的構造方法 Constructor c = clazz.getDeclaredConstructor(null); //強制訪問,強吻,不願意也要吻 c.setAccessible(true); //暴力初始化 Object o1 = c.newInstance(); //調用了兩次構造方法,相當於 new 了兩次 //犯了原則性問題, Object o2 = c.newInstance(); System.out.println(o1 == o2); // Object o2 = c.newInstance(); }catch (Exception e){ e.printStackTrace(); } } } //運行結果 false 顯然,是創建了兩個不同的實例。現在,我們在其構造方法中做一些限制,一旦出現多次重複創建,則直接拋出異常。來看優化後的程式碼:
//史上最牛 B 的單例模式的實現方式 public class LazyInnerClassSingleton { //默認使用 LazyInnerClassGeneral 的時候,會先初始化內部類 //如果沒使用的話,內部類是不載入的 private LazyInnerClassSingleton(){ if(LazyHolder.LAZY != null){ throw new RuntimeException("不允許創建多個實例"); } } //每一個關鍵字都不是多餘的 //static 是為了使單例的空間共享 //保證這個方法不會被重寫,重載 public static final LazyInnerClassSingleton getInstance(){ //在返回結果以前,一定會先載入內部類 return LazyHolder.LAZY; } //默認不載入 private static class LazyHolder{ private static final LazyInnerClassSingleton LAZY = new LazyInnerClassSingleton(); } } 再運行測試程式碼,會得到以下結果:調用構造方法就會拋出異常。至此,史上最牛B的單例寫法便大功告成。
序列化破壞單例
當我們將一個單例對象創建好,有時候需要將對象序列化然後寫入到磁碟,下次使用時再從磁碟中讀取到對象,反序列化轉化為記憶體對象。反序列化後的對象會重新分配記憶體,即重新創建。那如果序列化的目標的對象為單例對象,就違背了單例模式的初衷,相當於破壞了單例,來看一段程式碼:
//反序列化時導致單例破壞 public class SeriableSingleton implements Serializable { //序列化就是說把記憶體中的狀態通過轉換成位元組碼的形式 //從而轉換一個 IO 流,寫入到其他地方(可以是磁碟、網路 IO) //記憶體中狀態給永久保存下來了 //反序列化 //講已經持久化的位元組碼內容,轉換為 IO 流 //通過 IO 流的讀取,進而將讀取的內容轉換為 Java 對象 //在轉換過程中會重新創建對象 new public final static SeriableSingleton INSTANCE = new SeriableSingleton(); private SeriableSingleton(){} public static SeriableSingleton getInstance(){ return INSTANCE; } } 編寫測試程式碼:
package com.gupaoedu.vip.pattern.singleton.test; import com.gupaoedu.vip.pattern.singleton.seriable.SeriableSingleton; import java.io.FileInputStream; import java.io.FileOutputStream; import java.io.ObjectInputStream; import java.io.ObjectOutputStream; public class SeriableSingletonTest { public static void main(String[] args) { SeriableSingleton s1 = null; SeriableSingleton s2 = SeriableSingleton.getInstance(); FileOutputStream fos = null; try { fos = new FileOutputStream("SeriableSingleton.obj"); ObjectOutputStream oos = new ObjectOutputStream(fos); oos.writeObject(s2); oos.flush(); oos.close(); FileInputStream fis = new FileInputStream("SeriableSingleton.obj"); ObjectInputStream ois = new ObjectInputStream(fis); s1 = (SeriableSingleton)ois.readObject(); ois.close(); System.out.println(s1); System.out.println(s2); System.out.println(s1 == s2); } catch (Exception e) { e.printStackTrace(); } } } //運行結果 false 運行結果中,可以看出,反序列化後的對象和手動創建的對象是不一致的,實例化了兩次,違背了單例的設計初衷。那麼,我們如何保證序列化的情況下也能夠實現單例?其實很簡單,只需要增加readResolve()方法即可。來看優化程式碼:
package com.gupaoedu.vip.pattern.singleton.seriable; import java.io.Serializable; public class SeriableSingleton implements Serializable { public final static SeriableSingleton INSTANCE = new SeriableSingleton(); private SeriableSingleton(){} public static SeriableSingleton getInstance(){ return INSTANCE; } private Object readResolve(){ return INSTANCE; } } //再次運行結果 為ture 大家一定會關心這是什麼原因呢?為什麼要這樣寫?看上去很神奇的樣子,也讓人有些費解。不如,我們一起來看看 JDK 的源碼實現以一清二楚了。我們進入ObjectInputStream類的readObject()方法,程式碼如下:
public final Object readObject() throws IOException, ClassNotFoundException{ if (enableOverride) { return readObjectOverride(); } // if nested read, passHandle contains handle of enclosing object int outerHandle = passHandle; try { Object obj = readObject0(false); handles.markDependency(outerHandle, passHandle); ClassNotFoundException ex = handles.lookupException(passHandle); if (ex != null) { throw ex; } if (depth == 0) { vlist.doCallbacks(); } return obj; } finally { passHandle = outerHandle; if (closed && depth == 0) { clear(); } } } 我們發現在readObject中又調用了我們重寫的readObject0()方法。 進入readObject0()方法,程式碼如下:
private Object readObject0(boolean unshared) throws IOException { ... case TC_OBJECT: return checkResolve(readOrdinaryObject(unshared)); ... } 我們看到TC_OBJECTD中判斷,調用了ObjectInputStream的readOrdinaryObject()方法,我們繼續進入看源碼:
private Object readOrdinaryObject(boolean unshared)throws IOException{ if (bin.readByte() != TC_OBJECT) { throw new InternalError(); } ObjectStreamClass desc = readClassDesc(false); desc.checkDeserialize(); Class<?> cl = desc.forClass(); if (cl == String.class || cl == Class.class || cl == ObjectStreamClass.class) { throw new InvalidClassException("invalid class descriptor"); } Object obj; try { obj = desc.isInstantiable() ? desc.newInstance() : null; } catch (Exception ex) { throw (IOException) new InvalidClassException( desc.forClass().getName(), "unable to create instance").initCause(ex); } ... return obj; } 發現調用了ObjectStreamClass的isInstantiable()方法, 而isInstantiable()裡面的程式碼如下:
boolean isInstantiable() { requireInitialized(); return (cons != null); } 程式碼非常簡單,就是判斷一下構造方法是否為空,構造方法不為空就返回true。意味著,只要有無參構造方法就會實例化。這時候,其實還沒有找到為什麼加上readResolve()方法就避免了單例被破壞的真正原因。我再回ObjectInputStream的readOrdinaryObject()方法繼續往下看:
private Object readOrdinaryObject(boolean unshared)throws IOException{ if (bin.readByte() != TC_OBJECT) { throw new InternalError(); } ObjectStreamClass desc = readClassDesc(false); desc.checkDeserialize(); Class<?> cl = desc.forClass(); if (cl == String.class || cl == Class.class || cl == ObjectStreamClass.class) { throw new InvalidClassException("invalid class descriptor"); } Object obj; try { obj = desc.isInstantiable() ? desc.newInstance() : null; } catch (Exception ex) { throw (IOException) new InvalidClassException( desc.forClass().getName(), "unable to create instance").initCause(ex); } ... if (obj != null && handles.lookupException(passHandle) == null && desc.hasReadResolveMethod()){ Object rep = desc.invokeReadResolve(obj); if (unshared && rep.getClass().isArray()) { rep = cloneArray(rep); } if (rep != obj) { // Filter the replacement object if (rep != null) { if (rep.getClass().isArray()) { filterCheck(rep.getClass(), Array.getLength(rep)); } else { filterCheck(rep.getClass(), -1); } } handles.setObject(passHandle, obj = rep); } } return obj; } 判斷無參構造方法是否存在之後,又調用了hasReadResolveMethod()方法,來看程式碼:
boolean hasReadResolveMethod() { requireInitialized(); return (readResolveMethod != null); } 邏輯非常簡單,就是判斷 readResolveMethod 是否為空,不為空就返回 true。那麼readResolveMethod 是在哪裡賦值的呢?通過全局查找找到了賦值程式碼在私有方法ObjectStreamClass()方法中給readResolveMethod進行賦值,來看程式碼:
readResolveMethod = getInheritableMethod( cl, "readResolve", null, Object.class); 上面的邏輯其實就是通過反射找到一個無參的readResolve()方法,並且保存下來。現在再 回 到 ObjectInputStream 的 readOrdinaryObject() 方 法 繼 續 往 下 看 , 如 果readResolve()存在則調用invokeReadResolve()方法,來看程式碼:
Object invokeReadResolve(Object obj) throws IOException, UnsupportedOperationException { requireInitialized(); if (readResolveMethod != null) { try { return readResolveMethod.invoke(obj, (Object[]) null); } catch (InvocationTargetException ex) { Throwable th = ex.getTargetException(); if (th instanceof ObjectStreamException) { throw (ObjectStreamException) th; } else { throwMiscException(th); throw new InternalError(th); // never reached } } catch (IllegalAccessException ex) { // should not occur, as access checks have been suppressed throw new InternalError(ex); } } else { throw new UnsupportedOperationException(); } } 我們可以看到在invokeReadResolve()方法中用反射調用了readResolveMethod方法。通過JDK源碼分析我們可以看出,雖然,增加readResolve()方法返回實例,解決了單例被破壞的問題。但是,我們通過分析源碼以及調試,我們可以看到實際上實例化了兩次,只不過新創建的對象沒有被返回而已。那如果,創建對象的動作發生頻率增大,就意味著記憶體分配開銷也就隨之增大,難道真的就沒辦法從根本上解決問題嗎?下面我們來註冊式單例也許能幫助到你。
註冊式單例
註冊式單例又稱為登記式單例,就是將每一個實例都登記到某一個地方,使用唯一的標識獲取實例。註冊式單例有兩種寫法:一種為容器快取,一種為枚舉登記。先來看枚舉式單例的寫法,來看程式碼,創建EnumSingleton類:
public enum EnumSingleton { INSTANCE; private Object data; public Object getData() { return data; } public void setData(Object data) { this.data = data; } public static EnumSingleton getInstance(){ return INSTANCE; } } 來看測試程式碼:
public class EnumSingletonTest { public static void main(String[] args) { try { EnumSingleton instance1 = null; EnumSingleton instance2 = EnumSingleton.getInstance(); instance2.setData(new Object()); FileOutputStream fos = new FileOutputStream("EnumSingleton.obj"); ObjectOutputStream oos = new ObjectOutputStream(fos); oos.writeObject(instance2); oos.flush(); oos.close(); FileInputStream fis = new FileInputStream("EnumSingleton.obj"); ObjectInputStream ois = new ObjectInputStream(fis); instance1 = (EnumSingleton) ois.readObject(); ois.close(); System.out.println(instance1.getData()); System.out.println(instance2.getData()); System.out.println(instance1.getData() == instance2.getData()); }catch (Exception e){ e.printStackTrace(); } } } //運行結果為ture 具體為什麼這麼神奇 可以自己追源碼探索下 這裡不再贅述了 
