曹工說Spring Boot源碼(27)– Spring的component-scan,光是include-filter屬性的各種配置方式,就夠玩半天了
- 2020 年 4 月 1 日
- 筆記
寫在前面的話
相關背景及資源:
曹工說Spring Boot源碼(1)– Bean Definition到底是什麼,附spring思維導圖分享
曹工說Spring Boot源碼(2)– Bean Definition到底是什麼,咱們對著介面,逐個方法講解
曹工說Spring Boot源碼(3)– 手動註冊Bean Definition不比遊戲好玩嗎,我們來試一下
曹工說Spring Boot源碼(4)– 我是怎麼自定義ApplicationContext,從json文件讀取bean definition的?
曹工說Spring Boot源碼(5)– 怎麼從properties文件讀取bean
曹工說Spring Boot源碼(6)– Spring怎麼從xml文件里解析bean的
曹工說Spring Boot源碼(7)– Spring解析xml文件,到底從中得到了什麼(上)
曹工說Spring Boot源碼(8)– Spring解析xml文件,到底從中得到了什麼(util命名空間)
曹工說Spring Boot源碼(9)– Spring解析xml文件,到底從中得到了什麼(context命名空間上)
曹工說Spring Boot源碼(10)– Spring解析xml文件,到底從中得到了什麼(context:annotation-config 解析)
曹工說Spring Boot源碼(11)– context:component-scan,你真的會用嗎(這次來說說它的奇技淫巧)
曹工說Spring Boot源碼(12)– Spring解析xml文件,到底從中得到了什麼(context:component-scan完整解析)
曹工說Spring Boot源碼(13)– AspectJ的運行時織入(Load-Time-Weaving),基本內容是講清楚了(附源碼)
曹工說Spring Boot源碼(14)– AspectJ的Load-Time-Weaving的兩種實現方式細細講解,以及怎麼和Spring Instrumentation集成
曹工說Spring Boot源碼(15)– Spring從xml文件里到底得到了什麼(context:load-time-weaver 完整解析)
曹工說Spring Boot源碼(16)– Spring從xml文件里到底得到了什麼(aop:config完整解析【上】)
曹工說Spring Boot源碼(17)– Spring從xml文件里到底得到了什麼(aop:config完整解析【中】)
曹工說Spring Boot源碼(18)– Spring AOP源碼分析三部曲,終於快講完了 (aop:config完整解析【下】)
曹工說Spring Boot源碼(19)– Spring 帶給我們的工具利器,創建代理不用愁(ProxyFactory)
曹工說Spring Boot源碼(20)– 碼網恢恢,疏而不漏,如何記錄Spring RedisTemplate每次操作日誌
曹工說Spring Boot源碼(21)– 為了讓大家理解Spring Aop利器ProxyFactory,我已經拼了
曹工說Spring Boot源碼(22)– 你說我Spring Aop依賴AspectJ,我依賴它什麼了
曹工說Spring Boot源碼(23)– ASM又立功了,Spring原來是這麼遞歸獲取註解的元註解的
曹工說Spring Boot源碼(24)– Spring註解掃描的瑞士軍刀,asm技術實戰(上)
曹工說Spring Boot源碼(25)– Spring註解掃描的瑞士軍刀,ASM + Java Instrumentation,順便提提Jar包破解
曹工說Spring Boot源碼(26)– 學習位元組碼也太難了,實在不能忍受了,寫了個小小的位元組碼執行引擎
工程結構圖:

概要
前面三講,主要涉及了ASM的一些內容,為什麼要講ASM,主要是因為spring在進入到註解時代後,掃描註解也變成了一項必備技能,現在一個大系統,業務類就動不動大幾百個,掃描註解也是比較耗時的,所以催生了利用ASM來快速掃描類上註解的需求。
但是,掃描了那麼多類,比如,component-scan掃描了100個類,怎麼知道哪些要納入spring管理,變成bean呢?
這個問題很簡單,對吧?component註解、controller、service、repository、configuration註解了的類,就會掃描為bean。
那,假如現在面試官問你,不使用這幾個註解,讓你自定義一個註解,比如@MyComponent,你要怎麼才能把@MyComponent註解的類,掃描成bean呢?
核心原理
因為xml版本的component-scan,和註解版本的@Component-scan,內部復用了同樣的程式碼,所以我這裡還是以xml版本來講。
xml版本的,一般如下配置:
<context:component-scan base-package="xxx.xxx"> </context:component-scan> 該元素的處理器為:
org.springframework.context.annotation.ComponentScanBeanDefinitionParser.
該類實現了org.springframework.beans.factory.xml.BeanDefinitionParser介面,該介面只有一個方法:
BeanDefinition parse(Element element, ParserContext parserContext); 方法核心,就是傳入要解析的xml元素,和上下文資訊,然後你憑藉這些資訊,去解析bean definition出來。
假設交給我們來寫,大概如下思路:
- 獲取component-scan的base-package屬性
- 獲取第一步的結果下的全部class,獲取class上的註解資訊,保存起來
- 依次判斷class上,是否註解了controller、service、configuration等註解,如果是,則算是合格的bean definition。
spring的實現也差不多,但是複雜的多,核心倒是差不多。比如,spring中:
獲取component-scan的base-package屬性,可能是個list,所以要遍歷;其中,循環內部,調用了ClassPathScanningCandidateComponentProvider#findCandidateComponents。
for (String basePackage : basePackages) { /** * 掃描候選的component,注意,這裡的名稱叫CandidateComponent,所以這裡真的就只掃描了 * @component或者基於它的那幾個。(service、controller那些) * 這裡是沒包含下面這些: * 1、propertysource註解的 */ Set<BeanDefinition> candidates = findCandidateComponents(basePackage); 如下所示,在獲取某個包下面的滿足條件的bean時,程式碼如下:
public Set<BeanDefinition> findCandidateComponents(String basePackage) { Set<BeanDefinition> candidates = new LinkedHashSet<BeanDefinition>(); try { // 1 String packageSearchPath = ResourcePatternResolver.CLASSPATH_ALL_URL_PREFIX + resolveBasePackage(basePackage) + "/" + this.resourcePattern; Resource[] resources = this.resourcePatternResolver.getResources(packageSearchPath); // 2 for (Resource resource : resources) { if (resource.isReadable()) { try { // 3 MetadataReader metadataReader = this.metadataReaderFactory.getMetadataReader(resource); // 4 if (isCandidateComponent(metadataReader)) { ... 我們逐個講解每個程式碼點:
- 1處,獲取包下面的全部resource,類型為Resource
- 2處,遍歷Resource數組
- 3處,獲取資源的metadataReader,這個metadataReader,可以用來獲取資源(一般為class文件)上的註解
- 4處,調用方法isCandidateComponent,判斷是否為候選的bean
接下來,我們看看 isCandidateComponent 怎麼實現的:
protected boolean isCandidateComponent(MetadataReader metadataReader) throws IOException { // 1 for (TypeFilter tf : this.excludeFilters) { if (tf.match(metadataReader, this.metadataReaderFactory)) { return false; } } for (TypeFilter tf : this.includeFilters) { // 2 if (tf.match(metadataReader, this.metadataReaderFactory)) { AnnotationMetadata metadata = metadataReader.getAnnotationMetadata(); if (!metadata.isAnnotated(Profile.class.getName())) { return true; } AnnotationAttributes profile = MetadataUtils.attributesFor(metadata, Profile.class); return this.environment.acceptsProfiles(profile.getStringArray("value")); } } return false; } -
1處,遍歷excludeFilters,如果參數中的class,匹配excludeFilter,則返回false,表示不合格;
-
2處,遍歷includeFilters,如果參數中的class,匹配includeFilter,則基本可以斷定合格了,但是因為@profile註解的存在,又加了一層判斷,如果class上不存在profile,則返回true,合格;
否則,判斷profile是否和當前激活了的profile匹配,如果匹配,則返回true,否則flase。
敲黑板,這裡的excludeFilters和includeFilters,其實就是@component-scan中的如下屬性:
public @interface ComponentScan { ... /** * Indicates whether automatic detection of classes annotated with {@code @Component} * {@code @Repository}, {@code @Service}, or {@code @Controller} should be enabled. */ boolean useDefaultFilters() default true; /** * Specifies which types are eligible for component scanning. * <p>Further narrows the set of candidate components from everything in * {@link #basePackages()} to everything in the base packages that matches * the given filter or filters. * @see #resourcePattern() */ Filter[] includeFilters() default {}; /** * Specifies which types are not eligible for component scanning. * @see #resourcePattern() */ Filter[] excludeFilters() default {}; ... } spring 為什麼認識@Component註解的類
大家看了前面的程式碼,大概知道了,判斷一個類,是否足夠榮幸,被掃描為一個bean,是依賴於兩個屬性,一個includeFilters,一個excludeFilters。
但是,我們好像並不能知道:為什麼@Component註解的類、@controller、@service註解的類,就能成為一個bean呢?
我們先直接做個黑盒實驗,按照如下配置:
<context:component-scan use-default-filters="true" base-package="org.springframework.test"> </context:component-scan> 被掃描的類路徑下,一個測試類,註解了Controller:
@Controller public class TestController { } 然後我們運行測試程式碼:
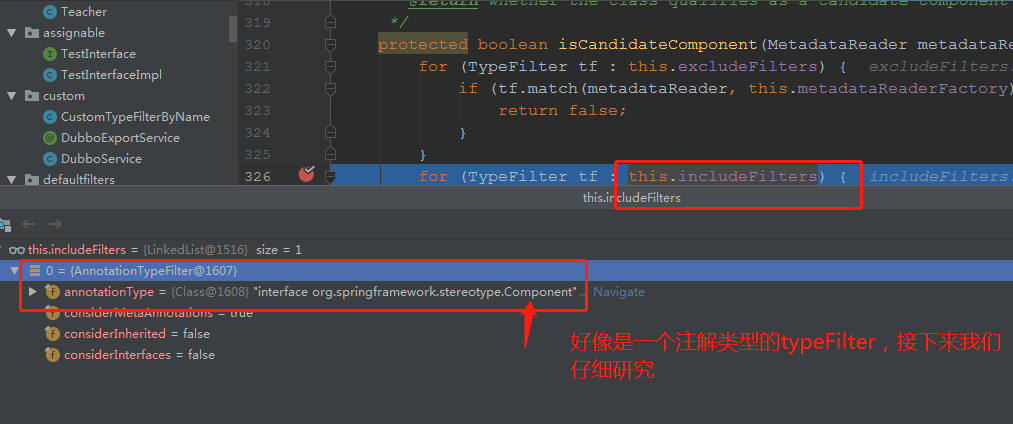
public static void testDefaultFilter() { ClassPathXmlApplicationContext context = new ClassPathXmlApplicationContext("classpath:component-scan-default-filter.xml"); TestController bean = context.getBean(TestController.class); System.out.println(bean); } 在如下地方,debug斷點可以看到:

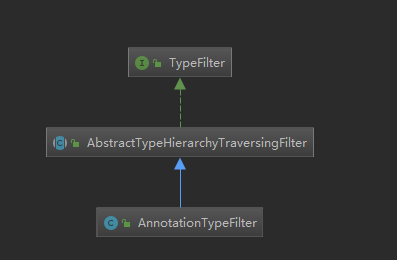
如上的includeFilters,大家看到了,包含了一個TypeFilter,類型為org.springframework.core.type.filter.AnnotationTypeFilter,其類繼承結構為:

這個TypeFilter,就一個方法:
public interface TypeFilter { /** * Determine whether this filter matches for the class described by * the given metadata. * @param metadataReader the metadata reader for the target class * @param metadataReaderFactory a factory for obtaining metadata readers * for other classes (such as superclasses and interfaces) * @return whether this filter matches * @throws IOException in case of I/O failure when reading metadata */ boolean match(MetadataReader metadataReader, MetadataReaderFactory metadataReaderFactory) throws IOException; } 方法很好理解,參數是:當前的被掃描到的那個類的元數據reader,通過這個reader,可以取到class文件中的各種資訊,底層就是通過ASM方式來實現;第二個參數,可以先跳過。
返回值呢,就是:這個filter是否匹配,我們前面的includeFilters和excludeFilters數組,其元素類型都是這個,所以,這個typeFilter是只管匹配與否,不分是非,不管對錯。
我們這裡這個org.springframework.core.type.filter.AnnotationTypeFilter,就是根據註解來匹配,比如,我們前面這裡的filter,就要求是@Componnet註解標註了的類才可以。
但是,我們的TestController,沒有標註Component註解,只標註了Controller註解。對,是這樣,但是因為Controller是被@Component標註了的,所以,你標註Controller,就相當於同時標註了下面這一坨:
@Target({ElementType.TYPE}) @Retention(RetentionPolicy.RUNTIME) @Documented @Component public @interface Controller { 同時,由於我們的AnnotationTypeFilter,在匹配演算法上,做的比較漂亮,不止檢測直接標註在類上的註解,如Controller,還會去檢測:Controller上的註解(俗稱:元註解,即,註解的註解)。這塊實現邏輯在:
org.springframework.core.type.filter.AnnotationTypeFilter#matchSelf @Override protected boolean matchSelf(MetadataReader metadataReader) { AnnotationMetadata metadata = metadataReader.getAnnotationMetadata(); return metadata.hasAnnotation(this.annotationType.getName()) || (this.considerMetaAnnotations && metadata.hasMetaAnnotation(this.annotationType.getName())); } 這裡的considerMetaAnnotations,默認為true,此時,就會去檢測@Controller上的元註解,發現標註了@Component,所以,這裡的檢測就為true。
所以,標註了Controller的類,就被掃描為Bean了。
includeFilters,什麼時候添加了這麼一個AnnotationTypeFilter
在xml場景下,是在如下位置:
org.springframework.context.annotation.ComponentScanBeanDefinitionParser#parse public BeanDefinition parse(Element element, ParserContext parserContext) { String[] basePackages = StringUtils.tokenizeToStringArray(element.getAttribute(BASE_PACKAGE_ATTRIBUTE), ConfigurableApplicationContext.CONFIG_LOCATION_DELIMITERS); // Actually scan for bean definitions and register them. // 1 ClassPathBeanDefinitionScanner scanner = configureScanner(parserContext, element); Set<BeanDefinitionHolder> beanDefinitions = scanner.doScan(basePackages); registerComponents(parserContext.getReaderContext(), beanDefinitions, element); return null; } 上述程式碼,就是負責解析component-scan這個標籤時,被調用的;程式碼1處,configureScanner程式碼如下:
protected ClassPathBeanDefinitionScanner configureScanner(ParserContext parserContext, Element element) { XmlReaderContext readerContext = parserContext.getReaderContext(); boolean useDefaultFilters = true; if (element.hasAttribute(USE_DEFAULT_FILTERS_ATTRIBUTE)) { useDefaultFilters = Boolean.valueOf(element.getAttribute(USE_DEFAULT_FILTERS_ATTRIBUTE)); } // 1. ClassPathBeanDefinitionScanner scanner = createScanner(readerContext, useDefaultFilters); ... } 如上,程式碼1處,createScanner時,傳入useDefaultFilters,這是個boolean值,默認為true,來自於component-scan的如下屬性,即use-default-filters:
<context:component-scan use-default-filters="false" base-package="org.springframework.test"> <context:include-filter type="aspectj" expression="org.springframework.test.assignable.*"/> </context:component-scan> 跟蹤進去後,最終會調用如下位置的程式碼:
protected void registerDefaultFilters() { /** * 默認掃描Component註解 */ this.includeFilters.add(new AnnotationTypeFilter(Component.class)); ... } ok,一切就水落石出了。
自定義typeFilter–掃描指定註解
說了那麼多,我們完全可以禁用掉默認的typeFilter,配置自己想要的typeFilter,比如,我想要定義如下注解:
@Documented @Target(ElementType.TYPE) @Retention(RetentionPolicy.RUNTIME) public @interface MyComponent { } 標註了這個註解的,我們就要把它掃描為bean,那麼可以如下配置:
<context:component-scan use-default-filters="false" base-package="org.springframework.test"> <context:include-filter type="annotation" expression="org.springframework.test.annotation.MyComponent"/> </context:component-scan> 注意,禁用掉默認的filter,避免干擾,可以看到,如下我們的測試類,是只註解了@MyComponent的:
@MyComponent public class Teacher { } 測試程式碼:
public static void testAnnotationFilter() { ClassPathXmlApplicationContext context = new ClassPathXmlApplicationContext("classpath:component-scan-annotation-filter.xml"); Teacher bean = context.getBean(Teacher.class); System.out.println(bean); } 輸出如下:
22:34:01.574 [main] DEBUG o.s.b.f.s.DefaultListableBeanFactory – Returning cached instance of singleton bean ‘teacher’
org.springframework.test.annotation.Teacher@2bd7cf67
自定義typeFilter–掃描指定註解
事實上,component-scan允許我們定義多種類型的typeFilter,如AspectJ:
<context:component-scan use-default-filters="false" base-package="org.springframework.test"> <context:include-filter type="aspectj" expression="org.springframework.test.assignable.*"/> </context:component-scan> 只要滿足這個路徑的,都會被掃描為bean。
測試路徑下,有如下類:
package org.springframework.test.assignable; public interface TestInterface { } public class TestInterfaceImpl implements TestInterface { } 測試程式碼:
static void testAspectj() { ClassPathXmlApplicationContext context = new ClassPathXmlApplicationContext( "classpath:component-scan-aspectj-filter.xml"); TestInterface bean = context.getBean(TestInterface.class); System.out.println(bean); } 輸出如下:
22:37:22.347 [main] DEBUG o.s.b.f.s.DefaultListableBeanFactory – Returning cached instance of singleton bean ‘testInterfaceImpl’
org.springframework.test.assignable.TestInterfaceImpl@3dea2f07
這個背後使用的typefilter,類型為:
org.springframework.core.type.filter.AspectJTypeFilter。
public class AspectJTypeFilter implements TypeFilter { private final World world; private final TypePattern typePattern; public AspectJTypeFilter(String typePatternExpression, ClassLoader classLoader) { this.world = new BcelWorld(classLoader, IMessageHandler.THROW, null); this.world.setBehaveInJava5Way(true); PatternParser patternParser = new PatternParser(typePatternExpression); TypePattern typePattern = patternParser.parseTypePattern(); typePattern.resolve(this.world); IScope scope = new SimpleScope(this.world, new FormalBinding[0]); this.typePattern = typePattern.resolveBindings(scope, Bindings.NONE, false, false); } // 1 public boolean match(MetadataReader metadataReader, MetadataReaderFactory metadataReaderFactory) throws IOException { String className = metadataReader.getClassMetadata().getClassName(); ResolvedType resolvedType = this.world.resolve(className); return this.typePattern.matchesStatically(resolvedType); } } 程式碼1處,即:使用aspectj的方式,來判斷是否候選的class是否匹配。
自定義typeFilter–指定類型的子類或實現類被掃描為bean
我們也可以這樣配置:
<context:component-scan use-default-filters="false" base-package="org.springframework.test"> <context:include-filter type="assignable" expression="org.springframework.test.assignable.TestInterface"/> </context:component-scan> 這裡的類型是assignable,只要是TestInterface的子類,即可以被掃描為bean。
其實現:
public class AssignableTypeFilter extends AbstractTypeHierarchyTraversingFilter { private final Class targetType; /** * Create a new AssignableTypeFilter for the given type. * @param targetType the type to match */ public AssignableTypeFilter(Class targetType) { super(true, true); this.targetType = targetType; } @Override protected boolean matchClassName(String className) { return this.targetType.getName().equals(className); } @Override protected Boolean matchSuperClass(String superClassName) { return matchTargetType(superClassName); } @Override protected Boolean matchInterface(String interfaceName) { return matchTargetType(interfaceName); } protected Boolean matchTargetType(String typeName) { if (this.targetType.getName().equals(typeName)) { return true; } else if (Object.class.getName().equals(typeName)) { return Boolean.FALSE; } else if (typeName.startsWith("java.")) { try { Class clazz = getClass().getClassLoader().loadClass(typeName); return Boolean.valueOf(this.targetType.isAssignableFrom(clazz)); } catch (ClassNotFoundException ex) { // Class not found - can't determine a match that way. } } return null; } } 總體來說,邏輯不複雜,反正就是:只要是我們指定的類型的子類或者介面實現,就ok。
自定義typeFilter–實現自己的typeFilter
我這裡實現了一個typeFilter,如下:
/** * 自定義的類型匹配器,如果註解了我們的DubboExportService,就匹配;否則不匹配 */ public class CustomTypeFilterByName implements TypeFilter { @Override public boolean match(MetadataReader metadataReader, MetadataReaderFactory metadataReaderFactory) throws IOException { boolean b = metadataReader.getAnnotationMetadata().hasAnnotation(DubboExportService.class.getName()); if (b) { return true; } return false; } } 判斷很簡單,註解了DubboExportService就行。
看看怎麼配置:
<context:component-scan use-default-filters="false" base-package="org.springframework.test"> <context:include-filter type="custom" expression="org.springframework.test.custom.CustomTypeFilterByName"/> </context:component-scan> 總結
好了,說了那麼多,大家都理解沒有呢,如果沒有,建議把程式碼拉下來一起跟著學。
其實dubbo貌似就是通過如上的自定義typeFilter來實現的,回頭我找找相關源碼,佐證一下,補上。
demo的源碼在:
