介面自動化框架pyface詳細介紹
- 2020 年 3 月 29 日
- 筆記
版權說明
本框架系本人結合一些實踐經驗和開源框架設計思想,在家基於興趣愛好獨立完成的程式碼開發。
源碼只保存在私人電腦,辦公電腦上無。github開源與公司無關,先把關係撇清,不涉及侵權。
噓。
框架定位
首先最重要的就是學習交流,無商業用途。其次本框架有一定實用價值,可作為工作輔助工具,解決現有技術無法處理的問題。最後可以優化改造投入生產實用(若有更好的idea請務必告訴我,求知若渴)。
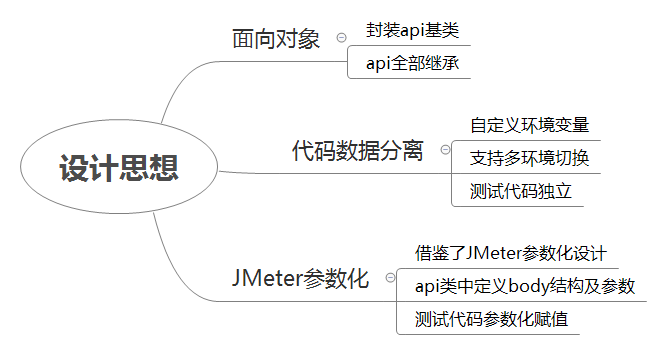
設計思想
技術棧
說明文字為本框架中用途。
python:腳本語言。
requests:http請求庫。
allure:測試報告
numpy:數據格式兼容。
pandas:mysql返回數據處理。
PyMySQL:連接mysql。
SQLAlchemy:mysql連接引擎,支援ORM。
texttable:日誌列印sql查詢結果表格。
目錄結構

用例組織方式
模板程式碼使用code_auto.py自動生成。
self.api_dir = os.path.join(os.path.join(self.base_dir, 'api'), 'bu') # 1 self.case_dir = os.path.join(os.path.join(self.base_dir, 'case'), 'sprint') # 2 self.uri = '/api/post' # 3 self.description = 'Demo auto code' # 4 # 5 self.body = """{} """ 1 輸入api子目錄名稱。介面是按業務部門來區分的,子目錄名稱建議按業務部門(bu==Business Unit)來設置。
2 輸入測試用例子目錄名稱。現在流行敏捷開發,建議按迭代sprint或獨立功能模組命名。
3 介面uri。需要注意的是,開頭要有1個斜杠/。
4 介面描述。如名稱、作用。
5 請求體。
執行後在api和case目錄生成測試初始化程式碼。
域名、Headers/Cookie涉及到環境變數,在data/env設置。
class _GldExp: x = 1 headers = {"Content-Type": "application/json"} dao_x = Dao('host:port', 'username', 'password') test_url = 'https://x' class _Gld: x = 2 headers = {"Content-Type": "application/json"} dao_x = Dao('host:port', "username", "password") test_url = 'https://x' def uuid_list(n): """Uuid list @param n: Number @return: A uuid list """ return [str(uuid.uuid4()).replace('-', '') for i in range(n)] # Set environment name vars_ = _GldExp 2個內部類_GldExp和_Gld,定義參數化環境變數。
在env文件中可以定義一些業務相關函數。公共函數需要放到common/func,建議不要輕易把框架無關的函數放到公共函數裡面。
import env後,使用vars_引用來調用具體的環境變數,如vars_.test_url。
測試程式碼編寫方式
api/bu目錄下,每個介面==1個py文件。
class ApiPost(Api): def __init__(self): super().__init__() self.url = vars_.test_url + "/api/post" def load(self): self.body = {} return self def send(self): self.res = self.req.post(url=self.url, headers=vars_.headers, json=self.body) self.set_content() return self.res api繼承了基類Api。根據不同環境初始化vars_.test_url,load()方法用於載入參數,send()方法用於發送請求(視不同method修改對應的請求方法&參數,如get,可以在common/request.py中找到相關定義)。
測試程式碼完全面向對象。
def test_default(): x = ApiPost() x.load().send() 這樣能很方便的在介面之間傳遞參數,以及做參數化的工作。
比如,在介面.py中,需要參數化body的name:
def load(self): self.body = { "name": self.name } PyCharm會提示此屬性未定義,忽略它。
在測試程式碼中寫參數化就很簡單:
x.name = 'dongfanger' x.load().send() JMeter參數化方式
本框架參數化借鑒了JMeter的參數化方式。也就是,在介面發請求後,對參數賦值;在介面收到相應後,提取參數。這也是測試程式碼要完全面向對象的原因。
面向對象能較好的組織測試程式碼,使程式碼邏輯清晰,閱讀易於理解。
比如,先定義2個介面,蘋果樹和商店:
class AppleTree(Api): def __init__(self): super().__init__() self.url = vars_.test_url + "/api/post/apple/tree" def load(self): self.body = {} return self def send(self): self.res = self.req.post(url=self.url, headers=vars_.headers, json=self.body) self.set_content() return self.res class ShopSale(Api): def __init__(self): super().__init__() self.url = vars_.test_url + "/api/post/shop/sale" def load(self): self.body = { "apple": self.apple } return self def send(self): self.res = self.req.post(url=self.url, headers=vars_.headers, json=self.body) self.set_content() return self.res 測試程式碼編寫,蘋果樹先生產蘋果,再運輸到商店,商店賣蘋果:
def test_apple_to_shop(): apple_tree = AppleTree() apple_tree.load().send() # 生產蘋果 good_apple = apple_tree.content['good_apple'] # content在Api基類中定義 shop_sale = ShopSale() shop_sale.apple = good_apple # 傳遞參數 shop_sale.load().send() print(shop_sale.content) content在Api基類中定義:
def set_content(self): """After request, assert status and set content """ status_ok(self.res) res_json = self.res.json() assert 1000 == res_json.get('status') try: self.content = res_json['content'] except KeyError: logger.info(f"{'*' * 26}n" f"Response no contentn" f"{'*' * 26}n") 先斷言返回狀態ok,再取響應json裡面key為content的value。不同公司json規範不一樣,需要做調整。
批量執行用例生成測試報告
pytest_allure.py批量執行測試用例。
# Input the directory to run pytest run_dir = os.path.join(base_dir, 'case') 默認執行case目錄下test_開頭或結尾的文件(pytest規則)。測試方法需要以test_開頭。
可以指定目錄,如:
# Input the directory to run pytest run_dir = os.path.join(os.path.join(base_dir, 'case'), 'sprint0001') 本框架藉助pytest_sessionfinish hook函數實現了生成測試報告並自動打開瀏覽器。
def pytest_sessionfinish(session): allure_report_dir_test = session.config.getoption('allure_report_dir') if allure_report_dir_test: html_dir = os.path.join(allure_report_dir_test, 'html') os.system(f'mkdir {html_dir}') os.system(f"allure generate {allure_report_dir_test} -o {html_dir}") os.system(f"allure open {html_dir}") mysql支援
mysql主要用於:一提供參數化賦值;二資料庫比對斷言。
commons/dao.py實現了相關功能。在data/env.py中根據環境定義好連接後,通過vars_使用。
dao_x = Dao('host:port', 'username', 'password') sql_result = vars_.dao_x.select('select id, name from new_table;') dao實現採用了pandas+sqlalchemy,對返回結果取值就可以按dataframe來,如sql_result['name'][0]。
藉助texttable會列印表格日誌,觀察數據。
[2020-03-22 18:14:13]Running sql select id, name from new_table; [2020-03-22 18:14:14]Sql result: +----+------+ | id | name | +====+======+ | 1 | w | +----+------+ | 2 | g | +----+------+ 值得說明的是,為了數據校驗方便,默認會把無小數的float轉換為int,如5.0->5。
@staticmethod def _convert(x): """Convert logic code @param x: Single cell data @return: Converted single cell data """ # float to int if isinstance(x, float) and x % 1 == 0: return int(x) return x 結語
開源使我快樂。
分享才能收穫更多。
我在github等你。
https://github.com/dongfanger/pyface
版權申明:本文為部落客原創文章,轉載請保留原文鏈接及作者。