GitLab → 搭建私有的版本控制的託管服務平台
- 2020 年 3 月 26 日
- 筆記
開心一刻
睡著正香,媳婦用力把我晃醒說:“快起來,我爸來了。”
我一下醒了,手腳熟練的把衣服一抱,滾到床底,順便把鞋也收了進去
媳婦蹲下無奈的說:“快出來!咱倆都結婚半年了。”
我:“對哦,搞習慣了”

環境準備
linux:CentOS 7
GitLab 社區版:gitlab-ce-12.8.7-ce.0.el6.x86_64.rpm,可從 清華大學開源軟體鏡像站 下載
因為 GitLab 對記憶體要求比較高,官方推薦至少準備 4G 記憶體來安裝 GitLab,我們就大方一點,準備 5G
環境準備如下

樓主是新搭建的 CentOS 7,環境非常乾淨,便於 GitLab 的搭建(主要是避免埠衝突,GitLab 包含很多組件,它們都需要埠)
由於我們大天朝的那面牆的神奇作用,按 GitLab 官方的安裝教程,我們沒法安裝它,但辦法總比困難多,具體我們往下看
GitLab 搭建
安裝和配置必要的依賴項
1、安裝依賴項
[root@localhost opt]# yum install -y curl policycoreutils-python openssh-server
2、啟用 sshd
[root@localhost opt]# systemctl enable sshd [root@localhost opt]# systemctl start sshd
3、防火牆放行 http 和 https
[root@localhost opt]# firewall-cmd --permanent --add-service=http [root@localhost opt]# firewall-cmd --permanent --add-service=https [root@localhost opt]# systemctl reload firewalld
樓主為了省事,直接關了防火牆(上面的做法是比較正經的!)
[root@localhost opt]# firewall-cmd --state [root@localhost opt]# systemctl stop firewalld.service [root@localhost opt]# systemctl disable firewalld.service
安裝 GitLab
安裝非常簡單,就一行命令
[root@localhost opt]# rpm -ivh gitlab-ce-12.8.7-ce.0.el6.x86_64.rpm --force
安裝應該非常快,分分鐘的事,當出現下圖,就表示安裝完成

配置 GitLab
GitLab 的配置文件路徑: /etc/gitlab/gitlab.rb,此時時只改一個配置項: external_url ,便於我們快速看到搭建效果
編輯 gitlab.rb: [root@localhost gitlab]# vi /etc/gitlab/gitlab.rb
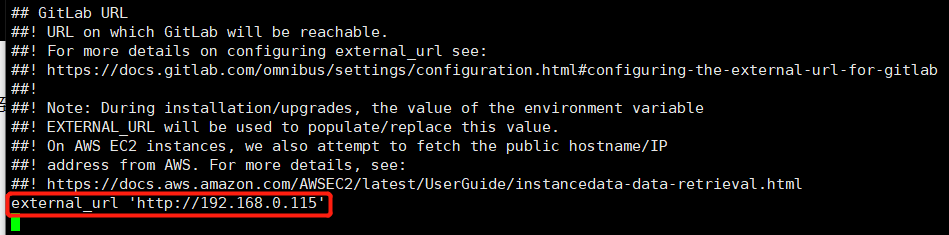
樓主為了省事,就不配置域名,而直接配置成 ip 了
修改之後執行: [root@localhost opt]# gitlab-ctl reconfigure ,使得配置生效
首次配置比較慢,因為需要配置、初始化各個組件;當出現下圖內容時,表示配置完成

配置完成後會生成各個組件的配置文件和日誌文件,配置文件路徑: /opt/gitlab/etc/ ,日誌文件路徑: /var/log/gitlab/
一旦配置好,GitLab 也就啟動了,我們訪問下: http://192.168.0.115/ ,當出現如下介面,表示我們搭建成功了

初次訪問會提示我們重置 root 賬戶的密碼;登錄進去後,主介面如下

至此,GitLab 基本搭建好了
關於常用的一些自定義配置,以及搭建過程中遇到的問題,我們另開一篇來講,內容挺多的
GitLab 常用命令
啟動:gitlab-ctl start
查看狀態:gitlab-ctl status
重啟:gitlab-ctl restart
重新配置:gitlab-ctl reconfigure # 一般是修改配置後用
查看實時日誌:gitlab-ctl tail
總結
1、GitLab 架構圖

組件非常多,更多詳情請查閱:GitLab實戰三——Gitlab架構組件詳解
2、只要環境足夠乾淨,記憶體足夠大,搭建起來應該是沒什麼問題的