Netty之緩衝區ByteBuf解讀(二)
- 2020 年 3 月 18 日
- 筆記

上篇介紹了 ByteBuf 的簡單讀寫操作以及讀寫指針的基本介紹,本文繼續對 ByteBuf 的基本操作進行解讀。
讀寫指針回滾
這裡的 demo 例子還是使用上節使用的。
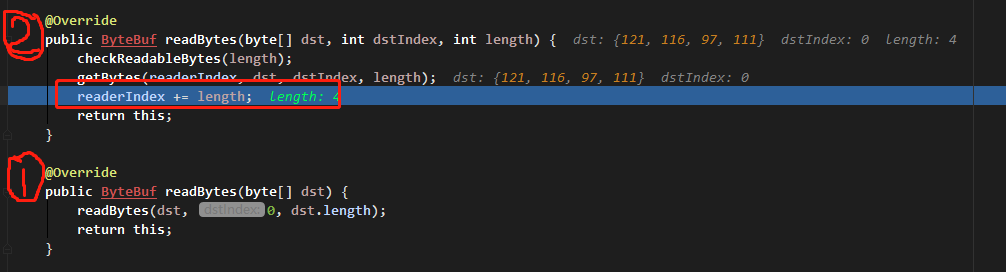
ByteBuf buf = Unpooled.buffer(15); String content = "ytao公眾號"; buf.writeBytes(content.getBytes()); System.out.println(String.format("nwrite: ridx=%s widx=%s cap=%s", buf.readerIndex(), buf.writerIndex(), buf.capacity())); byte[] dst = new byte[4]; buf.readBytes(dst); System.out.println(String.format("nread(4): ridx=%s widx=%s cap=%s", buf.readerIndex(), buf.writerIndex(), buf.capacity()));進入 readBytes 方法,可以看到每次讀取的時候,指針是累加的,如圖:
但是,有時我們可能需要對當前操作進行回滾,讓指針回到之前的位置。這時,mark 和 reset 搭配使用,可以實現該操作需求。
mark 用來記錄可能需要回滾的當前位置,reset 是將指針回滾至 mark 記錄的值。
比如,接著面的 demo,再讀取三個位元組,然後回滾讀取三個位元組的操作。
buf.markReaderIndex(); dst = new byte[3]; buf.readBytes(dst); System.out.println(String.format("nmarkRead and read(3): ridx=%s widx=%s cap=%s", buf.readerIndex(), buf.writerIndex(), buf.capacity())); buf.resetReaderIndex(); System.out.println(String.format("nresetReaderIndex: ridx=%s widx=%s cap=%s", buf.readerIndex(), buf.writerIndex(), buf.capacity()));先將讀索引進行 mark,然後讀取內容,在調用讀取的 reset,指針索引如下:
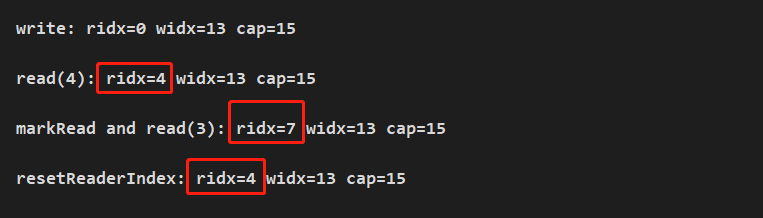
讀指針累加到 7 後,又重新回滾至 4 的位置。
同樣,寫指針也是如此操作進行回滾。所以 mark 和 reset 都有一個讀和寫。

以及

讀寫指針清空
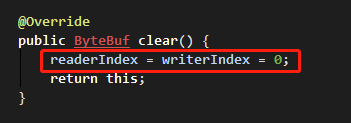
將讀寫指針清為初始值,使用 clear() 函數。
ByteBuf buf = Unpooled.buffer(15); String content = "ytao公眾號"; buf.writeBytes(content.getBytes()); System.out.println(String.format("nwrite: ridx=%s widx=%s cap=%s", buf.readerIndex(), buf.writerIndex(), buf.capacity())); buf.markWriterIndex(); byte[] dst = new byte[4]; buf.readBytes(dst); System.out.println(String.format("nread(4): ridx=%s widx=%s cap=%s", buf.readerIndex(), buf.writerIndex(), buf.capacity())); buf.markReaderIndex(); buf.clear(); System.out.println(String.format("nclear: ridx=%s widx=%s cap=%s", buf.readerIndex(), buf.writerIndex(), buf.capacity()));執行結果:
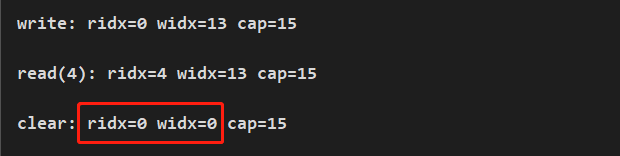
clear 只會將指針的位置重置為初始值,並不會清空緩衝區里的內容,如下圖。同時,也可使用 mark 和 reset 進行驗證,這裡不再進行演示。
查找字元位置
查找字元是在很多場景下,都會使用到,比如前面文章講過的粘包/拆包處理,就有根據字元串進行劃分包數據。其實現原理就是根據查找指定字元進行讀取。
ByteBuf 也提供多種不同的查找方法進行處理:
indexOf
indexOf 函數,擁有三個參數,查找開始位置索引 fromIndex, 查詢位置最大的索引 toIndex,查找位元組 value。
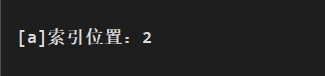
// fromIndex 為 0, toIndex 為 13, value 為 a int i = buf.indexOf(0, 13, (byte)'a'); System.out.println("[a]索引位置:"+i);在索引 0~13 中返回查找的字元 a 索引位置:
indexOf 源碼實現:
// ByteBuf 實現類 @Override public int indexOf(int fromIndex, int toIndex, byte value) { return ByteBufUtil.indexOf(this, fromIndex, toIndex, value); } // ByteBufUtil 類 public static int indexOf(ByteBuf buffer, int fromIndex, int toIndex, byte value) { // 判斷查詢起始和終點索引大小 if (fromIndex <= toIndex) { return firstIndexOf(buffer, fromIndex, toIndex, value); } else { return lastIndexOf(buffer, fromIndex, toIndex, value); } } private static int firstIndexOf(ByteBuf buffer, int fromIndex, int toIndex, byte value) { fromIndex = Math.max(fromIndex, 0); if (fromIndex >= toIndex || buffer.capacity() == 0) { return -1; } // 從起始索引進行遍歷到終點索引,如果這區間有查找的位元組,就返回第一個位元組的位置,否則返回 -1 for (int i = fromIndex; i < toIndex; i ++) { if (buffer.getByte(i) == value) { return i; } } return -1; } private static int lastIndexOf(ByteBuf buffer, int fromIndex, int toIndex, byte value) { fromIndex = Math.min(fromIndex, buffer.capacity()); if (fromIndex < 0 || buffer.capacity() == 0) { return -1; } // 從起始索引進行遍歷到終點索引倒著遍歷,獲取的是查找區間的最後一個位元組位置 for (int i = fromIndex - 1; i >= toIndex; i --) { if (buffer.getByte(i) == value) { return i; } } return -1; }bytesBefore
bytesBefore 函數擁有三個重載方法:

bytesBefore 函數的實現,就是在 indexOf 上進行一層查找區間的封裝,最後都是在 indexOf 中實現查找。
@Override public int bytesBefore(int index, int length, byte value) { // 最終都進入 indexOf 中查找 int endIndex = indexOf(index, index + length, value); if (endIndex < 0) { return -1; } // 返回相對查找起始索引的位置 return endIndex - index; }注意:這裡返回的是相對查找起始索引的位置。
forEachByte
forEachByte 函數有兩個重載方法:

這裡涉及到一個 ByteBufProcessor 介面,這個是對一些常用的位元組,其中包括 空,空白鍵,換行等等進行了抽象定義。
forEachByte 函數實現主要邏輯:
private int forEachByteAsc0(int index, int length, ByteBufProcessor processor) { if (processor == null) { throw new NullPointerException("processor"); } if (length == 0) { return -1; } final int endIndex = index + length; // 起始 -> 終點索引,進行遍歷 int i = index; try { do { // 如果可以匹配上位元組,返回該索引位置 if (processor.process(_getByte(i))) { i ++; } else { return i; } } while (i < endIndex); } catch (Exception e) { PlatformDependent.throwException(e); } // 查找區間遍歷完沒有匹配上,返回 -1 return -1; }forEachByteDesc
forEachByteDesc 也是有兩個重載方法:

forEachByteDesc 從函數名字可以看出,指的倒序查找。意指從查找區間最大索引到最小索引進行遍歷:
private int forEachByteDesc0(int index, int length, ByteBufProcessor processor) { if (processor == null) { throw new NullPointerException("processor"); } if (length == 0) { return -1; } // 從最大索引開始,進行遍歷 int i = index + length - 1; try { do { if (processor.process(_getByte(i))) { i --; } else { return i; } // 直到 i 小於查找區間最小索引值時,遍歷完成 } while (i >= index); } catch (Exception e) { PlatformDependent.throwException(e); } // 沒有找到指定位元組返回 -1 return -1; } 查找操作的具體實現還是比較好理解,進入程式碼查看實現一般都能讀懂。
複製
ByteBuf 複製後會生成一個新的 ByteBuf 對象。
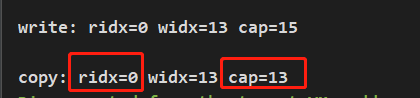
copy() 整個對象被複制,其所有數據都是該對象自身維護,與舊對象無任何關聯關係。包括緩衝區內容,但是該方法的的容量默認為舊 buf 的可讀區間大小,讀索引為 0,寫索引為舊數據寫索引的值。
ByteBuf buf2 = buf.copy(); System.out.println(String.format("ncopy: ridx=%s widx=%s cap=%s", buf2.readerIndex(), buf2.writerIndex(), buf2.capacity()));執行結果:
copy(int index, int length) 為指定複製的起始位置及長度,其他與上面 copy() 類似。
duplicate() 這個也是複製,但是與 copy 函數不同的是,複製後生成的 ByteBuf 和舊的 ByteBuf 是共享一份緩衝區內容的。它複製的只是自己可以單獨維護的一份索引。並且它複製的默認容量也是和舊的一樣。
對象引用/回收
ByteBuf 對象被引用後,可以調用 retain() 函數進行累計計數。每調用一次 retain() 則會 +1。
其在 AbstractReferenceCountedByteBuf 實現:
@Override public ByteBuf retain() { for (;;) { int refCnt = this.refCnt; if (refCnt == 0) { throw new IllegalReferenceCountException(0, 1); } // 達到最大值時,拋出異常 if (refCnt == Integer.MAX_VALUE) { throw new IllegalReferenceCountException(Integer.MAX_VALUE, 1); } // 保證執行緒安全,這裡 CAS 進行累加 if (refCntUpdater.compareAndSet(this, refCnt, refCnt + 1)) { break; } } return this; } @Override public boolean compareAndSet(T obj, int expect, int update) { // unsafe 為jdk的 Unsafe 類 return unsafe.compareAndSwapInt(obj, offset, expect, update); }同樣,可以進行添加多個引用,自己指定數量,retain(int increment) 帶參函數實現,和上面 +1 實現思路一樣,程式碼就不貼出來了。
ByteBuf 在申請記憶體使用完後,需要對其進行釋放,否則可能會造成資源浪費及記憶體泄漏的風險。這也是 ByteBuf 自己實現的一套有效回收機制。
釋放的函數為 release(),它的實現就是每次 -1。直到為 1 時,調用釋放函數 deallocate() 進行釋放。
其在 AbstractReferenceCountedByteBuf 實現:
@Override public final boolean release() { for (;;) { int refCnt = this.refCnt; if (refCnt == 0) { throw new IllegalReferenceCountException(0, -1); } // 引用數量 -1 if (refCntUpdater.compareAndSet(this, refCnt, refCnt - 1)) { 當引用數量為 1 時,符合釋放條件 if (refCnt == 1) { deallocate(); return true; } return false; } } }同樣,釋放也支援一次釋放多個引用數量,也是通過指定數量,傳遞給 release(int decrement) 進行引用數量的減少並釋放對象。
總結
本文對 ByteBuf 中最基本,最常用 API 進行的解讀,這也是在實際開發中或閱讀相關程式碼時,可能會遇到的基本 API,通過兩篇文章的說明,相信對 ByteBuf 的基本使用不會存在太大問題,還有些未分析到的 API,根據自己對 ByteBuf 已有的理解,差不多也能進行分析。
個人部落格: https://ytao.top
關注公眾號 【ytao】,更多原創好文