面試總被問分散式ID怎麼辦? 滴滴(Tinyid)甩給他
- 2020 年 3 月 14 日
- 筆記
整理了一些Java方面的架構、面試資料(微服務、集群、分散式、中間件等),有需要的小夥伴可以關注公眾號【程式設計師內點事】,無套路自行領取
引言
接著《一口氣說出 9種 分散式ID生成方式,面試官有點懵了》來繼續詳細的介紹分散式ID生成器,大家比較感興趣的美團(Leaf)、滴滴(Tinyid)、百度(uid-generator)三個開源項目,美團(Leaf)已經講完,詳見《9種分散式ID生成之美團(Leaf)實戰》,今天結合實戰搞一下滴滴開源的(Tinyid)。
Tinyid介紹
Tinyid是滴滴開發的一款分散式ID系統,Tinyid是在美團(Leaf)的leaf-segment演算法基礎上升級而來,不僅支援了資料庫多主節點模式,還提供了tinyid-client客戶端的接入方式,使用起來更加方便。但和美團(Leaf)不同的是,Tinyid只支援號段一種模式不支援雪花模式。
Tinyid的特性
- 全局唯一的long型ID
- 趨勢遞增的id
- 提供 http 和 java-client 方式接入
- 支援批量獲取ID
- 支援生成1,3,5,7,9…序列的ID
- 支援多個db的配置
適用場景:只關心ID是數字,趨勢遞增的系統,可以容忍ID不連續,可以容忍ID的浪費
不適用場景:像類似於訂單ID的業務,因生成的ID大部分是連續的,容易被掃庫、或者推算出訂單量等資訊
Tinyid原理
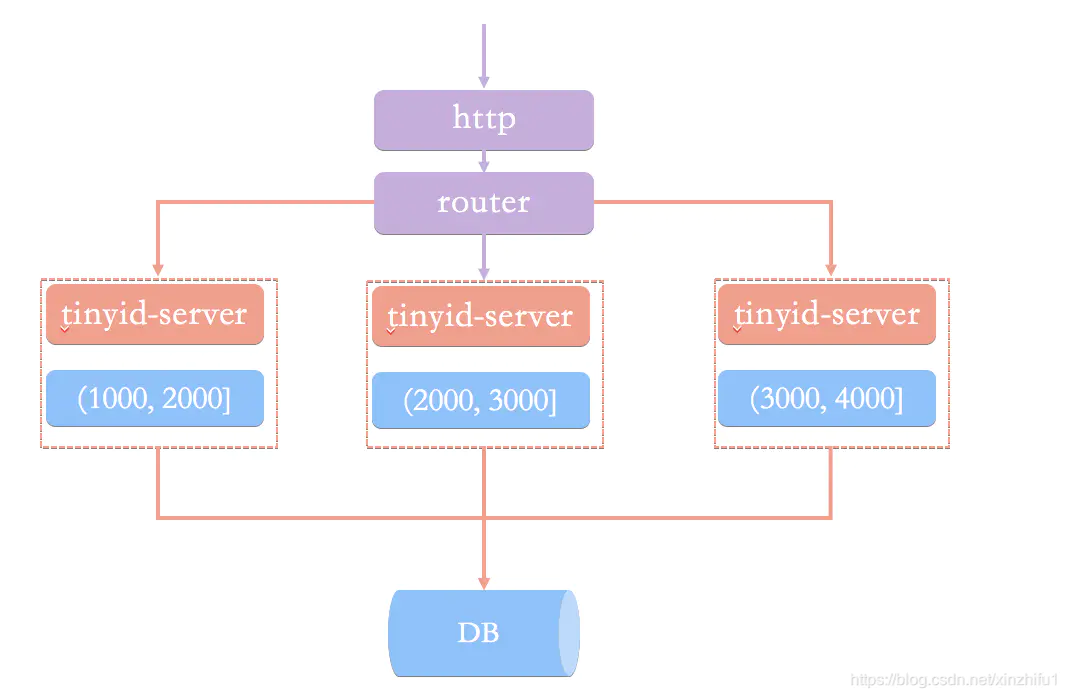
Tinyid是基於號段模式實現,再簡單啰嗦一下號段模式的原理:就是從資料庫批量的獲取自增ID,每次從資料庫取出一個號段範圍,例如 (1,1000] 代表1000個ID,業務服務將號段在本地生成1~1000的自增ID並載入到記憶體.。
Tinyid會將可用號段載入到記憶體中,並在記憶體中生成ID,可用號段在首次獲取ID時載入,如當前號段使用達到一定比例時,系統會非同步的去載入下一個可用號段,以此保證記憶體中始終有可用號段,以便在發號服務宕機後一段時間內還有可用ID。
原理圖大致如下圖:
Tinyid實現
Tinyid的GitHub地址 : https://github.com/didi/tinyid.git
Tinyid提供了兩種調用方式,一種基於Tinyid-server提供的http方式,另一種Tinyid-client客戶端方式。
不管使用哪種方式調用,搭建Tinyid都必須提前建表tiny_id_info、tiny_id_token。
CREATE TABLE `tiny_id_info` ( `id` bigint(20) unsigned NOT NULL AUTO_INCREMENT COMMENT '自增主鍵', `biz_type` varchar(63) NOT NULL DEFAULT '' COMMENT '業務類型,唯一', `begin_id` bigint(20) NOT NULL DEFAULT '0' COMMENT '開始id,僅記錄初始值,無其他含義。初始化時begin_id和max_id應相同', `max_id` bigint(20) NOT NULL DEFAULT '0' COMMENT '當前最大id', `step` int(11) DEFAULT '0' COMMENT '步長', `delta` int(11) NOT NULL DEFAULT '1' COMMENT '每次id增量', `remainder` int(11) NOT NULL DEFAULT '0' COMMENT '餘數', `create_time` timestamp NOT NULL DEFAULT '2010-01-01 00:00:00' COMMENT '創建時間', `update_time` timestamp NOT NULL DEFAULT '2010-01-01 00:00:00' COMMENT '更新時間', `version` bigint(20) NOT NULL DEFAULT '0' COMMENT '版本號', PRIMARY KEY (`id`), UNIQUE KEY `uniq_biz_type` (`biz_type`) ) ENGINE=InnoDB AUTO_INCREMENT=1 DEFAULT CHARSET=utf8 COMMENT 'id資訊表'; CREATE TABLE `tiny_id_token` ( `id` int(11) unsigned NOT NULL AUTO_INCREMENT COMMENT '自增id', `token` varchar(255) NOT NULL DEFAULT '' COMMENT 'token', `biz_type` varchar(63) NOT NULL DEFAULT '' COMMENT '此token可訪問的業務類型標識', `remark` varchar(255) NOT NULL DEFAULT '' COMMENT '備註', `create_time` timestamp NOT NULL DEFAULT '2010-01-01 00:00:00' COMMENT '創建時間', `update_time` timestamp NOT NULL DEFAULT '2010-01-01 00:00:00' COMMENT '更新時間', PRIMARY KEY (`id`) ) ENGINE=InnoDB AUTO_INCREMENT=1 DEFAULT CHARSET=utf8 COMMENT 'token資訊表'; INSERT INTO `tiny_id_info` (`id`, `biz_type`, `begin_id`, `max_id`, `step`, `delta`, `remainder`, `create_time`, `update_time`, `version`) VALUES (1, 'test', 1, 1, 100000, 1, 0, '2018-07-21 23:52:58', '2018-07-22 23:19:27', 1); INSERT INTO `tiny_id_info` (`id`, `biz_type`, `begin_id`, `max_id`, `step`, `delta`, `remainder`, `create_time`, `update_time`, `version`) VALUES (2, 'test_odd', 1, 1, 100000, 2, 1, '2018-07-21 23:52:58', '2018-07-23 00:39:24', 3); INSERT INTO `tiny_id_token` (`id`, `token`, `biz_type`, `remark`, `create_time`, `update_time`) VALUES (1, '0f673adf80504e2eaa552f5d791b644c', 'test', '1', '2017-12-14 16:36:46', '2017-12-14 16:36:48'); INSERT INTO `tiny_id_token` (`id`, `token`, `biz_type`, `remark`, `create_time`, `update_time`) VALUES (2, '0f673adf80504e2eaa552f5d791b644c', 'test_odd', '1', '2017-12-14 16:36:46', '2017-12-14 16:36:48'); tiny_id_info表是具體業務方號段資訊數據表

max_id :號段的最大值
step:步長,即為號段的長度
biz_type:業務類型
號段獲取對max_id欄位做一次update操作,update max_id= max_id + step,更新成功則說明新號段獲取成功,新的號段範圍是(max_id ,max_id +step]。
tiny_id_token是一個許可權表,表示當前token可以操作哪些業務的號段資訊。

修改tinyid-server中 offlineapplication.properties 文件配置資料庫,由於tinyid支援資料庫多master模式,可以配置多個資料庫資訊。啟動 TinyIdServerApplication 測試一下。
datasource.tinyid.primary.driver-class-name=com.mysql.jdbc.Driver datasource.tinyid.primary.url=jdbc:mysql://127.0.0.1:3306/xin-master?autoReconnect=true&useUnicode=true&characterEncoding=UTF-8 datasource.tinyid.primary.username=junkang datasource.tinyid.primary.password=junkang datasource.tinyid.primary.testOnBorrow=false datasource.tinyid.primary.maxActive=10 datasource.tinyid.secondary.driver-class-name=com.mysql.jdbc.Driver datasource.tinyid.secondary.url=jdbc:mysql://localhost:3306/db2?autoReconnect=true&useUnicode=true&characterEncoding=UTF-8 datasource.tinyid.secondary.username=root datasource.tinyid.secondary.password=123456 datasource.tinyid.secondary.testOnBorrow=false datasource.tinyid.secondary.maxActive=101、Http方式
tinyid內部一共提供了四個http介面來獲取ID和號段。
package com.xiaoju.uemc.tinyid.server.controller; /** * @author du_imba */ @RestController @RequestMapping("/id/") public class IdContronller { private static final Logger logger = LoggerFactory.getLogger(IdContronller.class); @Autowired private IdGeneratorFactoryServer idGeneratorFactoryServer; @Autowired private SegmentIdService segmentIdService; @Autowired private TinyIdTokenService tinyIdTokenService; @Value("${batch.size.max}") private Integer batchSizeMax; @RequestMapping("nextId") public Response<List<Long>> nextId(String bizType, Integer batchSize, String token) { Response<List<Long>> response = new Response<>(); try { IdGenerator idGenerator = idGeneratorFactoryServer.getIdGenerator(bizType); List<Long> ids = idGenerator.nextId(newBatchSize); response.setData(ids); } catch (Exception e) { response.setCode(ErrorCode.SYS_ERR.getCode()); response.setMessage(e.getMessage()); logger.error("nextId error", e); } return response; } @RequestMapping("nextIdSimple") public String nextIdSimple(String bizType, Integer batchSize, String token) { String response = ""; try { IdGenerator idGenerator = idGeneratorFactoryServer.getIdGenerator(bizType); if (newBatchSize == 1) { Long id = idGenerator.nextId(); response = id + ""; } else { List<Long> idList = idGenerator.nextId(newBatchSize); StringBuilder sb = new StringBuilder(); for (Long id : idList) { sb.append(id).append(","); } response = sb.deleteCharAt(sb.length() - 1).toString(); } } catch (Exception e) { logger.error("nextIdSimple error", e); } return response; } @RequestMapping("nextSegmentId") public Response<SegmentId> nextSegmentId(String bizType, String token) { try { SegmentId segmentId = segmentIdService.getNextSegmentId(bizType); response.setData(segmentId); } catch (Exception e) { response.setCode(ErrorCode.SYS_ERR.getCode()); response.setMessage(e.getMessage()); logger.error("nextSegmentId error", e); } return response; } @RequestMapping("nextSegmentIdSimple") public String nextSegmentIdSimple(String bizType, String token) { String response = ""; try { SegmentId segmentId = segmentIdService.getNextSegmentId(bizType); response = segmentId.getCurrentId() + "," + segmentId.getLoadingId() + "," + segmentId.getMaxId() + "," + segmentId.getDelta() + "," + segmentId.getRemainder(); } catch (Exception e) { logger.error("nextSegmentIdSimple error", e); } return response; } } nextId、nextIdSimple都是獲取下一個ID,nextSegmentIdSimple、getNextSegmentId是獲取下一個可用號段。區別在於介面是否有返回狀態。
nextId: 'http://localhost:9999/tinyid/id/nextId?bizType=test&token=0f673adf80504e2eaa552f5d791b644c' response : { "data": [2], "code": 200, "message": "" } nextId Simple: 'http://localhost:9999/tinyid/id/nextIdSimple?bizType=test&token=0f673adf80504e2eaa552f5d791b644c' response: 3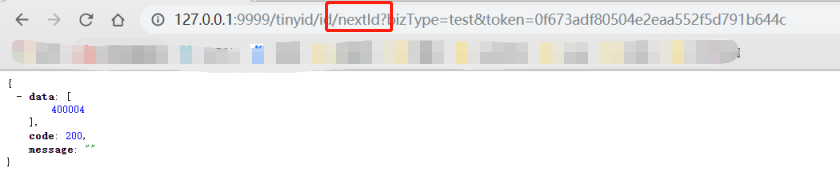

2、Tinyid-client客戶端
如果不想通過http方式,Tinyid-client客戶端也是一種不錯的選擇。
引用 tinyid-server包
<dependency> <groupId>com.xiaoju.uemc.tinyid</groupId> <artifactId>tinyid-client</artifactId> <version>${tinyid.version}</version> </dependency>啟動 tinyid-server項目打包後得到 tinyid-server-0.1.0-SNAPSHOT.jar ,設置版本 ${tinyid.version}為0.1.0-SNAPSHOT。
在我們的項目 application.properties 中配置 tinyid-server服務的請求地址 和 用戶身份token
tinyid.server=127.0.0.1:9999 tinyid.token=0f673adf80504e2eaa552f5d791b644c```在Java程式碼調用TinyId也很簡單,只需要一行程式碼。
// 根據業務類型 獲取單個ID Long id = TinyId.nextId("test"); // 根據業務類型 批量獲取10個ID List<Long> ids = TinyId.nextId("test", 10); Tinyid整個項目的源碼實現也是比較簡單,像與資料庫交互更直接用jdbcTemplate實現
@Override public TinyIdInfo queryByBizType(String bizType) { String sql = "select id, biz_type, begin_id, max_id," + " step, delta, remainder, create_time, update_time, version" + " from tiny_id_info where biz_type = ?"; List<TinyIdInfo> list = jdbcTemplate.query(sql, new Object[]{bizType}, new TinyIdInfoRowMapper()); if(list == null || list.isEmpty()) { return null; } return list.get(0); }總結
兩種方式推薦使用Tinyid-client,這種方式ID為本地生成,號段長度(step)越長,支援的qps就越大,如果將號段設置足夠大,則qps可達1000w+。而且tinyid-client 對 tinyid-server 訪問變的低頻,減輕了server端的壓力。
整理了一些Java方面的架構、面試資料(微服務、集群、分散式、中間件等),有需要的小夥伴可以關注公眾號【程式設計師內點事】,無套路自行領取
