30分鐘學會創建 iOS應用
- 2020 年 3 月 8 日
- 筆記
註:本文首發於我的個人部落格:https://evilpan.com/2019/04/06/ios-basics/
上篇文章介紹了Objective-C的基本概念,本文就來接著看如何創建我們的第一個簡單iOS應用,
本著簡單可復現的方式,我們會以儘可能小的成本來構建並在真機運行iOS應用。 也就是說,
不用越獄, 也無需開發者帳號。當然,一台iPhone手機還是需要的,為了方便編譯最好還有macOS環境。
Xcode
iOS的應用必須要用Xcode來創建,步驟很簡單:
- 下載並打開Xcode
- 選擇ios -> Single View Application
- 填寫項目名、開發組、包名(Identifier)
項目創建成功後,目錄結構如下:
$ tree HelloWorld/ HelloWorld/ ├── HelloWorld │ ├── AppDelegate.h │ ├── AppDelegate.m │ ├── Assets.xcassets │ │ ├── AppIcon.appiconset │ │ │ └── Contents.json │ │ └── Contents.json │ ├── Base.lproj │ │ ├── LaunchScreen.storyboard │ │ └── Main.storyboard │ ├── Info.plist │ ├── ViewController.h │ ├── ViewController.m │ └── main.m └── HelloWorld.xcodeproj ├── project.pbxproj ├── project.xcworkspace │ ├── contents.xcworkspacedata │ ├── xcshareddata │ │ └── IDEWorkspaceChecks.plist │ └── xcuserdata │ └── pan.xcuserdatad │ └── UserInterfaceState.xcuserstate └── xcuserdata └── pan.xcuserdatad ├── xcdebugger │ └── Breakpoints_v2.xcbkptlist └── xcschemes └── xcschememanagement.plist可以看到項目下有兩個文夾,分別是源程式碼文件HelloWorld,以及工程文件HelloWorld.xcodeproj。
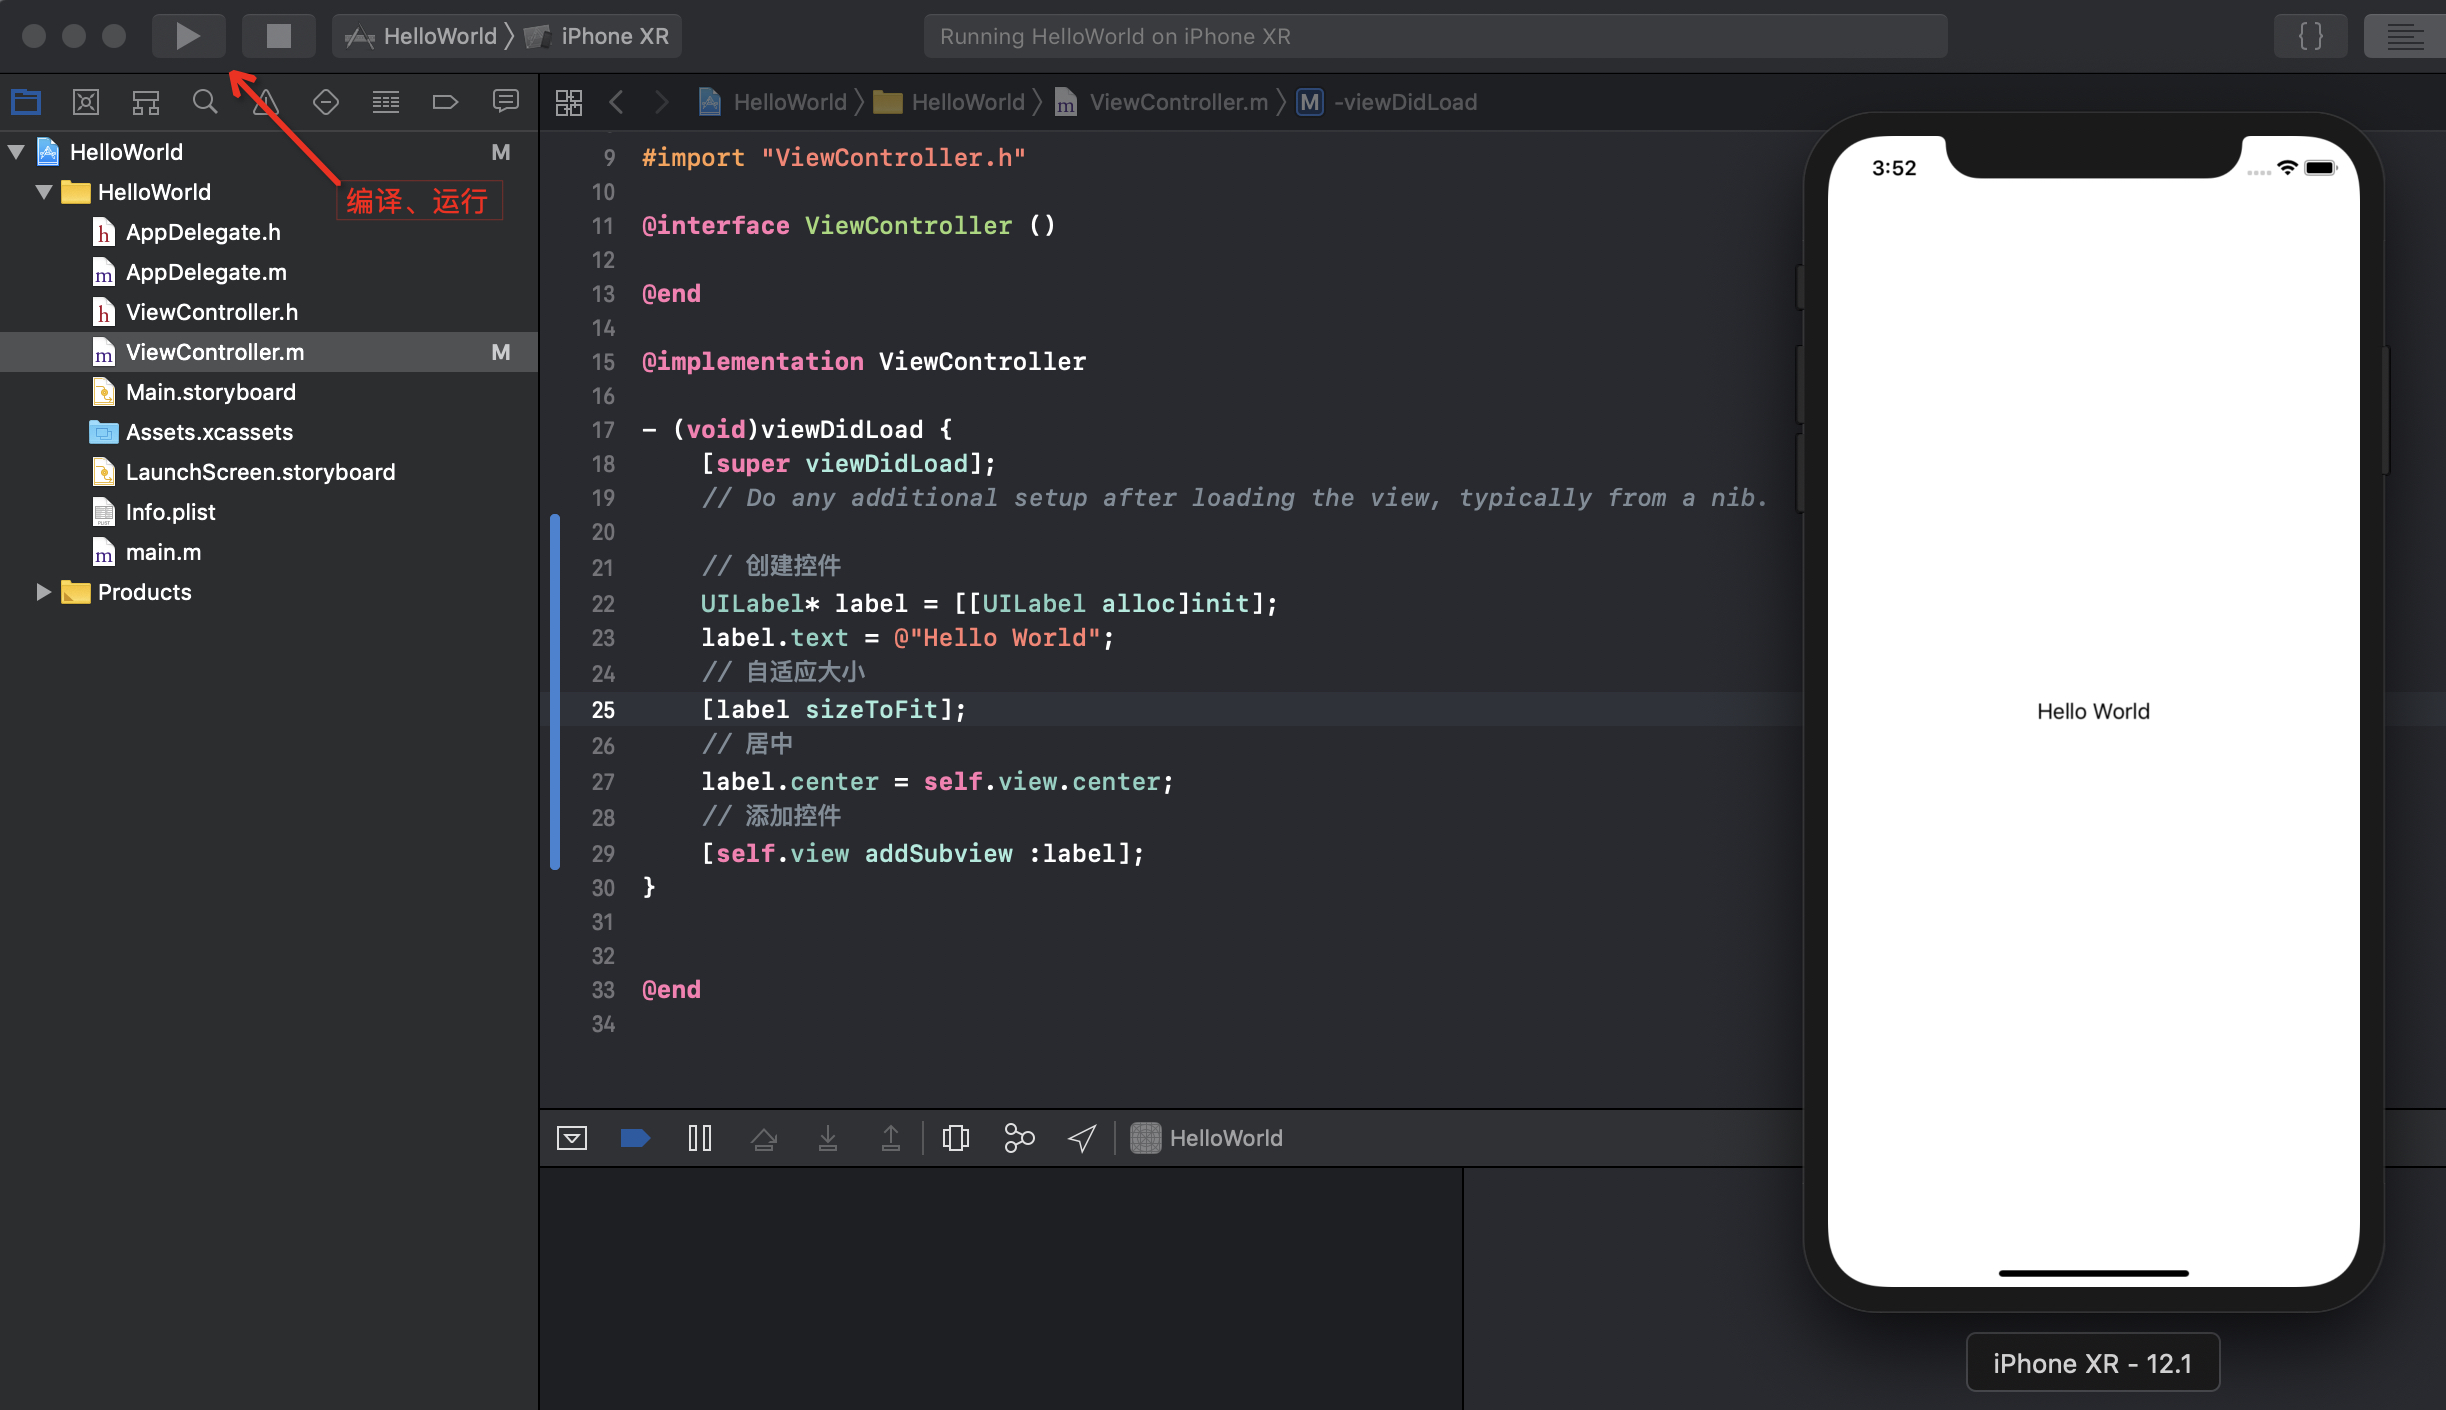
作為示例,我們可以修改ViewController.m文件,如下:
#import "ViewController.h" @interface ViewController () @end @implementation ViewController - (void)viewDidLoad { [super viewDidLoad]; // Do any additional setup after loading the view, typically from a nib. // 創建控制項 UILabel* label = [[UILabel alloc]init]; label.text = @"Hello World"; // 自適應大小 [label sizeToFit]; // 居中 label.center = self.view.center; // 添加控制項 [self.view addSubview :label]; } @end這樣,一個Hello World小程式就完成了,左上角運行按鈕,即可編譯並在模擬器中運行,如下:
[imgSim.jpg][imgSim]
在源程式碼框下方Products區域也能看到編譯出的HelloWorld.app。
是不是很簡單?好我們今天的文章就這樣結束了,… 才怪!
命令行編譯
為了更好地了解編譯過程,我們可以脫離Xcode IDE,在命令行編譯該項目:
首先,在項目目錄中查看Schemes:
$ xcodebuild -list -project HelloWorld.xcodeproj Information about project "HelloWorld": Targets: HelloWorld Build Configurations: Debug Release If no build configuration is specified and -scheme is not passed then "Release" is used. Schemes: HelloWorld然後,選擇一個scheme進行編譯,這裡是HelloWorld:
$ xcodebuild -scheme HelloWorld build note: Using new build system note: Planning build note: Using build description from disk Build system information error: Signing for "HelloWorld" requires a development team. Select a development team in the project editor. (in target 'HelloWorld') ** BUILD FAILED **凹,編譯失敗了,簽名出錯,因為萬惡的資本主義壞蘋果要求必須要每年99$或者299$去購買
Apple Developer Program 會員資格才能對應用進行合法簽名,從而發布並運行我們創建的app。
但是這裡寫的這個簡單APP只需要在我自己的手機上運行,所以並不需要這一步,禁用簽名進行編譯即可:
$ xcodebuild -scheme HelloWorld build CODE_SIGN_IDENTITY="" CODE_SIGNING_REQUIRED=NO Build settings from command line: CODE_SIGN_IDENTITY = CODE_SIGNING_REQUIRED = NO note: Using new build system note: Planning build note: Constructing build description Build system information warning: HelloWorld isn't code signed but requires entitlements. It is not possible to add entitlements to a binary without signing it. (in target 'HelloWorld') ... Validate /Users/pan/Library/Developer/Xcode/DerivedData/HelloWorld-dnyjqrgxcjjobvfzytzhtzpmjlmx/Build/Products/Debug-iphoneos/HelloWorld.app (in target: HelloWorld) ... Touch /Users/pan/Library/Developer/Xcode/DerivedData/HelloWorld-dnyjqrgxcjjobvfzytzhtzpmjlmx/Build/Products/Debug-iphoneos/HelloWorld.app (in target: HelloWorld) ... ** BUILD SUCCEEDED **編譯成功了!中間省略了很多輸出資訊,這裡就不貼了。值得一提的是,生成的app並不是在當前項目目錄下,
而是在$HOME/Library/Developer/Xcode/DerivedData/$PROJECT-xxxx/{...}/HelloWorld.app中,
xxxx看起來是一段隨機數。HelloWorld.app就是一個傳統的蘋果應用,其目錄結構如下:
$ tree HelloWorld.app HelloWorld.app ├── Base.lproj │ ├── LaunchScreen.storyboardc │ │ ├── 01J-lp-oVM-view-Ze5-6b-2t3.nib │ │ ├── Info.plist │ │ └── UIViewController-01J-lp-oVM.nib │ └── Main.storyboardc │ ├── BYZ-38-t0r-view-8bC-Xf-vdC.nib │ ├── Info.plist │ └── UIViewController-BYZ-38-t0r.nib ├── HelloWorld ├── Info.plist └── PkgInfo其中HelloWorld就是ARM64的Mach-O文件:
$ file HelloWorld.app/HelloWorld HelloWorld.app/HelloWorld: Mach-O 64-bit executable arm64模擬器
iOS模擬器除了可以在Xcode啟動,也可以通過命令行進行管理,如:
xcrun simctl help查看具體幫助:
$ xcrun simctl help install Install an app on a device. Usage: simctl install <device> <path>例如,我們要想在模擬器中啟動上節編譯好的HelloWorld.app,可以用以下命令:
# 查看當前設備列表,選擇一個設備UDID xcrun simctl list devices # 打開並啟動設備 open -a Simulator --args -CurrentDeviceUDID $UDID # 在啟動的設備中安裝我們的應用,注意需要app支援x86架構 xcrun simctl install booted /path/to/HelloWorld.app關於simctl的更多使用示例可以參考這篇文章。
簽名與ipa
上節說到我們可以不簽名來編譯APP,但對於真機而言,要想運行應用,簽名是必須的。
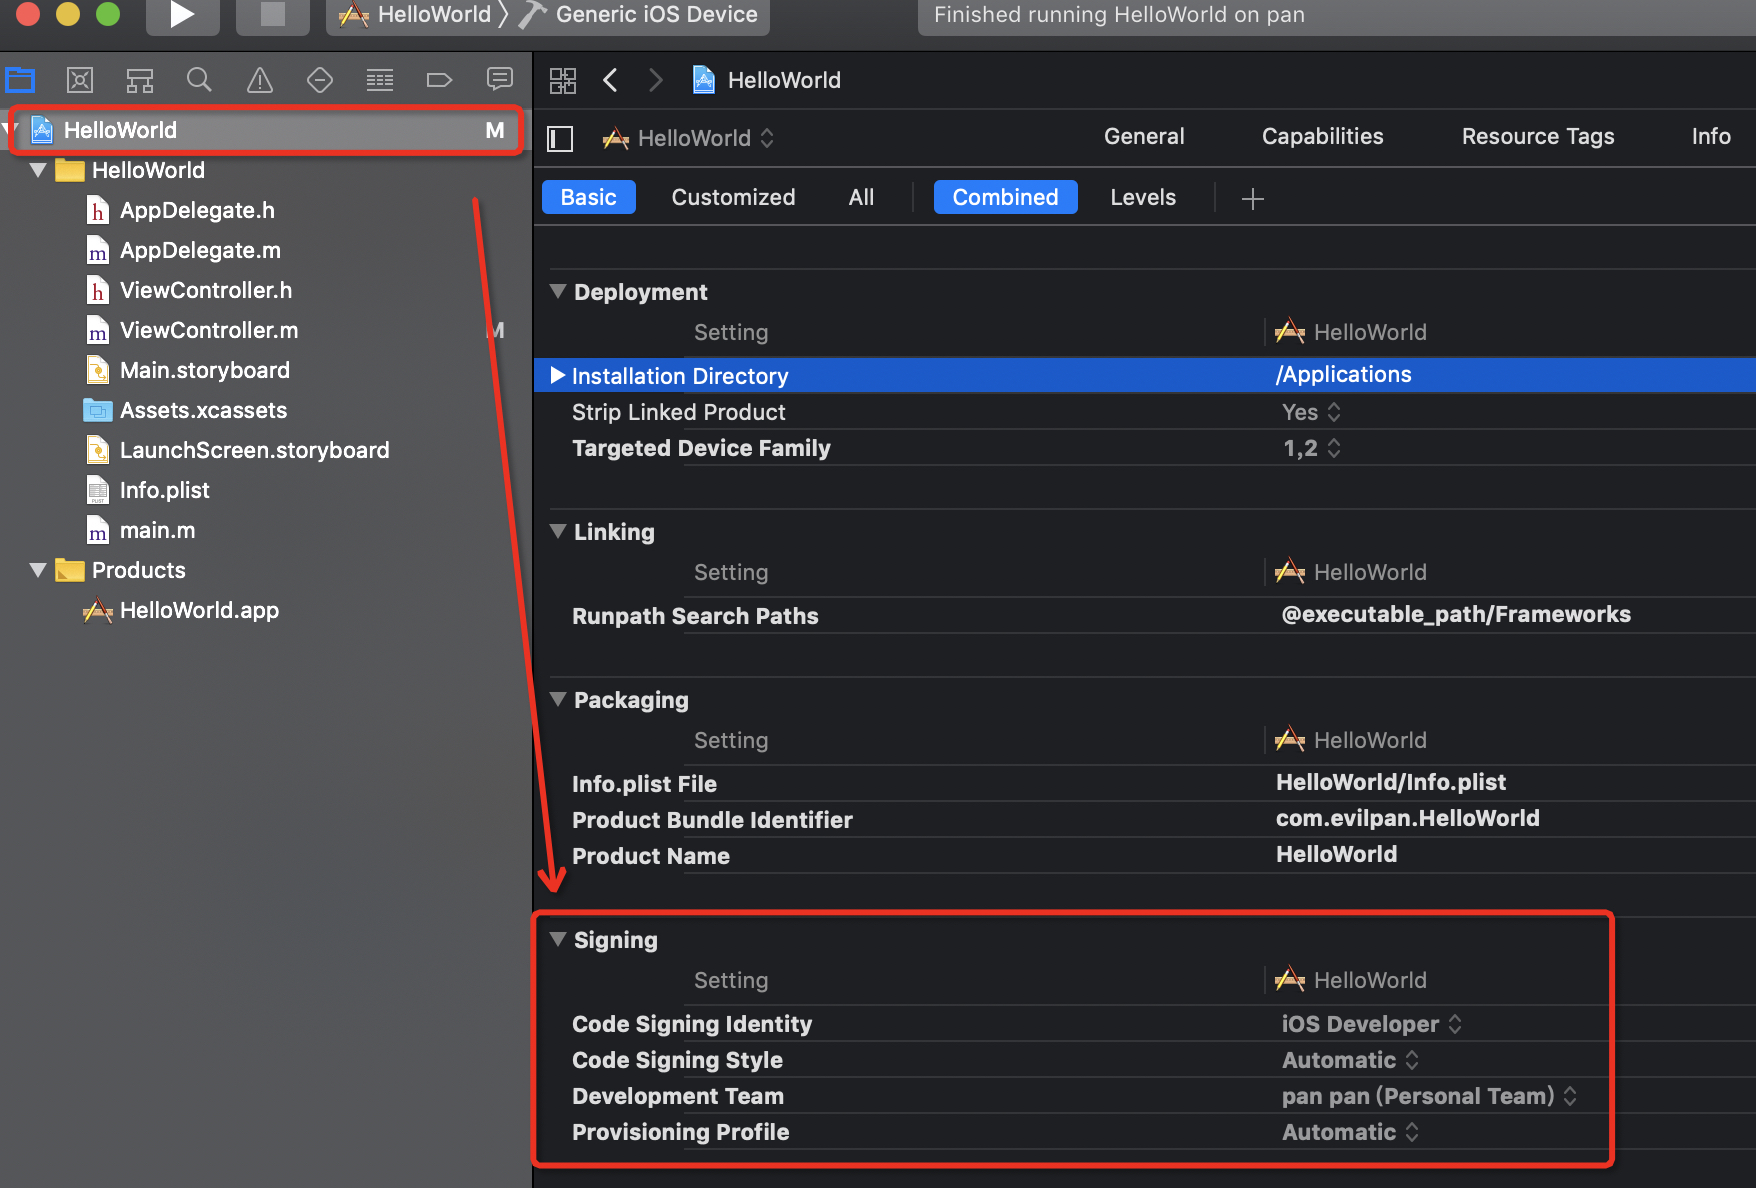
在Xcode7以後,開發者可以只用自己的Apple ID來在自己的設備上運行iOS應用,設置如下:
[imgSign.jpg][imgSign]
這樣就可以通過USB在物理機上運行iOS應用了,不過要注意的是第一次啟動時會提示不可信的開發者,
需要到設置-通用中進行信任。
什麼是ipa
iOS應用與Android應用類似的一點是,最後安裝到系統中的都是一個zip壓縮包,對於Android而言後綴是apk,
而對於iOS而言則是ipa(iPhone Application Archive)。通常ipa會通過蘋果加密(使用FairPlay DRM技術)。
所以一般我們想從手機上已經安裝的應用還原出ipa需要先解密,也通常稱為砸殼。
常見的解密方法有如下幾種:
- Clutch- Fast iOS executable dumper
- dumpdecrypted – Dumps decrypted mach-o files from encrypted iPhone applications from memory to disk
- frida-ios-dump
當然這些都是需要越獄的,在非越獄的機器上可以通過iMazing提取,熱門應用可以直接在第三方應用商店下載,
比如AppCake。
ipa打包
對於有源碼的應用,我們可以使用Xcode進行打包,打包流程可以參考stackoverflow中的一個回答。
不過這需要有開發者帳號。由於我們是自己使用,因此要找一種無需開發者帳號的方法。
無需開發者帳號的打包方式有很多,比如:
- How to create ipa in xcode 6 without Apple Developer account?
- Export an IPA From Xcode Without an Apple Developer Account
這裡使用命令行方式進行打包(archive&export):
# archive xcodebuild archive -project HelloWorld/HelloWorld.xcodeproj -scheme HelloWorld -configuration Debug -archivePath ./build/HelloWorld # export xcodebuild -exportArchive -archivePath ./build/HelloWorld.xcarchive -exportOptionsPlist exportOptions.plist -exportPath ./build這樣就在./build目錄下生成HelloWorld.ipa包了。其中exportOptions.plist如下:
<?xml version="1.0" encoding="UTF-8"?> <!DOCTYPE plist PUBLIC "-//Apple//DTD PLIST 1.0//EN" "http://www.apple.com/DTDs/PropertyList-1.0.dtd"> <plist version="1.0"> <dict> <key>method</key> <string>development</string> </dict> </plist>詳細exportOptions的key/value值可以通過xcodebuild -help查看。
ipa安裝
無需AppStore的ipa的安裝方法有下面幾種(歡迎補充):
- 使用Apple Configurator 2 工具(只支援MacOS)
- 使用Xcode安裝
- 使用OTA部署方式安裝
- 其他
使用Apple Configurator 2
Apple Configurator 2是蘋果公司提供的一個部署和配置工具,可以直接從AppStore下載。
USB連接蘋果手機後打開工具,圖形介面操作,依次選擇:
Add -> Apps -> Choose from my Mac然後點擊生成的ipa文件即可。不是很推薦這個工具,如果一定要用圖形介面,還不如用下面的Xcode。
使用Xcode
同樣是圖形介面操作,USB連接手機後依次選擇:
Window -> Devices and Simulators -> Devices選擇自己的手機後,點擊+添加或者直接把ipa文件拖拽進來即可。
OTA部署
OTA部署支援使用HTTPS的方式部署和分發你的ipa包,一個示例OTA鏈接地址如下:
itms-services://?action=download-manifest&url=https://example.com/ota.plistitms-services是蘋果上的自定義協議,會根據action下載並處理目標plist文件,
ota.plist內容如下:
<plist version="1.0"> <dict> <key>items</key> <array> <dict> <key>assets</key> <array> <dict> <key>kind</key> <string>software-package</string> <key>url</key> <string> https://example.com/app.ipa </string> </dict> </array> <key>metadata</key> <dict> <key>bundle-identifier</key> <string>com.evilpan.helloworld</string> <key>bundle-version</key> <string>1</string> <key>kind</key> <string>software</string> <key>title</key> <string>一個有趣的APP</string> </dict> </dict> </array> </dict> </plist>解析後會從https://example.com/app.ipa下載應用,用戶點擊確定即可安裝。
這裡注意不論是ota.plist還是app.ipa的地址都是強制要求為HTTPS的,
因此若想以這種形式安裝,還必須要去註冊一個合法的SSL證書,也可以用免費的。
由於AppStore審核很嚴格,很多私人用的或者不合規的iOS軟體都是通過OTA部署的形式分發的,
並且在會在安裝說明中指引用戶去設置->通用->描述文件與設備管理中手動點擊信任該個人/企業開發者。
其他
除了上述方式,還有一些開源腳本可以幫助我們安裝部署自己的應用,如ios-deploy,
只要連接USB輸入以下命令即可安裝:
$ ios-deploy -b HelloWorld.ipa [....] Waiting for iOS device to be connected ------ Install phase ------ ... [ 65%] InstallingEmbeddedProfile [ 70%] VerifyingApplication [ 75%] CreatingContainer [ 80%] InstallingApplication [ 85%] PostflightingApplication [ 90%] SandboxingApplication [ 95%] GeneratingApplicationMap [100%] Installed package HelloWorld.ipa有點類似於Android的adb install,相當方便。個人建議直接使用源碼編譯而不是npm安裝。
後記
本文從開發者的角度,介紹了iOS應用創建、編譯、打包、測試、部署等方面,
從零開始構建並運行我們的第一個iOS程式。 既介紹了模擬器的安裝測試方式,
也介紹了物理機上的打包和部署過程。其中很多地方儘可能的使用命令行去運行,
這有利於後續自動化的操作,也有利於我們理解各個選項所使用到的參數作用。
為了降低工作量,我們特地在沒有越獄以及沒有開發者帳號的情況下完成上述操作。
下一篇,我們將嘗試從攻擊者的角度,實際「破解」一個iOS應用,Stay Tuned!
參考鏈接
- iOS builds / ipa creation from the command line
- Setting up Frida Without Jailbreak on devices running iOS 12.1.4
- AppCake – Third party ipa download
- dumpdecrypted – Dumps decrypted mach-o files from encrypted iPhone applications from memory to disk
- Clutch- Fast iOS executable dumper
- frida-ios-dump
- insert_dylib
- Non-market App Distribution – Monaca Docs


