SpringBoot怎麼自定義一個Starter ?
- 2022 年 11 月 15 日
- 筆記
- JAVA, spring, springboot, starter, 技術分享, 自定義starter
小夥伴們曾經可能都經歷過整天寫著CURD的業務,都沒寫過一些組件相關的東西,這篇文章記錄一下SpringBoot如何自定義一個Starter。
原理和理論就不用多說了,可以在網上找到很多關於該方面的資料,這裡主要分享如何自定義。
原文鏈接:SpringBoot怎麼自定義一個Starter ?一隻小Coder
需求
在一個項目中,用戶需要發送消息,可以通過郵件,QQ,微信,釘釘,飛書等,目前這些發送消息的方式都已經提供了公開的API,想要實現在項目中通過簡單的配置各個發發送方的發送方資訊,然後直接調用發送的API,發送資訊即可,下面舉個🌰:
配置
message:
  email:
    username: Aden
    password: 123456
    key: HJFHADJSFBDASFHUADSINF
    api-url: //blog.qiyuan.run
  feishu:
    user-name: Aden
    pass-word: 654321
    key: HFJKADSBFJKADSJFKADSNFAD
    api-url: //blog.qiyuan.run
調用
    @Autowired
    SendEmailMessageServiceImpl emailMessageService;

    @Autowired
    SendFeishuMessageServiceImpl feishuMessageService;

    public boolean sendEmail(String msg) {
        return emailMessageService.sendMessage(msg);
    }

    public boolean sendFeishu(String msg){
        return feishuMessageService.sendMessage(msg);
    }
效果的就是以上這樣,只要通過配置需要發送消息的配置,自動注入發送消息的API,就可以實現發送消息了,以下是實現過程。
starter創建
第一步,需要為你的starter取一個響亮的名字,spring的官方文檔中說明,官方的 starter 的命名格式為 spring-boot-starter-{xxxx} 比如spring-boot-starter-activemq
第三方我們自己的命名格式為 {xxxx}-spring-boot-starter。比如mybatis-spring-boot-starter,此處,我命名為message-spring-boot-starter
自定義配置資訊類
因為要在項目中的配置文件中寫配置資訊,所以在這個starter中,我們需要通過一個配置資訊類來接收配置的資訊。
@ConfigurationProperties(prefix = "message")
@Data
public class MessageProperties {
    /**
     * 郵箱消息
     */
    private MessageConfigInfo email = new MessageConfigInfo();
    /**
     * 飛書消息
     */
    private MessageConfigInfo feishu = new MessageConfigInfo();

    @Data
    public static class MessageConfigInfo {
        /**
         * 用戶名
         */
        private String userName;
        /**
         * 密碼
         */
        private String passWord;
        /**
         * 秘鑰
         */
        private String key;
        /**
         * 消息發送API
         */
        private String apiUrl;
    }
}
發送消息的實現
由於需要通過這個starter實現發送消息,所以這裡可能得要引入發送郵件,發送飛書的官方API,這裡就不搞這麼複雜了,主要還是看過程,自定義一個介面模擬一下即可。
模擬介面定義
public interface SendMessageService {
    Boolean sendMessage(String message);
}
模擬介面實現
public class SendEmailMessageServiceImpl implements SendMessageService {

    private MessageProperties messageProperties;

    public SendEmailMessageServiceImpl(MessageProperties messageProperties) {
        this.messageProperties = messageProperties;
    }

    @Override
    public Boolean sendMessage(String message) {
        System.out.println(messageProperties.toString() + "  開發發送郵件,發送內容為:" + message);
        return true;
    }
}
public class SendFeishuMessageServiceImpl implements SendMessageService {

    private MessageProperties messageProperties;

    public SendFeishuMessageServiceImpl(MessageProperties messageProperties) {
        this.messageProperties = messageProperties;
    }

    @Override
    public Boolean sendMessage(String message) {
        System.out.println(messageProperties.toString() + "  開發發送郵件,發送內容為:" + message);
        return true;
    }
}
自動配置類
@EnableConfigurationProperties(value = MessageProperties.class)
@Configuration
public class MessageAutoConfiguration {
    /**
     * 給發送郵件的實現類,注入配置資訊
     * @param messageProperties
     * @return
     */
    @Bean
    public SendEmailMessageServiceImpl emailMessageConfig(MessageProperties messageProperties){
        return new SendEmailMessageServiceImpl(messageProperties);
    }


    /**
     * 給發送飛書的實現類,注入配置資訊
     * @param messageProperties
     * @return
     */
    @Bean
    public SendFeishuMessageServiceImpl feishuMessageConfig(MessageProperties messageProperties){
        return new SendFeishuMessageServiceImpl(messageProperties);
    }
}
spring.factories
org.springframework.boot.autoconfigure.EnableAutoConfiguration=run.qiyuan.message.config.MessageAutoConfiguration
項目結構
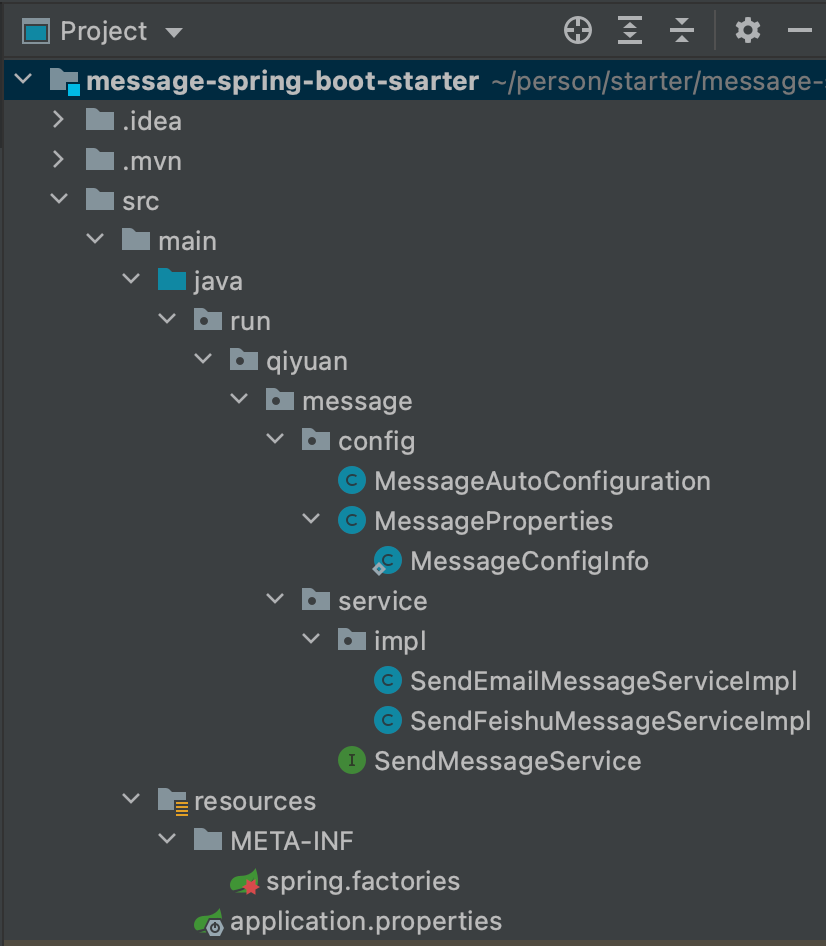
編寫完之後,mvn install即可。
如何使用該starter
在我們的項目中,引入自定義starter的坐標
        <dependency>
            <groupId>run.qiyuan</groupId>
            <artifactId>message-spring-boot-starter</artifactId>
            <version>0.0.1-SNAPSHOT</version>
        </dependency>
然後在配置文件中配置相關的資訊
message:
  email:
    username: Aden
    password: 123456
    key: HJFHADJSFBDASFHUADSINF
    api-url: //blog.qiyuan.run
  feishu:
    user-name: Aden
    pass-word: 654321
    key: HFJKADSBFJKADSJFKADSNFAD
    api-url: //blog.qiyuan.run
測試
@SpringBootApplication
public class TeachApplication {

    public static void main(String[] args) {
        ConfigurableApplicationContext context = SpringApplication.run(TeachApplication.class, args);
        SendEmailMessageServiceImpl emailMessageService = context.getBean(SendEmailMessageServiceImpl.class);
        emailMessageService.sendMessage("你好,Starter!,這是一封郵件資訊!\n\n");
        SendFeishuMessageServiceImpl feishuMessageService = context.getBean(SendFeishuMessageServiceImpl.class);
        feishuMessageService.sendMessage("你好,Starter!,這是一封飛書資訊!");
    }
}
結果


