Istio(二):在Kubernetes(k8s)集群上安裝部署istio1.14
一.模組概覽
在安裝 Istio 模組中,我們將介紹在 Kubernetes 集群上安裝 Istio1.14 的不同方法。我們將通過詳細的步驟,了解如何在 Kubernetes 集群上安裝 Istio。
關於istio簡介可以查看部落格《Istio(一):服務網格和 Istio 概述》//www.cnblogs.com/renshengdezheli/p/16836205.html
二.系統環境
| 伺服器版本 | docker軟體版本 | Kubernetes(k8s)集群版本 | Istio軟體版本 | CPU架構 |
|---|---|---|---|---|
| CentOS Linux release 7.4.1708 (Core) | Docker version 20.10.12 | v1.21.9 | Istio1.14 | x86_64 |
Kubernetes集群架構:k8scloude1作為master節點,k8scloude2,k8scloude3作為worker節點
| 伺服器 | 作業系統版本 | CPU架構 | 進程 | 功能描述 |
|---|---|---|---|---|
| k8scloude1/192.168.110.130 | CentOS Linux release 7.4.1708 (Core) | x86_64 | docker,kube-apiserver,etcd,kube-scheduler,kube-controller-manager,kubelet,kube-proxy,coredns,calico | k8s master節點 |
| k8scloude2/192.168.110.129 | CentOS Linux release 7.4.1708 (Core) | x86_64 | docker,kubelet,kube-proxy,calico | k8s worker節點 |
| k8scloude3/192.168.110.128 | CentOS Linux release 7.4.1708 (Core) | x86_64 | docker,kubelet,kube-proxy,calico | k8s worker節點 |
三.安裝istio
我們有兩種方法可以在單個 Kubernetes 集群上安裝 Istio:使用 Istioctl(istioctl)或使用 Istio Operator。在本模組中,我們將使用 Istio Operator 在一個 Kubernetes 集群上安裝 Istio。
3.1 使用 Istioctl 安裝
Istioctl 是一個命令行工具,我們可以用它來安裝和訂製 Istio 的安裝。使用該命令行工具,我們生成一個包含所有 Istio 資源的 YAML 文件,然後將其部署到 Kubernetes 集群上。
3.2 使用 Istio Operator 安裝
與 istioctl 相比,Istio Operator 安裝的優勢在於,我們不需要手動升級 Istio。相反,我們可以部署 Istio Operator,為你管理安裝。我們通過更新一個自定義資源來控制 Operator,而 Operator 則為你應用配置變化。
3.3 生產部署情況如何?
在決定 Istio 的生產部署模式時,還有一些額外的考慮因素需要牢記。我們可以配置 Istio 在不同的部署模型中運行 —— 可能跨越多個集群和網路,並使用多個控制平面。我們將在高級功能模組中了解其他部署模式、多集群安裝以及在虛擬機上運行工作負載。
3.4 平台安裝指南
Istio 可以安裝在不同的 Kubernetes 平台上。關於特定雲供應商的最新安裝指南,請參考平台安裝文檔。
//istio.io/latest/docs/setup/platform-setup/
四.GetMesh
Istio 是最受歡迎和發展最快的開源項目之一。它的發布時間表對企業的生命周期和變更管理實踐來說可能非常激進。GetMesh 通過針對不同的 Kubernetes 分發版測試所有 Istio 版本以確保功能的完整性來解決這一問題。GetMesh 的 Istio 版本在安全修補程式和其他錯誤更新方面得到積極的支援,並擁有比上游 Istio 提供的更長的支援期。
一些服務網格客戶需要支援更高的安全要求。GetMesh 通過提供兩種 Istio 發行版來解決合規性問題。
tetrate發行版,跟蹤上游 Istio 並可能應用額外的修補程式。tetratefips發行版,是符合 FIPS 標準的 tetrate 版本。
4.1 如何開始使用?
第一步是下載 GetMesh CLI。你可以在 macOS 和 Linux 平台上安裝 GetMesh。我們可以使用以下命令來下載最新版本的 GetMesh 和認證的 Istio。
4.2 如何開始?
第一步是下載 GetMesh CLI。你可以在 macOS 和 Linux 平台上安裝 GetMesh。我們可以使用以下命令下載最新版本的 GetMesh 並認證 Istio。
#安裝getmesh
[root@k8scloude1 ~]# curl -sL //istio.tetratelabs.io/getmesh/install.sh | bash
tetratelabs/getmesh info checking GitHub for latest tag
tetratelabs/getmesh info found version: 1.1.4 for v1.1.4/linux/amd64
tetratelabs/getmesh info installed /root/.getmesh/bin/getmesh
tetratelabs/getmesh info updating user profile (/root/.bash_profile)...
tetratelabs/getmesh info the following two lines are added into your profile (/root/.bash_profile):

export GETMESH_HOME="$HOME/.getmesh"
export PATH="$GETMESH_HOME/bin:$PATH"

Finished installation. Open a new terminal to start using getmesh!
修改配置文件使所有人都可以使用getmesh命令
[root@k8scloude1 ~]# cd .getmesh/

[root@k8scloude1 .getmesh]# pwd
/root/.getmesh

[root@k8scloude1 .getmesh]# vim /etc/profile.d/getmesh.sh

[root@k8scloude1 .getmesh]# cat /etc/profile.d/getmesh.sh
export GETMESH_HOME="/root/.getmesh"
export PATH="$GETMESH_HOME/bin:$PATH"

#使配置文件生效
[root@k8scloude1 .getmesh]# source /etc/profile.d/getmesh.sh
我們可以運行 version 命令以確保 GetMesh 被成功安裝。例如:
[root@k8scloude1 .getmesh]# getmesh version
getmesh version: 1.1.4
active istioctl: 1.14.4-tetrate-v0
client version: 1.14.4-tetrate-v0
control plane version: 1.14.3
data plane version: 1.14.3 (2 proxies)
版本命令輸出 GetMesh 的版本、活躍的 Istio CLI 的版本以及 Kubernetes 集群上安裝的 Istio 的版本。
4.3 使用 GetMesh 安裝 Istio
GetMesh 通過 Kubernetes 配置文件與活躍的 Kubernetes 集群進行通訊。
要在當前活躍的 Kubernetes 集群上安裝 Istio 的演示配置文件,我們可以像這樣使用 getmesh istioctl 命令:
[root@k8scloude1 .getmesh]# getmesh istioctl install --set profile=demo
該命令將檢查集群,以確保它準備好安裝 Istio,一旦你確認,安裝程式將繼續使用選定的配置文件安裝 Istio。
如果我們現在檢查版本,你會注意到輸出顯示控制平面和數據平面的版本。
4.4 驗證配置
config-validate 命令允許你對當前配置和任何尚未應用的 YAML 清單進行驗證。
該命令使用外部資源調用一系列驗證,如上游 Istio 驗證、Kiali 庫和 GetMesh 自定義配置檢查。
下面是一個命令輸出的例子,default命名空間沒有標記為 Istio 注入。
The namespace is not enabled for Istio injection. Run ‘kubectl label namespace default istio-injection=enabled’ to enable it, or ‘kubectl label namespace default istio-injection=disabled’ to explicitly mark it as not needing injection.這段資訊告訴我們:命名空間沒有啟用Istio注入,可以運行」kubectl label namespace default istio-injection=enabled「命令啟用Istio injection,或者運行’kubectl label namespace default istio-injection=disabled’命令顯式地將其標記為不需要注入。
[root@k8scloude1 ~]# getmesh config-validate
 Running the config validator. This may take some time...

 2021-08-02T19:20:33.873244Z     info    klog    Throttling request took 1.196458809s, request: GET://35.185.226.9/api/v1/namespaces/istio-system/configmaps/istio[]
 NAMESPACE       NAME    RESOURCE TYPE   ERROR CODE      SEVERITY        MESSAGE
 default         default Namespace       IST0102         Info            The namespace is not enabled for Istio injection. Run 'kubectl label namespace default istio-injection=enabled' to enable it, or 'kubectl label namespace default istio-injection=disabled' to explicitly mark it as not needing injection.

 The error codes of the found issues are prefixed by 'IST' or 'KIA'. For the detailed explanation, please refer to
 - //istio.io/latest/docs/reference/config/analysis/ for 'IST' error codes
 - //kiali.io/documentation/latest/validations/ for 'KIA' error codes
同樣,你也可以傳入一個 YAML 文件來驗證它,然後再將它部署到集群。例如:
[root@k8scloude1 ~]# getmesh config-validate my-resources.yaml
4.5 管理多個 Istio CLI
我們可以使用 show 命令來列出當前下載的 Istio 版本:
[root@k8scloude1 ~]# getmesh show
1.14.4-tetrate-v0 (Active)
如果電腦上沒有我們想使用的版本,可以使用 getmesh list 命令來列出所有可信的 Istio 版本:
[root@k8scloude1 ~]# getmesh list
 ISTIO VERSION     FLAVOR        FLAVOR VERSION     K8S VERSIONS
    *1.9.5         tetrate             0         1.17,1.18,1.19,1.20
     1.9.5          istio              0         1.17,1.18,1.19,1.20
     1.9.4         tetrate             0         1.17,1.18,1.19,1.20
     1.9.4          istio              0         1.17,1.18,1.19,1.20
     1.9.0         tetrate             0         1.17,1.18,1.19,1.20
     1.9.0       tetratefips           1         1.17,1.18,1.19,1.20
     1.9.0          istio              0         1.17,1.18,1.19,1.20
     1.8.6         tetrate             0         1.16,1.17,1.18,1.19
     1.8.6          istio              0         1.16,1.17,1.18,1.19
     1.8.5         tetrate             0         1.16,1.17,1.18,1.19
     1.8.5          istio              0         1.16,1.17,1.18,1.19
     1.8.3         tetrate             0         1.16,1.17,1.18,1.19
     1.8.3       tetratefips           1         1.16,1.17,1.18,1.19
     1.8.3          istio              0         1.16,1.17,1.18,1.19
     1.7.8         tetrate             0           1.16,1.17,1.18
     1.7.8          istio              0           1.16,1.17,1.18
要獲取一個特定的版本(比方說1.9.0 tetratefips),我們可以使用 fetch 命令:
[root@k8scloude1 ~]# getmesh fetch --version 1.9.0 --flavor tetratefips --flavor-version 1
當上述命令完成後,GetMesh 將獲取的 Istio CLI 版本設置為活躍版本。例如,運行 show 命令現在顯示 tetratefips 1.9.0 版本是活躍的:
[root@k8scloude1 ~]# getmesh show
 1.9.0-tetratefips-v1 (Active)
 1.9.5-tetrate-v0
同樣,如果我們運行 getmesh istioctl version ,我們會發現正在使用的 Istio CLI 的版本:
[root@k8scloude1 ~]# getmesh istioctl version
 client version: 1.9.0-tetratefips-v1
 control plane version: 1.9.5-tetrate-v0
 data plane version: 1.9.5-tetrate-v0 (2 proxies)
要切換到不同版本的 Istio CLI,我們可以運行 getmesh switch 命令:
[root@k8scloude1 ~]# getmesh switch --version 1.9.5 --flavor tetrate --flavor-version 0
4.6 CA 集成
我們沒有使用自簽的根證書,而是從 GCP CAS(證書授權服務)獲得一個中間的 Istio 證書授權(CA)來簽署工作負載證書。
假設你已經配置了自己的 CAS 實例, 可以用 CA 的參數創建一個 YAML 配置。下面是 YAML 配置的一個例子:
 providerName: "gcp"
 providerConfig:
   gcp:
     # 你在 GCP 上創建的證書授權的完整 CA 名稱
     casCAName: "projects/tetrate-io-istio/locations/us-west1/certificateAuthorities/tetrate-example-io"

 certificateParameters:
   secretOptions:
     istioCANamespace: "istio-system" # cacerts secret 所在的命名空間
     overrideExistingCACertsSecret: true # 重寫已存在的 cacerts secret,使用新的替換
   caOptions:
     validityDays: 365 # CA 到期前的有效天數
     keyLength: 2048 # 創建的 key 的比特數
     certSigningRequestParams: # x509.CertificateRequest;大部分欄位省略
       subject:
         commonname: "tetrate.example.io"
         country:
           - "US"
         locality:
           - "Sunnyvale"
         organization:
           - "Istio"
         organizationunit:
           - "engineering"
       emailaddresses:
         - "youremail@example.io"
配置完成後,你可以使用 gen-ca 命令來創建 cacert。
[root@k8scloude1 ~]# getmesh gen-ca --config-file gcp-cas-config.yaml
該命令在 istio-system 中創建 cacerts Kubernetes Secret。為了讓 istiod 接受新的 cert,你必須重新啟動 istiod。
如果你創建一個 sample 工作負載,並檢查所使用的證書,你會發現是 CA 為工作負載發布的證書。
Istio CA certs 集成可用於 GCP CA 服務和 AWS Private CA 服務。
五.發現選擇器(Discovery Selectors)
發現選擇器是 Istio 1.10 中引入的新功能之一。發現選擇器允許我們控制 Istio 控制平面觀察和發送配置更新的命名空間。
默認情況下,Istio 控制平面會觀察和處理集群中所有 Kubernetes 資源的更新。服務網格中的所有 Envoy代理的配置方式是,它們可以到達服務網格中的每個工作負載,並接受與工作負載相關的所有埠的流量。
例如,我們在不同的命名空間部署了兩個工作負載——foo 和 bar。儘管我們知道 foo 永遠不會與 bar 通訊,反之亦然,但一個服務的端點將被包含在另一個服務的已發現端點列表中。
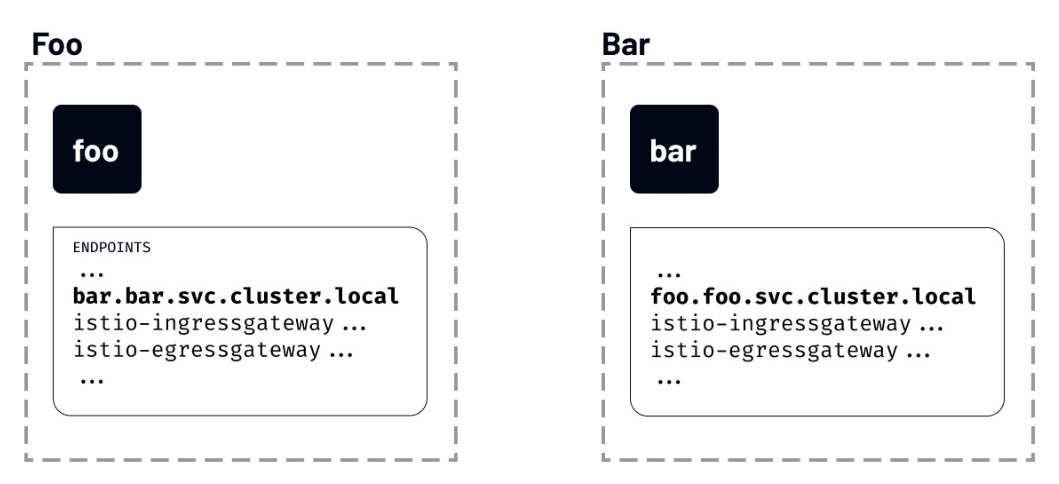
如果我們運行 istioctl proxy-config 命令,列出 foo 命名空間的 foo 工作負載可以看到的所有端點,你會注意到一個名為 bar 的服務條目:
[root@k8scloude1 ~]# istioctl proxy-config endpoints deploy/foo.foo
 ENDPOINT                         STATUS      OUTLIER CHECK     CLUSTER
 …
 10.4.1.4:31400                   HEALTHY     OK                outbound|31400||istio-ingressgateway.istio-system.svc.cluster.local
 10.4.1.5:80                      HEALTHY     OK                outbound|80||foo.foo.svc.cluster.local
 10.4.2.2:53                      HEALTHY     OK                outbound|53||kube-dns.kube-system.svc.cluster.local
 10.4.4.2:8383                    HEALTHY     OK                outbound|8383||istio-operator.istio-operator.svc.cluster.local
 10.4.4.3:8080                    HEALTHY     OK                outbound|80||istio-egressgateway.istio-system.svc.cluster.local
 10.4.4.3:8443                    HEALTHY     OK                outbound|443||istio-egressgateway.istio-system.svc.cluster.local
 10.4.4.4:80                      HEALTHY     OK                outbound|80||bar.bar.svc.cluster.local
 ...
如果 Istio 不斷用集群中每個服務的資訊來更新代理,即使這些服務是不相關的,我們可以想像這將如何拖累事情。
如果這聽起來很熟悉,你可能知道已經有一個解決方案了——Sidecar 資源。
我們將在後面的模組中討論 Sidecar 資源。
5.1 配置發現選擇器
發現選擇器可以在 MeshConfig 中的 Mesh 層面上進行配置。它們是一個 Kubernetes 選擇器的列表,指定了 Istio 在向 sidecar 推送配置時觀察和更新的命名空間的集合。
就像 Sidecar 資源一樣,discoverySelectors 可以用來限制被 Istio 觀察和處理的項目數量。
我們可以更新 IstioOperator 以包括 discoverySelectors 欄位,如下所示:
 apiVersion: install.istio.io/v1alpha1
 kind: IstioOperator
 metadata:
   namespace: istio-system
   name: istio-demo
 spec:
   meshConfig:
     discoverySelectors:
     - matchLabels:
         env: test
上面的例子將 env=test 設置為一個匹配標籤。這意味著標有 env=test 標籤的命名空間中的工作負載將被包含在 Istio 監控和更新的命名空間列表中。
如果我們給 foo 命名空間貼上 env=test 標籤,然後列出端點,我們會發現現在配置中列出的端點沒有那麼多。這是因為我們標註的唯一命名空間是 foo 命名空間,這也是 Istio 控制平面觀察和發送更新的唯一命名空間。
[root@k8scloude1 ~]# istioctl proxy-config endpoints deploy/foo.foo
 ENDPOINT                         STATUS      OUTLIER CHECK     CLUSTER
 10.4.1.5:80                      HEALTHY     OK                outbound|80||foo.foo.svc.cluster.local
 127.0.0.1:15000                  HEALTHY     OK                prometheus_stats
 127.0.0.1:15020                  HEALTHY     OK                agent
 unix://./etc/istio/proxy/SDS     HEALTHY     OK                sds-grpc
 unix://./etc/istio/proxy/XDS     HEALTHY     OK                xds-grpc
如果我們把命名空間 bar 也貼上標籤,然後重新運行 istioctl proxy-config 命令,我們會發現 bar 端點顯示為 foo 服務配置的一部分。
[root@k8scloude1 ~]# istioctl proxy-config endpoints deploy/foo.foo
 ENDPOINT                         STATUS      OUTLIER CHECK     CLUSTER
 10.4.1.5:80                      HEALTHY     OK                outbound|80||foo.foo.svc.cluster.local
 10.4.4.4:80                      HEALTHY     OK                outbound|80||bar.bar.svc.cluster.local
 127.0.0.1:15000                  HEALTHY     OK                prometheus_stats
 127.0.0.1:15020                  HEALTHY     OK                agent
 unix://./etc/istio/proxy/SDS     HEALTHY     OK                sds-grpc
 unix://./etc/istio/proxy/XDS     HEALTHY     OK                xds-grpc
六.實戰(k8s集群安裝Istio 1.14版本)
要安裝 Istio,我們需要一個運行中的 Kubernetes 集群實例。所有的雲供應商都提供託管的 Kubernetes 集群,我們可以用它來安裝 Istio 服務網格。
我們也可以在自己的電腦上使用以下任意平台在本地運行 Kubernetes集群:
當使用本地 Kubernetes 集群時,確保你的電腦滿足 Istio 安裝的最低要求(如 16384MB 記憶體和 4 個 CPU)。另外,確保 Kubernetes 集群的版本大於等於 v1.19.0。
6.1 Kubernetes 集群(1.21.9版本)
安裝istio的前提是已經有一套可以正常運行的Kubernetes集群,關於Kubernetes(k8s)集群的安裝部署,可以查看部落格《Centos7 安裝部署Kubernetes(k8s)集群》//www.cnblogs.com/renshengdezheli/p/16686769.html
Kubernetes集群版本為1.21.9
[root@k8scloude1 ~]# kubectl get node
NAME         STATUS   ROLES                  AGE    VERSION
k8scloude1   Ready    control-plane,master   255d   v1.21.9
k8scloude2   Ready    <none>                 255d   v1.21.9
k8scloude3   Ready    <none>                 255d   v1.21.9
Kubernetes CLI是kubectl工具,我們可以運行 kubectl version 來查看kubectl的版本
[root@k8scloude1 ~]# kubectl version
Client Version: version.Info{Major:"1", Minor:"21", GitVersion:"v1.21.9", GitCommit:"b631974d68ac5045e076c86a5c66fba6f128dc72", GitTreeState:"clean", BuildDate:"2022-01-19T17:51:12Z", GoVersion:"go1.16.12", Compiler:"gc", Platform:"linux/amd64"}
Server Version: version.Info{Major:"1", Minor:"21", GitVersion:"v1.21.9", GitCommit:"b631974d68ac5045e076c86a5c66fba6f128dc72", GitTreeState:"clean", BuildDate:"2022-01-19T17:45:53Z", GoVersion:"go1.16.12", Compiler:"gc", Platform:"linux/amd64"}
6.2 Istio 版本支援狀態
Istio最新版本為1.15,因為我們Kubernetes集群版本為1.21.9,所以我們選擇安裝Istio 1.14版本。
| 版本 | 目前支援 | 發行日期 | 停止維護 | 支援的 Kubernetes 版本 | 未測試,可能支援的 Kubernetes 版本 |
|---|---|---|---|---|---|
| master | 否,僅限開發 | – | – | – | – |
| 1.15 | 是 | 2022 年 8 月 31 日 | ~ 2023 年 3 月(預期) | 1.22, 1.23, 1.24, 1.25 | 1.16, 1.17, 1.18, 1.19, 1.20, 1.21 |
| 1.14 | 是 | 2022 年 5 月 24 日 | ~ 2023 年 1 月(預期) | 1.21, 1.22, 1.23, 1.24 | 1.16, 1.17, 1.18, 1.19, 1.20 |
| 1.13 | 是 | 2022 年 2 月 11 日 | ~ 2022 年 10 月(預期) | 1.20, 1.21, 1.22, 1.23 | 1.16, 1.17, 1.18, 1.19 |
| 1.12 | 是 | 2021 年 11 月 18 日 | 2022 年 7 月 12 日 | 1.19, 1.20, 1.21, 1.22 | 1.16, 1.17, 1.18 |
| 1.11 | 否 | 2021 年 8 月 12 日 | 2022 年 3 月 25 日 | 1.18, 1.19, 1.20, 1.21, 1.22 | 1.16, 1.17 |
| 1.10 | 否 | 2021 年 5 月 18 日 | 2022 年 1 月 7 日 | 1.18, 1.19, 1.20, 1.21 | 1.16, 1.17, 1.22 |
| 1.9 | 否 | 2021 年 2 月 9 日 | 2021 年 10 月 8 日 | 1.17, 1.18, 1.19, 1.20 | 1.15, 1.16 |
| 1.8 | 否 | 2020 年 11 月 10 日 | 2021 年 5 月 12 日 | 1.16, 1.17, 1.18, 1.19 | 1.15 |
| 1.7 | 否 | 2020 年 8 月 21 日 | 2021 年 2 月 25 日 | 1.16, 1.17, 1.18 | 1.15 |
| 1.6 及更早 | 否 | – | – | – | – |
Kubernetes 1.22 刪除了一些已棄用的 API,因此 1.10.0 之前的 Istio 版本將不再工作。如果您正在升級 Kubernetes 版本,請確保 Istio 的版本仍然受到支援。
istio各個版本的歸檔可以查看://istio.io/archive/
6.3 下載 Istio
在本實驗中,我們將使用 Istio 1.14版本。安裝 Istio 的第一步是下載 Istio CLI(istioctl)、安裝清單、示例和工具。
安裝最新版本的最簡單方法是使用 downloadIstio 腳本。打開一個終端窗口,打開你要下載 Istio 的文件夾,然後運行下載腳本。
下載istio最新版本命令為:
[root@k8scloude1 ~]# curl -L //istio.io/downloadIstio | sh -
您可以在命令行上傳遞變數以下載特定版本或覆蓋處理器架構。例如,要下載 x86_64 架構的 Istio 1.14.3,請運行:
[root@k8scloude1 ~]# curl -L //istio.io/downloadIstio | ISTIO_VERSION=1.14.3 TARGET_ARCH=x86_64 sh -
或者直接去//github.com/istio/istio/releases/download/1.14.3/istio-1.14.3-linux-amd64.tar.gz下載安裝包,下載安裝包之後解壓,istio-1.14.3/bin目錄下可以看到istioctl,istio-1.14.3/samples目錄下是示例應用程式。
[root@k8scloude1 ~]# ll -h istio-1.14.3-linux-amd64.tar.gz
-rw-r--r-- 1 root root 23M 9月  22 11:34 istio-1.14.3-linux-amd64.tar.gz

[root@k8scloude1 ~]# tar xf istio-1.14.3-linux-amd64.tar.gz

[root@k8scloude1 ~]# ls
istio-1.14.3-linux-amd64.tar.gz  istio-1.14.3

[root@k8scloude1 ~]# cd istio-1.14.3/

[root@k8scloude1 istio-1.14.3]# ls
bin  LICENSE  manifests  manifest.yaml  README.md  samples  tools

[root@k8scloude1 istio-1.14.3]# ls bin/
istioctl
為了訪問 istioctl,我們應該把它添加到 path 中。
[root@k8scloude1 bin]# pwd
/root/istio-1.14.3/bin

[root@k8scloude1 bin]# ls
istioctl

#臨時生效
[root@k8scloude1 bin]# export PATH=/root/istio-1.14.3/bin:$PATH

#永久生效
[root@k8scloude1 bin]# vim /etc/profile.d/istioctl.sh

[root@k8scloude1 bin]# cat /etc/profile.d/istioctl.sh
export ISTIOCTL_HOME="/root/istio-1.14.3"
export PATH="$ISTIOCTL_HOME/bin:$PATH"

[root@k8scloude1 bin]# source /etc/profile.d/istioctl.sh
要檢查 istioctl 是否在 path 里,運行 istioctl version。你應該看到這樣的輸出。
[root@k8scloude1 bin]# istioctl version
no running Istio pods in "istio-system"
1.14.3
6.4 安裝 Istio
Istio 支援多個配置文件(profile)。配置文件之間的區別在於所安裝的組件。
[root@k8scloude1 bin]# istioctl profile list
Istio configuration profiles:
    default
    demo
    empty
    external
    minimal
    openshift
    preview
    remote
這些配置文件提供了對 Istio 控制平面和 Istio 數據平面 Sidecar 的訂製內容。
您可以從 Istio 內置配置文件的其中一個開始入手,然後根據您的特定需求進一步自定義配置文件。當前提供以下幾種內置配置文件:
-
default:根據
IstioOperatorAPI 的默認設置啟動組件。 建議用於生產部署和 Multicluster Mesh 中的 Primary Cluster。您可以運行
istioctl profile dump命令來查看默認設置。 -
demo:這一配置具有適度的資源需求,旨在展示 Istio 的功能。 它適合運行 Bookinfo 應用程式和相關任務。 這是通過快速開始指導安裝的配置。此配置文件啟用了高級別的追蹤和訪問日誌,因此不適合進行性能測試。
-
minimal:與默認配置文件相同,但只安裝了控制平面組件。 它允許您使用 Separate Profile 配置控制平面和數據平面組件(例如 Gateway)。
-
remote:配置 Multicluster Mesh 的 Remote Cluster。
-
empty:不部署任何東西。可以作為自定義配置的基本配置文件。
-
preview:預覽文件包含的功能都是實驗性。這是為了探索 Istio 的新功能。不確保穩定性、安全性和性能(使用風險需自負)。
標註  的組件安裝在每個配置文件中:
| default | demo | minimal | remote | empty | preview | |
|---|---|---|---|---|---|---|
| 核心組件 | ||||||
istio-egressgateway |
|
|||||
istio-ingressgateway |
|
|
|
|||
istiod |
|
|
|
|
推薦用於生產部署的配置文件是 default 配置文件。
我們將安裝 demo 配置文件,因為它包含所有的核心組件,啟用了跟蹤和日誌記錄,便於學習不同的 Istio 功能。
我們也可以從 minimal 的組件開始,以後單獨安裝其他功能,如 ingress 和 egress 網關。
因為我們將使用 Istio Operator 進行安裝,所以我們必須先部署 Operator。關於Istio Operator 簡介可以查看//istio.io/v1.14/zh/blog/2019/introducing-istio-operator/
要部署 Istio Operator,請運行:
[root@k8scloude1 bin]# istioctl operator init
Installing operator controller in namespace: istio-operator using image: docker.io/istio/operator:1.14.3
Operator controller will watch namespaces: istio-system
 Istio operator installed
 Installation complete
init 命令創建了 istio-operator 命名空間,並部署了 CRD、Operator Deployment 以及 operator 工作所需的其他資源。安裝完成後,Operator 就可以使用了。
要安裝 Istio,我們必須創建 IstioOperator 資源,並指定我們要使用的配置文件。
創建一個名為 istio-demo-profile.yaml的文件,內容如下:
#創建目錄istioyaml,用來專門存放yaml文件
[root@k8scloude1 ~]# mkdir istioyaml

[root@k8scloude1 ~]# cd istioyaml/

[root@k8scloude1 istioyaml]# vim istio-demo-profile.yaml

#profile: demo表示使用demo配置文件安裝istio
[root@k8scloude1 istioyaml]# cat istio-demo-profile.yaml
apiVersion: v1
kind: Namespace
metadata:
  name: istio-system
---
apiVersion: install.istio.io/v1alpha1
kind: IstioOperator
metadata:
  namespace: istio-system
  name: demo-istio-install
spec:
  profile: demo
我們還在文件中添加了命名空間資源,以創建 istio-system 命名空間。
我們需要做的最後一件事是創建資源:
[root@k8scloude1 istioyaml]# kubectl apply -f istio-demo-profile.yaml
Warning: resource namespaces/istio-system is missing the kubectl.kubernetes.io/last-applied-configuration annotation which is required by kubectl apply. kubectl apply should only be used on resources created declaratively by either kubectl create --save-config or kubectl apply. The missing annotation will be patched automatically.
namespace/istio-system configured
istiooperator.install.istio.io/demo-istio-install created

#可以查看istio-system命名空間下的所有資源
[root@k8scloude1 istioyaml]# kubectl get all -o wide -n istio-system
NAME                                        READY   STATUS    RESTARTS   AGE     IP               NODE         NOMINATED NODE   READINESS GATES
pod/istio-egressgateway-58949b7c84-k7v6f    1/1     Running   0          3m38s   10.244.112.173   k8scloude2   <none>           <none>
pod/istio-ingressgateway-75bc568988-9j4wv   1/1     Running   0          3m38s   10.244.251.238   k8scloude3   <none>           <none>
pod/istiod-84d979766b-kz5sd                 1/1     Running   0          4m20s   10.244.112.130   k8scloude2   <none>           <none>

NAME                           TYPE           CLUSTER-IP      EXTERNAL-IP       PORT(S)                                                                      AGE     SELECTOR
service/istio-egressgateway    ClusterIP      10.102.56.241   <none>            80/TCP,443/TCP                                                               3m35s   app=istio-egressgateway,istio=egressgateway
service/istio-ingressgateway   LoadBalancer   10.107.131.65   192.168.110.190   15021:30093/TCP,80:32126/TCP,443:30293/TCP,31400:30628/TCP,15443:30966/TCP   3m35s   app=istio-ingressgateway,istio=ingressgateway
service/istiod                 ClusterIP      10.103.37.59    <none>            15010/TCP,15012/TCP,443/TCP,15014/TCP                                        4m21s   app=istiod,istio=pilot

NAME                                   READY   UP-TO-DATE   AVAILABLE   AGE     CONTAINERS    IMAGES                           SELECTOR
deployment.apps/istio-egressgateway    1/1     1            1           3m39s   istio-proxy   docker.io/istio/proxyv2:1.14.3   app=istio-egressgateway,istio=egressgateway
deployment.apps/istio-ingressgateway   1/1     1            1           3m39s   istio-proxy   docker.io/istio/proxyv2:1.14.3   app=istio-ingressgateway,istio=ingressgateway
deployment.apps/istiod                 1/1     1            1           4m21s   discovery     docker.io/istio/pilot:1.14.3     istio=pilot

NAME                                              DESIRED   CURRENT   READY   AGE     CONTAINERS    IMAGES                           SELECTOR
replicaset.apps/istio-egressgateway-58949b7c84    1         1         1       3m39s   istio-proxy   docker.io/istio/proxyv2:1.14.3   app=istio-egressgateway,istio=egressgateway,pod-template-hash=58949b7c84
replicaset.apps/istio-ingressgateway-75bc568988   1         1         1       3m39s   istio-proxy   docker.io/istio/proxyv2:1.14.3   app=istio-ingressgateway,istio=ingressgateway,pod-template-hash=75bc568988
replicaset.apps/istiod-84d979766b                 1         1         1       4m21s   discovery     docker.io/istio/pilot:1.14.3     istio=pilot,pod-template-hash=84d979766b
一旦 Operator 檢測到 IstioOperator 資源,它將開始安裝 Istio。整個過程可能需要5分鐘左右。
為了檢查安裝的狀態,我們可以看看 istio-system 命名空間中的 Pod 的狀態。
[root@k8scloude1 istioyaml]# kubectl get pod -o wide -n istio-system
NAME                                    READY   STATUS    RESTARTS   AGE     IP               NODE         NOMINATED NODE   READINESS GATES
istio-egressgateway-58949b7c84-k7v6f    1/1     Running   0          9m20s   10.244.112.173   k8scloude2   <none>           <none>
istio-ingressgateway-75bc568988-9j4wv   1/1     Running   0          9m20s   10.244.251.238   k8scloude3   <none>           <none>
istiod-84d979766b-kz5sd                 1/1     Running   0          10m     10.244.112.130   k8scloude2   <none>           <none>
當所有的 Pod 都在運行時,Operator 已經完成了 Istio 的安裝。
6.5 啟用 sidecar 注入
服務網格需要讓每個應用程式同時運行 sidecar 代理。
要將 sidecar 代理注入到現有的 Kubernetes 部署中,我們可以使用 istioctl 命令中的 kube-inject 動作。
然而,我們也可以在任意 Kubernetes 命名空間上啟用 sidecar 自動注入。如果我們用 istio-injection=enabled 標記命名空間,Istio 會自動為我們在該命名空間中創建的所有 Kubernetes Pod 注入 sidecar。
讓我們通過添加標籤來啟用 microservice 命名空間的 sidecar 自動注入。
#創建命名空間
[root@k8scloude1 istioyaml]# kubectl create ns microservice
namespace/microservice created

[root@k8scloude1 istioyaml]# kubectl label namespace microservice istio-injection=enabled
namespace/microservice labeled
要檢查命名空間是否被標記,請運行下面的命令。microservice 命名空間應該是唯一一個啟用了該值的命名空間。
[root@k8scloude1 istioyaml]# kubectl get namespace -L istio-injection
NAME                   STATUS   AGE     ISTIO-INJECTION
app-team1              Active   163d
microservice           Active   3m39s   enabled
my-app                 Active   162d
network                Active   219d
ns1                    Active   256d

#或者這樣查詢
[root@k8scloude1 istioyaml]# kubectl get namespace -l istio-injection=enabled
NAME           STATUS   AGE
microservice   Active   6m56s
現在我們可以嘗試在 microservice 命名空間創建一個 Deployment,並觀察注入的代理。我們將創建一個名為 mynginx 的 Deployment,使用hub.c.163.com/library/nginx:latest鏡像的單一容器。
 [root@k8scloude1 istioyaml]# kubectl create deployment mynginx --image=hub.c.163.com/library/nginx:latest -n microservice
deployment.apps/mynginx created
如果我們看一下 Pod,你會發現 Pod 里有兩個容器。
[root@k8scloude1 istioyaml]# kubectl get deployment -n microservice
NAME      READY   UP-TO-DATE   AVAILABLE   AGE
mynginx   1/1     1            1           27s

[root@k8scloude1 istioyaml]# kubectl get pod -n microservice
NAME                       READY   STATUS    RESTARTS   AGE
mynginx-5cb948ffc5-wv29l   2/2     Running   0          35s
同樣地,描述 Pod 時會顯示 Kubernetes 同時創建了一個 nginx 容器和一個 istio-proxy 容器:
[root@k8scloude1 istioyaml]# kubectl describe pod mynginx-5cb948ffc5-wv29l -n microservice
Name:         mynginx-5cb948ffc5-wv29l
......
Events:
  Type    Reason     Age   From               Message
  ----    ------     ----  ----               -------
  Normal  Scheduled  12m   default-scheduler  Successfully assigned microservice/mynginx-5cb948ffc5-wv29l to k8scloude2
  Normal  Pulled     12m   kubelet            Container image "docker.io/istio/proxyv2:1.14.3" already present on machine
  Normal  Created    12m   kubelet            Created container istio-init
  Normal  Started    12m   kubelet            Started container istio-init
  Normal  Pulling    12m   kubelet            Pulling image "hub.c.163.com/library/nginx:latest"
  Normal  Pulled     12m   kubelet            Successfully pulled image "hub.c.163.com/library/nginx:latest" in 2.24360029s
  Normal  Created    12m   kubelet            Created container nginx
  Normal  Started    12m   kubelet            Started container nginx
  Normal  Pulled     12m   kubelet            Container image "docker.io/istio/proxyv2:1.14.3" already present on machine
  Normal  Created    12m   kubelet            Created container istio-proxy
  Normal  Started    12m   kubelet            Started container istio-proxy
運行下面的命令,刪除deployment:
[root@k8scloude1 istioyaml]# kubectl delete deployment mynginx -n microservice
deployment.apps "mynginx" deleted

[root@k8scloude1 istioyaml]# kubectl get deployment -n microservice
No resources found in microservice namespace.

[root@k8scloude1 istioyaml]# kubectl get pod -n microservice
No resources found in microservice namespace.
6.6 更新和卸載 Istio
如果我們想更新當前的安裝或改變配置文件,那麼需要更新先前部署的 IstioOperator 資源。
要刪除安裝,我們必須刪除 IstioOperator,例如:
[root@k8scloude1 istioyaml]# kubectl get istiooperator -n istio-system
NAME                 REVISION   STATUS    AGE
demo-istio-install              HEALTHY   45m

[root@k8scloude1 istioyaml]# kubectl delete istiooperator demo-istio-install -n istio-system
在 Operator 刪除了Istio 後,運行下面的命令來刪除 Operator:
[root@k8scloude1 istioyaml]# istioctl operator remove
請確保在刪除 Operator 之前先刪除 IstioOperator 資源。否則,可能會有剩餘的 Istio 資源。


