驅動開發:內核中的自旋鎖結構
- 2022 年 9 月 28 日
- 筆記
- Windows 內核驅動開發, Windows 驅動開發
提到自旋鎖那就必須要說鏈表,在上一篇《驅動開發:內核中的鏈表與結構體》文章中簡單實用鏈表結構來存儲進程資訊列表,相信讀者應該已經理解了內核鏈表的基本使用,本篇文章將講解自旋鎖的簡單應用,自旋鎖是為了解決內核鏈表讀寫時存在執行緒同步問題,解決多執行緒同步問題必須要用鎖,通常使用自旋鎖,自旋鎖是內核中提供的一種高IRQL鎖,用同步以及獨佔的方式訪問某個資源。
首先以簡單的鏈表為案例,鏈表主要分為單向鏈表與雙向鏈表,單向鏈表的鏈表節點中只有一個鏈表指針,其指向後一個鏈表元素,而雙向鏈表節點中有兩個鏈表節點指針,其中Blink指向前一個鏈表節點Flink指向後一個節點,以雙向鏈表為例。
#include <ntifs.h>
#include <ntstrsafe.h>

/*
// 鏈表節點指針
typedef struct _LIST_ENTRY
{
  struct _LIST_ENTRY *Flink;   // 當前節點的後一個節點
  struct _LIST_ENTRY *Blink;   // 當前節點的前一個結點
}LIST_ENTRY, *PLIST_ENTRY;
*/

typedef struct _MyStruct
{
  ULONG x;
  ULONG y;
  LIST_ENTRY lpListEntry;
}MyStruct,*pMyStruct;

VOID UnDriver(PDRIVER_OBJECT driver)
{
  DbgPrint("驅動卸載成功 \n");
}

// By: LyShark
NTSTATUS DriverEntry(IN PDRIVER_OBJECT Driver, PUNICODE_STRING RegistryPath)
{
  DbgPrint("By:LyShark \n");
  DbgPrint("Email:[email protected] \n");
  // 初始化頭節點
  LIST_ENTRY ListHeader = { 0 };
  InitializeListHead(&ListHeader);

  // 定義鏈表元素
  MyStruct testA = { 0 };
  MyStruct testB = { 0 };
  MyStruct testC = { 0 };

  testA.x = 100;
  testA.y = 200;

  testB.x = 1000;
  testB.y = 2000;

  testC.x = 10000;
  testC.y = 20000;

  // 分別插入節點到頭部和尾部
  InsertHeadList(&ListHeader, &testA.lpListEntry);
  InsertTailList(&ListHeader, &testB.lpListEntry);
  InsertTailList(&ListHeader, &testC.lpListEntry);

  // 節點不為空 則 移除一個節點
  if (IsListEmpty(&ListHeader) == FALSE)
  {
    RemoveEntryList(&testA.lpListEntry);
  }

  // 輸出鏈表數據
  PLIST_ENTRY pListEntry = NULL;
  pListEntry = ListHeader.Flink;

  while (pListEntry != &ListHeader)
  {
    // 計算出成員距離結構體頂部記憶體距離
    pMyStruct ptr = CONTAINING_RECORD(pListEntry, MyStruct, lpListEntry);
    DbgPrint("節點元素X = %d 節點元素Y = %d \n", ptr->x, ptr->y);

    // 得到下一個元素地址
    pListEntry = pListEntry->Flink;
  }

  Driver->DriverUnload = UnDriver;
  return STATUS_SUCCESS;
}
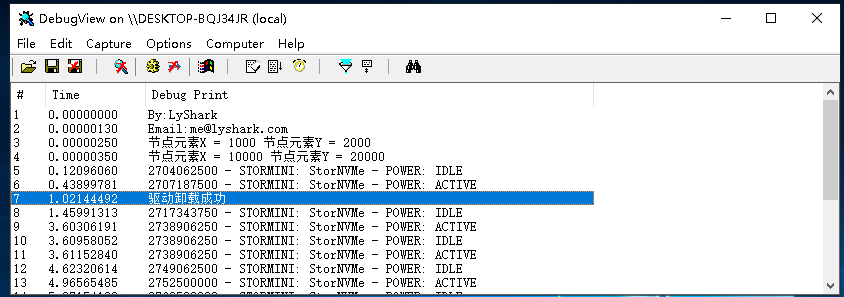
鏈表輸出效果如下:

如上所述,內核鏈表讀寫時存在執行緒同步問題,解決多執行緒同步問題必須要用鎖,通常使用自旋鎖,自旋鎖是內核中提供的一種高IRQL鎖,用同步以及獨佔的方式訪問某個資源。
#include <ntifs.h>
#include <ntstrsafe.h>

/*
// 鏈表節點指針
typedef struct _LIST_ENTRY
{
struct _LIST_ENTRY *Flink;   // 當前節點的後一個節點
struct _LIST_ENTRY *Blink;   // 當前節點的前一個結點
}LIST_ENTRY, *PLIST_ENTRY;
*/

typedef struct _MyStruct
{
	ULONG x;
	ULONG y;
	LIST_ENTRY lpListEntry;
}MyStruct, *pMyStruct;

// 定義全局鏈表和全局鎖
LIST_ENTRY my_list_header;
KSPIN_LOCK my_list_lock;

// 初始化
void Init()
{
	InitializeListHead(&my_list_header);
	KeInitializeSpinLock(&my_list_lock);
}

// 函數內使用鎖
void function_ins()
{
	KIRQL Irql;

	// 加鎖
	KeAcquireSpinLock(&my_list_lock, &Irql);

	DbgPrint("鎖內部執行 \n");

	// 釋放鎖
	KeReleaseSpinLock(&my_list_lock, Irql);
}

VOID UnDriver(PDRIVER_OBJECT driver)
{
	DbgPrint("驅動卸載成功 \n");
}

// By: LyShark
NTSTATUS DriverEntry(IN PDRIVER_OBJECT Driver, PUNICODE_STRING RegistryPath)
{
	DbgPrint("By:LyShark \n");
	DbgPrint("Email:[email protected] \n");

	// 初始化鏈表
	Init();

	// 分配鏈表空間
	pMyStruct testA = (pMyStruct)ExAllocatePool(NonPagedPoolExecute, sizeof(pMyStruct));
	pMyStruct testB = (pMyStruct)ExAllocatePool(NonPagedPoolExecute, sizeof(pMyStruct));

	// 賦值
	testA->x = 100;
	testA->y = 200;

	testB->x = 1000;
	testB->y = 2000;

	// 向全局鏈表中插入數據
	if (NULL != testA && NULL != testB)
	{
		ExInterlockedInsertHeadList(&my_list_header, (PLIST_ENTRY)&testA->lpListEntry, &my_list_lock);
		ExInterlockedInsertTailList(&my_list_header, (PLIST_ENTRY)&testB->lpListEntry, &my_list_lock);
	}

	function_ins();

	// 移除節點A並放入到remove_entry中
	PLIST_ENTRY remove_entry = ExInterlockedRemoveHeadList(&testA->lpListEntry, &my_list_lock);

	// 輸出鏈表數據
	while (remove_entry != &my_list_header)
	{
		// 計算出成員距離結構體頂部記憶體距離
		pMyStruct ptr = CONTAINING_RECORD(remove_entry, MyStruct, lpListEntry);
		DbgPrint("節點元素X = %d 節點元素Y = %d \n", ptr->x, ptr->y);

		// 得到下一個元素地址
		remove_entry = remove_entry->Flink;
	}

	Driver->DriverUnload = UnDriver;
	return STATUS_SUCCESS;
}
加鎖後執行效果如下:


