新一代網路請求庫:python-httpx庫
- 2022 年 9 月 9 日
- 筆記
- python第三方庫, 爬蟲知識
httpx庫
一、 概述
1、 簡介

![]()
![]()
HTTPX 是 Python 3 的全功能 HTTP 客戶端,它提供同步和非同步 API,並支援 HTTP/1.1 和 HTTP/2。
官方文檔位置://www.python-httpx.org/
該庫的特性:
HTTPX 建立在公認的可用性之上requests,並為您提供:
- 廣泛兼容請求的 API。
- 標準同步介面,但如果需要,可以支援非同步。
- HTTP/1.1和 HTTP/2 支援。
- 能夠直接向WSGI 應用程式或ASGI 應用程式發出請求。
- 到處都是嚴格的超時。
- 完全類型注釋。
- 100% 的測試覆蓋率。
加上requests…的所有標準功能
- 國際域名和 URL
- 保持活動和連接池
- 具有 Cookie 持久性的會話
- 瀏覽器式 SSL 驗證
- 基本/摘要認證
- 優雅的鍵/值 Cookie
- 自動減壓
- 自動內容解碼
- Unicode 響應體
- 多部分文件上傳
- HTTP(S) 代理支援
- 連接超時
- 流式下載
- .netrc 支援
- 分塊請求
安裝方式:
pip install httpx  # 安裝庫
pip install httpx[http2]  # 獲取http2的支援
pip install httpx[brotli]  # 包括可選的 brotli 解碼器支援
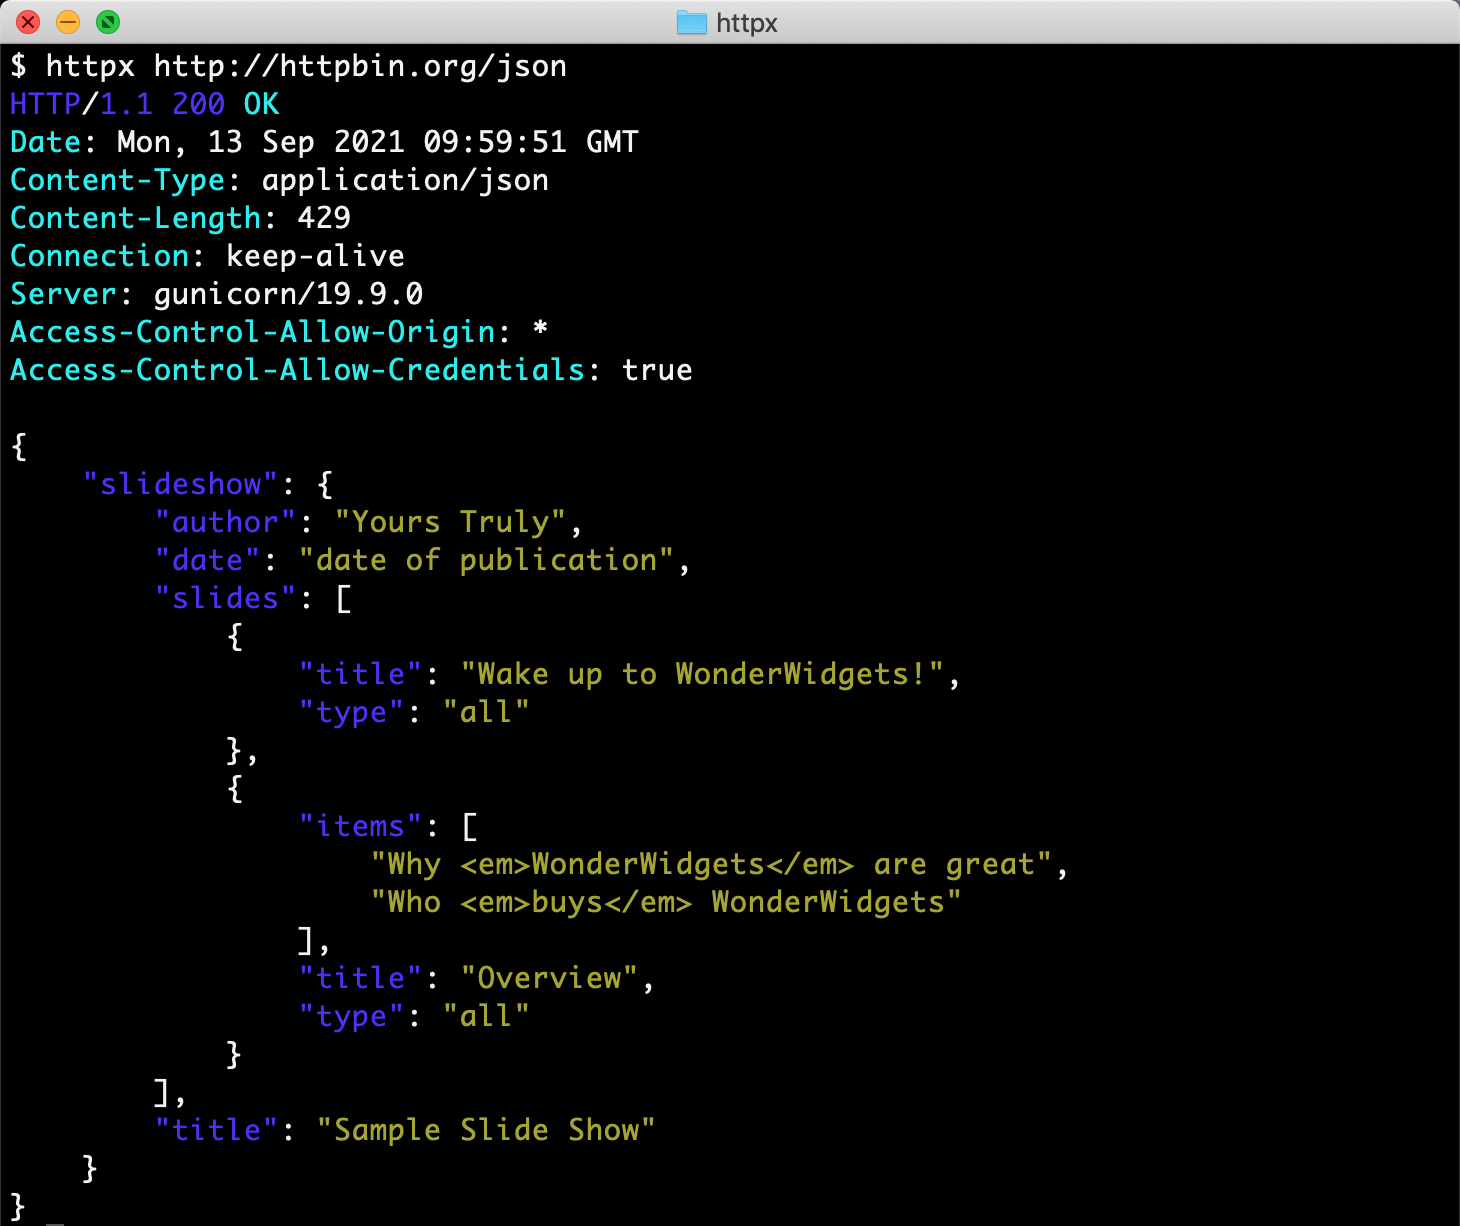
2、 命令行模式
安裝: pip install 'httpx[cli]'
現在允許我們直接從命令行使用 HTTPX…
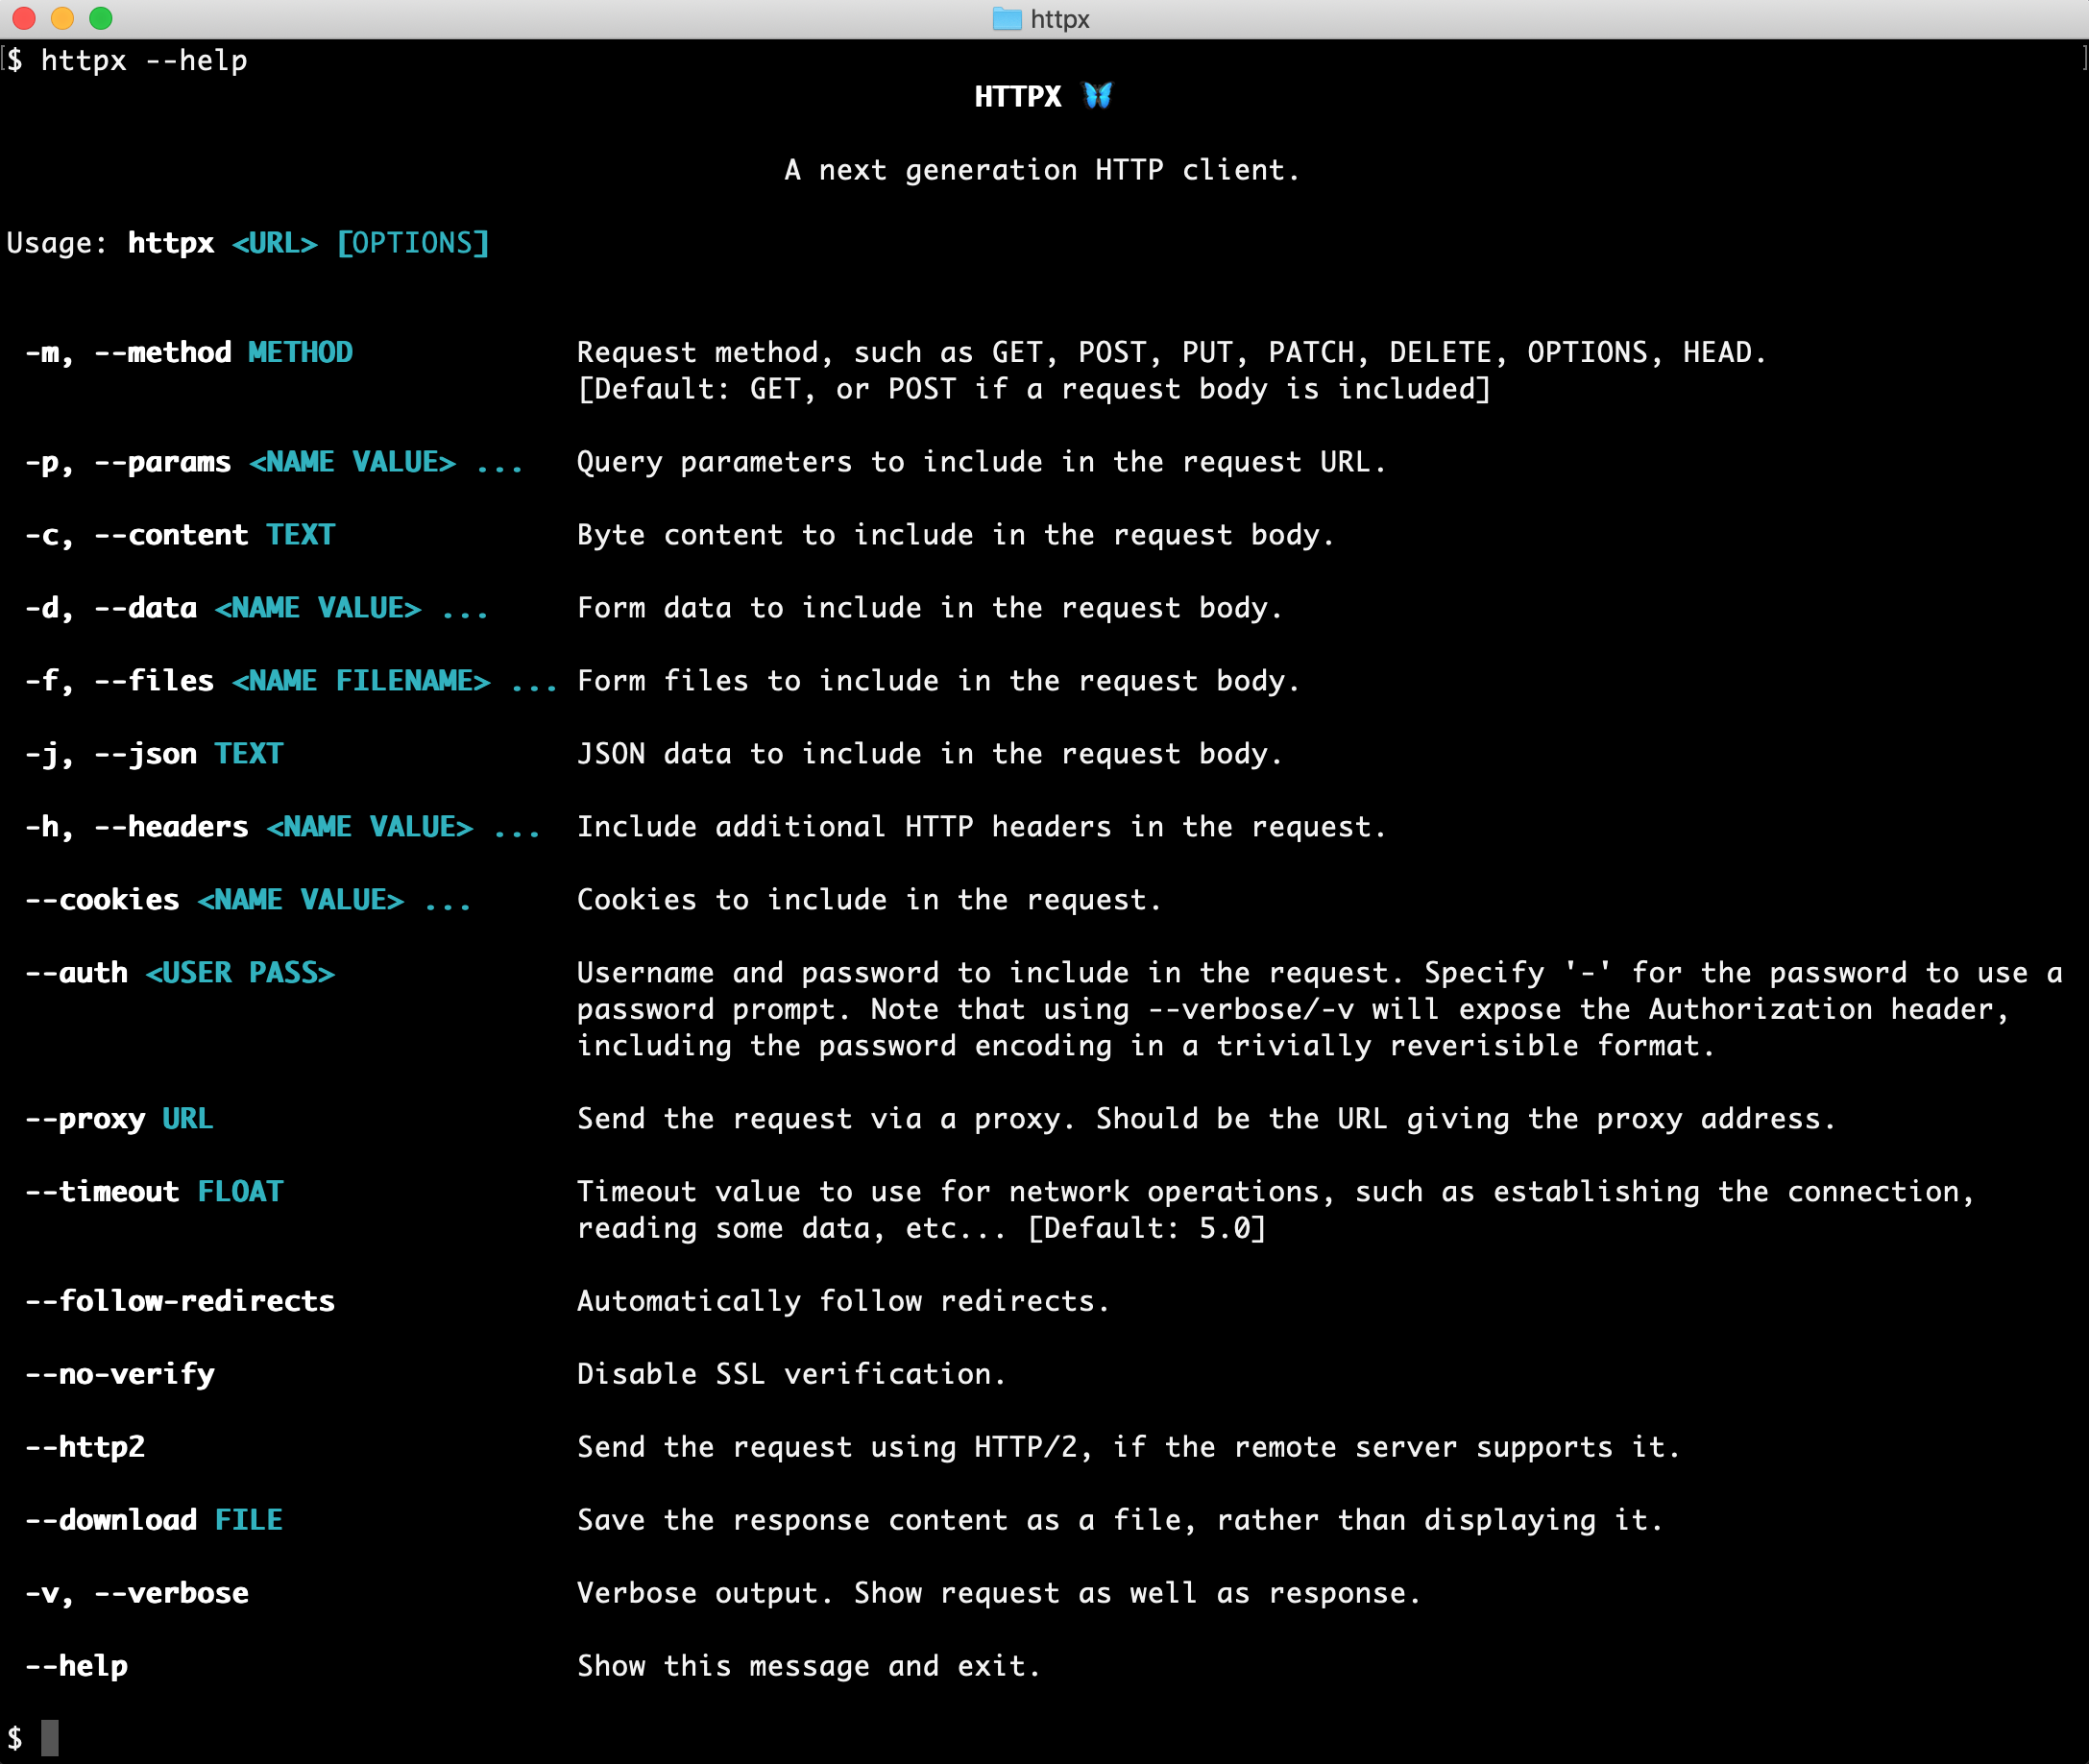
發送請求…
3、 快速開始
3.1 get請求
#!/usr/bin/python3
# -*- coding: UTF-8 -*-
__author__ = "A.L.Kun"
__file__ = "demo01.py"
__time__ = "2022/9/9 7:55"
import httpx
from fake_useragent import UserAgent

headers = {
    "user-agent": UserAgent().random,
}
params = {
    "wd": "python"  # 輸入百度搜索的內容
}
resp = httpx.get("//www.baidu.com/s", params=params, headers=headers, cookies=None, proxies=None)  # 和原來requests的使用方法類似
resp.encoding = resp.charset_encoding  # 根據文檔的編碼還對文檔進行編碼
print(resp.text)  # 獲取數據資訊
requests中的參數和httpx中的參數大部分類似
3.2 post請求
3.2.1 表單
#!/usr/bin/python3
# -*- coding: UTF-8 -*-
__author__ = "A.L.Kun"
__file__ = "demo01.py"
__time__ = "2022/9/9 7:55"
import httpx

data = {'key1': 'value1', 'key2': 'value2'}
r = httpx.post("//httpbin.org/post", data=data)
print(r.text)
3.2.2 文件
#!/usr/bin/python3
# -*- coding: UTF-8 -*-
__author__ = "A.L.Kun"
__file__ = "demo01.py"
__time__ = "2022/9/9 7:55"
import httpx

files = {'upload-file': open('a.jpg', 'rb')}
# 也可以通過元組來指定數據類型
# files = {'upload-file': ('report.xls', open('report.xls', 'rb'), 'application/vnd.ms-excel')}
r = httpx.post("//httpbin.org/post", files=files)
print(r.text)
3.2.3 JSON
#!/usr/bin/python3
# -*- coding: UTF-8 -*-
__author__ = "A.L.Kun"
__file__ = "demo01.py"
__time__ = "2022/9/9 7:55"
import httpx

data = {'integer': 123, 'boolean': True, 'list': ['a', 'b', 'c']}
r = httpx.post("//httpbin.org/post", json=data)
print(r.text)
3.2.4 二進位
#!/usr/bin/python3
# -*- coding: UTF-8 -*-
__author__ = "A.L.Kun"
__file__ = "demo01.py"
__time__ = "2022/9/9 7:55"
import httpx

content = b'Hello, world'
r = httpx.post("//httpbin.org/post", content=content, headers={
    "Content-Type": "application/octet-stream",
})
print(r.text)
Content-Type在上傳二進位數據時設置自定義標頭常見的媒體格式類型如下:
- text/html : HTML格式
- text/plain :純文本格式
- text/xml : XML格式
- image/gif :gif圖片格式
- image/jpeg :jpg圖片格式
- image/png:png圖片格式
以application開頭的媒體格式類型:
- application/xhtml+xml :XHTML格式
- application/xml: XML數據格式
- application/atom+xml :Atom XML聚合格式
- application/json: JSON數據格式
- application/pdf:pdf格式
- application/msword : Word文檔格式
- application/octet-stream : 二進位流數據(如常見的文件下載)
- application/x-www-form-urlencoded : <form encType=””>中默認的encType,form表單數據被編碼為key/value格式發送到伺服器(表單默認的提交數據的格式)
另外一種常見的媒體格式是上傳文件之時使用的:
- multipart/form-data : 需要在表單中進行文件上傳時,就需要使用該格式
3.3 響應處理
#!/usr/bin/python3
# -*- coding: UTF-8 -*-
__author__ = "A.L.Kun"
__file__ = "demo01.py"
__time__ = "2022/9/9 7:55"

import httpx

resp = httpx.request("GET", "//www.baidu.com")
if resp.status_code == httpx.codes.OK:
    print(resp.text)  # 如果請求成功

print(resp.raise_for_status())  # 判斷響應是否成功,成功返回None,失敗則報錯
3.4 流式響應
對於大型下載,您可能希望使用不會一次將整個響應主體載入到記憶體中的流式響應。
您可以流式傳輸響應的二進位內容..
#!/usr/bin/python3
# -*- coding: UTF-8 -*-
__author__ = "A.L.Kun"
__file__ = "demo01.py"
__time__ = "2022/9/9 7:55"

import httpx

with httpx.stream("GET", "//www.example.com") as r:
    for data in r.iter_bytes():  # 流式傳輸響應的二進位內容
        # for text in r.iter_text():  # 獲取全部的文本內容
        # for line in r.iter_lines():  # 逐行獲取傳輸響應的文本內容
        # for chunk in r.iter_raw():  # 獲取編碼前的原始數據
        # if r.headers['Content-Length'] < TOO_LONG:  # 有條件的載入內容
        print(data)
注意:
- 如果您以任何這些方式使用流式響應,則
response.contentandresponse.text屬性將不可用
3.5 cookie
#!/usr/bin/python3
# -*- coding: UTF-8 -*-
__author__ = "A.L.Kun"
__file__ = "demo01.py"
__time__ = "2022/9/9 7:55"

import httpx
# 獲取cookie
r = httpx.get('//httpbin.org/cookies/set?chocolate=chip')
print(r.cookies['chocolate'])  # 獲取請求中的cookie

# 設置cookie
cookies_1 = {"peanut": "butter"}

cookies_2 = httpx.Cookies()
cookies_2.set('cookie_on_domain', 'hello, there!', domain='httpbin.org')
cookies_2.set('cookie_off_domain', 'nope.', domain='example.org')
r = httpx.get('//httpbin.org/cookies', cookies=cookies_2)
print(r.json())
3.6 重定向
默認情況下,HTTPX不會跟隨所有 HTTP 方法的重定向,儘管這可以顯式啟用。
如,GitHub 將所有 HTTP 請求重定向到 HTTPS。
#!/usr/bin/python3
# -*- coding: UTF-8 -*-
__author__ = "A.L.Kun"
__file__ = "demo01.py"
__time__ = "2022/9/9 7:55"

import httpx
r = httpx.get('//github.com/')
print(r.status_code)
print(r.history)  # 查看重定向的記錄
print(r.next_request)  # 獲取到重定向以後的請求對象
resp = httpx.Client().send(r.next_request) # 對請求對象發送請求
print(resp.text)
那麼,我們可不可以跟蹤這個重定向呢?其實是可以的:
您可以使用參數修改默認重定向處理follow_redirects
#!/usr/bin/python3
# -*- coding: UTF-8 -*-
__author__ = "A.L.Kun"
__file__ = "demo01.py"
__time__ = "2022/9/9 7:55"

import httpx
r = httpx.get('//github.com/', follow_redirects=True)
print(r.history)  # 查看重定向記錄
print(r.url)  # 獲取請求的url
print(r.text)  # 獲取請求數據
3.7 超時和驗證
HTTPX 默認包含所有網路操作的合理超時,這意味著如果連接沒有正確建立,那麼它應該總是引發錯誤而不是無限期掛起。
網路不活動的默認超時為五秒。您可以將值修改為或多或少嚴格:
httpx.get('//github.com/', timeout=0.001)  # 同時也可以禁止超時行為
httpx.get('//github.com/', timeout=None)
HTTPX 支援基本和摘要 HTTP 身份驗證。
要提供基本身份驗證憑據,請將純文本str或bytes對象的 2 元組作為auth參數傳遞給請求函數:
#!/usr/bin/python3
# -*- coding: UTF-8 -*-
__author__ = "A.L.Kun"
__file__ = "demo01.py"
__time__ = "2022/9/9 7:55"

import httpx
httpx.get("//example.com", auth=("my_user", "password123"))  # 驗證方法一
auth = httpx.DigestAuth("my_user", "password123")  # 驗證方法二
httpx.get("//example.com", auth=auth)
二、 客戶端
1、 特性
如果您來自 Requests,httpx.Client()您可以使用它來代替requests.Session().
其功能:
當您使用快速入門指南中記錄的頂級 API 發出請求時,HTTPX 必須為每個請求建立一個新連接(連接不被重用)。隨著對主機的請求數量增加,這很快就會變得低效。
另一方面,Client實例使用HTTP 連接池。這意味著當您向同一主機發出多個請求時,Client將重用底層 TCP 連接,而不是為每個請求重新創建一個。
與使用頂級 API 相比,這可以帶來顯著的性能提升,包括:
- 減少請求之間的延遲(無握手)。
- 減少 CPU 使用率和往返次數。
- 減少網路擁塞。
額外功能:
Client實例還支援頂級 API 中不可用的功能,例如:
- 跨請求的 Cookie 持久性。
- 跨所有傳出請求應用配置。
- 通過 HTTP 代理髮送請求。
- 使用HTTP/2。
# 使用方法1
with httpx.Client() as client:
    ...


# 使用方法2
client = httpx.Client()
try:
    ...
finally:
    client.close()
2、 發出請求
一旦有了,就可以使用,等Client發送請求。例如:.get() .post() ,其傳遞參數的方法都一樣,要注意一點的是,在實例化Client的時候,可以傳入請求參數,使得這個局部作用域內可以共享這些參數,跨請求共享配置:
#!/usr/bin/python3
# -*- coding: UTF-8 -*-
__author__ = "A.L.Kun"
__file__ = "demo01.py"
__time__ = "2022/9/9 7:55"

import httpx

# 共用請求頭
url = '//httpbin.org/headers'
headers = {'user-agent': 'my-app/0.0.1'}
with httpx.Client(headers=headers) as client:
    # 這裡面的所有請求的請求頭都包含{'user-agent': 'my-app/0.0.1'}
    r = client.get(url)

print(r.json()['headers']['User-Agent'])

# 共用 + 私有
headers = {'X-Auth': 'from-client'}
params = {'client_id': 'client1'}
with httpx.Client(headers=headers, params=params) as client:
    headers_ = {'X-Custom': 'from-request'}
    params_ = {'request_id': 'request1'}
    r = client.get('//example.com', headers=headers_,
                   params=params_)  # 這個參數結合了headers+headers_ , params+params_,但是只限於params和headers,對於所有其他參數,內部請求級別的值優先

print(r.request.url)
print(r.request.headers['X-Auth'])
print(r.request.headers['X-Custom'])

# 優先順序
with httpx.Client(auth=('tom', 'mot123')) as client:
    r = client.get('//example.com', auth=('alice', 'ecila123'))

_, _, auth = r.request.headers['Authorization'].partition(' ')
import base64

print(base64.b64decode(auth))
3、 其他配置
此外,Client接受一些在請求級別不可用的配置選項。
例如,base_url允許您為所有傳出請求添加 URL:
#!/usr/bin/python3
# -*- coding: UTF-8 -*-
__author__ = "A.L.Kun"
__file__ = "demo01.py"
__time__ = "2022/9/9 7:55"

import httpx

with httpx.Client(base_url='//httpbin.org') as client:
     r = client.get('/headers')

print(r.request.url)
設置編碼:
import httpx
import chardet  # pip install chardet

def autodetect(content):
    return chardet.detect(content).get("encoding")  # 對html的編碼進行自動的檢測

# Using a client with character-set autodetection enabled.
client = httpx.Client(default_encoding=autodetect)
response = client.get(...)
print(response.encoding)  # This will either print the charset given in
                          # the Content-Type charset, or else the auto-detected
                          # character set.
print(response.text)
4、 python_web
您可以將httpx客戶端配置為使用 WSGI 協議直接調用 Python Web 應用程式。
這對於兩個主要用例特別有用:
- 在測試用例
httpx中用作客戶端。 - 在測試期間或在開發/登台環境中模擬外部服務。
下面是一個針對 Flask 應用程式集成的示例:
#!/usr/bin/python3
# -*- coding: UTF-8 -*-
__author__ = "A.L.Kun"
__file__ = "demo01.py"
__time__ = "2022/9/9 7:55"

from flask import Flask
import httpx

app = Flask(__name__)


@app.route("/")
def hello():
    return "Hello World!"


with httpx.Client(app=app, base_url="//localhost") as client:
    # base_url:指定app的根路由
    r = client.get("/")  # 獲取根路由下的響應數據
    print(r.text)
    assert r.status_code == 200  # 斷言
    assert r.text == "Hello World!"
對於一些更複雜的情況,您可能需要自定義 WSGI 傳輸。這使您可以:
- 通過設置檢查 500 個錯誤響應而不是引發異常
raise_app_exceptions=False。 script_name通過設置(WSGI)將 WSGI 應用程式掛載到子路徑。remote_addr通過設置(WSGI)為請求使用給定的客戶端地址。
# Instantiate a client that makes WSGI requests with a client IP of "1.2.3.4".
transport = httpx.WSGITransport(app=app, remote_addr="1.2.3.4")
with httpx.Client(transport=transport, base_url="//testserver") as client:
    ...
5、 Request對象
為了最大限度地控制通過網路發送的內容,HTTPX 支援構建顯式Request實例:
request = httpx.Request("GET", "//example.com")
要將Request實例分派到網路,請創建一個Client實例並使用.send():
with httpx.Client() as client:
    response = client.send(request)
    ...
如果您需要以默認Merging of parameters不支援的方式混合客戶端級別和請求級別選項,您可以使用.build_request()然後對Request實例進行任意修改。例如:
headers = {"X-Api-Key": "...", "X-Client-ID": "ABC123"}

with httpx.Client(headers=headers) as client:
    request = client.build_request("GET", "//api.example.com")

    print(request.headers["X-Client-ID"])  # "ABC123"

    # Don't send the API key for this particular request.
    del request.headers["X-Api-Key"]

    response = client.send(request)
    ...
6、 鉤子函數
HTTPX 允許您向客戶端註冊「事件掛鉤」,每次發生特定類型的事件時都會調用這些掛鉤。
目前有兩個事件掛鉤:
request– 在請求完全準備好之後,但在它被發送到網路之前調用。通過request實例。response– 在從網路獲取響應之後但在返回給調用者之前調用。通過response實例。
這些允許您安裝客戶端範圍的功能,例如日誌記錄、監視或跟蹤。
def log_request(request):
    print(f"Request event hook: {request.method} {request.url} - Waiting for response")

def log_response(response):
    request = response.request
    print(f"Response event hook: {request.method} {request.url} - Status {response.status_code}")

client = httpx.Client(event_hooks={'request': [log_request], 'response': [log_response]})  # 綁定鉤子函數
您還可以使用這些掛鉤來安裝響應處理程式碼,例如這個示例,它創建了一個總是httpx.HTTPStatusError 在 4xx 和 5xx 響應時引發的客戶端實例。
def raise_on_4xx_5xx(response):
    response.raise_for_status()

client = httpx.Client(event_hooks={'response': [raise_on_4xx_5xx]})
鉤子也允許修改request和response對象。
def add_timestamp(request):
    request.headers['x-request-timestamp'] = datetime.now(tz=datetime.utc).isoformat()

client = httpx.Client(event_hooks={'request': [add_timestamp]})
事件掛鉤必須始終設置為可調用列表,並且您可以為每種類型的事件註冊多個事件掛鉤。
除了能夠在實例化客戶端時設置事件掛鉤外,還有一個.event_hooks屬性允許您檢查和修改已安裝的掛鉤。
client = httpx.Client()
client.event_hooks['request'] = [log_request]
client.event_hooks['response'] = [log_response, raise_on_4xx_5xx]
如果您使用 HTTPX 的非同步支援,那麼您需要注意註冊的鉤子
httpx.AsyncClient必須是非同步函數,而不是普通函數。
7、 進度條
如果您需要監控大型響應的下載進度,您可以使用響應流並檢查response.num_bytes_downloaded屬性。
此介面是正確確定下載進度所必需的,因為如果使用 HTTP 響應壓縮,則返回的總位元組數response.content或response.iter_content()不會總是與響應的原始內容長度相對應。
例如,tqdm在下載響應時使用庫顯示進度條可以這樣完成……
import tempfile

import httpx
from tqdm import tqdm

with tempfile.NamedTemporaryFile() as download_file:  # 創建一個臨時文件。程式結束就刪除
    url = "//speed.hetzner.de/100MB.bin"
    with httpx.stream("GET", url) as response:  # 使用流發送請求
        total = int(response.headers["Content-Length"])

        with tqdm(total=total, unit_scale=True, unit_divisor=1024, unit="B") as progress:
            num_bytes_downloaded = response.num_bytes_downloaded
            for chunk in response.iter_bytes():
                download_file.write(chunk)
                progress.update(response.num_bytes_downloaded - num_bytes_downloaded)
                num_bytes_downloaded = response.num_bytes_downloaded
8、 .netrc 支援
HTTPX 支援 .netrc 文件。在trust_env=True某些情況下,如果未定義 auth 參數,HTTPX 會嘗試將 auth 從 .netrc 文件添加到請求的標頭中。
NETRC 文件在客戶端發出的請求之間進行快取。如果您需要刷新快取(例如,因為 NETRC 文件已更改),您應該創建一個新客戶端或重新啟動解釋器。
默認trust_env為真。設置為假:
httpx.get('//example.org/', trust_env=False)
如果NETRCenvironment 為空,HTTPX 會嘗試使用默認文件。( ~/.netrc, ~/_netrc)
改變NETRC環境:
import os
os.environ["NETRC"] = "my_default_folder/.my_netrc"
.netrc 文件內容示例:
machine netrcexample.org
login example-username
password example-password

...
使用Client實例時,trust_env應該在客戶端本身上設置,而不是在請求方法上:
client = httpx.Client(trust_env=False)
三、 代理
1、 簡介
HTTPX 支援通過在proxies客戶端初始化或頂級 API 函數(如httpx.get(..., proxies=...).

代理如何工作的圖表(來源:維基百科)。左側的「Internet」blob 可能是example.com通過代理請求的 HTTPX 客戶端。
2、 使用方法
2.1 簡單使用
要將所有流量(HTTP 和 HTTPS)路由到位於 的代理//localhost:8030,請將代理 URL 傳遞給客戶端…
with httpx.Client(proxies="//localhost:8030") as client:
    ...
對於更高級的用例,傳遞一個 proxies dict。例如,要將 HTTP 和 HTTPS 請求路由到 2 個不同的代理,分別位於//localhost:8030和//localhost:8031,傳遞一個dict代理 URL:
proxies = {
    "//": "//localhost:8030",
    "//": "//localhost:8031",
}

with httpx.Client(proxies=proxies) as client:
    ...
2.2 驗證
代理憑據可以作為userinfo代理 URL 的部分傳遞。例如:
proxies = {
    "//": "//username:password@localhost:8030",
    # ...
}
2.3 路由
HTTPX 提供了細粒度的控制來決定哪些請求應該通過代理,哪些不應該。此過程稱為代理路由。
該proxies字典將 URL 模式(「代理鍵」)映射到代理 URL。HTTPX 將請求的 URL 與代理密鑰進行匹配,以決定應該使用哪個代理(如果有)。從最具體的代理密鑰(例如//:)到最不具體的代理密鑰(例如 )進行匹配//。
HTTPX 支援基於scheme、domain、port或這些的組合的路由代理。
2.3.1 通配符路由
通過代理路由所有內容…
proxies = {
    "all://": "//localhost:8030",
}
2.3.2 方案路由
通過一個代理路由 HTTP 請求,通過另一個代理路由 HTTPS 請求…
proxies = {
    "//": "//localhost:8030",
    "//": "//localhost:8031",
}
2.3.3 域路由
# 代理域「example.com」上的所有請求,讓其他請求通過...
proxies = {
    "all://example.com": "//localhost:8030",
}
# 代理域「example.com」上的 HTTP 請求,讓 HTTPS 和其他請求通過...
proxies = {
    "//example.com": "//localhost:8030",
}
# 將所有請求代理到「example.com」及其子域,讓其他請求通過...
proxies = {
    "all://*example.com": "//localhost:8030",
}
# 代理所有請求到「example.com」的嚴格子域,讓「example.com」等請求通過...
proxies = {
    "all://*.example.com": "//localhost:8030",
}
2.3.4 埠路由
將埠 1234 上的 HTTPS 請求代理到「example.com」…
proxies = {
    "//example.com:1234": "//localhost:8030",
}
代理埠 1234 上的所有請求…
proxies = {
    "all://*:1234": "//localhost:8030",
}
2.3.5 無代理支援
也可以定義不應通過代理路由的請求。
為此,請None作為代理 URL 傳遞。例如…
proxies = {
    # Route requests through a proxy by default...
    "all://": "//localhost:8031",
    # Except those for "example.com".
    "all://example.com": None,
}
四、 非同步客戶端
1、 簡介
HTTPX 默認提供標準的同步 API,但如果需要,還可以選擇非同步客戶端。
非同步是一種比多執行緒更高效的並發模型,並且可以提供顯著的性能優勢並支援使用長壽命的網路連接,例如 WebSockets。
如果您使用的是非同步 Web 框架,那麼您還需要使用非同步客戶端來發送傳出的 HTTP 請求。
發送非同步請求:
#!/usr/bin/python3
# -*- coding: UTF-8 -*-
__author__ = "A.L.Kun"
__file__ = "demo01.py"
__time__ = "2022/9/9 7:55"

import asyncio
import httpx


async def test():
    async with httpx.AsyncClient() as client:
        r = await client.get("//www.baidu.com")

    print(r)


tasks = [test() for i in range(100)]
asyncio.run(asyncio.wait(tasks))
2、 API 差異
如果您使用的是非同步客戶端,那麼有一些 API 使用非同步方法。
2.1 發出請求
請求方法都是非同步的,因此您應該response = await client.get(...)對以下所有內容使用樣式:
AsyncClient.get(url, ...)AsyncClient.options(url, ...)AsyncClient.head(url, ...)AsyncClient.post(url, ...)AsyncClient.put(url, ...)AsyncClient.patch(url, ...)AsyncClient.delete(url, ...)AsyncClient.request(method, url, ...)AsyncClient.send(request, ...)
2.2 打開和關閉客戶
async with httpx.AsyncClient()如果您需要上下文管理的客戶端,請使用…
async with httpx.AsyncClient() as client:
    ...
或者,await client.aclose()如果您想明確關閉客戶端,請使用:
client = httpx.AsyncClient()
...
await client.aclose()
2.3 流式響應
該AsyncClient.stream(method, url, ...)方法是一個非同步上下文塊
client = httpx.AsyncClient()
async with client.stream('GET', '//www.example.com/') as response:
    async for chunk in response.aiter_bytes():
        ...
非同步響應流方法是:
Response.aread()– 用於有條件地讀取流塊內的響應。Response.aiter_bytes()– 用於將響應內容作為位元組流式傳輸。Response.aiter_text()– 用於將響應內容作為文本流式傳輸。Response.aiter_lines()– 用於將響應內容流式傳輸為文本行。Response.aiter_raw()– 用於流式傳輸原始響應位元組,而不應用內容解碼。Response.aclose()– 用於關閉響應。你通常不需要這個,因為.streamblock 在退出時會自動關閉響應。
對於上下文塊使用不實例的情況,可以通過使用 發送實例來進入「手動模式Request」client.send(..., stream=True)。
import httpx
from starlette.background import BackgroundTask
from starlette.responses import StreamingResponse

client = httpx.AsyncClient()

async def home(request):
    req = client.build_request("GET", "//www.example.com/")
    r = await client.send(req, stream=True)
    return StreamingResponse(r.aiter_text(), background=BackgroundTask(r.aclose))
使用這種「手動流模式」時,作為開發人員,您有責任確保
Response.aclose()最終調用它。不這樣做會使連接保持打開狀態,很可能導致資源泄漏。
2.4 流式傳輸請求
async def upload_bytes():
    ...  # yield byte content

await client.post(url, content=upload_bytes())
3、 非同步環境
3.1 asyncio
AsyncIO 是 Python 的內置庫 ,用於使用 async/await 語法編寫並發程式碼。
import asyncio
import httpx

async def main():
    async with httpx.AsyncClient() as client:
        response = await client.get('//www.example.com/')
        print(response)

asyncio.run(main())
3.2 trio
import httpx
import trio

async def main():
    async with httpx.AsyncClient() as client:
        response = await client.get('//www.example.com/')
        print(response)

trio.run(main)
trio必須安裝該軟體包才能使用 Trio 後端。
3.3 anyio
AnyIO 是一個非同步網路和並發庫,可在asyncio或trio. 它與您選擇的後端的本機庫融合在一起(默認為asyncio)。
import httpx
import anyio

async def main():
    async with httpx.AsyncClient() as client:
        response = await client.get('//www.example.com/')
        print(response)

anyio.run(main, backend='trio')
4、 python_web
正如httpx.Client允許您直接調用 WSGI Web 應用程式一樣,httpx.AsyncClient該類允許您直接調用 ASGI Web 應用程式。
我們以這個 Starlette 應用為例:
from starlette.applications import Starlette
from starlette.responses import HTMLResponse
from starlette.routing import Route


async def hello(request):
    return HTMLResponse("Hello World!")

app = Starlette(routes=[Route("/", hello)])
我們可以直接嚮應用程式發出請求,如下所示:
import httpx
async with httpx.AsyncClient(app=app, base_url="//testserver") as client:
    r = await client.get("/")
    assert r.status_code == 200
    assert r.text == "Hello World!"
對於一些更複雜的情況,您可能需要自定義 ASGI 傳輸。這使您可以:
- 通過設置檢查 500 個錯誤響應而不是引發異常
raise_app_exceptions=False。 - 通過設置將 ASGI 應用程式掛載到子路徑
root_path。 - 通過設置為請求使用給定的客戶端地址
client。
例如:
# Instantiate a client that makes ASGI requests with a client IP of "1.2.3.4",
# on port 123.
transport = httpx.ASGITransport(app=app, client=("1.2.3.4", 123))
async with httpx.AsyncClient(transport=transport, base_url="//testserver") as client:
    ...
其餘更多內容,請到官方文檔查看!//www.python-httpx.org/

