Linux的NFS的配置
快速程式碼
# nfs的Server配置文件和配置方法
echo '/newnfs 192.168.3.*rw,sync,no_root_squash)' >> /etc/exports
# 根目錄新建文件夾,許可權777
mkdir /newnfs && chmod 777 /newnfs
# 重新啟動rpcbind和nfs-server服務
systemctl restart rpcbind && systemctl restart nfs-server

# nfs的Client
# 查看Sever資訊
showmount -e 192.168.2.197
# 掛載
mkdir /newnfs
mount -t nfs 192.168.2.197:/newnfs /newnfs
文件傳輸系列
傳輸文件的方法有很多,比如ssh自帶的sftp,vsftp的ftp,samba提供的.
- openssh
- sftp:22/tcp
- sftp是基於ssh實現的,所以啟動了sshd後自帶sftp,不需要其他額外的配置就可以使用
- vsftp
- ftp:20,21/tpc
- ftp是最”傳統”的文件傳輸協議了,不過報文不加密,抓包就直接可以看到在頭部的帳號密碼,不安全
- samba
- smb:139/udp和445/tcp
- smb是微軟創造的協議,目前基礎在Windows系統和Linux系統之間傳輸文件使用
- webdav
- http:?/tcp
- webdav是我最喜歡的傳輸方式了,如果只需要下載文件,甚至不需要額外的下載軟體客戶端,只要在web上打開,同時也支援https
- nfs-utils
- nfs:2049/tcp和rpc:111/tcp
- 在多台Linux之間傳輸文件,nfs無非是最佳的選擇,nfs可以將其他Linux主機的文件掛載在本Linux,就想管理本地文件一樣的方便
NFS
- 今天來學習一下NFS
NFS概述
這裡的概述引用了大佬文章:NFS服務詳解
- NFS(Network File System)是一種基於TCP/IP傳輸的網路文件系統協議。通過使用NFS協議,客戶機可以像訪問本地目錄一樣訪問遠程伺服器中的共享資源
- NAS存儲: NFS服務的實現依賴於RPC (Remote Process Call,遠端過程調用)機制,以完成遠程到本地的映射過程。
- NFS需要兩個程式包
- nfs-utils:負責文件傳輸的主程式
- rpcbind:可以將RPC程式號碼和通用地址互相轉換,負責資訊傳輸的
- 二者互有分工,要先啟動rpcbind後才可啟動nfs.
NFS安裝
# 可以先查詢一下本機是否有安裝了nfs
# rpm系列Linux
rpm -aq | grep nfs

# deb系列
dpkg -l | grep nfs

# 查詢rpcbind也是同理

# 沒有就安裝一下啦
# rpm,當然用dnf命令也可以安裝的
yum install nfs-utils rpcbind

# deb
apt install nfs-utils rpcbind
NFS_Server配置
NFS對應的配置文件為/etc/exports,初始化時文件是空的,#號備註也沒有。
[root@client_149 ~]# cat /etc/exports
[root@client_149 ~]#
配置文件的格式
1共享目錄的路徑 2允許訪問的NFS客戶端ip(3共享許可權參數)
- 1、第一項為目錄的絕對路徑
- 2、允許訪問的ip,可以使用通配符,比如192.168.2.*代表192.168.2.0-255都可以訪問
- 3、許可權參數,有三對
|
參數
|
備註
|
|
文件讀寫許可權相關
|
|
|
登錄帳號映射匿名
|
|
|
同步數據的方式
|
|
#比如
/root/newdir 192.168.2.149(rw,sync,root_squash)
注意後面的扣號之間不需要空格,這也是個個坑。
新建共享文件夾
先建立個新的文件夾,並且給足許可權,777。
[root@server_197 ~]# mkdir /newnfs
[root@server_197 ~]# ll / | grep newnfs
drwxr-xr-x. 2 root root 6 Aug 30 19:57 newnfs
[root@server_197 ~]# chmod -R 777 /newnfs/
[root@server_197 ~]# ll / | grep newnfs
drwxrwxrwx. 2 root root 6 Aug 30 19:57 newnfs
寫入配置
[root@server_197 ~]# echo '/newnfs 192.168.2.*rw,sync,no_root_squash)' >> /etc/exports
[root@server_197 ~]# cat /etc/exports /newnfs
192.168.2.(rw,sync,no_root_squash)
固定埠(可選)
如果你在使用ipstables,或者是有有其他網段埠的限制,可能需要固定一下埠。
- nfs使用到埠
- portmapper(rpc-bind提供)埠:111 udp/tcp
- nfs/nfs_acl(nfs提供)埠:2049 udp/tcp
- mountd 埠:32768-65535 udp/tcp
- nlockmgr 埠:32768-65535 udp/tcp
系統 RPC服務在 nfs服務啟動時默認會給 mountd 和 nlockmgr 動態選取一個隨機埠來進行通訊。
在/etc/sysconfig/nfs後追加以下內容,用於固定mountd和nlockmgr埠為4001-4004。
RQUOTAD_PORT=4001
LOCKD_TCPPORT=4002
LOCKD_UDPPORT=4002
MOUNTD_PORT=4003
STATD_PORT=4004
可以在這裡固定好埠,修改後需要都要重新啟動一次服務。
啟動服務和開機啟動
使用systemctl來啟動rpcbind和nfs-server服務,要注意先啟動rpcbind再啟動nfs-server
[root@server_197 ~]# systemctl restart rpcbind
[root@server_197 ~]# systemctl enable rpcbind
[root@server_197 ~]# systemctl restart nfs-server
[root@server_197 ~]# systemctl enable nfs-server
Created symlink from /etc/systemd/system/multi-user.target.wants/nfs-server.service to /usr/lib/systemd/system/nfs-server.service.
用netstat看一下是不是有埠監聽了,有就是啟動成功了。
[root@server_197 ~]# netstat -tlpn | grep "2049\|111"
tcp 0 0 0.0.0.0:111 0.0.0.0:* LISTEN 1/systemd
tcp 0 0 0.0.0.0:2049 0.0.0.0:* LISTEN -
tcp6 0 0 :::111 :::* LISTEN 1/systemd
tcp6 0 0 :::2049 :::* LISTEN -
firewall和iptables
firewall放行對應的服務,nfs、rpc-bind、mountd。
如果可以建議只保留firewall就可以了。
systemctl stop iptables
systemctl disable iptables
[root@server_197 ~]# firewall-cmd --permanent --add-service=nfs
success
[root@server_197 ~]# firewall-cmd --permanent --add-service=rpc-bind
success
[root@server_197 ~]# firewall-cmd --permanent --add-service=mountd
success
[root@server_197 ~]# firewall-cmd --reload
success
iptables這個有點局限性,如果非要使用,先依據前面可選的先固定好mountd的埠。我一般情況都先關了iptables留firewall。不過還是這樣寫一下啦,萬一用得上。
以之前設置的mountd固定埠,4001-4004,以及nfs:2049、rpc:111
iptables -A INPUT -p tcp -m tcp --dport 111 -j ACCEPT
iptables -A INPUT -p udp -m udp --dport 111 -j ACCEPT
iptables -A INPUT -p tcp -m tcp --dport 2049 -j ACCEPT
iptables -A INPUT -p udp -m udp --dport 2049 -j ACCEPT
iptables -A INPUT -p tcp -m tcp --dport 4001:4004 -j ACCEPT
iptables -A INPUT -p udp -m udp --dport 4001:4004 -j ACCEPT

# iptables -I : 新加一條規則鏈
# iptables -A :增加一條規則鏈
# ptables -I 添加的規則放在現有規則的最前面,iptables -A 放在現有規則的最後。
重新啟動一下防火牆啦
NFS_Client配置
作為使用Client,相當於Sever分享了一塊硬碟,我們可以直接掛載在Client本地。
mount掛載
先看一下Sever共享資訊,也就是對應我們之前在Sever的/etc/exports的配置。
如果不在許可範圍內會提示mount.nfs: access denied by server while mounting。
- showmount -[e|a|v] <ip>
- -e,查看共享資訊(記住-e就可以了)
- -a,查看本機掛載的文件資源的情況NFS資源的情況
- -v,查看nfs版本
-
mount -t nfs 192.168.2.197:/newnfs /newnfs
- 將192.168.2.197:/newnfs掛載在本機的/newnfs,因為之前設置了許可權這個文件夾是777
[root@client_149 ~]# showmount -e 192.168.2.197 #看一下先Sever共享資訊
Export list for 192.168.2.197:
/newnfs 192.168.2.*
[root@client_149 ~]# mount -t nfs 192.168.2.197:/newnfs /newnfs
- 也可以從根目錄全部掛載,不過因為沒有許可權,還是只可以看到設置777許可權的/newnfs
# 新建個文件夾用於掛載Server的根目錄
[root@client_149 ~]# mkdir /nfs_197
# 掛載
[root@client_149 ~]# mount -t nfs 192.168.2.197:/ /nfs_197
# 查看一下掛載好的目錄內容
[root@client_149 ~]# ll /nfs_197
total 0
drwxrwxrwx. 2 root root 20 Aug 31 01:30 newnfs
自動掛載
fstab掛載
重新啟動後就要重新掛載啦,我們可以編輯一下/etc/fstab設置一下自動掛載。
在最後面追加
echo '192.168.2.197:/newnfs /newnfs nfs 0 0' >> /etc/fstab
如果不生效,將自動掛載也設置為開機啟動
systemctl start remote-fs.target
systemctl enable remote-fs.target
開機執行
當然,也可以開機時候自動執行掛載的命令/etc/rc.local
# 把之前的mount命令追加到rc.local的末尾
[root@client_149 ~]# echo 'mount -t nfs 192.168.2.197:/newnfs /newnfs' >> /etc/rc.local
# 追加完成後看一下
[root@client_149 ~]# cat /etc/rc.local | grep -v "#"
touch /var/lock/subsys/local
mount -t nfs 192.168.2.197:/newnfs /newnfs
這裡記得要這個/etc/rc.local可執行+x
測試
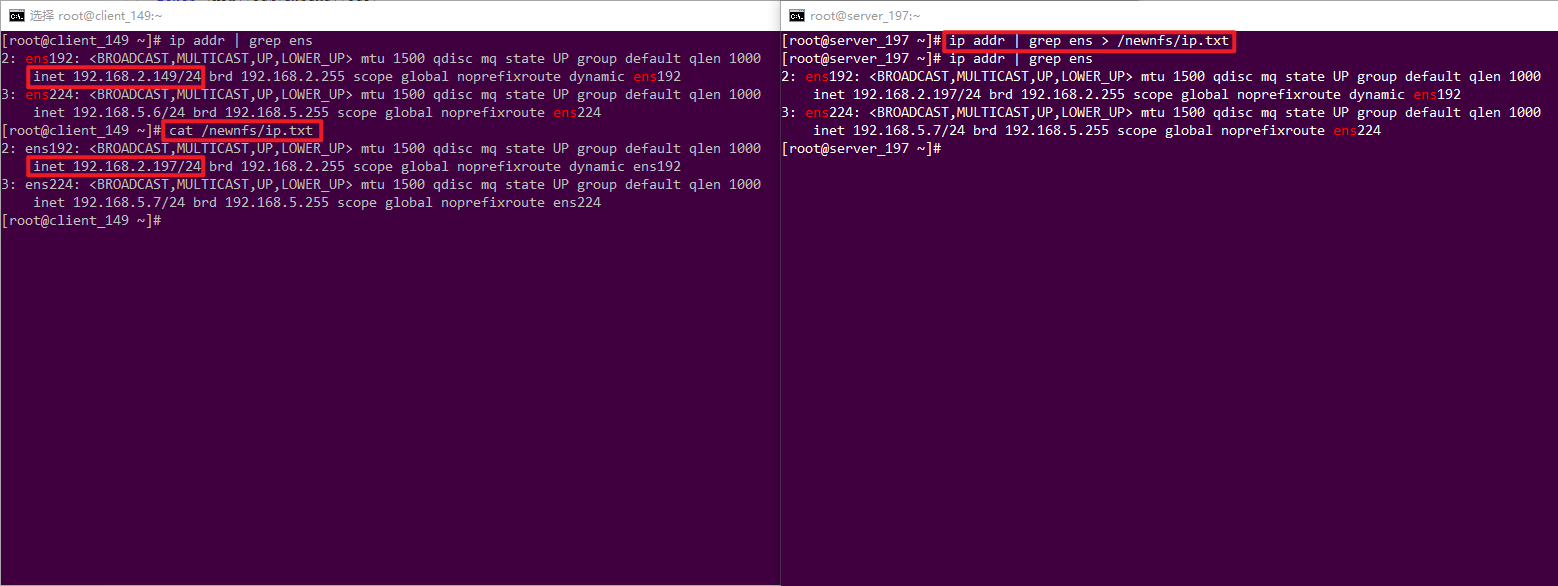
目前Server和Client都已經配置好,我們在Server、Client任意主機在共享、掛載的目錄內新建個文件,再在另一主機上查看一下。