Spring 01: Spring配置 + IOC控制反轉 + Setter注入
簡介
Spring框架是一個容器,是整合其他框架的框架
他的核心是IOC(控制反轉)和AOP(面向切面編程),由20多個模組構成,在很多領域都提供了優秀的問題解決方案
特點
-
輕量級:由20多個模組構成,每個jar包都很小,小於1M,核心包也就3M左右
-
程式碼污染小:Spring框架對程式設計師開發時的條條框框的約束較少,對程式碼的污染小
-
面向介面編程:面向介面編程,靈活性高,項目的可擴展性和可維護性都較高
-
AOP:面向切面編程,將公共的,通用的,重複的程式碼單獨開發,在需要時反織回去
-
示例:
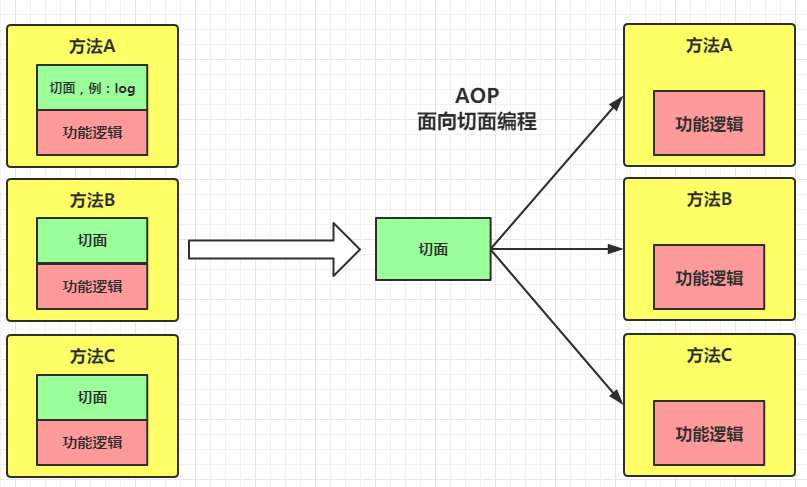
示例分析:在開發中普遍需要使用到日誌輸出功能,會將日誌輸出功能大量耦合到項目的不同位置,如上圖左側所示。
而日誌輸出功能與項目本身的核心業務邏輯無關,我們只是為了不時的查看程式的運行狀態。則可以將日誌功能單獨提出去開發,在需要的地方將日誌輸出功能(所謂:切面)反織回去即可,如上圖右側所示。
- 整合其他框架:使其他框架也更加易用
IOC
- IOC(Inversion of Control):是一個概念,也是一種思想,由Spring容器進行對象的創建和依賴注入,程式設計師在使用時直接取用即可
- 正轉示例
//程式設計師創建對象
Student stu = new Student();
//程式設計師進行賦值
stu.setName("荷包蛋");
stu.setAge(20);
- 反轉示例
<!-- Spring容器負責對象的創建 -->
<bean id="stu" class="com.example.pojo.Student">
    <!-- Spring容器負責為屬性賦值 -->
    <property name="name" value="荷包蛋" />
    <property name="age" value="20" />
</bean>
創建Spring項目
- 創建maven的java項目:模板類型 + 項目目錄結構 + 修改pom.xml文件添加基本配置的操作不再贅述,可以參考mybatis部落格集里對maven項目的配置
- 在pom.xml里添加Spring依賴
    <!-- 添加spring依賴-->
    <dependency>
      <groupId>org.springframework</groupId>
      <artifactId>spring-context</artifactId>
      <version>5.3.22</version>
    </dependency>
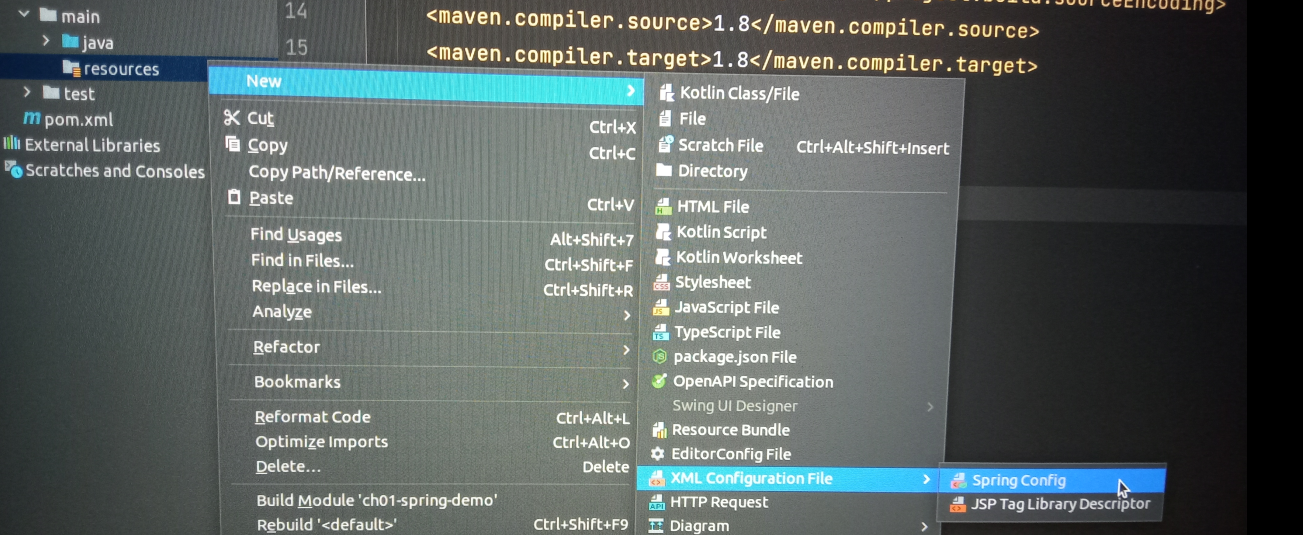
- 在src/main/resources目錄下添加Spring配置文件:applicationContext.xml,正常情況下,文件頭自動補全(在下圖狀態下,無法截圖,手機拍攝,包涵包涵)

創建實例對象
- 容器創建實例對象和傳統方式下手動創建實例對象的對比
//實體類
package com.example.pojo;

public class Student {
    private String name;
    private int age;

    public Student() {
        System.out.println("無參方法被調用,Student實例被創建.....");
    }

    @Override
    public String toString() {
        return "Student{" +
                "name='" + name + '\'' +
                ", age=" + age +
                '}';
    }
}
<!-- applicationContext.xml文件 -->

<?xml version="1.0" encoding="UTF-8"?>
<beans xmlns="//www.springframework.org/schema/beans"
       xmlns:xsi="//www.w3.org/2001/XMLSchema-instance"
       xsi:schemaLocation="//www.springframework.org/schema/beans //www.springframework.org/schema/beans/spring-beans.xsd">

    <!-- 定義實體類的實例對象 -->
    <bean id="stu" class="com.example.pojo.Student"/>
</beans>
//兩種創建實例對象的對比

package com.example.test;

import com.example.pojo.Student;
import org.junit.Test;
import org.springframework.context.ApplicationContext;
import org.springframework.context.support.ClassPathXmlApplicationContext;

public class TestStudent {

    //測試程式設計師手動創建實例對象
    @Test
    public void testStudent(){
        Student stu = new Student();
        System.out.println(stu);
    }

    //測試Spring容器創建實例對象
    @Test
    public void testStudentSpring(){
        //創建Spring容器,並啟動
        ApplicationContext applicationContext = new ClassPathXmlApplicationContext("applicationContext.xml");
        //從容器中獲取對象
        Student stu = (Student) applicationContext.getBean("stu");
        System.out.println(stu);
    }
}
    //兩次測試的輸出結果均為

    無參方法被調用,Student實例被創建.....
    Student{name='null', age=0}

    Process finished with exit code 0
- 當Spring容器創建時,對應的應用域中註冊的對象就會被創建
    @Test
    public void testStudentSpring(){
        //創建Spring容器
        ApplicationContext applicationContext = new ClassPathXmlApplicationContext("source01/applicationContext.xml");
    }
    //測試輸出結果

    無參方法被調用,Student實例被創建.....

    Process finished with exit code 0
基於xml的IOC(控制反轉)
setter注入
- 簡單類型(8 + 1)注入
- 使用value屬性
    //添加兩個屬性的set方法
    public void setName(String name) {
        this.name = name;
    }

    public void setAge(int age) {
        this.age = age;
    }
    <bean id="stu" class="com.example.pojo.Student">
        <!-- 使用setter注入法為實例對象的屬性賦值 -->
        <property name="name" value="荷包蛋"/>
        <property name="age" value="20"/>
    </bean>
    //測試Spring容器創建實例對象
    @Test
    public void testStudentSpring(){
        //創建Spring容器,並啟動
        ApplicationContext applicationContext = new ClassPathXmlApplicationContext("source01/applicationContext.xml");
        //從容器中獲取對象
        Student stu = (Student) applicationContext.getBean("stu");
        System.out.println(stu);
    }
    //測試輸出:
    無參方法被調用,Student實例被創建.....
    Student{name='荷包蛋', age=20}

    Process finished with exit code 0
-
引用類型注入
- 使用ref屬性
    //School類
    private String name;
    private String address;

    public void setName(String name) {
        this.name = name;
    }

    public void setAddress(String address) {
        this.address = address;
    }

    public School() {
        System.out.println("School類的構造方法被執行,實體對象被創建.....");
    }

    @Override
    public String toString() {
        return "School{" +
                "name='" + name + '\'' +
                ", address='" + address + '\'' +
                '}';
    }
//Student類 private String name; private int age; private School school; public Student() { System.out.println("Student類的構造方法執行,實體對象被創建...."); } public void setName(String name) { this.name = name; } public void setAge(int age) { this.age = age; } public void setSchool(School school) { this.school = school; } @Override public String toString() { return "Student{" + "name='" + name + '\'' + ", age=" + age + ", school=" + school + '}'; }<!-- applicationContext.xml文件 --> <!-- 定義School實體類的實例對象--> <bean id="school" class="com.example.pojo02.School"> <property name="name" value="nefu"/> <property name="address" value="哈爾濱"/> </bean> <!-- 定義Student實體類的實例對象 --> <bean id="stu" class="com.example.pojo02.Student"> <property name="name" value="荷包蛋"/> <property name="age" value="20"/> <!-- 根據bean工廠中註冊過的對象,進行依賴注入 --> <property name="school" ref="school"/> </bean>//測試setter注入法的ref屬性 @Test public void testStudent(){ //創建Spring容器,同時生成bean工廠中註冊的對象 ApplicationContext applicationContext = new ClassPathXmlApplicationContext("source02/applicationContext.xml"); //獲取對象 Student stu = (Student) applicationContext.getBean("stu"); System.out.println(stu); }//測試輸出結果 School類的構造方法被執行,實體對象被創建..... Student類的構造方法執行,實體對象被創建.... Student{name='荷包蛋', age=20, school=School{name='nefu', address='哈爾濱'}} Process finished with exit code 0 -
使用setter注入法必須提供無參構造方法,必須提供待注入屬性的setXXX()方法
- 無參構造方法用於創建實例對象,此時實例對象的屬性是一張白紙,未被賦值和其他數據污染
- 對應屬性的set方法是為了在底層調用時給目標屬性賦值用,框架再封裝,底層的執行程式碼該有的還要有,框架也不知道你在set方法中都想幹些什麼(畢竟set方法應該被用來賦值,但是不僅僅只能做賦值用)
- 有了前兩步,你便可以得到需要的對象,而且只有指定的屬性被賦值,其他屬性一塵不染
- 但是,如果提供了有參構造方法,或者沒有set方法,setter注入將會遇到無限多的麻煩
- 無set方法,底層無法調用對應set方法完成屬性賦值
- 有參構造方法的參數會擾亂我們對指定屬性的賦值計劃
- 例如,有參構造包括name和age兩個屬性,而set又要對name屬性注入值,就會導致name屬性被兩次賦值,在創建對象時就這樣做顯然不合理
- 所以:我們要做的就是,先創建一個乾淨的對象(無參構造,先不涉及屬性值的問題),再用對應屬性的set方法給屬性賦值,做到精準賦值,按需操作

