Kotlin協程解析系列(上):協程調度與掛起
vivo 互聯網客戶端團隊- Ruan Wen
本文是Kotlin協程解析系列文章的開篇,主要介紹Kotlin協程的創建、協程調度與協程掛起相關的內容

一、協程引入
Kotlin 中引入 Coroutine(協程) 的概念,可以幫助編寫非同步程式碼。
在使用和分析協程前,首先要了解一下:
協程是什麼?
為什麼需要協程?
協程最為人稱道的就是可以用看起來同步的方式寫出非同步的程式碼,極大提高了程式碼的可讀性。在實際開發中最常見的非同步操作莫過於網路請求。通常我們需要通過各種回調的方式去處理網路請求,很容易就陷入到地獄回調中。
WalletHttp.target(VCoinTradeSubmitResult.class).setTag(tag)
                .setFullUrl(Constants.VCOIN_TRADE_SUBMIT_URL).setParams(params)
                .callback(new HttpCallback<VCoinTradeSubmitResult>() {
                    @Override
                    public void onSuccess(VCoinTradeSubmitResult vCoinTradeSubmitResult) {

                        super.onSuccess(vCoinTradeSubmitResult);
                        if (mView == null) {
                            return;
                        }
                        //......
                    }
                }).post();
上述示例是一個項目開發中常見的一個網路請求操作,通過介面回調的方式去獲取網路請求結果。實際開發中也會經常遇到連續多個介面請求的情況,例如我們項目中的個人中心頁的邏輯就是先去非同步獲取。
本地快取,獲取失敗的話就需要非同步刷新一下帳號token,然後網路請求相關個人中心的其他資訊。這裡簡單舉一個支付示例,進行支付時,可能要先去獲取帳號token,然後依賴該token再去做支付。
請求操作,根據支付返回數據再去查詢支付結果,這種情況通過回調就可能演變為「地獄回調」。
//獲取帳號token
WalletHttp.target(Account.class).setTag(tag)
        .setFullUrl(Constants.ACCOUNT_URL).setParams(params)
        .callback(new HttpCallback<Account>() {
            @Override
            public void onSuccess(Account account) {
                super.onSuccess(account);
                //根據帳號token進行支付操作
                WalletHttp.target(Pay.class).setFullUrl(Constants.PAY_URL).addToken(account.getToken()).callback(new HttpCallback<Pay>() {
                    @Override
                    public void onSuccess(Pay pay){
                        super.onSuccess(pay);
                        //根據支付操作返回查詢支付結果
                        WalletHttp.target(PayResult.class).setFullUrl(Constants.RESULT_URL).addResultCode(pay.getResultCode()).callback(new HttpCallback<PayResult>() {
                            @Override
                            public void onSuccess(PayResult result){

                                super.onSuccess(result);
                                //......
                            }
                        }).post();
                    }
                }).post();
            }
        }).post();
對於這種場景,kotlin協程「同步方式寫出非同步程式碼」的這個特性就可以很好的解決上述問題。若上述場景用kotlin 協程程式碼實現呢,可能就為:
fun postItem(tag: String, params: Map<String, Any?>) = viewModelScope.launch {
    // 獲取帳號資訊
    val account = repository.queryAccount(tag, params)
    // 進行支付操作
    val pay = repository.paySubmit(tag,account.token)
    //查詢支付結果
    val result = repository.queryPayResult(tag,pay.resultCode)
    //......
}
可以看出,協程程式碼非常簡潔,以順序的方式書寫非同步程式碼,程式碼可讀性極強。
如果想要將原先的網路回調請求也改寫成這種同步模式呢,只需要對原先請求回調用協程提供的suspendCancellableCoroutine等方法進行封裝處理,即可讓早期的非同步程式碼也享受上述「同步程式碼」的絲滑。
協程:
一種非搶佔式或者協作式的電腦程式並發調度實現,程式可以主動掛起或者恢復執行,其核心點是函數或一段程式能夠被掛起,稍後再在掛起的位置恢復,通過主動讓出運行權來實現協作,程式自己處理掛起和恢復來實現程式執行流程的協作調度。
協程本質上是輕量級執行緒。
協程的特點有:
協程可以讓非同步程式碼同步化,其本質是輕量級執行緒。
可在單個執行緒運行多個協程,其支援掛起,不會使運行協程的執行緒阻塞。
可以降低非同步程式的設計複雜度。
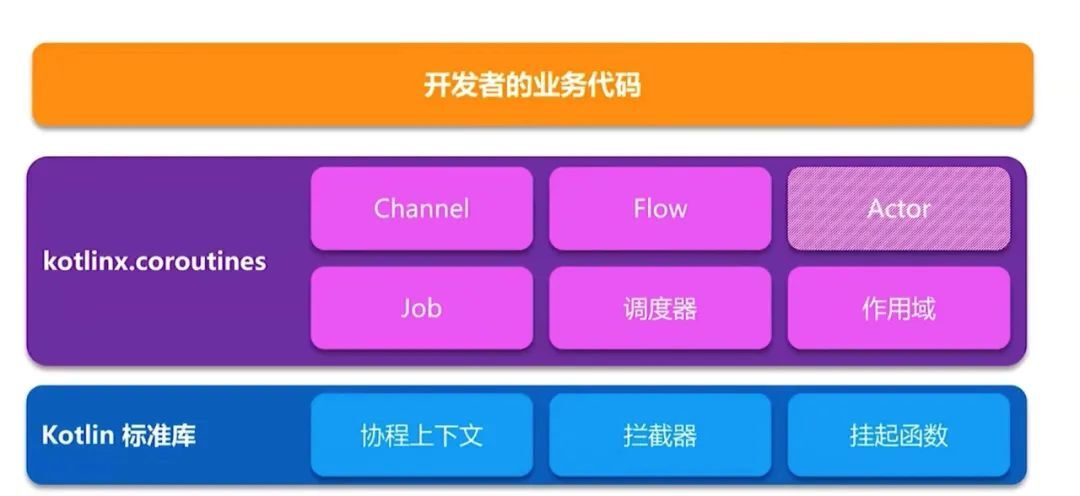
Kotlin協程實現層次:
基礎設施層:標準庫的協程API,主要對協程提供了概念和語義上最基本的支援;
業務框架層:協程的上層框架支援,基於標準庫實現的封裝,也是我們日常開發使用的協程擴展庫。
二、協程啟動
具體在使用協程前,首先要配置對Kotlin協程的依賴。
(1)項目根目錄build.gradle
buildscript {
    ...
    ext.kotlin_coroutines = 'xxx'
    ...
}
(2)Module下build.gradle
dependencies {
    ...
    //協程標準庫
    implementation "org.jetbrains.kotlin:kotlin-stdlib:$kotlin_coroutines"
    //依賴協程核心庫,包含協程公共API部分
    implementation "org.jetbrains.kotlinx:kotlinx-coroutines-core:$kotlin_coroutines"
    //依賴android支援庫,協程Android平台的具體實現方式
    implementation "org.jetbrains.kotlinx:kotlinx-coroutines-android:$kotlin_coroutines"
   ...
}
2.1 Thread 啟動
在Java中,可以通過Thread開啟並發操作:
new Thread(new Runnable() {
    @Override
    public void run() {
        //... do what you want
    }
}).start();
在Kotlin中,使用執行緒更為便捷:
val myThread = thread {
    //.......
}
這個Thread方法有個參數start默認為true,即創造出來的執行緒默認啟動,你可以自定義啟動時機:
val myThread = thread(start = false) {
    //......
}

myThread.start()
2.2 協程啟動
動協程需要三部分:上下文、啟動模式、協程體。
啟動方式一般有三種,其中最簡單的啟動協程的方式為:
GlobalScope.launch {
    //......
}
GlobalScope.launch()屬於協程構建器Coroutine builders,Kotlin 中還有其他幾種 Builders,負責創建協程:
runBlocking:T
使用runBlocking頂層函數創建,會創建一個新的協程同時阻塞當前執行緒,直到協程結束。適用於main函數和單元測試
launch
創建一個新的協程,不會阻塞當前執行緒,必須在協程作用域中才可以調用。它返回的是一個該協程任務的引用,即Job對象。這是最常用的啟動協程的方式。
async
創建一個新的協程,不會阻塞當前執行緒,必須在協程作用域中才可以調用,並返回Deffer對象。可通過調用Deffer.await()方法等待該子協程執行完成並獲取結果。常用於並發執行-同步等待和獲取返回值的情況。
2.2.1 runBlocking
public fun <T> runBlocking(context: CoroutineContext = EmptyCoroutineContext, block: suspend CoroutineScope.() -> T): T
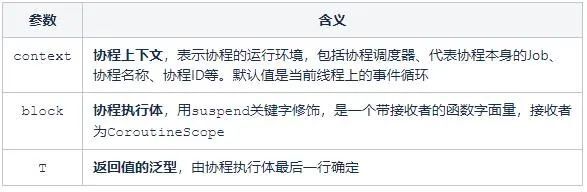
runBlocking是一個頂層函數,可以在任意地方獨立使用。它能創建一個新的協程同時阻塞當前執行緒,直到其內部所有邏輯以及子協程所有邏輯全部執行完成。常用於main函數和測試中。
//main函數中應用
fun main() = runBlocking {
    launch { // 創建一個新協程,runBlocking會阻塞執行緒,但內部運行的協程是非阻塞的
        delay(1000L)
        println("World!")
    }
    println("Hello,")
    delay(2000L)      // 延時2s,保證JVM存活
}

//測試中應用
class MyTest {
    @Test
    fun testMySuspendingFunction() = runBlocking {
        // ......
    }
}
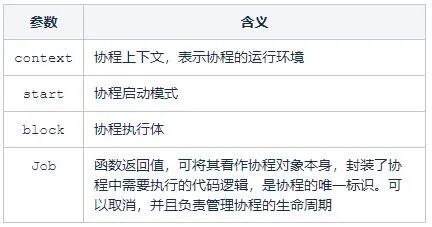
2.2.2 launch
launch是最常用的用於啟動協程的方式,會在不阻塞當前執行緒的情況下啟動一個協程,並返回對該協程任務的引用,即Job對象。
public fun CoroutineScope.launch(
    context: CoroutineContext = EmptyCoroutineContext,
    start: CoroutineStart = CoroutineStart.DEFAULT,
    block: suspend CoroutineScope.() -> Unit
): Job
協程需要運行在協程上下文環境中,在非協程環境中的launch有兩種:GlobalScope 與 CoroutineScope 。
- GlobalScope.launch()
在應用範圍內啟動一個新協程,不會阻塞調用執行緒,協程的生命周期與應用程式一致。
fun launchTest() {
    print("start")
    GlobalScope.launch {
        delay(1000)//1秒無阻塞延遲
        print("GlobalScope.launch")
    }
    print("end")
}

/** 列印結果
start
end
GlobalScope.launch
*/
這種啟動的協程存在組件被銷毀但協程還存在的情況,一般不推薦。其中GlobalScope本身就是一個作用域,launch屬於其子作用域。
- CoroutineScope.launch()
啟動一個新的協程而不阻塞當前執行緒,並返回對協程的引用作為一個Job。
fun launchTest2() {
    print("start")
    val job = CoroutineScope(Dispatchers.IO).launch {
        delay(1000)
        print("CoroutineScope.launch")
    }
    print("end")
}
協程上下文控制協程生命周期和執行緒調度,使得協程和該組件生命周期綁定,組件銷毀時,協程一併銷毀,從而實現安全可靠地協程調用。這是在應用中最推薦的協程使用方式。
關於launch,根據業務需求需要創建一個或多個協程,則可能就需要在一個協程中啟動子協程。
fun launchTest3() {
    print("start")
    GlobalScope.launch {
        delay(1000)
        print("CoroutineScope.launch")
        //在協程內創建子協程
        launch {
            delay(1500)
            print("launch 子協程")
        }
    }
    print("end")
}

/**** 列印結果
start
end
CoroutineScope.launch
launch 子協程
*/
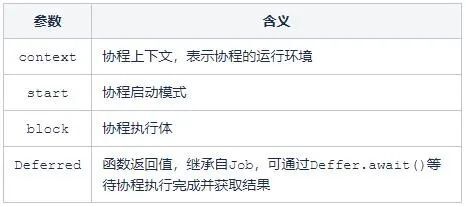
2.2.3 async
async類似於launch,都是創建一個不會阻塞當前執行緒的新的協程。區別在於:async的返回是Deferred對象,可通過Deffer.await()等待協程執行完成並獲取結果,而 launch 不行。常用於並發執行-同步等待和獲取返回值的情況。
public fun <T> CoroutineScope.async(
    context: CoroutineContext = EmptyCoroutineContext,
    start: CoroutineStart = CoroutineStart.DEFAULT,
    block: suspend CoroutineScope.() -> T
): Deferred<T>
注意:
-
await() 不能在協程之外調用,因為它需要掛起直到計算完成,而且只有協程可以以非阻塞的方式掛起。所以把它放到協程中。
-
如果Deferred不執行await()則async內部拋出的異常不會被logCat或try Catch捕獲,但是依然會導致作用域取消和異常崩潰; 但當執行await時異常資訊會重新拋出
-
如果將async函數中的啟動模式設置為CoroutineStart.LAZY懶載入模式時則只有調用Deferred對象的await時(或者執行async.satrt())才會開始執行非同步任務。
三、協程補充知識
在敘述協程啟動內容,涉及到了Job、Deferred、啟動模式、作用域等概念,這裡補充介紹一下上述概念。
3.1 Job
Job 是協程的句柄,賦予協程可取消,賦予協程以生命周期,賦予協程以結構化並發的能力。
Job是launch構建協程返回的一個協程任務,完成時是沒有返回值的。可以把Job看成協程對象本身,封裝了協程中需要執行的程式碼邏輯,協程的操作方法都在Job身上。Job具有生命周期並且可以取消,它也是上下文元素,繼承自CoroutineContext。
在日常 Android 開發過程中,協程配合 Lifecycle 可以做到自動取消。
Job生命周期
Job 的生命周期分為 6 種狀態,分為
-
New
-
Active
-
Completing
-
Cancelling
-
Cancelled
-
Completed
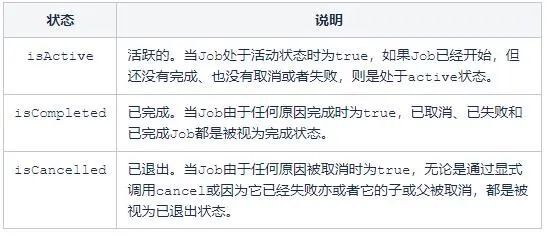
通常外界會持有 Job 介面作為引用被協程調用者所持有。Job 介面提供 isActive、isCompleted、isCancelled 3 個變數使外界可以感知 Job 內部的狀態。
val job = launch(start = CoroutineStart.LAZY) {
    println("Active")
}
println("New")
job.join()
println("Completed")

/**列印結果**/
New
Active
Completed

/**********
* 1. 以 lazy 方式創建出來的協程 state 為 New
* 2. 對應的 job 調用 join 函數後,協程進入 Active 狀態,並開始執行協程對應的具體程式碼
* 3. 當協程執行完畢後,由於沒有需要等待的子協程,協程直接進入 Completed 狀態
*/
關於Job,常用的方法有:
//活躍的,是否仍在執行
public val isActive: Boolean

//啟動協程,如果啟動了協程,則為true;如果協程已經啟動或完成,則為false
public fun start(): Boolean

//取消Job,可通過傳入Exception說明具體原因
public fun cancel(cause: CancellationException? = null)

//掛起協程直到此Job完成
public suspend fun join()

//取消任務並等待任務完成,結合了[cancel]和[join]的調用
public suspend fun Job.cancelAndJoin()

//給Job設置一個完成通知,當Job執行完成的時候會同步執行這個函數
public fun invokeOnCompletion(handler: CompletionHandler): DisposableHandle
Job父子層級
對於Job,還需要格外關注的是Job的父子層級關係。
-
一個Job可以包含多個子Job。
-
當父Job被取消後,所有的子Job也會被自動取消。
-
當子Job被取消或者出現異常後父Job也會被取消。
-
具有多個子 Job 的父Job 會等待所有子Job完成(或者取消)後,自己才會執行完成。
3.2 Deferred
Deferred繼承自Job,具有與Job相同的狀態機制。
它是async構建協程返回的一個協程任務,可通過調用await()方法等待協程執行完成並獲取結果。其中Job沒有結果值,Deffer有結果值。
public interface Deferred<out T> : Job
3.3 作用域
協程作用域(CoroutineScope):協程定義的作用範圍,本質是一個介面。
確保所有的協程都會被追蹤,Kotlin 不允許在沒有使用CoroutineScope的情況下啟動新的協程。CoroutineScope可被看作是一個具有超能力的ExecutorService的輕量級版本。它能啟動新的協程,同時這個協程還具備suspend和resume的優勢。
每個協程生成器launch、async等都是CoroutineScope的擴展,並繼承了它的coroutineContext,自動傳播其所有元素和取消。
啟動協程需要作用域,但是作用域又是在協程創建過程中產生的。
public interface CoroutineScope {
    /**
     * 此域的上下文。Context被作用域封裝,用於在作用域上擴展的協程構建器的實現。
     */
    public val coroutineContext: CoroutineContext
}
官方提供的常用作用域:
- runBlocking:
頂層函數,可啟動協程,但會阻塞當前執行緒
- GlobalScope
全局協程作用域。通過GlobalScope創建的協程不會有父協程,可以把它稱為根協程。它啟動的協程的生命周期只受整個應用程式的生命周期的限制,且不能取消,在運行時會消耗一些記憶體資源,這可能會導致記憶體泄露,不適用於業務開發。
- coroutineScope
創建一個獨立的協程作用域,直到所有啟動的協程都完成後才結束自身。
它是一個掛起函數,需要運行在協程內或掛起函數內。當這個作用域中的任何一個子協程失敗時,這個作用域失敗,所有其他的子協程都被取消。
- supervisorScope
與coroutineScope類似,不同的是子協程的異常不會影響父協程,也不會影響其他子協程。(作用域本身的失敗(在block或取消中拋出異常)會導致作用域及其所有子協程失敗,但不會取消父協程。)
- MainScope
為UI組件創建主作用域。一個頂層函數,上下文是SupervisorJob() + Dispatchers.Main,說明它是一個在主執行緒執行的協程作用域,通過cancel對協程進行取消。
fun scopeTest() {
    GlobalScope.launch {//父協程
        launch {//子協程
            print("GlobalScope的子協程")
        }
        launch {//第二個子協程
            print("GlobalScope的第二個子協程")
        }
    }

    val mainScope = MainScope()
    mainScope.launch {//啟動協程
        //todo
    }
}
Jetpack 的Lifecycle相關組件提供了已經綁定UV聲明周期的作用域供我們直接使用:
- lifecycleScope:
Lifecycle Ktx庫提供的具有生命周期感知的協程作用域,與Lifecycle綁定生命周期,生命周期被銷毀時,此作用域將被取消。會與當前的UI組件綁定生命周期,介面銷毀時該協程作用域將被取消,不會造成協程泄漏,推薦使用。
- viewModelScope:
與lifecycleScope類似,與ViewModel綁定生命周期,當ViewModel被清除時,這個作用域將被取消。推薦使用。
3.4 啟動模式
前述進行協程創建啟動時涉及到了啟動模式CoroutineStart,其是一個枚舉類,為協程構建器定義啟動選項。在協程構建的start參數中使用。
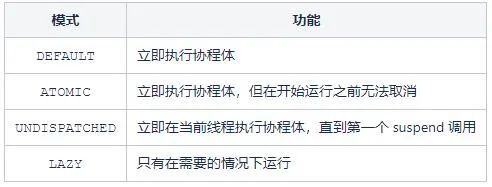
DEFAULT模式
DEFAULT 是餓漢式啟動,launch 調用後,會立即進入待調度狀態,一旦調度器 OK 就可以開始執行。
suspend fun main() {
    log(1)
    val job = GlobalScope.launch{
        log(2)
    }
    log(3)
    Thread.sleep(5000)  //防止程式退出
}
fun log(o: Any?) {
    println("[${Thread.currentThread().name}]:$o")
}
前述示例程式碼採用默認的啟動模式和默認的調度器,,運行結果取決於當前執行緒與後台執行緒的調度順序。
/**可能的運行結果一****/
[main]:1
[main]:3
[main]:2

/**可能的運行結果二****/
[main]:1
[main]:2
[main]:3
LAZY模式
LAZY 是懶漢式啟動,launch 後並不會有任何調度行為,協程體不會進入執行狀態,直到我們需要他的運行結果時進行執行,其launch 調用後會返回一個 Job 實例。
對於這種情況,可以:
-
調用Job.start,主動觸發協程的調度執行
-
調用Job.join,隱式的觸發協程的調度執行
suspend fun main() {
    log(1)
    val job = GlobalScope.launch(start = CoroutineStart.LAZY){
        log(2)
    }
    log(3)
    job.join()
    log(4)
}
fun log(o: Any?) {
    println("[${Thread.currentThread().name}]:$o")
}
對於join,一定要等待協程執行完畢,所以其運行結果一定為:
[main]:1
[main]:3
[DefaultDispatcher-worker-1]:2
[main]:4
如果把join()換為start(),則輸出結果不一定。
ATOMIC模式
ATOMIC 只有涉及 cancel 的時候才有意義。調用cancel的時機不同,結果也有差異。
suspend fun main() {
    log(1)
    val job = GlobalScope.launch(start = CoroutineStart.ATOMIC){
        log(2)
    }
    job.cancel()
    log(3)
    Thread.sleep(2000)
}
fun log(o: Any?) {
    println("[${Thread.currentThread().name}]:$o")
}
前述程式碼示例創建協程後立即cancel,由於是ATOMIC模式,因此協程一定會被調度,則log 1、2、3一定都會被列印輸出。如果將模式改為DEFAULT模式,則log 2有可能列印輸出,也可能不會。
其實cancel 調用一定會將該 job 的狀態置為 cancelling,只不過ATOMIC 模式的協程在啟動時無視了這一狀態。
suspend fun main() {
    log(1)
    val job = GlobalScope.launch(start = CoroutineStart.ATOMIC) {
        log(2)
        delay(1000)
        log(3)
    }
    job.cancel()
    log(4)
    job.join()
    Thread.sleep(2000)
}
fun log(o: Any?) {
    println("[${Thread.currentThread().name}]:$o")
}

/**列印輸出結果可能如下****/
[main]:1
[DefaultDispatcher-worker-1]:2
[main]:4
前述程式碼中,2和3中加了一個delay,delay會使得協程體的執行被掛起,1000ms 之後再次調度後面的部分。對於 ATOMIC 模式,它一定會被啟動,實際上在遇到第一個掛起點之前,它的執行是不會停止的,而 delay 是一個 suspend 函數,這時我們的協程迎來了自己的第一個掛起點,恰好 delay 是支援 cancel 的,因此後面的 3 將不會被列印。
UNDISPATCHED模式
協程在這種模式下會直接開始在當前執行緒下執行,直到第一個掛起點。
與ATOMIC的不同之處在於 UNDISPATCHED 不經過任何調度器即開始執行協程體。遇到掛起點之後的執行就取決於掛起點本身的邏輯以及上下文當中的調度器了。
suspend fun main() {
    log(1)
    val job = GlobalScope.launch(start = CoroutineStart.UNDISPATCHED) {
        log(2)
        delay(100)
        log(3)
    }
    log(4)
    job.join()
    log(5)
    Thread.sleep(2000)
}
fun log(o: Any?) {
    println("[${Thread.currentThread().name}]:$o")
}
協程啟動後會立即在當前執行緒執行,因此 1、2 會連續在同一執行緒中執行,delay 是掛起點,因此 3 會等 100ms 後再次調度,這時候 4 執行,join 要求等待協程執行完,因此等 3 輸出後再執行 5。
結果如下:
[main]:1
[main]:2
[main]:4
[DefaultDispatcher-worker-1]:3
[DefaultDispatcher-worker-1]:5
3.5 withContext
withContext {}不會創建新的協程。在指定協程上運行掛起程式碼塊,放在該塊內的任何程式碼都始終通過IO調度器執行,並掛起該協程直至程式碼塊運行完成。
public suspend fun <T> withContext(
    context: CoroutineContext,
    block: suspend CoroutineScope.() -> T
): T

withContext會使用新指定的上下文的dispatcher,將block的執行轉移到指定的執行緒中。
它會返回結果, 可以和當前協程的父協程存在交互關係, 主要作用為了來回切換調度器。
coroutineScope{
    launch(Dispatchers.Main) {      // 在 UI 執行緒開始
        val image = withContext(Dispatchers.IO) {  // 切換到 IO 執行緒,並在執行完成後切回 UI 執行緒
            getImage(imageId)                      // 將會運行在 IO 執行緒
        }
        avatarIv.setImageBitmap(image)             // 回到 UI 執行緒更新 UI
    }
}
四、協程調度
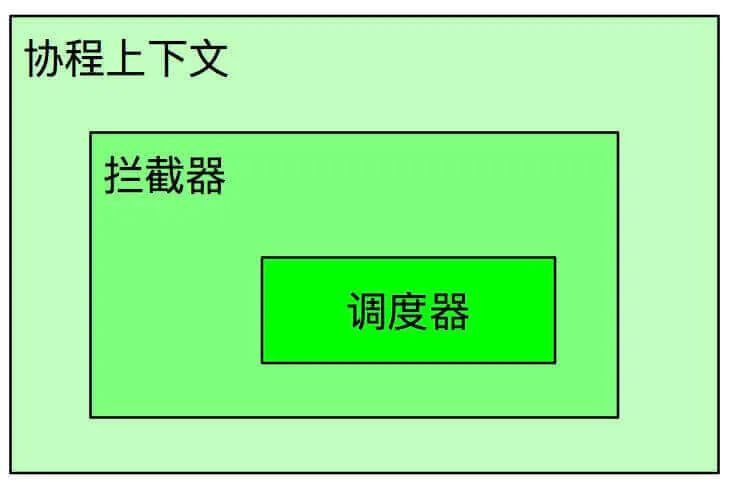
4.1 協程上下文
在協程啟動部分提到,啟動協程需要三個部分,其中一個部分就是上下文,其介面類型是CoroutineContext,通常所見的上下文類型是CombinedContext或者EmptyCoroutineContext,一個表示上下文組合,另一個表示空。
協程上下文是Kotlin協程的基本結構單元,主要承載著資源獲取,配置管理等工作,是執行環境的通用數據資源的統一管理者。除此之外,也包括攜帶參數,攔截協程執行等,是實現正確的執行緒行為、生命周期、異常以及調試的關鍵。
協程使用以下幾種元素集定義協程行為,他們均繼承自CoroutineContext:
【Job】:協程的句柄,對協程的控制和管理生命周期。
【CoroutineName】:協程的名稱,用於調試
【CoroutineDispatcher】:調度器,確定協程在指定的執行緒執行
【CoroutineExceptionHandler】:協程異常處理器,處理未捕獲的異常
這裡回顧一下launch和async兩個函數簽名。
public fun CoroutineScope.launch(
    context: CoroutineContext = EmptyCoroutineContext,
    start: CoroutineStart = CoroutineStart.DEFAULT,
    block: suspend CoroutineScope.() -> Unit
): Job

public fun <T> CoroutineScope.async(
    context: CoroutineContext = EmptyCoroutineContext,
    start: CoroutineStart = CoroutineStart.DEFAULT,
    block: suspend CoroutineScope.() -> T
): Deferred<T>
兩個函數第一個參數都是CoroutineContext類型。
所有協程構建函數都是以CoroutineScope的擴展函數的形式被定義的,而CoroutineScope的介面唯一成員就是CoroutineContext類型。
public interface CoroutineScope {
    public val coroutineContext: CoroutineContext
}
簡而言之,協程上下文是協程必備組成部分,管理了協程的執行緒綁定、生命周期、異常處理和調試。
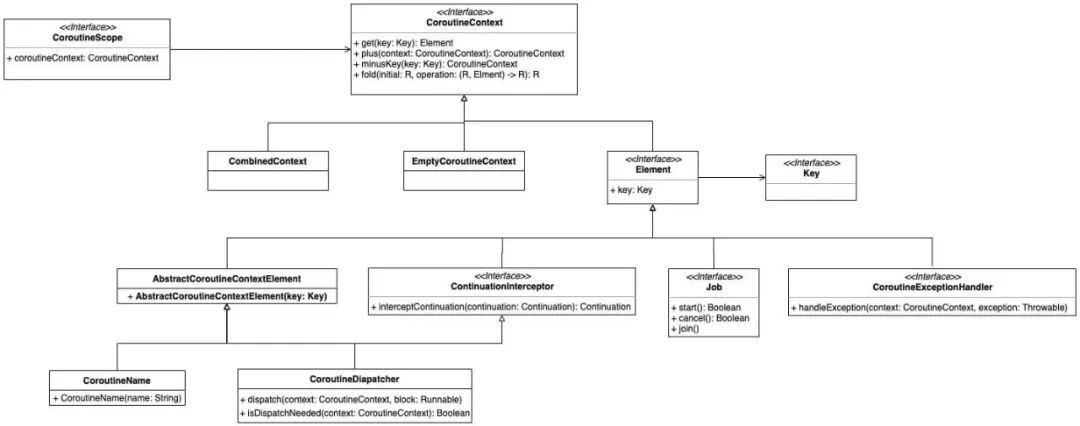
4.1.1 協程上下文結構
看一下CoroutineContext的介面方法:
public interface CoroutineContext {

    //操作符[]重載,可以通過CoroutineContext[Key]這種形式來獲取與Key關聯的Element
    public operator fun <E : Element> get(key: Key<E>): E?

    //提供遍歷CoroutineContext中每一個Element的能力,並對每一個Element做operation操作
    public fun <R> fold(initial: R, operation: (R, Element) -> R): R

    //操作符+重載,可以CoroutineContext + CoroutineContext這種形式把兩個CoroutineContext合併成一個
    public operator fun plus(context: CoroutineContext): CoroutineContext = .......

    //返回一個新的CoroutineContext,這個CoroutineContext刪除了Key對應的Element
    public fun minusKey(key: Key<*>): CoroutineContext

    //Key定義,空實現,僅僅做一個標識
    public interface Key<E : Element>

    ///Element定義,每個Element都是一個CoroutineContext
    public interface Element : CoroutineContext {

        //每個Element都有一個Key實例
        public val key: Key<*>
        ......
    }
}
Element:協程上下文的一個元素,本身就是一個單例上下文,裡面有一個key,是這個元素的索引。
可知,Element本身也實現了CoroutineContext介面。
這裡我們再看一下官方解釋:
/**
Persistent context for the coroutine. It is an indexed set of [Element] instances.
An indexed set is a mix between a set and a map.
Every element in this set has a unique [Key].*/
從官方解釋可知,CoroutineContext是一個Element的集合,這種集合被稱為indexed set,介於set 和 map 之間的一種結構。set 意味著其中的元素有唯一性,map 意味著每個元素都對應一個鍵。
如果將協程上下文內部的一系列上下文稱為子上下文,上下文為每個子上下文分配了一個Key,它是一個帶有類型資訊的介面。
這個介面通常被實現為companion object。
//Job
public interface Job : CoroutineContext.Element {
    /**
     * Key for [Job] instance in the coroutine context.
     */
    public companion object Key : CoroutineContext.Key<Job>
}

//攔截器
public interface ContinuationInterceptor : CoroutineContext.Element {
    /**
     * The key that defines *the* context interceptor.
     */
    companion object Key : CoroutineContext.Key<ContinuationInterceptor>
}

//協程名
public data class CoroutineName(
    val name: String
) : AbstractCoroutineContextElement(CoroutineName) {
    /**
     * Key for [CoroutineName] instance in the coroutine context.
     */
    public companion object Key : CoroutineContext.Key<CoroutineName>
}

//異常處理器
public interface CoroutineExceptionHandler : CoroutineContext.Element {
    /**
     * Key for [CoroutineExceptionHandler] instance in the coroutine context.
     */
    public companion object Key : CoroutineContext.Key<CoroutineExceptionHandler>
}
源碼中定義的子上下文,都會在內部聲明一個靜態的Key,類內部的靜態變數意味著被所有類實例共享,即全局唯一的 Key 實例可以對應多個子上下文實例。
在一個類似 map 的結構中,每個鍵必須是唯一的,因為對相同的鍵 put 兩次值,新值會代替舊值。通過上述方式,通過鍵的唯一性保證了上下文中的所有子上下文實例都是唯一的。
我們按照這個格式仿寫一下然後反編譯。
class MyElement :AbstractCoroutineContextElement(MyElement) {
    companion object Key : CoroutineContext.Key<MyElement>
}

//反編譯的java文件
public final class MyElement extends AbstractCoroutineContextElement {
    @NotNull
   public static final MyElement.Key Key = new MyElement.Key((DefaultConstructorMarker)null);

   public MyElement() {
      super((kotlin.coroutines.CoroutineContext.Key)Key);
   }

    public static final class Key implements kotlin.coroutines.CoroutineContext.Key {
      private Key() {
      }

      // $FF: synthetic method
      public Key(DefaultConstructorMarker $constructor_marker) {
         this();
      }
   }
}
對比kt和Java文件,可以看到Key就是一個靜態變數,且其實現類未做處理,作用與HashMap中的Key類似。
Key是靜態變數,全局唯一,為Element提供唯一性保障。
前述內容總結如下:
協程上下文是一個元素的集合,單個元素本身也是一個上下文,其定義是遞歸的,自己包含若干個自己。
協程上下文這個集合有點像 set 結構,其中的元素都是唯一的,不重複的。其通過給每一個元素配有一個靜態的鍵實例,構成一組鍵值對的方式實現。這使其類似 map 結構。這種介於 set 和 map 之間的結構稱為indexed set。
CoroutineContext.get()獲取元素
關於CoroutineContext,我們先看一下其是如何取元素的。
這裡看一下Element、CombinedContext、EmptyCoroutineContext的內部實現,其中CombinedContext就是CoroutineContext集合結構的實現,EmptyCoroutineContext就表示一個空的CoroutineContext,它裡面是空實現。
@SinceKotlin("1.3")
internal class CombinedContext(
    //左上下文
    private val left: CoroutineContext,
    //右元素
    private val element: Element
) : CoroutineContext, Serializable {

    override fun <E : Element> get(key: Key<E>): E? {
        var cur = this
        while (true) {
            //如果輸入 key 和右元素的 key 相同,則返回右元素
            cur.element[key]?.let { return it }
            // 若右元素不匹配,則向左繼續查找
            val next = cur.left
            if (next is CombinedContext) {
                cur = next
            } else { // 若左上下文不是混合上下文,則結束遞歸
                return next[key]
            }
        }
    }
    ......
}

public interface Element : CoroutineContext {
    public val key: Key<*>

    public override operator fun <E : Element> get(key: Key<E>): E? =
    @Suppress("UNCHECKED_CAST")
    // 如果給定鍵和元素本身鍵相同,則返回當前元素,否則返回空
    if (this.key == key) this as E else null
    ......
}

public object EmptyCoroutineContext : CoroutineContext, Serializable {
    //返回空
    public override fun <E : Element> get(key: Key<E>): E? = null
}
通過Key檢索Element,返回值只能是Element或null,鏈表節點中的元素值,其中CombinedContext利用while循環實現了類似遞歸的效果,其中較早被遍歷到的元素自然具有較高的優先順序。
//使用示例
println(coroutineContext[CoroutineName])
println(Dispatchers.Main[CoroutineName])
CoroutineContext.minusKey()刪除元素
同理看一下Element、CombinedContext、EmptyCoroutineContext的內部實現。
internal class CombinedContext(
    //左上下文
    private val left: CoroutineContext,
    //右元素
    private val element: Element
) : CoroutineContext, Serializable {
    public override fun minusKey(key: Key<*>): CoroutineContext {
        //如果element就是要刪除的元素,返回left,否則說明要刪除的元素在left中,繼續從left中刪除對應的元素
        element[key]?.let { return left }
        //在左上下文中去掉對應元素
        val newLeft = left.minusKey(key)
        return when {
            //如果left中不存在要刪除的元素,那麼當前CombinedContext就不存在要刪除的元素,直接返回當前CombinedContext實例
            newLeft === left -> this
            //如果left中存在要刪除的元素,刪除了這個元素後,left變為了空,那麼直接返回當前CombinedContext的element就行
            newLeft === EmptyCoroutineContext -> element
            //如果left中存在要刪除的元素,刪除了這個元素後,left不為空,那麼組合一個新的CombinedContext返回
            else -> CombinedContext(newLeft, element)
        }
    }
    ......
}

public object EmptyCoroutineContext : CoroutineContext, Serializable {
    public override fun minusKey(key: Key<*>): CoroutineContext = this
    ......
}

public interface Element : CoroutineContext {
    //如果key和自己的key匹配,那麼自己就是要刪除的Element,返回EmptyCoroutineContext(表示刪除了自己),否則說明自己不需要被刪除,返回自己
    public override fun minusKey(key: Key<*>): CoroutineContext =
    if (this.key == key) EmptyCoroutineContext else this
    ......
}
如果把CombinedContext和Element結合來看,那麼CombinedContext的整體結構如下:

其結構類似鏈表,left就是指向下一個結點的指針,get、minusKey操作大體邏輯都是先訪問當前element,不滿足,再訪問left的element,順序都是從right到left。
CoroutineContext.fold()元素遍歷
internal class CombinedContext(
    //左上下文
    private val left: CoroutineContext,
    //右元素
    private val element: Element
) : CoroutineContext, Serializable {

    //先對left做fold操作,把left做完fold操作的的返回結果和element做operation操作
    public override fun <R> fold(initial: R, operation: (R, Element) -> R): R =
    operation(left.fold(initial, operation), element)
    ......
}

public object EmptyCoroutineContext : CoroutineContext, Serializable {
    public override fun <R> fold(initial: R, operation: (R, Element) -> R): R = initial
    ......
}

public interface Element : CoroutineContext {
    //對傳入的initial和自己做operation操作
    public override fun <R> fold(initial: R, operation: (R, Element) -> R): R =
    operation(initial, this)
    ......
}
fold也是遞歸的形式操作,fold的操作大體邏輯是:先訪問left,直到遞歸到最後的element,然後再從left到right的返回,從而訪問了所有的element。
CoroutineContext.plus()添加元素
關於CoroutineContext的元素添加方法,直接看其plus()實現,也是唯一沒有被重寫的方法。
public operator fun plus(context: CoroutineContext): CoroutineContext =
//如果要相加的CoroutineContext為空,那麼不做任何處理,直接返回
if (context === EmptyCoroutineContext) this else
//如果要相加的CoroutineContext不為空,那麼對它進行fold操作,可以把acc理解成+號左邊的CoroutineContext,element理解成+號右邊的CoroutineContext的某一個element
context.fold(this) { acc, element ->
                    //首先從左邊CoroutineContext中刪除右邊的這個element
                    val removed = acc.minusKey(element.key)
                    //如果removed為空,說明左邊CoroutineContext刪除了和element相同的元素後為空,那麼返回右邊的element即可
                    if (removed === EmptyCoroutineContext) element else {
                        //如果removed不為空,說明左邊CoroutineContext刪除了和element相同的元素後還有其他元素,那麼構造一個新的CombinedContext返回
                        val interceptor = removed[ContinuationInterceptor]
                        if (interceptor == null) CombinedContext(removed, element) else {
                            val left = removed.minusKey(ContinuationInterceptor)
                            if (left === EmptyCoroutineContext) CombinedContext(element, interceptor) else
                            CombinedContext(CombinedContext(left, element), interceptor)
                        }
                    }
                   }
plus方法大部分情況下返回一個CombinedContext,即我們把兩個CoroutineContext相加後,返回一個CombinedContext,在組合成CombinedContext時,+號右邊的CoroutineContext中的元素會覆蓋+號左邊的CoroutineContext中的含有相同key的元素。
這個覆蓋操作就在fold方法的參數operation程式碼塊中完成,通過minusKey方法刪除掉重複元素。
plus方法中可以看到裡面有個對ContinuationInterceptor的處理,目的是讓ContinuationInterceptor在每次相加後都能變成CoroutineContext中的最後一個元素。
ContinuationInterceptor繼承自Element,稱為協程上下文攔截器,作用是在協程執行前攔截它,從而在協程執行前做出一些其他的操作。通過把ContinuationInterceptor放在最後面,協程在查找上下文的element時,總能最快找到攔截器,避免了遞歸查找,從而讓攔截行為前置執行。
4.1.2 CoroutineName
public data class CoroutineName(
    val name: String
) : AbstractCoroutineContextElement(CoroutineName) {
CoroutineName是用戶用來指定的協程名稱的,用於方便調試和定位問題。
GlobalScope.launch(CoroutineName("GlobalScope")) {
    launch(CoroutineName("CoroutineA")) {//指定協程名稱
        val coroutineName = coroutineContext[CoroutineName]//獲取協程名稱
        print(coroutineName)
    }
}

/** 列印結果
CoroutineName(CoroutineA)
*/
協程內部可以通過coroutineContext這個全局屬性直接獲取當前協程的上下文。
4.1.3 上下文組合
如果要傳遞多個上下文元素,CoroutineContext可以使用”+”運算符進行合併。由於CoroutineContext是由一組元素組成的,所以加號右側的元素會覆蓋加號左側的元素,進而組成新創建的CoroutineContext。
GlobalScope.launch {
    //通過+號運算添加多個上下文元素
    var context = CoroutineName("協程1") + Dispatchers.Main
    print("context == $context")

    context += Dispatchers.IO //添加重複Dispatchers元素,Dispatchers.IO 會替換 ispatchers.Main
    print("context == $context")

    val contextResult = context.minusKey(context[CoroutineName]!!.key)//移除CoroutineName元素
    print("contextResult == $contextResult")
}

/**列印結果
context == [CoroutineName(協程1), Dispatchers.Main]
context == [CoroutineName(協程1), Dispatchers.IO]
contextResult == Dispatchers.IO
*/
如果有重複的元素(key一致)則右邊的會代替左邊的元素,相關原理參看協程上下文結構章節。
4.1.4 CoroutineScope 構建
CoroutineScope實際上是一個CoroutineContext的封裝,當我們需要啟動一個協程時,會在CoroutineScope的實例上調用構建函數,如async和launch。
在構建函數中,一共出現了3個CoroutineContext。
查看協程構建函數async和launch的源碼,其第一行都是如下程式碼:
val newContext = newCoroutineContext(context)
進一步查看:
@ExperimentalCoroutinesApi
public actual fun CoroutineScope.newCoroutineContext(context: CoroutineContext): CoroutineContext {
    val combined = coroutineContext + context   //CoroutineContext拼接組合
    val debug = if (DEBUG) combined + CoroutineId(COROUTINE_ID.incrementAndGet()) else combined
    return if (combined !== Dispatchers.Default && combined[ContinuationInterceptor] == null)
        debug + Dispatchers.Default else debug
}
構建器內部進行了一個CoroutineContext拼接操作,plus左值是CoroutineScope內部的CoroutineContext,右值是作為構建函數參數的CoroutineContext。
抽象類AbstractCoroutineScope實現了CoroutineScope和Job介面。大部分CoroutineScope的實現都繼承自AbstractCoroutineScope,意味著他們同時也是一個Job。
public abstract class AbstractCoroutine<in T>(
    parentContext: CoroutineContext,
    initParentJob: Boolean,
    active: Boolean
) : JobSupport(active), Job, Continuation<T>, CoroutineScope {
    /**
     * The context of this coroutine that includes this coroutine as a [Job].
     */
    public final override val context: CoroutineContext = parentContext + this
    //重寫了父類的coroutineContext屬性
    public override val coroutineContext: CoroutineContext get() = context
}
從上述分析可知:coroutine context = parent context + coroutine job
4.1.5 典型用例
全限定Context
launch( Dispatchers.Main + Job() + CoroutineName("HelloCoroutine") + CoroutineExceptionHandler { _, _ -> /* ... */ }) {
/* ... */
}
全限定Context,即全部顯式指定具體值的Elements。不論你用哪一個CoroutineScope構建該協程,它都具有一致的表現,不會受到CoroutineScope任何影響。
CoroutineScope Context
基於Activity生命周期實現一個CoroutineScope
abstract class ScopedAppActivity:
AppCompatActivity(),
CoroutineScope
{
    protected lateinit var job: Job
    override val coroutineContext: CoroutineContext
    get() = job + Dispatchers.Main // 注意這裡使用+拼接CoroutineContext

    override fun onCreate(savedInstanceState: Bundle?) {
        super.onCreate(savedInstanceState)
        job = Job()
    }

    override fun onDestroy() {
        super.onDestroy()
        job.cancel()
    }
}
Dispatcher:使用Dispatcher.Main,以在UI執行緒進行繪製
Job:在onCreate時構建,在onDestroy時銷毀,所有基於該CoroutineContext創建的協程,都會在Activity銷毀時取消,從而避免Activity泄露的問題
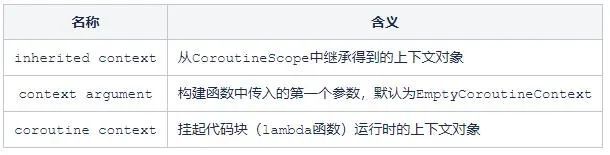
臨時指定參數
CoroutineContext的參數主要有兩個來源:從scope中繼承+參數指定。我們可以用withContext便捷地指定某個參數啟動子協程,例如我們想要在協程內部執行一個無法被取消的子協程:
withContext(NonCancellable) {
    /* ... */
}
讀取協程上下文參數
通過頂級掛起只讀屬性coroutineContext獲取協程上下文參數,它位於 kotlin-stdlib / kotlin.coroutines / coroutineContext
println("Running in ${coroutineContext[CoroutineName]}")
Nested Context內嵌上下文
內嵌上下文切換:在協程A內部構建協程B時,B會自動繼承A的Dispatcher。
可以在調用async時加入Dispatcher參數,切換到工作執行緒
// 錯誤的做法,在主執行緒中直接調用async,若耗時過長則阻塞UI
GlobalScope.launch(Dispatchers.Main) {
    val deferred = async {
        /* ... */
    }
    /* ... */
}

// 正確的做法,在工作執行緒執行協程任務
GlobalScope.launch(Dispatchers.Main) {
    val deferred = async(Dispatchers.Default) {
        /* ... */
    }
    /* ... */
}
4.2 協程攔截器
@SinceKotlin("1.3")
public interface ContinuationInterceptor : CoroutineContext.Element {
    companion object Key : CoroutineContext.Key<ContinuationInterceptor>

    public fun <T> interceptContinuation(continuation: Continuation<T>): Continuation<T>
    //......

}
-
無論在CoroutineContext後面 放了多少個攔截器,Key 為 ContinuationInterceptor 的攔截器只能有一個。
-
Continuation 在調用其 Continuation#resumeWith() 方法,會執行其 suspend 修飾的函數的程式碼塊,如果我們提前攔截到,可以做點其他事情,比如說切換執行緒,這是 ContinuationInterceptor 的主要作用。
協程的本質就是回調,這個回調就是被攔截的Continuation。OkHttp用攔截器做快取,打日誌,模擬請求等,協程攔截器同理。
我們通過Dispatchers 來指定協程發生的執行緒,Dispatchers 實現了 ContinuationInterceptor介面。
這裡我們自定義一個攔截器放到協程上下文,看一下會發生什麼。
class MyContinuationInterceptor: ContinuationInterceptor{
    override val key = ContinuationInterceptor
    override fun <T> interceptContinuation(continuation: Continuation<T>) = MyContinuation(continuation)
}

class MyContinuation<T>(val continuation: Continuation<T>): Continuation<T> {
    override val context = continuation.context
    override fun resumeWith(result: Result<T>) {
        log("<MyContinuation> $result" )
        continuation.resumeWith(result)
    }
}
suspend fun main(args: Array<String>) { // start main coroutine
    GlobalScope.launch(MyContinuationInterceptor()) {
        log(1)
        val job = async {
            log(2)
            delay(1000)
            log(3)
            "Hello"
        }
        log(4)
        val result = job.await()
        log("5. $result")
    }.join()
    log(6)
}
fun log(o: Any?) {
    println("[${Thread.currentThread().name}]:$o")
}
/******列印結果******/
[main]:<MyContinuation> Success(kotlin.Unit)      //11
[main]:1
[main]:<MyContinuation> Success(kotlin.Unit)      //22
[main]:2
[main]:4
[kotlinx.coroutines.DefaultExecutor]:<MyContinuation> Success(kotlin.Unit)        //33
[kotlinx.coroutines.DefaultExecutor]:3
[kotlinx.coroutines.DefaultExecutor]:<MyContinuation> Success(Hello)
[kotlinx.coroutines.DefaultExecutor]:5. Hello
[kotlinx.coroutines.DefaultExecutor]:6
- 所有協程啟動時,都有一次Continuation.resumeWith 的操作,協程有機會調度到其他執行緒的關鍵之處就在於此。
- delay是掛起點,1s之後需要繼續調度執行該協程,因此就有了33處日誌。
前述分析CoroutineContext的plus方法涉及到了ContinuationInterceptor,plus每次都會將ContinuationInterceptor添加到拼接鏈的尾部,這裡再詳細解釋一下原因。
public operator fun plus(context: CoroutineContext): CoroutineContext =
//如果要相加的CoroutineContext為空,那麼不做任何處理,直接返回
if (context === EmptyCoroutineContext) this else
//如果要相加的CoroutineContext不為空,那麼對它進行fold操作,可以把acc理解成+號左邊的CoroutineContext,element理解成+號右邊的CoroutineContext的某一個element
context.fold(this) { acc, element ->
                    //首先從左邊CoroutineContext中刪除右邊的這個element
                    val removed = acc.minusKey(element.key)
                    //如果removed為空,說明左邊CoroutineContext刪除了和element相同的元素後為空,那麼返回右邊的element即可
                    if (removed === EmptyCoroutineContext) element else {
                        //如果removed不為空,說明左邊CoroutineContext刪除了和element相同的元素後還有其他元素,那麼構造一個新的CombinedContext返回
                        val interceptor = removed[ContinuationInterceptor]
                        if (interceptor == null) CombinedContext(removed, element) else {
                            val left = removed.minusKey(ContinuationInterceptor)
                            if (left === EmptyCoroutineContext) CombinedContext(element, interceptor) else
                            CombinedContext(CombinedContext(left, element), interceptor)
                        }
                    }
                   }
原因一:CombinedContext的結構決定。
其有兩個元素,left是一個前驅集合,element為一個純粹CoroutineContext,它的get方法每次都是從element開始進行查找對應Key的CoroutineContext對象;沒有匹配到才會去left集合中進行遞歸查找。為了加快查找ContinuationInterceptor類型的實例,才將它加入到拼接鏈的尾部,對應的就是element。
原因二:ContinuationInterceptor使用很頻繁
每次創建協程都會去嘗試查找當前協程的CoroutineContext中是否存在ContinuationInterceptor。這裡我們用launch來驗證一下
public fun CoroutineScope.launch(
    context: CoroutineContext = EmptyCoroutineContext,
    start: CoroutineStart = CoroutineStart.DEFAULT,
    block: suspend CoroutineScope.()
 ->
Unit
): Job {
    val newContext = newCoroutineContext(context)
    val coroutine = if (start.isLazy)
        LazyStandaloneCoroutine(newContext, block) else
        StandaloneCoroutine(newContext, active = true)
    coroutine.start(start, coroutine, block)
    return coroutine
}
如果使用的launch使用的是默認參數,此時Coroutine就是StandaloneCoroutine,然後調用start方法啟動協程。
    start(block, receiver, this)
}

public operator fun <T> invoke(block: suspend () -> T, completion: Continuation<T>): Unit =
        when (this) {
            DEFAULT -> block.startCoroutineCancellable(completion)
            ATOMIC -> block.startCoroutine(completion)
            UNDISPATCHED -> block.startCoroutineUndispatched(completion)
            LAZY -> Unit // will start lazily
        }
如果我們使用默認參數,看一下默認參數對應執行的block.startCoroutineCancellable(completion)
public fun <T> (suspend () -> T).startCoroutineCancellable(completion: Continuation<T>): Unit = runSafely(completion) {
    createCoroutineUnintercepted(completion).intercepted().resumeCancellableWith(Result.success(Unit))
}
-
首先通過createCoroutineUnintercepted來創建一個協程
-
然後再調用intercepted方法進行攔截操作
-
最後調用resumeCancellable,即Continuation的resumeWith方法,啟動協程,所以每次啟動協程都會自動回調一次resumeWith方法
這裡看一下intercepted
public actual fun <T> Continuation<T>.intercepted(): Continuation<T> =
    (this as? ContinuationImpl)?.intercepted() ?: this
看其在ContinuationImpl的intercepted方法實現
public fun intercepted(): Continuation<Any?> =
        intercepted
            ?: (context[ContinuationInterceptor]?.interceptContinuation(this) ?: this)
                .also { intercepted = it }
-
首先獲取到ContinuationInterceptor實例
-
然後調用它的interceptContinuation方法返回一個處理過的Continuation(多次調用intercepted,對應的interceptContinuation只會調用一次)
至此可知,ContinuationInterceptor的攔截是通過interceptContinuation方法進行
下面再看一個ContinuationInterceptor的典型示例
val interceptor = object : ContinuationInterceptor {

    override val key: CoroutineContext.Key<*> = ContinuationInterceptor

    override fun <T> interceptContinuation(continuation: Continuation<T>): Continuation<T> {
        println("intercept todo something. change run to thread")
        return object : Continuation<T> by continuation {
            override fun resumeWith(result: Result<T>) {
                println("create new thread")
                thread {
                    continuation.resumeWith(result)
                }
            }
        }
    }
}

println(Thread.currentThread().name)

lifecycleScope.launch(interceptor) {
    println("launch start. current thread: ${Thread.currentThread().name}")

    withContext(Dispatchers.Main) {
        println("new continuation todo something in the main thread. current thread: ${Thread.currentThread().name}")
    }

    launch {
        println("new continuation todo something. current thread: ${Thread.currentThread().name}")
    }

    println("launch end. current thread: ${Thread.currentThread().name}")
}
/******列印結果******/
main
// 第一次launch
intercept todo something. change run to thread
create new thread
launch start. current thread: Thread-2
new continuation todo something in the main thread. current thread: main
create new thread
// 第二次launch
intercept todo something. change run to thread
create new thread
launch end. current thread: Thread-7
new continuation todo something. current thread: Thread-8
-
首先程式運行在main執行緒,啟動協程時將自定義的interceptor加入到上下文中,協程啟動時進行攔截,將在main執行緒運行的程式切換到新的thread執行緒
-
withContext沒有攔截成功,具體原因在下面的調度器再詳細解釋,簡單來說就是我們自定義的interceptor被替換了。
-
launch start與launch end所處的執行緒不一樣,因為withContext結束之後,它內部還會進行一次執行緒恢復,將自身所處的main執行緒切換到之前的執行緒。協程每一個掛起後恢復都是通過回調resumeWith進行的,然而外部launch協程我們進行了攔截,在它返回的Continuation的resumeWith回調中總是會創建新的thread。
4.3 調度器
CoroutineDispatcher調度器指定指定執行協程的目標載體,它確定了相關的協程在哪個執行緒或哪些執行緒上執行。可以將協程限制在一個特定的執行緒執行,或將它分派到一個執行緒池,亦或是讓它不受限地運行。
public abstract class CoroutineDispatcher :
    AbstractCoroutineContextElement(ContinuationInterceptor), ContinuationInterceptor {

        //將可運行塊的執行分派到給定上下文中的另一個執行緒上
        public abstract fun dispatch(context: CoroutineContext, block: Runnable)

        //返回一個continuation,它封裝了提供的[continuation],攔截了所有的恢復
        public final override fun <T> interceptContinuation(continuation: Continuation<T>): Continuation<T>
        //......
    }
協程需要調度的位置就是掛起點的位置,只有當掛起點正在掛起的時候才會進行調度,實現調度需要使用協程的攔截器。
調度的本質就是解決掛起點恢復之後的協程邏輯在哪裡運行的問題。調度器也屬於協程上下文一類,它繼承自攔截器。
-
【val Default】: CoroutineDispatcher
-
【val Main】: MainCoroutineDispatcher
-
【val Unconfined】: CoroutineDispatcher
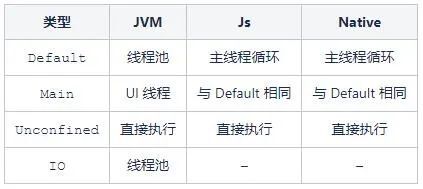
IO僅在 Jvm 上有定義,它基於 Default 調度器背後的執行緒池,並實現了獨立的隊列和限制,因此協程調度器從 Default 切換到 IO 並不會觸發執行緒切換
關於調度器介紹到這裡,還沒有詳細解釋前述協程攔截器中的withContext為什麼攔截失敗。這裡針對這個詳細看一下源碼實現。
public actual val Main: MainCoroutineDispatcher get() = MainDispatcherLoader.dispatcher
其返回類型為MainCoroutineDispatcher,繼承自CoroutineDispatcher。
public abstract class MainCoroutineDispatcher : CoroutineDispatcher()

public abstract class CoroutineDispatcher :
AbstractCoroutineContextElement(ContinuationInterceptor), ContinuationInterceptor {
    public open fun isDispatchNeeded(context: CoroutineContext): Boolean = true

    public abstract fun dispatch(context: CoroutineContext, block: Runnable)

    public open fun dispatchYield(context: CoroutineContext, block: Runnable): Unit = dispatch(context, block)

    public final override fun <T> interceptContinuation(continuation: Continuation<T>): Continuation<T> =
        DispatchedContinuation(this, continuation)
    ......
}
CoroutineDispatch實現了ContinuationInterceptor,根據前述解釋的CoroutineContext結構,可知我們自定義的攔截器沒有生效是因為被替換了。
CoroutineDispatch中的isDispatchNeeded就是判斷是否需要分發,然後dispatch就是執行分發。
ContinuationInterceptor重要的方法就是interceptContinuation,在CoroutineDispatcher中直接返回了DispatchedContinuation對象,它是一個Continuation類型,看一下其resumeWith實現。
override fun resumeWith(result: Result<T>) {
    val context = continuation.context
    val state = result.toState()
    //判斷是否需要分發
    if (dispatcher.isDispatchNeeded(context)) {
        _state = state
        resumeMode = MODE_ATOMIC
        dispatcher.dispatch(context, this)
    } else {
        executeUnconfined(state, MODE_ATOMIC) {
            withCoroutineContext(this.context, countOrElement) {
                //不需要分發,直接使用原先的continuation對象的resumewith
                continuation.resumeWith(result)
            }
        }
    }
}
那麼分發的判斷邏輯是怎麼實現的?這要根據具體的dispatcher來看。
如果我們拿的是Dispatchers.Main,其dispatcher為HandlerContext。
internal class HandlerContext private constructor(
    private val handler: Handler,
    private val name: String?,
    private val invokeImmediately: Boolean
) : HandlerDispatcher(), Delay {

    override fun isDispatchNeeded(context: CoroutineContext): Boolean {
        return !invokeImmediately || Looper.myLooper() != handler.looper
    }

    override fun dispatch(context: CoroutineContext, block: Runnable) {
        if (!handler.post(block)) {
            cancelOnRejection(context, block)
        }
    }
    ......
其中HandlerContext繼承於HandlerDispatcher,而HandlerDispatcher繼承於MainCoroutineDispatcher
Dispatcher的基本實現原理大致為:
-
首先在協程進行啟動的時候通過攔截器的方式進行攔截,對應的方法是interceptContinuation
-
然後返回一個具有切換執行緒功能的Continuation
-
在每次進行resumeWith的時候,內部再通過isDispatchNeeded進行判斷當前協程的運行是否需要切換執行緒。
-
如果需要則調用dispatch進行執行緒的切換,保證協程的正確運行。如果要自定義協程執行緒的切換,可以通過繼承CoroutineDispatcher來實現。
這裡再簡單看一下WithContext,我們都知道其不僅可以接受CoroutineDispatcher來幫助我們切換執行緒,同時在執行完畢之後還會幫助我們將之前切換掉的執行緒進恢復,保證協程運行的連貫性。那這是怎麼實現的呢?
withContext的執行緒恢復原理是它內部生成了一個DispatchedCoroutine,保存切換執行緒時的CoroutineContext與切換之前的Continuation,最後在onCompletionInternal進行恢復。我們簡單翻一翻其源碼實現。
public suspend fun <T> withContext(
    context: CoroutineContext,
    block: suspend CoroutineScope.() -> T
): T {
    contract {
        callsInPlace(block, InvocationKind.EXACTLY_ONCE)
    }
    return suspendCoroutineUninterceptedOrReturn sc@ { uCont ->
        // 創建新的CoroutineContext
        val oldContext = uCont.context
        val newContext = oldContext + context
        ......
        //使用新的Dispatcher,覆蓋外層
        val coroutine = DispatchedCoroutine(newContext, uCont)
        block.startCoroutineCancellable(coroutine, coroutine)
        coroutine.getResult()
    }
}
internal class DispatchedCoroutine<in T>(
    context: CoroutineContext,
    uCont: Continuation<T>
) : ScopeCoroutine<T>(context, uCont) {
    //在complete時會會回調
    override fun afterCompletion(state: Any?) {
        // Call afterResume from afterCompletion and not vice-versa, because stack-size is more
        // important for afterResume implementation
        afterResume(state)
    }

    override fun afterResume(state: Any?) {
        ////uCont就是父協程,context仍是老版context,因此可以切換回原來的執行緒上
        if (tryResume()) return // completed before getResult invocation -- bail out
        // Resume in a cancellable way because we have to switch back to the original dispatcher
        uCont.intercepted().resumeCancellableWith(recoverResult(state, uCont))
    }
    ......
}
-
對於withContext,傳入的context會覆蓋外層的攔截器並生成一個newContext,因此可以實現執行緒切換。
-
DispatchedCoroutine作為complete傳入協程體的創建函數中,因此協程體執行完成後會回調到afterCompletion中。
-
DispatchedCoroutine中傳入的uCont是父協程,它的攔截器仍是外層的攔截器,因此會切換回原來的執行緒中。
4.3.1 典型用例
例如:點擊一個按鈕,進行非同步操作後再回調刷新UI
getUserBtn.setOnClickListener {
    getUser { user ->
        handler.post {
            userNameView.text = user.name
        }
    }
}
typealias Callback = (User) -> Unit

fun getUser(callback: Callback){
    ...
}
由於 getUser 函數需要切到其他執行緒執行,因此回調通常也會在這個非 UI 的執行緒中調用,所以為了確保 UI 正確被刷新,我們需要用 handler.post 切換到 UI 執行緒。
如果要用協程實現呢?
suspend fun getUserCoroutine() = suspendCoroutine<User> {
    continuation ->
    getUser {
        continuation.resume(it)
    }
}

getUserBtn.setOnClickListener {
    GlobalScope.launch(Dispatchers.Main) {
        userNameView.text = getUserCoroutine().name
    }
}
suspendCoroutine 這個方法並不是幫我們啟動協程的,它運行在協程當中並且幫我們獲取到當前協程的 Continuation 實例,也就是拿到回調,方便後面我們調用它的 resume 或者 resumeWithException 來返回結果或者拋出異常。
4.3.2 執行緒綁定
調度器的目的就是切執行緒,我們只要提供執行緒,調度器就應該很方便的創建出來。
suspend fun main() {
    val myDispatcher= Executors.newSingleThreadExecutor{ r -> Thread(r, "MyThread") }.asCoroutineDispatcher()
    GlobalScope.launch(myDispatcher) {
        log(1)
    }.join()
    log(2)
}
由於這個執行緒池是我們自己創建的,因此我們需要在合適的時候關閉它。
除了上述的方法,kotlin協程還給出了更簡單的api,如下:
GlobalScope.launch(newSingleThreadContext("Dispather")) {
    //......
}.join()
前述我們是通過執行緒的方式,同理可以通過執行緒池轉為調度器實現。
Executors.newScheduledThreadPool(10)
    .asCoroutineDispatcher().use { dispatcher ->
        GlobalScope.launch(dispatcher) {
            //......
        }.join
五、協程掛起
在前述協程時,經常會出現suspend關鍵字和掛起的說法,其含義和用法是什麼?一起深入看一下。
5.1 概述
suspend翻譯過來就是中斷、掛起,用在函數聲明前,起到掛起協程的標識,本質作用是程式碼調用時為方法添加一個Continuation類型的參數,保證協程中Continuation的上下傳遞。
掛起函數只能在協程或另一個掛起函數中被調用,如果你在非協程中使用到了掛起函數,會報錯。
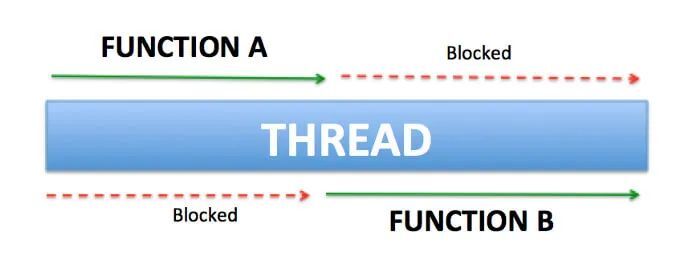
阻塞:
函數A必須在函數B之前完成執行,執行緒被鎖定以便函數A能夠完成其執行
掛起:
函數A雖然已經啟動,但可以暫停,讓函數B執行,然後只在稍後恢復。執行緒沒有被函數A鎖定。
「掛起」是指協程從它當前執行緒脫離,切換到另一個執行緒運行。當執行緒運行到suspend函數時,會暫時掛起這個函數及後續程式碼的執行。簡而言之,掛起函數是一個可以啟動、暫停和恢復的函數。
協程運行的時候每遇到被suspend修飾的方法時,都可能會掛起當前協程,不是必會掛起,例如如下方法就不會被掛起。
private suspend fun a() {
  println("aa")
}
這是因為這種方法不會返回COROUTINE_SUSPENDED類型,這在後面詳細解釋。
5.2 suspend本質
Kotlin 使用堆棧幀來管理要運行哪個函數以及所有局部變數。
協程在常規函數基礎上添加了suspend和resume兩項操作用於處理長時間運行的任務。
【suspend】:掛起或暫停,用於掛起執行當前協程,並保存所有局部變數
【resume】:恢復,用於讓已掛起的協程從掛起處恢復繼續執行
掛起(暫停)協程時,會複製並保存當前的堆棧幀以供稍後使用,將資訊保存到Continuation對象中。
恢復協程時,會將堆棧幀從其保存位置複製回來,對應的Continuation通過調用resumeWith函數才會恢復協程的執行,然後函數再次開始運行。同時返回Result類型的成功或者異常的結果。
public interface Continuation<in T> {
    //對應這個Continuation的協程上下文
    public val context: CoroutineContext
    //恢復相應協程的執行,傳遞一個成功或失敗的結果作為最後一個掛起點的返回值。
    public fun resumeWith(result: Result<T>)
}

//將[value]作為最後一個掛起點的返回值,恢復相應協程的執行。
@SinceKotlin("1.3")
@InlineOnly
public inline fun <T> Continuation<T>.resume(value: T): Unit =
    resumeWith(Result.success(value))

//恢復相應協程的執行,以便在最後一個掛起點之後重新拋出[異常]。
@SinceKotlin("1.3")
@InlineOnly
public inline fun <T> Continuation<T>.resumeWithException(exception: Throwable): Unit =
    resumeWith(Result.failure(exception))
-
Continuation 類有一個 resumeWith 函數可以接收 Result 類型的參數。
-
在結果成功獲取時,調用resumeWith(Result.success(value))或者調用拓展函數resume(value);出現異常時,調用resumeWith(Result.failure(exception))或者調用拓展函數resumeWithException(exception)。這就是 Continuation 的恢復調用。
@FormUrlEncoded
@POST("/api/common/countryList")
suspend fun fetchCountryList(@FieldMap params: Map<String, String?>): CountryResponse
前述掛起函數解析後反編譯如下:
@FormUrlEncoded
@POST("/api/common/countryList")
@Nullable
Object fetchCountryList(@FieldMap @NotNull Map var1, @NotNull Continuation var2);
-
掛起函數反編譯後,發現多了一個Continuation參數,有編譯器傳遞,說明調用掛起函數需要Continuation。
-
只有掛起函數或者協程中才有Continuation,所以掛起函數只能在協程或者其他掛起函數中執行。
5.2.1 Continuation
這裡看一下該Continuation的傳遞來源。
這個函數只能在協程或者掛起函數中執行,說明Continuation很有可能是從協程中傳入來的,查看協程構建源碼。
public fun CoroutineScope.launch(
    context: CoroutineContext = EmptyCoroutineContext,
    start: CoroutineStart = CoroutineStart.DEFAULT,
    block: suspend CoroutineScope.() -> Unit
): Job {
    val newContext = newCoroutineContext(context)
    val coroutine = if (start.isLazy)
        LazyStandaloneCoroutine(newContext, block) else
        StandaloneCoroutine(newContext, active = true)
    coroutine.start(start, coroutine, block)
    return coroutine
}
通過launch啟動一個協程時,其通過coroutine的start方法啟動協程:
public fun <R> start(start: CoroutineStart, receiver: R, block: suspend R.() -> T) {
    start(block, receiver, this)
}
然後start方法裡面調用了CoroutineStart的invoke,這個時候我們發現了Continuation:
//CoroutineStart的invoke方法出現了Continuation
public operator fun <R, T> invoke(block: suspend R.() -> T, receiver: R, completion: Continuation<T>): Unit =
when (this) {
    DEFAULT -> block.startCoroutineCancellable(receiver, completion)
    ATOMIC -> block.startCoroutine(receiver, completion)
    UNDISPATCHED -> block.startCoroutineUndispatched(receiver, completion)
    LAZY -> Unit // will start lazily
}
@InternalCoroutinesApi
public fun <T> (suspend () -> T).startCoroutineCancellable(completion: Continuation<T>): Unit = runSafely(completion) {

    createCoroutineUnintercepted(completion).intercepted().resumeCancellableWith(Result.success(Unit))
}
最終回調到Continuation的resumeWith()恢複函數中。
public fun <T> Continuation<T>.resumeCancellableWith(
    result: Result<T>,
    onCancellation: ((cause: Throwable) -> Unit)? = null
): Unit = when (this) {
    is DispatchedContinuation -> resumeCancellableWith(result, onCancellation)
    else -> resumeWith(result)
}
我們再深入kotlin源碼看一下其內部實現。
public actual fun <R, T> (suspend R.() -> T).createCoroutineUnintercepted(
    receiver: R,
    completion: Continuation<T>
): Continuation<Unit> {
    val probeCompletion = probeCoroutineCreated(completion)
    return if (this is BaseContinuationImpl)
        create(receiver, probeCompletion)
    else {
        createCoroutineFromSuspendFunction(probeCompletion) {
            (this as Function2<R, Continuation<T>, Any?>).invoke(receiver, it)//1
        }
    }
}
private inline fun <T> createCoroutineFromSuspendFunction(
    completion: Continuation<T>,
    crossinline block: (Continuation<T>) -> Any?
): Continuation<Unit> {
    val context = completion.context
    // label == 0 when coroutine is not started yet (initially) or label == 1 when it was
    return if (context === EmptyCoroutineContext)
        object : RestrictedContinuationImpl(completion as Continuation<Any?>) {
            private var label = 0

            override fun invokeSuspend(result: Result<Any?>): Any? =
                when (label) {
                    0 -> {
                        label = 1
                        result.getOrThrow() // Rethrow exception if trying to start with exception (will be caught by BaseContinuationImpl.resumeWith
                        block(this) // run the block, may return or suspend
                    }
                    1 -> {
                        label = 2
                        result.getOrThrow() // this is the result if the block had suspended
                    }
                    else -> error("This coroutine had already completed")
                }
        }
    else
        object : ContinuationImpl(completion as Continuation<Any?>, context) {
            private var label = 0

            override fun invokeSuspend(result: Result<Any?>): Any? =
                when (label) {
                    0 -> {
                        label = 1
                        result.getOrThrow() // Rethrow exception if trying to start with exception (will be caught by BaseContinuationImpl.resumeWith
                        block(this) // run the block, may return or suspend
                    }
                    1 -> {
                        label = 2
                        result.getOrThrow() // this is the result if the block had suspended
                    }
                    else -> error("This coroutine had already completed")
                }
        }
}
-
createCoroutineUnintercepted(receiver, completion)方法在Kotlin源碼中是通過suspend關鍵字修飾的擴展方法。
-
suspend關鍵字修飾(suspend R.() -> T)對象實際被編譯成為一個Function2<r, continuation, Any?>介面對象,而關鍵字suspend實際編譯成了Continuation介面。
所以:
-
協程體本身就是Continuation,即必須在協程內調用suspend掛起函數。
-
suspend關鍵字並不具備暫停、掛起程式碼塊或者函數方法功能。
5.2.2 狀態機CPS
協程實際掛起是如何實現的?
這裡首先通過一個示例來演示一下狀態機。
suspend fun main() {
    log(1)
    log(returnSuspended())
    log(2)
    delay(1000)
    log(3)
    log(returnImmediately())
    log(4)
}

suspend fun returnSuspended() = suspendCoroutineUninterceptedOrReturn<String>{
        continuation ->
    thread {
        Thread.sleep(1000)
        continuation.resume("Return suspended.")
    }
    COROUTINE_SUSPENDED
}

suspend fun returnImmediately() = suspendCoroutineUninterceptedOrReturn<String>{
    log(5)
    "Return immediately."
}
這裡我們定義了兩個掛起函數,一個會真正掛起,一個會直接返回結果,其運行結果為:
[main]:1
[Thread-2]:Return suspended.
[Thread-2]:2
[kotlinx.coroutines.DefaultExecutor]:3
[kotlinx.coroutines.DefaultExecutor]:5
[kotlinx.coroutines.DefaultExecutor]:Return immediately.
[kotlinx.coroutines.DefaultExecutor]:4
前述程式碼的實際實現情況大致如下:
public class ContinuationImpl implements Continuation<Object> {

    private int label = 0;
    private final Continuation<Unit> completion;

    public ContinuationImpl(Continuation<Unit> completion) {
        this.completion = completion;
    }

    @Override
    public CoroutineContext getContext() {
        return EmptyCoroutineContext.INSTANCE;
    }

    @Override
    public void resumeWith(@NotNull Object o) {
        try {
            Object result = o;
            switch (label) {
                case 0: {
                    LogKt.log(1);
                    result = SuspendFunctionsKt.returnSuspended( this);
                    label++;
                    if (isSuspended(result)) return;
                }
                case 1: {
                    LogKt.log(result);
                    LogKt.log(2);
                    result = DelayKt.delay(1000, this);
                    label++;
                    if (isSuspended(result)) return;
                }
                case 2: {
                    LogKt.log(3);
                    result = SuspendFunctionsKt.returnImmediately( this);
                    label++;
                    if (isSuspended(result)) return;
                }
                case 3:{
                    LogKt.log(result);
                    LogKt.log(4);
                }
            }
            completion.resumeWith(Unit.INSTANCE);
        } catch (Exception e) {
            completion.resumeWith(e);
        }
    }

    private boolean isSuspended(Object result) {
        return result == IntrinsicsKt.getCOROUTINE_SUSPENDED();
    }
}
-
首先定義了一個ContinuationImpl,即一個Continuation的實現。
-
可以在 Kotlin 的標準庫當中找到一個名叫 ContinuationImpl 的類,其 resumeWith 最終調用到了 invokeSuspend,而這個 invokeSuspend 實際上就是我們的協程體,通常也就是一個 Lambda 表達式。
-
通過 launch啟動協程,傳入的那個 Lambda 表達式,實際上會被編譯成一個 SuspendLambda 的子類,而它又是 ContinuationImpl 的子類。
public class RunSuspend implements Continuation<Unit> {

    private Object result;

    @Override
    public CoroutineContext getContext() {
        return EmptyCoroutineContext.INSTANCE;
    }

    @Override
    public void resumeWith(@NotNull Object result) {
        synchronized (this){
            this.result = result;
            notifyAll(); // 協程已經結束,通知下面的 wait() 方法停止阻塞
        }
    }

    public void await() throws Throwable {
        synchronized (this){
            while (true){
                Object result = this.result;
                if(result == null) wait(); // 調用了 Object.wait(),阻塞當前執行緒,在 notify 或者 notifyAll 調用時返回
                else if(result instanceof Throwable){
                    throw (Throwable) result;
                } else return;
            }
        }
    }
}
接著,定義了一個RunSuspend,用來接收結果。
public static void main(String... args) throws Throwable {
    RunSuspend runSuspend = new RunSuspend();
    ContinuationImpl table = new ContinuationImpl(runSuspend);
    table.resumeWith(Unit.INSTANCE);
    runSuspend.await();
}
作為 completion 傳入的 RunSuspend 實例的 resumeWith 實際上是在 ContinuationImpl 的 resumeWtih 的最後才會被調用,因此它的 await() 一旦進入阻塞態,直到 ContinuationImpl 的整體狀態流轉完畢才會停止阻塞,此時進程也就運行完畢正常退出了。
這段程式碼的運行結果為:
/******列印結果******/
[main]:1
[Thread-2]:Return suspended.
[Thread-2]:2
[kotlinx.coroutines.DefaultExecutor]:3
[kotlinx.coroutines.DefaultExecutor]:5
[kotlinx.coroutines.DefaultExecutor]:Return immediately.
[kotlinx.coroutines.DefaultExecutor]:4
-
協程體的執行就是一個狀態機,每一次遇到掛起函數,都是一次狀態轉移,就像我們前面例子中的 label 不斷的自增來實現狀態流轉一樣
-
狀態機即程式碼中每一個掛起點和初始掛起點對應的Continuation都會轉化為一種狀態,協程恢復只是跳轉到下一種狀態。
-
掛起函數將執行過程分為多個 Continuation 片段,並且利用狀態機的方式保證各個片段是順序執行的,所以非同步邏輯也可以用順序的程式碼來實現。
5.3 協程運行原理
前述相關示例更多是為了驗證分析協程的一些特性,這裡從協程的創建、啟動、恢復、執行緒調度,協程切換等詳細解析協程的實現。
5.3.1 協程創建與啟動
首先創建一個協程並啟動,最常見的莫過於CoroutineScope.launch{},其源碼實現為:
public fun CoroutineScope.launch(
    context: CoroutineContext = EmptyCoroutineContext,
    start: CoroutineStart = CoroutineStart.DEFAULT,
    block: suspend CoroutineScope.() -> Unit
): Job {
    val newContext = newCoroutineContext(context)
    val coroutine = if (start.isLazy)
        LazyStandaloneCoroutine(newContext, block) else
        StandaloneCoroutine(newContext, active = true)
    coroutine.start(start, coroutine, block)
    return coroutine
}
我們如果不指定start 參數,所以它會使用默認的 CoroutineStart.DEFAULT,最終 coroutine 會得到一個 StandaloneCoroutine。其實現自AbstractCoroutine,實現了Continuation。
前述分析suspend本質時已知,其最終會調用到createCoroutineUnintercepted,主要是創建了一個新的可掛起計算,通過調用resume(Unit)啟動協程,返回值為Continuation,Continuation提供了resumeWith恢復協程的介面,用以實現協程恢復,Continuation封裝了協程的程式碼運行邏輯和恢復介面。
將協程程式碼進行反編譯,再看一下其位元組碼和java實現,例如
suspend fun test() {
    CoroutineScope(Dispatchers.IO).launch {
        delay(11)
    }
}
查看其位元組碼實現時,可知其編譯生成內部類。
協程的計算邏輯封裝在invokeSuspend方法中,而SuspendLambda的繼承關係為 ,
SuspendLambda -> ContinuationImpl -> BaseContinuationImpl -> Continuation
其中BaseContinuationImpl 部分關鍵源碼如下:
internal abstract class BaseContinuationImpl(...) {
    // 實現 Continuation 的 resumeWith,並且是 final 的,不可被重寫
    public final override fun resumeWith(result: Result<Any?>) {
        ...
        val outcome = invokeSuspend(param)
        ...
    }
    // 由編譯生成的協程相關類來實現
    protected abstract fun invokeSuspend(result: Result<Any?>): Any?
}
前述的協程示例程式碼反編譯為:
public static final Object test(@NotNull Continuation $completion) {
    Job var10000 = BuildersKt.launch$default(CoroutineScopeKt.CoroutineScope((CoroutineContext)Dispatchers.getIO()), (CoroutineContext)null, (CoroutineStart)null, (Function2)(new Function2((Continuation)null) {
        int label;

        @Nullable
        public final Object invokeSuspend(@NotNull Object $result) {
            //掛起標識
            Object var2 = IntrinsicsKt.getCOROUTINE_SUSPENDED();
            switch(this.label) {
                case 0:
                    ResultKt.throwOnFailure($result);
                    //設置掛起後恢復,進入的狀態
                    this.label = 1;
                    if (DelayKt.delay(11L, this) == var2) {
                        return var2;
                    }
                    break;
                case 1:
                    // 是否需要拋出異常
                    ResultKt.throwOnFailure($result);
                    break;
                default:
                    throw new IllegalStateException("call to 'resume' before 'invoke' with coroutine");
            }

            return Unit.INSTANCE;
        }

        @NotNull
        public final Continuation create(@Nullable Object value, @NotNull Continuation completion) {
            Intrinsics.checkNotNullParameter(completion, "completion");
            Function2 var3 = new <anonymous constructor>(completion);
            return var3;
        }

        public final Object invoke(Object var1, Object var2) {
            return ((<undefinedtype>)this.create(var1, (Continuation)var2)).invokeSuspend(Unit.INSTANCE);
        }
    }), 3, (Object)null);
    return var10000 == IntrinsicsKt.getCOROUTINE_SUSPENDED() ? var10000 : Unit.INSTANCE;
}
所以,協程的啟動流程為:resume(Unit)->resumeWith()->invokeSuspend()。
協程的掛起通過suspend掛起函數實現,協程的恢復通過Continuation.resumeWith實現。
5.3.2 協程執行緒調度
協程的執行緒調度是通過攔截器實現的,前面提到了協程啟動調用到了startCoroutineCancellable,關於協程調度在前述的協程調度器部分已詳細介紹了,這裡再簡單過一下。
@InternalCoroutinesApi
public fun <T> (suspend () -> T).startCoroutineCancellable(completion: Continuation<T>): Unit = runSafely(completion) {
    createCoroutineUnintercepted(completion).intercepted().resumeCancellableWith(Result.success(Unit))
}
看一下其intercepted()的具體實現:
@SinceKotlin("1.3")
public actual fun <T> Continuation<T>.intercepted(): Continuation<T> =
    (this as? ContinuationImpl)?.intercepted() ?: this
internal abstract class ContinuationImpl(
    ......
) : BaseContinuationImpl(completion) {
    constructor(completion: Continuation<Any?>?) : this(completion, completion?.context)

    public override val context: CoroutineContext
        get() = _context!!

    @Transient
    private var intercepted: Continuation<Any?>? = null

    public fun intercepted(): Continuation<Any?> =
        intercepted
            ?: (context[ContinuationInterceptor]?.interceptContinuation(this) ?: this)
                .also { intercepted = it }
    // context[ContinuationInterceptor] 就是協程的 CoroutineDispatcher
    ......
}
public abstract class CoroutineDispatcher :
AbstractCoroutineContextElement(ContinuationInterceptor), ContinuationInterceptor {
    public final override fun <T> interceptContinuation(continuation: Continuation<T>): Continuation<T> =
        DispatchedContinuation(this, continuation)
    ......
}
intercepted()最終會使用協程的CoroutineDispatcher的interceptContinuation方法包裝原來的 Continuation,攔截所有的協程運行操作。
DispatchedContinuation攔截了協程的啟動和恢復,分別是resumeCancellableWith和重寫的resumeWith(Result)。
internal class DispatchedContinuation<in T>(
    @JvmField val dispatcher: CoroutineDispatcher,
    @JvmField val continuation: Continuation<T>
) : DispatchedTask<T>(MODE_UNINITIALIZED), CoroutineStackFrame, Continuation<T> by continuation {

    @Suppress("NOTHING_TO_INLINE")
    inline fun resumeCancellableWith(
        result: Result<T>,
        noinline onCancellation: ((cause: Throwable) -> Unit)?
    ) {
        val state = result.toState(onCancellation)
        //判斷是否需要執行緒調度
        if (dispatcher.isDispatchNeeded(context)) {
            _state = state
            resumeMode = MODE_CANCELLABLE
            //將協程運算分發到另一個執行緒
            dispatcher.dispatch(context, this)
        } else {
            executeUnconfined(state, MODE_CANCELLABLE) {
                if (!resumeCancelled(state)) {
                    //直接在當前執行緒執行協程運算
                    resumeUndispatchedWith(result)
                }
            }
        }
    }

    override fun resumeWith(result: Result<T>) {
        val context = continuation.context
        val state = result.toState()
        //判斷是否需要執行緒調度
        if (dispatcher.isDispatchNeeded(context)) {
            _state = state
            resumeMode = MODE_ATOMIC
            //將協程的運算分發到另一個執行緒
            dispatcher.dispatch(context, this)
        } else {
            executeUnconfined(state, MODE_ATOMIC) {
                withCoroutineContext(this.context, countOrElement) {
                    //直接在當前執行緒執行協程運算
                    continuation.resumeWith(result)
                }
            }
        }
    }

}

internal abstract class DispatchedTask<in T>(
    @JvmField public var resumeMode: Int
) : SchedulerTask(){
    public final override fun run() {
        //封裝了 continuation.resume 邏輯
    }
    ......
}
5.3.3 協程掛起與恢復
編譯器會生成繼承自SuspendLambda的子類,協程的真正運算邏輯都在invokeSuspend中。這裡我們先再次回到startCoroutineCancellable函數中。
internal fun <R, T> (suspend (R) -> T).startCoroutineCancellable(
    receiver: R, completion: Continuation<T>,
    onCancellation: ((cause: Throwable) -> Unit)? = null
) =
runSafely(completion) {
    createCoroutineUnintercepted(receiver, completion).intercepted().resumeCancellableWith(Result.success(Unit), onCancellation)
}
看一下其中的resumeCancellableWith方法。
public fun <T> Continuation<T>.resumeCancellableWith(
    result: Result<T>,
    onCancellation: ((cause: Throwable) -> Unit)? = null
): Unit = when (this) {
    is DispatchedContinuation -> resumeCancellableWith(result, onCancellation)
    else -> resumeWith(result)
}
這是Continuation的擴展方法,最後都會調用到Continuation的resumeWith,這裡的Continuation就是前述所說的SuspendLambda,它繼承了 BaseContinuationImpl
internal abstract class BaseContinuationImpl(
    public val completion: Continuation<Any?>?
) : Continuation<Any?>, CoroutineStackFrame, Serializable {
    // This implementation is final. This fact is used to unroll resumeWith recursion.
    public final override fun resumeWith(result: Result<Any?>) {
        // This loop unrolls recursion in current.resumeWith(param) to make saner and shorter stack traces on resume
        var current = this
        var param = result
        while (true) {

            probeCoroutineResumed(current)
            with(current) {
                val completion = completion!! // fail fast when trying to resume continuation without completion
                val outcome: Result<Any?> =
                try {
                    //執行invokeSuspend內的程式碼塊
                    val outcome = invokeSuspend(param)
                    //如果程式碼塊內執行了掛起方法,協程掛起,resumeWith執行結束,再次調用resumeWith時協程掛起點之後的程式碼才能繼續執行
                    if (outcome === COROUTINE_SUSPENDED) return
                    Result.success(outcome)
                } catch (exception: Throwable) {
                    Result.failure(exception)
                }
                releaseIntercepted() // this state machine instance is terminating
                if (completion is BaseContinuationImpl) {
                    // 如果完成的completion也是BaseContinuationImpl,就會進入循環
                    current = completion
                    param = outcome
                } else {
                    // 執行completion resumeWith方法
                    completion.resumeWith(outcome)
                    return
                }
            }
        }
    }

    protected abstract fun invokeSuspend(result: Result<Any?>): Any?

    .....
}
下面看一下invokeSuspend的實現邏輯。
fun main(args: Array<String>) {
    val coroutineDispatcher = newSingleThreadContext("ctx")
    // 啟動協程 1
    GlobalScope.launch(coroutineDispatcher) {
        println("the first coroutine")
        async (Dispatchers.IO) {
            println("the second coroutine 11111")
            delay(100)
            println("the second coroutine 222222")
        }.await()
        println("the first coroutine end end end")
    }
    // 保證 main 執行緒存活,確保上面兩個協程運行完成
    Thread.sleep(500)
}
前述示例編譯成SuspendLambda子類的invokeSuspend方法為:
public final Object invokeSuspend(@NotNull Object $result) {
    //掛起函數返回標識SUSPEND_FLAG
    Object var5 = IntrinsicsKt.getCOROUTINE_SUSPENDED();
    String var3;
    boolean var4;
    //label默認初始值為0
    switch(this.label) {
        case 0:
            ResultKt.throwOnFailure($result);
            CoroutineScope $this$launch = (CoroutineScope)this.L$0;
            var3 = "the first coroutine";
            var4 = false;
            System.out.println(var3);
            //新建並啟動 async 協程
            Deferred var10000 = BuildersKt.async$default($this$launch, (CoroutineContext)Dispatchers.getIO(), (CoroutineStart)null, (Function2)(new Function2((Continuation)null) {
                int label;

                @Nullable
                public final Object invokeSuspend(@NotNull Object $result) {
                    //掛起標識
                    Object var4 = IntrinsicsKt.getCOROUTINE_SUSPENDED();
                    String var2;
                    boolean var3;
                    switch(this.label) {
                        case 0:
                            ResultKt.throwOnFailure($result);
                            var2 = "the second coroutine 11111";
                            var3 = false;
                            System.out.println(var2);
                            this.label = 1;
                            //判斷是否執行delay掛起函數
                            if (DelayKt.delay(100L, this) == var4) {
                                //掛起,跳出該方法
                                return var4;
                            }
                            break;
                        case 1:
                            ResultKt.throwOnFailure($result);
                            // 恢復協程後再執行一次 resumeWith(),然後無異常的話執行最後的 println()
                            break;
                        default:
                            throw new IllegalStateException("call to 'resume' before 'invoke' with coroutine");
                    }

                    var2 = "the second coroutine 222222";
                    var3 = false;
                    System.out.println(var2);
                    return Unit.INSTANCE;
                }

                @NotNull
                public final Continuation create(@Nullable Object value, @NotNull Continuation completion) {
                    Intrinsics.checkNotNullParameter(completion, "completion");
                    Function2 var3 = new <anonymous constructor>(completion);
                    return var3;
                }

                public final Object invoke(Object var1, Object var2) {
                    return ((<undefinedtype>)this.create(var1, (Continuation)var2)).invokeSuspend(Unit.INSTANCE);
                }
            }), 2, (Object)null);
            //設置掛起後恢復時,進入的狀態
            this.label = 1;
            //調用await()掛起函數
            if (var10000.await(this) == var5) {
                return var5;
            }
            break;
        case 1:
            ResultKt.throwOnFailure($result);
            break;
        default:
            throw new IllegalStateException("call to 'resume' before 'invoke' with coroutine");
    }

    var3 = "the first coroutine end end end";
    var4 = false;
    System.out.println(var3);
    return Unit.INSTANCE;
}
如果async執行緒未執行完成,await()返回為IntrinsicsKt.getCOROUTINE_SUSPENDED(),就會 return,launch 協程的invokeSuspend方法執行完成,協程所在執行緒繼續往下運行,此時 launch 協程處於掛起狀態。
所以協程的掛起在程式碼層面來說就是跳出協程執行的方法體,或者說跳出協程當前狀態機下的對應狀態,然後等待下一個狀態來臨時在進行執行。
關於協程掛起有三點注意事項:
-
啟動其他協程並不會掛起當前協程,所以launch和async啟動執行緒時,除非新協程運行在當前執行緒,則當前協程只能在新協程運行完成後繼續執行,否則當前協程都會馬上繼續運行。
-
協程掛起並不會阻塞執行緒,因為協程掛起時相當於執行完協程的方法,執行緒繼續執行其他之後的邏輯。
-
掛起函數並一定都會掛起協程,例如await()掛起函數如果返回值不等於IntrinsicsKt.getCOROUTINE_SUSPENDED(),則協程繼續執行掛起點之後邏輯。
看完invokeSuspend,我們再次回到startCoroutineCancellable函數中,其調用的createCoroutineUnintercepted 方法中創建的 SuspendLambda 實例是 BaseContinuationImpl 的子類對象,其 completion 參數為下:
launch: if (isLazy) LazyStandaloneCoroutine else StandaloneCoroutine
async: if (isLazy) LazyDeferredCoroutine else DeferredCoroutine
上面這幾個類都是 AbstractCoroutine 的子類。而根據 completion 的類型會執行不同的邏輯:
BaseContinuationImpl: 執行協程邏輯
其它: 調用 resumeWith 方法,處理協程的狀態,協程掛起後的恢復即與它有關
前述的示例中async啟動的協程,也會調用其invokeSuspend方法執行async協程,假設async 返回的結果已經可用時,即非 COROUTINE_SUSPENDED 值,此時 completion 是 DeferredCoroutine 對象,因此就會調用 DeferredCoroutine.resumeWith 方法,然後返回,父協程的恢復邏輯便是在這裡。
public final override fun resumeWith(result: Result<T>) {
    val state = makeCompletingOnce(result.toState())
    if (state === COMPLETING_WAITING_CHILDREN) return
    afterResume(state)
}
在 makeCompletingOnce 方法中,會根據 state 去處理協程狀態,這裡最終會走到ResumeAwaitOnCompletion.invoke 來恢復父協程,必要的話還會把 async 的結果給它。
private class ResumeAwaitOnCompletion<T>(
    private val continuation: CancellableContinuationImpl<T>
) : JobNode() {
    override fun invoke(cause: Throwable?) {
        val state = job.state
        assert { state !is Incomplete }
        if (state is CompletedExceptionally) {
            // Resume with with the corresponding exception to preserve it
            continuation.resumeWithException(state.cause)
        } else {
           // resume 被掛起的協程
            @Suppress("UNCHECKED_CAST")
            continuation.resume(state.unboxState() as T)
        }
    }
}
這裡的 continuation 就是 launch 協程體,也就是 SuspendLambda 對象,於是 invoke 方法會再一次調用到 BaseContinuationImpl.resumeWith 方法,接著調用 SuspendLambda.invokeSuspend, 然後根據 label 取值繼續執行接下來的邏輯!
launch 協程恢復的過程,從 async 協程的SuspendLambda的子類的completion.resumeWith(outcome) -> AbstractCoroutine.resumeWith(result) ..-> JobSupport.tryFinalizeSimpleState() -> JobSupport.completeStateFinalization() -> state.list?.notifyCompletion(cause) -> node.invoke,最後 handler 節點裡面通過調用resume(result)恢復協程。
await()掛起函數恢復協程的原理:
-
將 launch 協程封裝為 ResumeAwaitOnCompletion 作為 handler 節點添加到 aynsc 協程的 state.list
-
然後在 async 協程完成時會通知 handler 節點調用 launch 協程的 resume(result) 方法將結果傳給 launch 協程,並恢復 launch 協程繼續執行 await 掛起點之後的邏輯。

5.3.4 協程三層封裝
通過前述的一系列分析可知,協程有三層封裝:
常用的launch和async返回的Job、Deferred,裡面封裝了協程狀態,提供了取消協程介面,而它們的實例都是繼承自AbstractCoroutine,它是協程的第一層包裝。
第二層包裝是編譯器生成的SuspendLambda的子類,封裝了協程的真正運算邏輯,繼承自BaseContinuationImpl,其中completion屬性就是協程的第一層包裝。
第三層包裝是前面分析協程的執行緒調度時提到的DispatchedContinuation,封裝了執行緒調度邏輯,包含了協程的第二層包裝。
協程其實就是一段可以掛起和恢復執行的運算邏輯,而協程的掛起通過掛起函數實現,掛起函數用狀態機的方式用掛起點將協程的運算邏輯拆分成不同的片段,每次運行協程執行不同的邏輯片段。
所以協程有兩個很大的好處:
簡化非同步編程,支援非同步返回;
掛起不阻塞執行緒,提供執行緒利用率
六、總結
本文通過為什麼使用協程,協程如何創建啟動,協程的調度原理和協程的掛起原理幾個方面對協程進行了初步剖析,下面一起回顧一下全文重點內容,對全文內容進行一個總結
協程引入:
協程可以讓非同步程式碼同步化,降低程式涉及的複雜度
協程本質是輕量級執行緒,單個執行緒可以運行多個協程,協程的運行不會導致執行緒阻塞
協程啟動:
協程啟動需要三部分:上下文、啟動模式、協程體。創建協程的方式有runBlocking、launch和async,推薦使用CoroutineScope.launch的方式創建協程,使用async的方式創建並發執行,同步等待獲取返回值的情況。
Job是launch構建協程返回的一個協程任務,完成時沒有返回值,可看成協程對象本身。其提供相關方法可用於觀察協程執行情況。Deferred繼承自Job,是async構建協程返回的一個協程任務,可通過調用await()方法等待執行完成獲取結果。
啟動協程需要作用域,作用域在協程創建過程中產生,常見的協程作用域有GlobalScope、coroutineScope等,協程配合Jetpack Lifecycle相關組件提供的lifecycleScope等作用域進行使用,異常絲滑好用。
協程的啟動模式有DEFAULT、ATOMIC、UNDISPATCHED、LAZY四種,注意不同啟動模式的區別。
如果要在父協程中進行子協程切換操作,可以使用withContext。
協程調度:
協程上下文是一個元素的集合,其定義是遞歸的,自己包含若干個自己,其結構介於set 和 map 之間。
協程實現的本質是回調,這個回調即Continuation。協程攔截器的實現就是攔截Continuation,可在此處進行快取、日誌列印等攔截處理
調度器即確認相關協程在哪個執行緒上執行,調度的本質是解決掛起恢復後協程邏輯在哪裡運行的問題,其繼承自攔截器。
調度器的是實現原理即在協程啟動時通過攔截器進行攔截,返回一個Continuation,再在協程恢復進行resumeWith操作時,進行執行緒切換判斷和執行緒切換。
協程掛起:
掛起函數是一個可啟動、暫停和恢復的函數,被suspend修飾的函數在協程運行時不是一定會被掛起的。
掛起函數的掛起實現原理就是狀態機的狀態轉移。協程體的執行就是一個狀態機,每遇到一次掛起函數就是一次狀態轉移,而協程的恢復不過是從一種狀態跳轉到下一種狀態。掛起函數將整個執行過程劃分為多個Continuation片段,利用狀態機的方式保證各個片段時順序執行的,從而實現了用順序的程式碼實現非同步邏輯。
參考資料:
- 【1】破解Kotlin協程
- 【2】Kotlin Jetpack 實戰 | 09.圖解協程原理
- 【3】一文看透 Kotlin 協程本質
- 【4】抽絲剝繭Kotlin – 協程
- 【5】Kotlin協程實現原理
- 【6】kotlin 協程-Android實戰
- 【7】kotlin 協程 官方指導文檔


