如何基於WPF寫一款資料庫文檔管理工具(二)
系列目錄
本篇重點
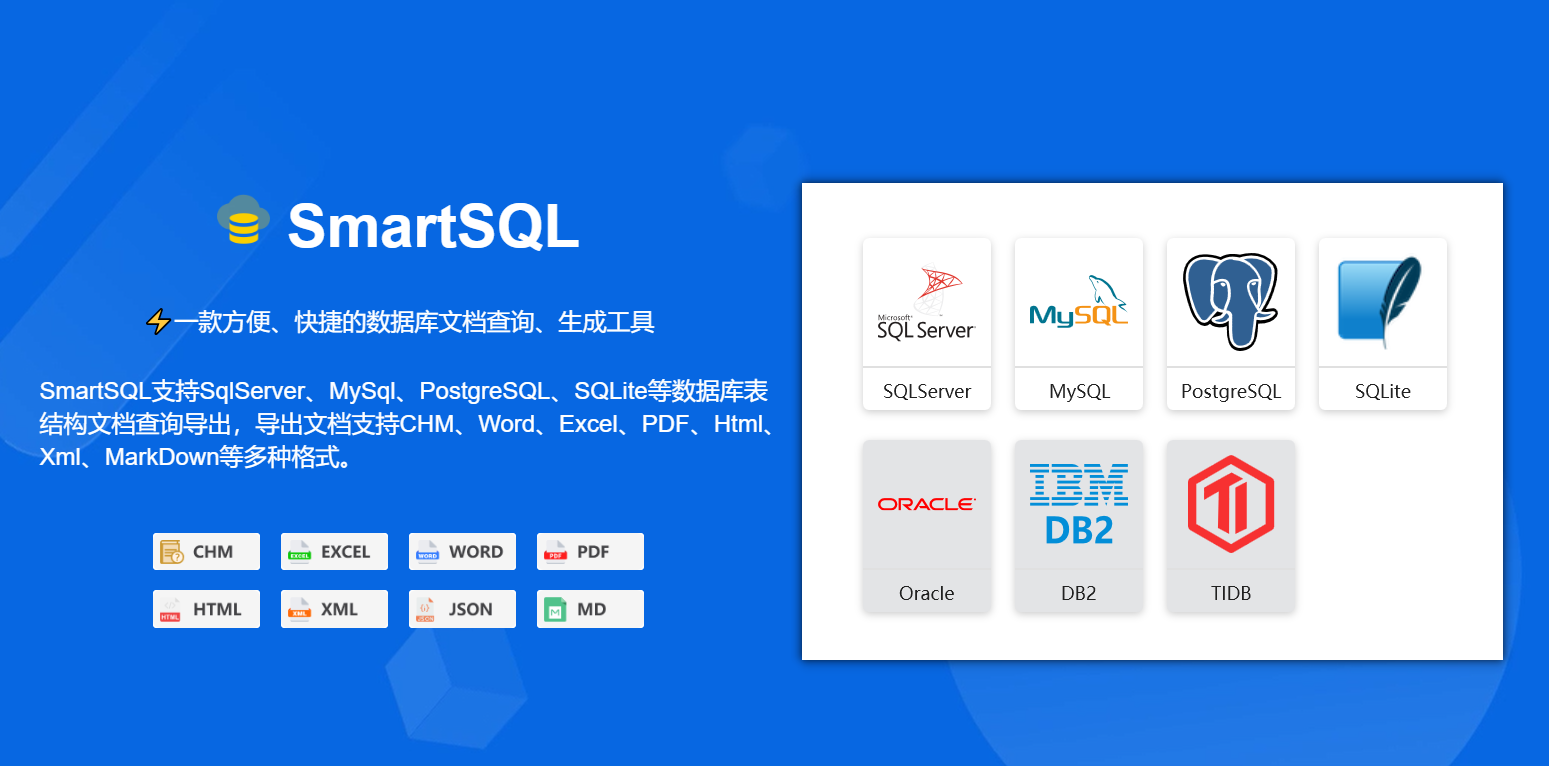
上次發表了基於WPF重複造輪子,寫一款資料庫文檔管理工具(一) 得到不少人支援,文章一度上到了部落格園推薦表首頁,看來大家對這個工具還是很喜歡。今天就繼續來分享一下我在開發這款工具的過程中積累的一些技術點。
本篇主要講的是基於HandyControl控制項的DataGrid進行數據綁定以及如何實現自定義一個自定義控制項。在寫這些之前我們先來看下我們工具的整個介面:
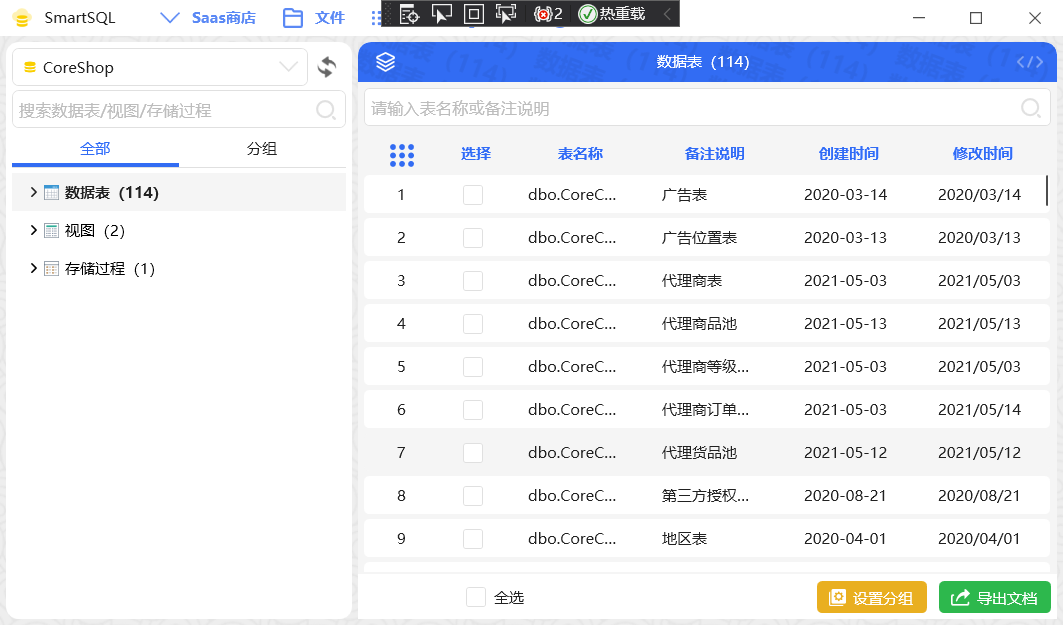
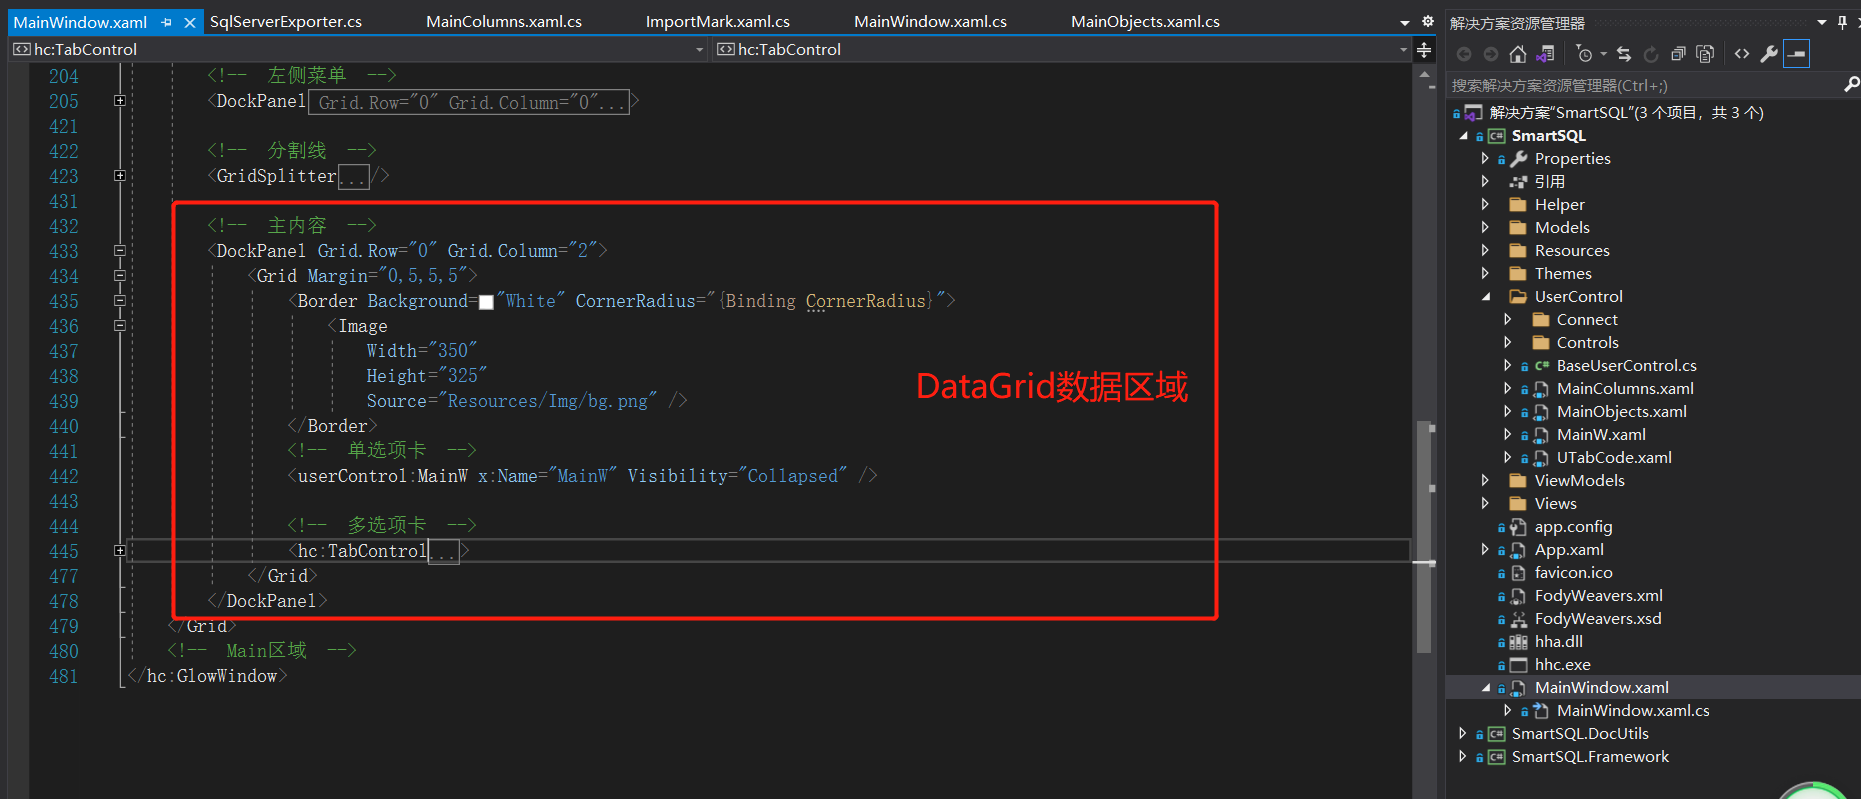
今天我們要實現的就是右邊主介面展示的列表區域,其實這個區域是由多個用戶控制項組成的。下面截圖就是列表區域的外層布局。
在這裡我們也可以直接定義一個用戶控制項,然後使用MVVM的模式根據不同的類型展示不同的用戶控制項內容。
一.用戶控制項
下面貼一下我們用戶控制項的具體實現程式碼:
點擊查看程式碼
<local:BaseUserControl
    x:Class="SmartSQL.UserControl.MainObjects"
    xmlns="//schemas.microsoft.com/winfx/2006/xaml/presentation"
    xmlns:x="//schemas.microsoft.com/winfx/2006/xaml"
    xmlns:d="//schemas.microsoft.com/expression/blend/2008"
    xmlns:hc="//handyorg.github.io/handycontrol"
    xmlns:i="//schemas.microsoft.com/expression/2010/interactivity"
    xmlns:local="clr-namespace:SmartSQL.UserControl"
    xmlns:localBase="clr-namespace:SmartSQL.UserControl.Controls"
    xmlns:mc="//schemas.openxmlformats.org/markup-compatibility/2006"
    mc:Ignorable="d">
    <Grid Background="#f5f5f5">
        <!--  對象搜索框  -->
        <hc:SearchBar
            x:Name="SearchObject"
            Height="30"
            Margin="5,5,5,0"
            Padding="5,0,5,0"
            VerticalAlignment="Top"
            HorizontalContentAlignment="Left"
            hc:InfoElement.Placeholder="{Binding Placeholder}"
            FontSize="13"
            ShowClearButton="True"
            Style="{StaticResource SearchBarPlus}"
            TextChanged="SearchObject_OnTextChanged" />
        <!--  結構數據展現框  -->
        <DataGrid
            x:Name="TableGrid"
            Margin="0,38,0,32"
            hc:DataGridAttach.CanUnselectAllWithBlankArea="True"
            hc:DataGridAttach.ShowRowNumber="True"
            AutoGenerateColumns="False"
            Background="Transparent"
            BeginningEdit="TableGrid_OnBeginningEdit"
            CellEditEnding="TableGrid_OnCellEditEnding"
            ColumnWidth="*"
            HeadersVisibility="All"
            ItemsSource="{Binding ObjectsViewData, Mode=TwoWay}"
            MouseDoubleClick="TableGrid_OnMouseDoubleClick"
            MouseLeftButtonUp="TableGrid_OnMouseLeftButtonUp"
            RowHeaderWidth="60"
            SelectionUnit="CellOrRowHeader">
            <DataGrid.CellStyle>
                <Style BasedOn="{StaticResource DataGridCellStyle}" TargetType="DataGridCell">
                    <Setter Property="VerticalAlignment" Value="Center" />
                    <EventSetter Event="MouseEnter" Handler="DisplayToolTip_MouseEnter" />
                    <Style.Triggers>
                        <Trigger Property="IsSelected" Value="True">
                            <Setter Property="BorderThickness" Value="0" />
                        </Trigger>
                    </Style.Triggers>
                </Style>
            </DataGrid.CellStyle>

            <DataGrid.Columns>
                <DataGridCheckBoxColumn
                    Width="60"
                    Binding="{Binding IsChecked}"
                    CanUserSort="False"
                    CellStyle="{StaticResource DataGridTextCenterColumnStyle}"
                    Header="選擇" />
                <DataGridTextColumn
                    x:Name="ObjHead"
                    Binding="{Binding DisplayName}"
                    Header="對象名"
                    IsReadOnly="True" />
                <DataGridTextColumn
                    Binding="{Binding Comment}"
                    CanUserSort="False"
                    Header="備註說明" />
                <DataGridTextColumn
                    Binding="{Binding CreateDate, StringFormat='yyyy-MM-dd'}"
                    CellStyle="{StaticResource DataGridTextCenterColumnStyle}"
                    Header="創建時間"
                    IsReadOnly="True" />
                <DataGridTextColumn
                    Binding="{Binding ModifyDate, StringFormat='yyyy/MM/dd'}"
                    CellStyle="{StaticResource DataGridTextCenterColumnStyle}"
                    Header="修改時間"
                    IsReadOnly="True" />
            </DataGrid.Columns>
        </DataGrid>
        <Grid
            x:Name="NoDataText"
            Margin="5,45,5,37"
            HorizontalAlignment="Stretch"
            Background="White"
            Cursor="Arrow">
            <localBase:NoDataArea
                Margin="0"
                HorizontalAlignment="Center"
                ShowType="Img" />
        </Grid>
        <Grid
            Height="36"
            VerticalAlignment="Bottom"
            Background="White"
            Cursor="Arrow">
            <hc:SimpleStackPanel
                Margin="47,0,5,10"
                HorizontalAlignment="Left"
                VerticalAlignment="Bottom">
                <hc:UniformSpacingPanel Spacing="10">
                    <CheckBox
                        x:Name="ChkAll"
                        Margin="39,0,0,0"
                        Click="ChkAll_OnClick"
                        Content="全選" />
                </hc:UniformSpacingPanel>
            </hc:SimpleStackPanel>
            <hc:SimpleStackPanel
                Margin="5,0,5,5"
                HorizontalAlignment="Right"
                VerticalAlignment="Bottom">
                <hc:UniformSpacingPanel Spacing="10">
                    <Button
                        x:Name="BtnSetGroup"
                        Height="26"
                        hc:IconElement.Geometry="{StaticResource SetGroupGeometry}"
                        Click="BtnSetGroup_OnClick"
                        Content="設置分組"
                        Cursor="Hand"
                        Style="{StaticResource ButtonWarning}" />
                    <Button
                        x:Name="BtnExport"
                        Height="26"
                        hc:IconElement.Geometry="{StaticResource ExportGeometry}"
                        Click="BtnExport_OnClick"
                        Content="導出文檔"
                        Cursor="Hand"
                        Style="{StaticResource ButtonSuccess}" />
                    <!--<Button
                        x:Name="BtnCreateEntity"
                        Height="26"
                        hc:IconElement.Geometry="{StaticResource SaveGeometry}"
                        Content="生成實體類"
                        Style="{StaticResource ButtonPrimary}" />-->
                </hc:UniformSpacingPanel>
            </hc:SimpleStackPanel>
        </Grid>
    </Grid>
</local:BaseUserControl>
然後再具體使用的頁面按照下面這樣寫就可以實現一個用戶控制項的嵌入了:
<local:MainObjects x:Name="MainObjects" />
二.用戶控制項數據傳遞
雖然頁面是嵌入成功了,我們要實現點擊左邊菜單的數據表然後載入對應表的列表內容該怎麼做呢?
其實我這裡做了兩層嵌套,外面第一層主窗口,中間還有一層用戶控制項MainW.xaml,然後才是載入數據列表的MainObjects.xaml,下面來看看我們後台程式碼的實現:
        /// <summary>
        /// 選中表載入主內容對應數據
        /// </summary>
        /// <param name="sender"></param>
        /// <param name="e"></param>
        private void SelectedTable_OnClick(object sender, RoutedEventArgs e)
        {
            #region MyRegion
            var selectDatabase = (DataBase)SelectDatabase.SelectedItem;
            if (!(TreeViewTables.SelectedItem is TreeNodeItem objects) || objects.Type == ObjType.Group || objects.TextColor.Equals("Red"))
            {
                return;
            }
            var sqLiteHelper = new SQLiteHelper();
            var isMultipleTab = sqLiteHelper.GetSysBool(SysConst.Sys_IsMultipleTab);
            if (!isMultipleTab)
            {
                if (TabItemData.Any())
                {
                    TabItemData.Clear();
                }
                CornerRadius = 10;
                MainW.Visibility = Visibility.Visible;
                MainTabW.Visibility = Visibility.Collapsed;
                MainW.ObjChangeRefreshEvent += Group_ChangeRefreshEvent;
                MainW.SelectedConnection = SelectendConnection;
                MainW.SelectedDataBase = selectDatabase;
                MainW.SelectedObject = objects;
                MainW.LoadPage(TreeViewData);
                return;
            }
            CornerRadius = 0;
            MainW.Visibility = Visibility.Collapsed;
            MainTabW.Visibility = Visibility.Visible;
            var curItem = TabItemData.FirstOrDefault(x => x.DisplayName == objects.DisplayName);
            if (curItem != null)
            {
                MainTabW.SelectedItem = curItem;
                return;
            }

            var dic = new Dictionary<string, string>
            {
                {"Type", "pack://application:,,,/Resources/svg/category.svg"},
                {"Table", "pack://application:,,,/Resources/svg/table.svg"},
                {"View", "pack://application:,,,/Resources/svg/view.svg"},
                {"Proc", "pack://application:,,,/Resources/svg/proc.svg"}
            };
            var mainW = new MainW
            {
                SelectedConnection = SelectendConnection,
                SelectedDataBase = selectDatabase,
                SelectedObject = objects,
            };
            mainW.LoadPage(TreeViewData);
            var tabItem = new MainTabWModel
            {
                DisplayName = objects.DisplayName,
                Icon = dic[objects.Type],
                MainW = mainW
            };
            TabItemData.Insert(0, tabItem);
            MainTabW.SelectedItem = TabItemData.First();
            #endregion
        }
上面程式碼就是通過用戶控制項的依賴屬性將主介面的相關資訊一層層往後面傳遞,這裡暫時只貼主介面到中間介面的傳遞程式碼,想看詳細傳遞的過程可以去我的開源項目中查看。
那麼在用戶控制項中我們怎麼實現載入具體的列表資訊呢?其實我們在點擊左邊菜單的時候就去載入用戶控制項裡面的初始化數據載入方法就行了,就像上面程式碼中的MainW.LoadPage(TreeViewData);,這個就是用戶控制項中載入頁面初始數據的方法,在這個方法裡面我們實現列表頁面的DataGrid數據綁定,下面是相關程式碼:
        /// <summary>
        /// 載入頁面數據
        /// </summary>
        public void LoadPageData()
        {
            ChkAll.IsChecked = false;
            NoDataText.Visibility = Visibility.Collapsed;
            if (SelectedObject.Type == ObjType.Type)
            {
                var headerT = "表名稱";
                var placeHolderT = "請輸入表名稱或備註說明";
                switch (SelectedObject.Name)
                {
                    case "treeTable": break;
                    case "treeView":
                        headerT = "視圖名稱";
                        placeHolderT = "請輸入視圖名稱或備註說明"; break;
                    default:
                        headerT = "存儲過程名稱";
                        placeHolderT = "請輸入存儲過程名稱或備註說明"; break;
                }
                ObjHead.Header = headerT;
                Placeholder = placeHolderT;
                if (SelectedObject.Parent == null)
                {
                    ObjectsViewData = ObjectsViewData.First(x => x.Name == SelectedObject.Name).Children;
                }
                else
                {
                    ObjectsViewData = ObjectsViewData.First(x => x.DisplayName == SelectedObject.Parent.DisplayName)
                        .Children;
                    ObjectsViewData = ObjectsViewData.First(x => x.Name == SelectedObject.Name).Children;
                }
                if (!ObjectsViewData.Any())
                {
                    NoDataText.Visibility = Visibility.Visible;
                }
                ObjectsViewData.ForEach(x =>
                {
                    x.IsChecked = false;
                });
                ObjItems = ObjectsViewData;
                SearchObject.Text = string.Empty;
            }
        }
在這裡我們的DataGrid就是用的MVVM模式實現的數據雙向綁定,要實現這個綁定我們還要在頁面的默認構造函數中寫上一句程式碼:
        public MainObjects()
        {
            InitializeComponent();
            DataContext = this;
        }
這樣就實現了DataGrid的數據綁定了。
好了,今天就分享到這了,想了解更多關於WPF相關的知識就請移步我的開源項目中查看吧。
開源地址
//gitee.com/dotnetchina/SmartSQL
聲明:SmartSQL已於2022.08.01正式加入Gitee開源組織
dotNET China,為.net開源盡自己的綿薄之力,感謝各位的支援!