Java開發學習(十七)—-AOP案例之測量業務層介面執行效率
一、需求分析
這個需求比較簡單
-
需求:任意業務層介面執行均可顯示其執行效率(執行時長)
這個的目的是查看每個業務層執行的時間,這樣就可以監控出哪個業務比較耗時,將其查找出來方便優化。
具體實現的思路:
(1) 開始執行方法之前記錄一個時間
(2) 執行方法
(3) 執行完方法之後記錄一個時間
(4) 用後一個時間減去前一個時間的差值,就是我們需要的結果。
所以要在方法執行的前後添加業務,經過分析我們將採用環繞通知。
說明:原始方法如果只執行一次,時間太快,兩個時間差可能為0,所以我們要執行萬次來計算時間差。
二、環境準備
-
創建一個Maven項目
-
pom.xml添加Spring依賴
<dependencies> <dependency> <groupId>org.springframework</groupId> <artifactId>spring-context</artifactId> <version>5.2.10.RELEASE</version> </dependency> <dependency> <groupId>org.springframework</groupId> <artifactId>spring-jdbc</artifactId> <version>5.2.10.RELEASE</version> </dependency> <dependency> <groupId>org.springframework</groupId> <artifactId>spring-test</artifactId> <version>5.2.10.RELEASE</version> </dependency> <dependency> <groupId>org.aspectj</groupId> <artifactId>aspectjweaver</artifactId> <version>1.9.4</version> </dependency> <dependency> <groupId>mysql</groupId> <artifactId>mysql-connector-java</artifactId> <version>5.1.47</version> </dependency> <dependency> <groupId>com.alibaba</groupId> <artifactId>druid</artifactId> <version>1.1.16</version> </dependency> <dependency> <groupId>org.mybatis</groupId> <artifactId>mybatis</artifactId> <version>3.5.6</version> </dependency> <dependency> <groupId>org.mybatis</groupId> <artifactId>mybatis-spring</artifactId> <version>1.3.0</version> </dependency> <dependency> <groupId>junit</groupId> <artifactId>junit</artifactId> <version>4.12</version> <scope>test</scope> </dependency> </dependencies> -
添加AccountService、AccountServiceImpl、AccountDao與Account類
public interface AccountService { void save(Account account); void delete(Integer id); void update(Account account); List<Account> findAll(); Account findById(Integer id); } @Service public class AccountServiceImpl implements AccountService { @Autowired private AccountDao accountDao; public void save(Account account) { accountDao.save(account); } public void update(Account account){ accountDao.update(account); } public void delete(Integer id) { accountDao.delete(id); } public Account findById(Integer id) { return accountDao.findById(id); } public List<Account> findAll() { return accountDao.findAll(); } } public interface AccountDao { @Insert("insert into tbl_account(name,money)values(#{name},#{money})") void save(Account account); @Delete("delete from tbl_account where id = #{id} ") void delete(Integer id); @Update("update tbl_account set name = #{name} , money = #{money} where id = #{id} ") void update(Account account); @Select("select * from tbl_account") List<Account> findAll(); @Select("select * from tbl_account where id = #{id} ") Account findById(Integer id); } public class Account implements Serializable { private Integer id; private String name; private Double money; //setter..getter..toString方法省略 } -
resources下提供一個jdbc.properties,並有如下數據
jdbc.driver=com.mysql.jdbc.Driver
jdbc.url=jdbc:mysql://localhost:3306/spring_db?useSSL=false
jdbc.username=root
jdbc.password=root
-
創建相關配置類
//Spring配置類:SpringConfig @Configuration @ComponentScan("com.itheima") @PropertySource("classpath:jdbc.properties") @Import({JdbcConfig.class,MybatisConfig.class}) public class SpringConfig { } //JdbcConfig配置類 public class JdbcConfig { @Value("${jdbc.driver}") private String driver; @Value("${jdbc.url}") private String url; @Value("${jdbc.username}") private String userName; @Value("${jdbc.password}") private String password; @Bean public DataSource dataSource(){ DruidDataSource ds = new DruidDataSource(); ds.setDriverClassName(driver); ds.setUrl(url); ds.setUsername(userName); ds.setPassword(password); return ds; } } //MybatisConfig配置類 public class MybatisConfig { @Bean public SqlSessionFactoryBean sqlSessionFactory(DataSource dataSource){ SqlSessionFactoryBean ssfb = new SqlSessionFactoryBean(); ssfb.setTypeAliasesPackage("com.itheima.domain"); ssfb.setDataSource(dataSource); return ssfb; } @Bean public MapperScannerConfigurer mapperScannerConfigurer(){ MapperScannerConfigurer msc = new MapperScannerConfigurer(); msc.setBasePackage("com.itheima.dao"); return msc; } } -
編寫Spring整合Junit的測試類
@RunWith(SpringJUnit4ClassRunner.class) @ContextConfiguration(classes = SpringConfig.class) public class AccountServiceTestCase { @Autowired private AccountService accountService; @Test public void testFindById(){ Account ac = accountService.findById(2); } @Test public void testFindAll(){ List<Account> all = accountService.findAll(); } }

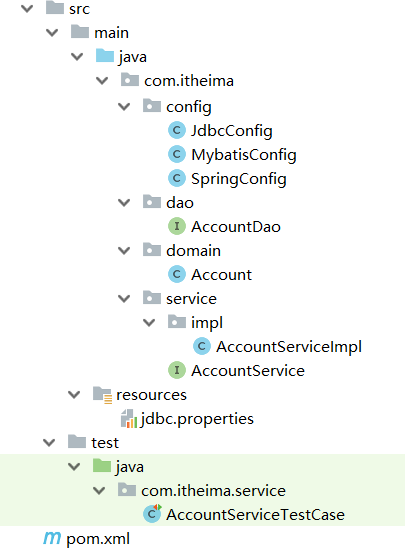
最終創建好的項目結構如下:
三、功能開發
步驟1:開啟SpringAOP的註解功能
在Spring的主配置文件SpringConfig類中添加註解
@EnableAspectJAutoProxy步驟2:創建AOP的通知類
-
該類要被Spring管理,需要添加@Component
-
要標識該類是一個AOP的切面類,需要添加@Aspect
-
配置切入點表達式,需要添加一個方法,並添加@Pointcut
@Component
@Aspect
public class ProjectAdvice {
    //配置業務層的所有方法
    @Pointcut("execution(* com.itheima.service.*Service.*(..))")
    private void servicePt(){}

    public void runSpeed(){

    }
}
步驟3:添加環繞通知
在runSpeed()方法上添加@Around
@Component
@Aspect
public class ProjectAdvice {
    //配置業務層的所有方法
    @Pointcut("execution(* com.itheima.service.*Service.*(..))")
    private void servicePt(){}
    //@Around("ProjectAdvice.servicePt()") 可以簡寫為下面的方式
    @Around("servicePt()")
    public Object runSpeed(ProceedingJoinPoint pjp){
        Object ret = pjp.proceed();
        return ret;
    }
}注意:目前並沒有做任何增強
步驟4:完成核心業務,記錄萬次執行的時間
@Component
@Aspect
public class ProjectAdvice {
    //配置業務層的所有方法
    @Pointcut("execution(* com.itheima.service.*Service.*(..))")
    private void servicePt(){}
    //@Around("ProjectAdvice.servicePt()") 可以簡寫為下面的方式
    @Around("servicePt()")
    public void runSpeed(ProceedingJoinPoint pjp){

        long start = System.currentTimeMillis();
        for (int i = 0; i < 10000; i++) {
           pjp.proceed();
        }
        long end = System.currentTimeMillis();
        System.out.println("業務層介面萬次執行時間: "+(end-start)+"ms");
    }
}
步驟5:運行單元測試類
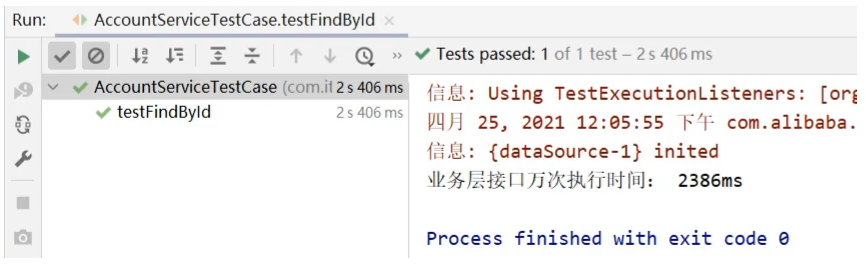
注意:因為程式每次執行的時長是不一樣的,所以運行多次最終的結果是不一樣的。
步驟6:程式優化
目前程式所面臨的問題是,多個方法一起執行測試的時候,控制台都列印的是:
業務層介面萬次執行時間:xxxms
我們沒有辦法區分到底是哪個介面的哪個方法執行的具體時間,具體如何優化?
@Component
@Aspect
public class ProjectAdvice {
//配置業務層的所有方法
@Pointcut("execution(* com.itheima.service.*Service.*(..))")
private void servicePt(){}
//@Around("ProjectAdvice.servicePt()") 可以簡寫為下面的方式
@Around("servicePt()")
public void runSpeed(ProceedingJoinPoint pjp){
//獲取執行簽名資訊
Signature signature = pjp.getSignature();
//通過簽名獲取執行操作名稱(介面名)
String className = signature.getDeclaringTypeName();
//通過簽名獲取執行操作名稱(方法名)
String methodName = signature.getName();
long start = System.currentTimeMillis();
for (int i = 0; i < 10000; i++) {
pjp.proceed();
}
long end = System.currentTimeMillis();
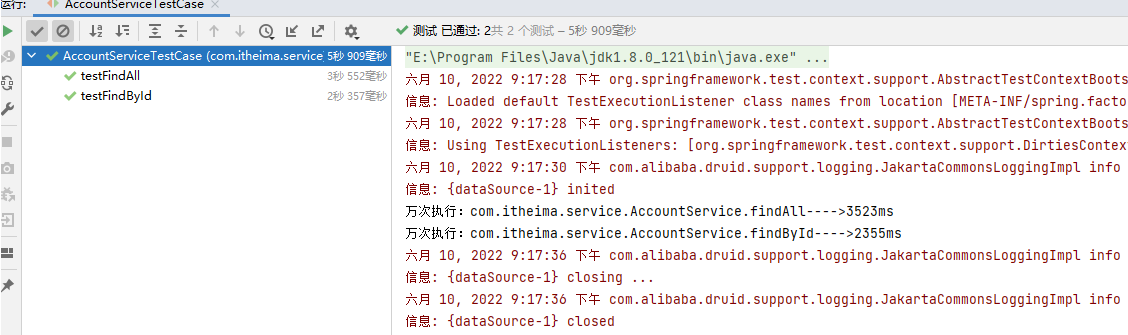
System.out.println("萬次執行:"+ className+"."+methodName+"---->" +(end-start) + "ms");
}
}步驟7:運行單元測試類