Linux 目錄掛載服務
Linux 伺服器掛載文件目錄通常有三種形式,手動掛載、自動掛載、Autofs 自動掛載,下面對這三個掛載做一下介紹,接受一下這三個區別以及使用場景:
準備伺服器和客戶端:
server 192.168.31.89 (企業里一般有專門的文件伺服器,這裡以一台伺服器作為文件伺服器,具體搭建較為簡單,不再贅述)
client 192.168.31.90
1 手動掛載
這種方式比較簡單,重點是掌握mount 命令知識即可,
Usage:
 mount [-lhV]
 mount -a [options]
 mount [options] [--source] <source> | [--target] <directory>
 mount [options] <source> <directory>
 mount <operation> <mountpoint> [<target>]

Options:
 -a, --all               mount all filesystems mentioned in fstab
 -c, --no-canonicalize   don't canonicalize paths
 -f, --fake              dry run; skip the mount(2) syscall
 -F, --fork              fork off for each device (use with -a)
 -T, --fstab <path>      alternative file to /etc/fstab
 -h, --help              display this help text and exit
 -i, --internal-only     don't call the mount.<type> helpers
 -l, --show-labels       lists all mounts with LABELs
 -n, --no-mtab           don't write to /etc/mtab
 -o, --options <list>    comma-separated list of mount options
 -O, --test-opts <list>  limit the set of filesystems (use with -a)
 -r, --read-only         mount the filesystem read-only (same as -o ro)
 -t, --types <list>      limit the set of filesystem types
     --source <src>      explicitly specifies source (path, label, uuid)
     --target <target>   explicitly specifies mountpoint
 -v, --verbose           say what is being done
 -V, --version           display version information and exit
 -w, --rw, --read-write  mount the filesystem read-write (default)

 -h, --help     display this help and exit
 -V, --version  output version information and exit
掛載執行命令
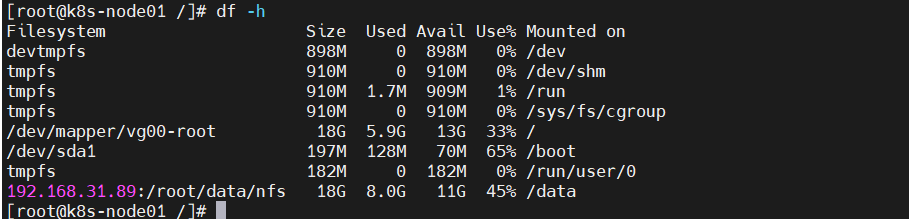
mount HOST:REMOTE-PATH LOCAL-PATH示例程式碼: mount -t nfs -o rw 192.168.31.89:/root/data/nfs /data 掛載執行結果
2 自動掛載
手動掛載在於命令執行簡單,操作快捷,但缺點是僅能在當前會話中保持,一旦機器重啟或發生宕機,則掛載取消,進而導致掛載執行失敗,我們需要在手動掛載執行的基礎,修改配置文件:
1.修改/etc/fstab 文件,將掛載目錄放在其中,例如下圖,這樣就可以保證開機時候可以自動掛載:
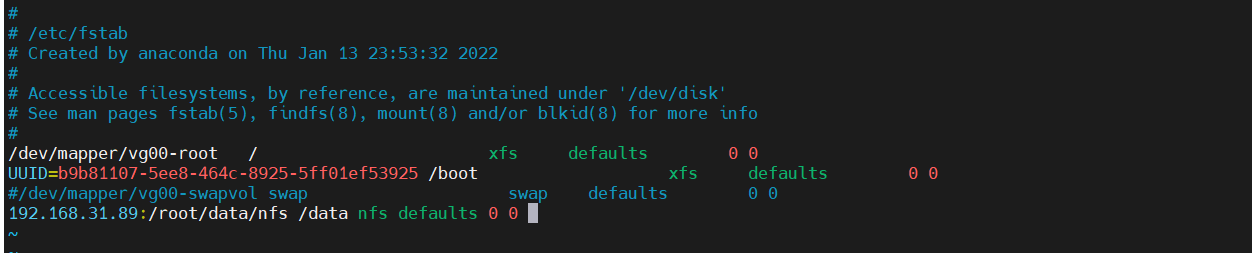
通常,/etc/fstab 中的 NFSv3 裝入項如下:
nfs.example.com:/data /local/path nfs rw,noauto 0 0對於 NFSv4 裝入,請在第三列中使用 nfs4 而不是 nfs:
nfs.example.com:/data /local/pathv4 nfs4 rw,noauto 0 0如果您沒有輸入 noauto 選項,系統的 init 腳本將在啟動時處理這些文件系統的裝入。
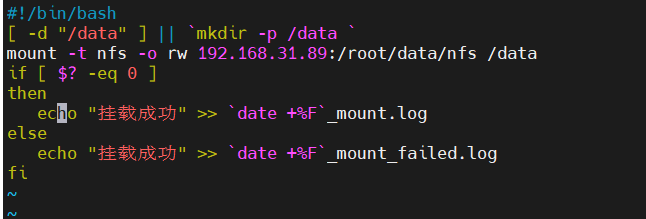
2.寫入啟動腳本,並將其設定systemd 服務中,可參考文章如何加入系統systemd 開機服務,示例如下:
3 Autofs 自動掛載
這點和上面兩種有略微區別,重點在於用時掛載,不用會自動取消掛載,減少系統服務進程消耗,同時也減輕伺服器連接壓力。
1)Autofs與Mount/Umount的不同之處在於,它是一種看守程式。如果它檢測到用戶正試圖訪問一個尚未掛接的文件系統,它就會自動檢測該文件系統,如果存在,那麼Autofs會自動將其掛接。
2)另一方面,如果它檢測到某個已掛接的文件系統在一段時間內沒有被使用,那麼Autofs會自動將其卸載。因此一旦運行了Autofs後,用戶就不再需要手動完成文件系統的掛接和卸載。
3.1 安裝
RedHat Linux Enterprise Server 上默認未安裝 autofs。要使用它的自動裝載功能,請先使用下面的命令安裝該程式
sudo yum install autofsSUSE Linux Enterprise Server 請先使用下面的命令安裝該程式
sudo zypper install autofs3.2 配置
使用 vim 等文本編輯器編輯 autofs 的配置文件來手動配置它。配置 autofs 有兩個基本步驟 — master 映射文件和特定映射文件。
autofs 的默認 master 配置文件是 /etc/auto.master。可通過在 /etc/sysconfig/autofs 文件中更改 DEFAULT_MASTER_MAP_NAME 選項的值來更改其位置。以下是 Linux Enterprise Server 中默認 master 映射文件的內容:
#
# Sample auto.master file
# This is a 'master' automounter map and it has the following format:
# mount-point [map-type[,format]:]map [options]
# For details of the format look at auto.master(5).
#
/misc   /etc/auto.misc
#
# NOTE: mounts done from a hosts map will be mounted with the
#       "nosuid" and "nodev" options unless the "suid" and "dev"
#       options are explicitly given.
#
/net    -hosts
#
# Include /etc/auto.master.d/*.autofs
# The included files must conform to the format of this file.
#
+dir:/etc/auto.master.d
#
# Include central master map if it can be found using
# nsswitch sources.
#
# Note that if there are entries for /net or /misc (as
# above) in the included master map any keys that are the
# same will not be seen as the first read key seen takes
# precedence.
#
+auto.master|
|
|
|
雖然這些內容默認會被注釋掉 (#),但它依然是簡單的自動裝入器映射語法示例。 |
|
|
如果您需要將 master 映射分割成幾個文件,請將該行取消注釋,並將映射(後綴為 |
|
|
|
auto.master 中的項有三個欄位,語法如下:
mount point map name optionsmount point
要在其中裝入 autofs 文件系統的基本位置,例如 /home。
map name
裝入時所用映射源的名稱。
options
這些選項(如指定)將作為默認值應用於給定映射中的所有項。
3.3操作和調試
autofs 服務的操作由 systemd 控制。autofs 的 systemctl 命令的一般語法為sudo systemctl enable|start|stop|reload |restart autofs
例如同樣載入NFS,相關配置方案如下:
1 編輯 master 映射文件 /etc/auto.master:
sudo vim /etc/auto.master2 在 /etc/auto.master 末尾為新的 NFS 裝入添加一條新項
/nfs /etc/auto.nfs --timeout=10它告訴 autofs 基本安裝點是 /nfs,NFS 共享在 /etc/auto.nfs 映射中指定,並且此映射中的所有共享將在 10 秒不活動後自動卸載
編輯或創建映射文件 vim /etc/auto.nfs 對每個 NFS 共享,/etc/auto.nfs 通常都會包含單獨的一行。
data 192.168.31.89:/root/data/nfs
上面的行表示當收到請求時,系統會將 192.168.31.89 主機上的 /root/data/nfs 目錄自動裝入到本地主機上的 /nfs/data 目錄(/nfs 取自 auto.master 映射)。/nfs/data 目錄將由 autofs 自動創建。
3 重新啟動autofs 並檢查它是否正常工作
sudo systemctl restart autofs
如果您能看到遠程共享上的文件列表,則表示 autofs 工作正常
4 /net 安裝點
如果您使用了許多 NFS 共享,這個助手安裝點將非常有用。/net 會根據需要自動裝入本地網路上的所有 NFS 共享。該項在 auto.master 文件中已經存在,因此,您只需將其取消注釋,然後重啟動 autofs 即可:
/net -hostssystemctl restart autofs例如,如果您有名為 server 的伺服器以及名為 /export 的 NFS 共享,您可以在命令行上鍵入
# cd /net/server/export5 使用通配符自動裝入子目錄
如果您的某個目錄含有多個子目錄,並且您需要將這些子目錄單個自動裝入(一般情況下,該目錄是包含各個用戶主目錄的 /home 目錄),autofs 提供了便捷的解決方案。
如果這些子目錄是主目錄,則在 auto.master 中添加下行:
/home /etc/auto.home現在,您需要在 /etc/auto.home 文件中添加正確的映射,以便自動裝入用戶的主目錄。一種方法是為每個目錄創建單獨的項:
wilber      server.com:/home/wilber
penguin      server.com:/home/penguin
tux      server.com:/home/tux
[...]
這種方法非常麻煩,因為您需要在 auto.home 中管理用戶列表。您可以使用星號「*」取代安裝點,使用符號「&」取代要裝入的目錄。
* server:/home/&

