現代化前端規範:工具+程式碼
- 2022 年 6 月 24 日
- 筆記
前端周刊發表每周前端技術相關的大事件、文章教程、一些框架的版本更新、以及程式碼和工具。每周定期發表,歡迎大家關注、轉載。
歡迎關注公眾號「前端每周看」
工具
vscode
vscode 可以說是前端最流行的編輯器,其有豐富的插件系統。不同開發人員對編輯器設置不同,比如縮進是用空格還是 tab,縮進幾個等等。如果多人開發同一個項目,必然會引起文件衝突,所以一個團隊最好能統一編輯器。
參考://editorconfig.org,在項目根目錄新建.editconfig文件
root = true

[*]
charset = utf-8
indent_style = space
indent_size = 2
end_of_line = lf
insert_final_newline = true
trim_trailing_whitespace = true

[*.md]
insert_final_newline = false
trim_trailing_whitespace = false
prettier
程式碼格式化工具,vscode 有很多格式化插件,像 formate、vetur 等,我們選擇 prettier 作為團隊格式化工具。
1、安裝 prettier
yarn add prettier --save-dev
在項目根目錄新建.prettierrc.js
module.exports = {
  // 強制使用單引號
  singleQuote: true,
  // 字元串使用單引號
  singleQuote: true,
  // 大括弧內的首尾需要空格
  bracketSpacing: true,
  // 末尾不需要逗號
  trailingComma: 'none',
  // 箭頭函數參數括弧
  arrowParens: 'avoid',
  // 在jsx中把'>' 是否單獨放一行
  jsxBracketSameLine: true,
  // 使用默認的折行標準
  proseWrap: 'preserve',
  // 根據顯示樣式決定 html 要不要折行
  htmlWhitespaceSensitivity: 'css',
  // 換行符使用 crlf/lf/auto
  endOfLine: 'auto'
};
2、配置 vscode 保存自動格式化,
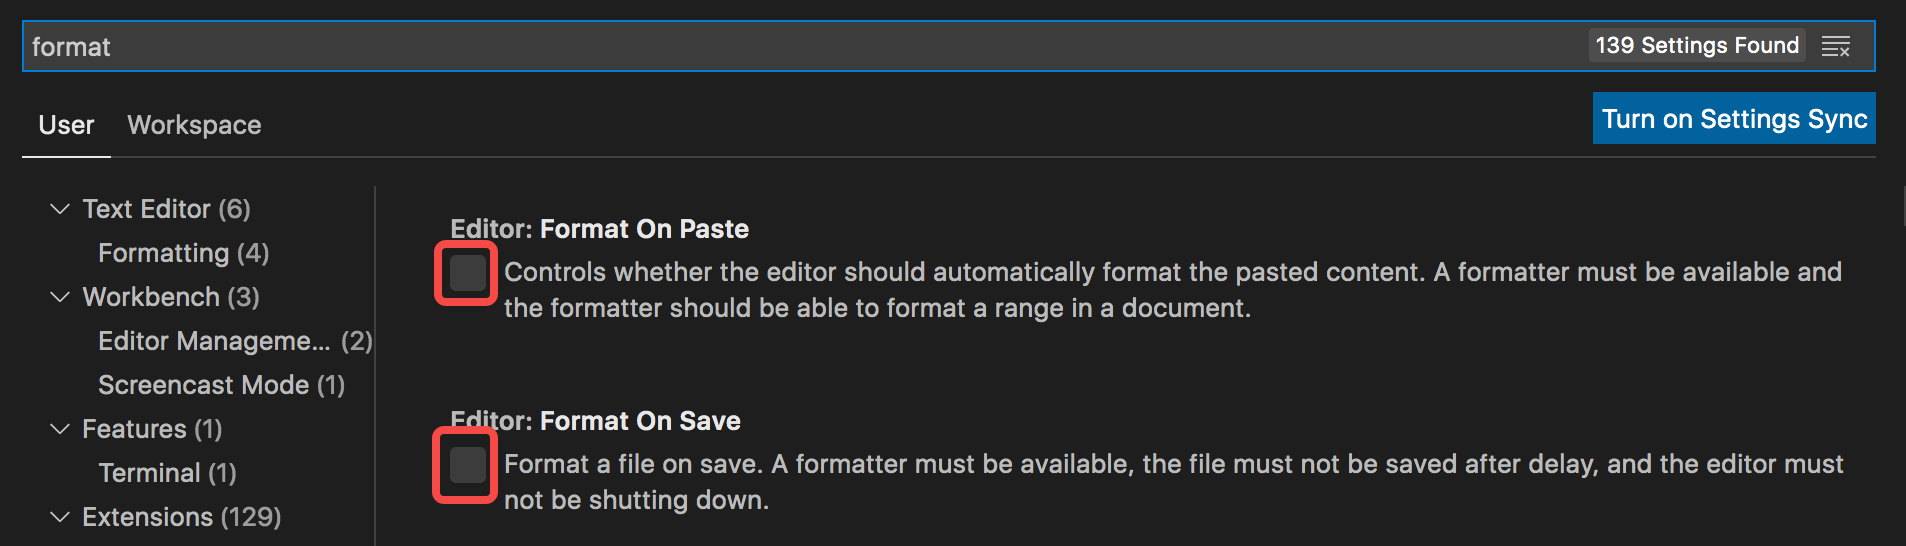
第一步,打開 vscode 設置,搜索 format,勾選 OnPaste、OnSave,如下圖
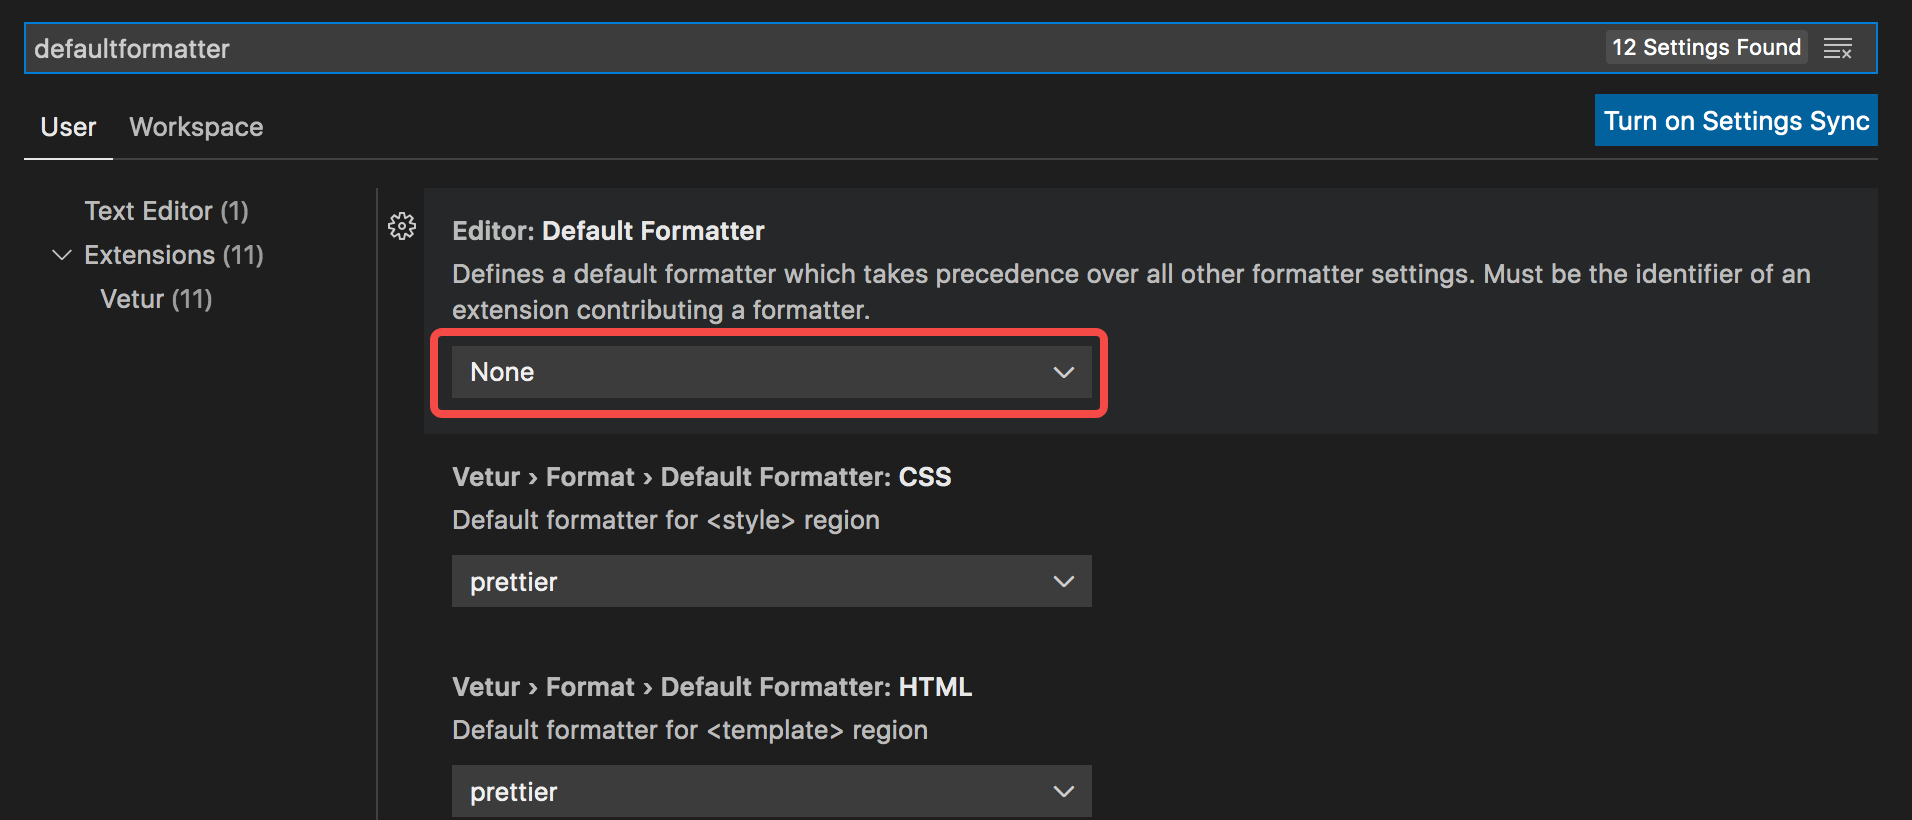
第二步,搜索,defaultformatter,設置默認格式化工具,選擇 Prettier
3、可以在項目 package.json 里配置 format 腳本,
"format": "prettier --write --parser typescript \"(src|test)/**/*.ts\""
eslint
eslint 作為程式碼檢測工具,支援 ts、tsx
1、安裝 eslint
yarn add eslint --save-dev
2、安裝 ts 解析器以及 ts 規則補充
yarn add @typescript-eslint/parser --save-dev
yarn add @typescript-eslint/eslint-plugin --save-dev
eslint 默認使用 Espree 進行解析,無法識別 ts 的一些語法,所以需要安裝一個 ts 的解析器 @typescript-eslint/parser,用它來代替默認的解析器@typescript-eslint/eslint-plugin 作為 eslint 默認規則的補充,提供了一些額外的適用於 ts 語法的規則。
3、支援 tsx
yarn add eslint-plugin-react --save-dev
由於是 react 項目,所以還需要插件 eslint-plugin-react 來支援 .tsx
4、在項目根目錄創建 .eslintrc.js
當運行 ESLint 的時候檢查一個文件的時候,它會首先嘗試讀取該文件的目錄下的配置文件,然後再一級一級往上查找,將所找到的配置合併起來,作為當前被檢查文件的配置。
module.exports = {
  parser: '@typescript-eslint/parser',
  plugins: [
    'react',
    'react-hooks',
    '@typescript-eslint/eslint-plugin',
    'prettier'
  ],
  settings: {
    react: {
      version: 'detect'
    }
  },
  rules: {
    'prettier/prettier': 'error',
    'no-debugger': 'error',
    // 取消函數參數需要重新賦值給另一個變數才能使用
    'no-param-reassign': [0],
    // 取消 { a, b, c } 多個變數需要換行
    'object-curly-newline': [0],
    // 禁用var,用let和const代替
    'no-var': 2,
    // 開啟強制單引號
    quotes: [2, 'single'],
    // 強制全等( === 和 !==)
    eqeqeq: 2,
    // 語句強制分號結尾
    semi: [2, 'always'],
    // 禁止出現未使用的變數
    '@typescript-eslint/no-unused-vars': [2],
    // 箭頭函數參數括弧,一個參數時可省略括弧
    'arrow-parens': [2, 'as-needed'],
    // 箭頭函數,箭頭前後空格
    'arrow-spacing': [2, { before: true, after: true }],
    // 禁止對象最後一項逗號
    'comma-dangle': [2, 'never'],
    // 單行程式碼/字元串最大長度
    'max-len': [2, { code: 120 }],
    // jsx縮進2個空格
    'react/jsx-indent': [2, 2],
    // 文件末尾強制換行
    'eol-last': 2,

    // react配置
    // 強制組件方法順序
    'react/sort-comp': [2],
    // 結束標籤,組件省略閉合標籤,html不省略閉合標籤
    'react/self-closing-comp': [2, { component: true, html: false }],
    // 檢查 Hook 的規則,不允許在if for裡面使用
    'react-hooks/rules-of-hooks': [2],
    // 檢查 effect 的依賴
    'react-hooks/exhaustive-deps': [2]
  }
};
git-commit-message
驗證 git 提交規則,創建 verify-commit-msg.js 文件
const chalk = require('chalk')
const msgPath = process.env.GIT_PARAMS
const msg = require('fs').readFileSync(msgPath, 'utf-8').trim()

const commitRE =
  /^(revert: )?(wip|release|feat|fix|polish|docs|style|refactor|perf|test|workflow|ci|chore|types|build)(\(.+\))?: .{1,50}/

if (!commitRE.test(msg)) {
  console.log()
  console.error(
    `  ${chalk.bgRed.white(' ERROR ')} ${chalk.red(
      `invalid commit message format.`
    )}\n\n` +
      chalk.red(
        `  Proper commit message format is required for automated changelog generation. Examples:\n\n`
      ) +
      `    ${chalk.green(`feat(compiler): add 'comments' option`)}\n` +
      `    ${chalk.green(
        `fix(v-model): handle events on blur (close #28)`
      )}\n\n` +
      chalk.red(`  See .github/COMMIT_CONVENTION.md for more details.\n`)
  )
  process.exit(1)
}
程式碼提交規則
feat:     新功能
fix:      修復
docs:     文檔變更
style:    程式碼格式(不影響程式碼運行的變動)
refactor: 重構(既不是增加feature,也不是修復bug)
perf:     性能優化
test:     增加測試
chore:    構建過程或輔助工具的變動
revert:   回退
build:    打包
程式碼
整個團隊是用 umi 封裝的腳手架,所有項目都是 React.js+Mobx+TypeScript,下面列出了基本規範。
React.js
命名
-
React 組件文件名使用 PascalCase 命名規則,並且以.tsx 後綴名。例如:AnotherComponent.tsx
-
如果 React 組件是一個單文件,以組件名作為文件名;如果是將 React 組件放在一個目錄里,以組件名作為目錄名,並且組件所在文件以 index.jsx 命名
src
|-- components
| |-- BadNamedComponent
| |-- BadNamedComponent.jsx
| |-- BadNamedComponent.css
| |-- GoodNamedComponent
| |-- ChildComponent.jsx
| |-- ChildComponent.css
| |-- index.jsx
| |-- index.css
| |-- AnotherComponent.jsx
| |-- AnotherComponent.csssha

// ❌
import BadNamedComponent from '@/components/BadNamedComponent/BadNamedComponent';

// ❌
import GoodNamedComponent from '@/components/GoodNamedComponent/index';

// ✅
import GoodNamedComponent from '@/components/GoodNamedComponent';

// ✅
import AnotherComponent from '@/components/AnotherComponent';

+ React 組件使用 PascalCase 方式命名,React 組件實例使用 camelCase 方式命名

// ❌
import someComponent from './SomeComponent';

// ✅
import SomeComponent from './SomeComponent';

// ❌
const AnotherComponent = <AnotherComponent />;

// ✅
const anotherComponent = <AnotherComponent />;
-
不推薦 使用高階組件。如果必需使用,以 with 前綴命名高階組件
// ❌
export default function wrapForm(WrappedComponent) {
return function FormWrapper(props) {
return <WrappedComponent {...props} {...somePropsFromWrapper} />;
}
}

// ✅
export default function withForm(WrappedComponent) {
return function WithForm(props) {
return <WrappedComponent {...props} {...somePropsFromWrapper} />;
}
}
-
高階組件需要添加 displayName 屬性方便調試, displayName 屬性的格式為:裝飾器函數名稱加上圓括弧 () 包裹的 WrappedComponent 的 displayName 或者 name 屬性,如下所示
// ❌
export default function withForm(WrappedComponent) {
function WithForm(props) {
return <WrappedComponent {...props} {...somePropsFromWrapper} />;
}

return WithForm;
}

// ✅
export default function withForm(WrappedComponent) {
function WithForm(props) {
return <WrappedComponent {...props} {...somePropsFromWrapper} />;
}

const wrappedComponentName = WrappedComponent.displayName
|| WrappedComponent.name
|| 'Component';

WithForm.displayName = `withForm(${wrappedComponentName})`;
return WithForm;
}
-
props 使用 camelCase 方式命名
// ❌
<SomeComponent
  SomeProp="value1"
  other_prop="value2"
/>

// ✅
<SomeComponent
  someProp="value1"
  otherProp="value2"
/>
-
不要使用下劃線作為變數名的前綴
function SomeComponent() {
// ❌
const \_handleSubmit = useCallback((params) => {
submitWith(params);
}, []);

// ✅
const handleSubmit = useCallback((params) => {
submitWith(params);
}, []);

return (
<Form onSubmit={_handleSubmit} onSubmit2={handleSubmit} />
);
}
括弧
-
當 JSX 標籤跨多行時,必須使用圓括弧 () 包裹
// ❌
function ParentComponent() {
return <div>
<ChildComponent />

  </div>;
}

// ✅
function ParentComponent() {
return (
<div>
<ChildComponent />
</div>
);
}
標籤
-
沒有 children 時必須使用自閉合標籤
// ❌
<SomeComponent prop="value"></SomeComponent>

// ✅
<SomeComponent prop="value" />
2.7.5 對齊
+ 多行屬性的折行和對齊方式

// ❌
<SomeComponent superLongParam="bar"
     anotherSuperLongParam="baz" />

// ✅
<SomeComponent
  superLongParam="bar"
  anotherSuperLongParam="baz"
/>

// ✅
<ParentComponent
superLongParam="bar"
anotherSuperLongParam="baz"

>   <ChildComponent />
> </ParentComponent>
-
條件渲染語句對齊方式
// ❌
{
someCondition
? <ComponentA />
: <ComponentB />
}

// ✅
{someCondition ? (
<ComponentA />
) : (
<ComponentB />
)}
引號
-
JSX 上的字元串字面量屬性使用雙引號,其它地方全部使用單引號
function SomeComponent() {
// ❌
const wrongString = "double quotes is wrong";

// ✅
const rightString = 'single quotes is right';
}

// ❌
<SomeComponent someProp='value1' />

// ✅
<SomeComponent someProp="value1" />

// ❌
<SomeComponent style={{ fontSize: "12px" }} />

// ✅
<SomeComponent style={{ fontSize: '12px' }} />
空格
-
自閉合標籤在標籤閉合處留一個空格,變數屬性的花括弧 {} 和變數之間不能出現空格,非折行對象屬性與花括弧之間留一個空格
// ❌
<SomeComponent/>

// ❌
<SomeComponent      />

// ✅
<SomeComponent />

// ❌
<SomeComponent someProp={ someValue } />

// ✅
<SomeComponent someProp={someValue} />

// ❌
<SomeComponent someObjectProp={{prop: value}} />

// ✅
<SomeComponent someObjectProp={{ prop: value }} />
樣式
-
不推薦 使用內聯 style 樣式,建議統一寫在單獨的 css 文件里或者使用類似 @material-ui/styles 的樣式管理方案。如果有必要使用內聯樣式,建議將 styles 定義為變數統一管理,在 JSX 中通過變數引入使用
// ❌
<SomeComponent style={{
  marginTop: '10px',
  fontSize: '12px',
  color: '#f00',
}} />

// ✅
const styles = {
someComponent: {
marginTop: '10px',
fontSize: '12px',
color: '#f00',
},
};
<SomeComponent style={styles.someComponent} />
-
樣式使用 styled-components 插件包裹
import styled from 'styled-components';

const Wrapper = styled.div`
  width: 100%;
`;
const FC: React.FC = () => {
  return <Wrapper></Wrapper>;
};

export default FC;
props
-
值為 true 的 prop 屬性只寫屬性名
// ❌
<SomeComponent visible={true} />

// ✅
<SomeComponent visible />
-
在使用 <img>標籤時,如果不是裝飾性 (Decorative Image) 圖片必須有 alt 屬性,如果是裝飾性圖片則應該設置 alt=”” 或者 role=”presentation” 屬性
// ❌
<img src="logo.png" />

// ✅
<img src="logo.png" alt="wedoctor" />

// ✅
<img src="some-presentational-image.png" alt="" />

// ✅
<img src="some-presentational-image.png" role="presentation" />
-
不要使用數組下標 index 作為 key ,從數組項上摘取一個唯一標識該項的屬性作為 key,如果沒有,先手動給數組裡的每一項添加一個唯一標識
// ❌
{someList.map((item, index) => (
<Item key={index} {...item} />
))}

// ✅
{someList.map(item => (
<Item key={item.id} {...item} />
))}
-
為非必傳 (non-required) prop 配置默認屬性 defaultProps
// ❌
function SomeComponent({ requiredProp, nonRequiredProp }) {
return (
<div>{requiredProp}{nonRequiredProp}</div>
);
}
SomeComponent.propTypes = {
requiredProp: PropTypes.number.isRequired,
nonRequiredProp: PropTypes.string,
};

// ✅
function SomeComponent({ requiredProp, nonRequiredProp }) {
return (
<div>{requiredProp}{nonRequiredProp}</div>
);
}
SomeComponent.propTypes = {
requiredProp: PropTypes.number.isRequired,
nonRequiredProp: PropTypes.string,
};
SomeComponent.defaultProps = {
nonRequiredProp: '',
};
-
慎重使用展開語法 (Spread syntax) 給子組件傳 props 。中間過渡組件(比如 HOC )可以直接使用 {…this.props} 給內部子組件傳 props,其它類型組件必須摘出和內部子組件相關的 props 再使用展開語法 {…relevantProps}
// ❌
function SomeRegularComponent(props) {
return (
<ChildComponent {...props} />
);
}

// ✅
function HOC(WrappedComponent) {
return function WrapperComponent(props) {
const propFromWrapper = 'value';
return (
<WrappedComponent {...props} propFromWrapper={propFromWrapper} />
);
};
}

// ✅
function SomeRegularComponent(props) {
const { irrelevantProp1, irrelevantProp2, ...relevantProps } = props;
return (
<ChildComponent {...relevantProps} />
);
}
-
props 的書寫順序建議為:字元串字面量 prop > 非字元串的字面量 prop > 變數 prop > 事件處理函數 Event handlers
// ✅
<ChildComponent
  literalStringProp="some string prop"
  literalNumberProp={1}
  literalBooleanProp={false}
  variableProp={someVariable}
  onChange={handleChange}
/>
Hooks
文檔://ahooks.js.org/zh-CN/hooks/use-request/index
-
只允許在組件函數的最外層調用 Hooks 函數,而不能在循環、if 判斷以及嵌套函數內調用
function ParentComponent() {
// ❌
if (someCondition) {
useEffect(() => {
doSomeSideEffects();
}, []);
}

// ✅
useEffect(() => {
if (someCondition) {
doSomeSideEffects();
}
}, []);

return (
<ChildComponent onChange={handleChange} />
);
}
-
只允許在 React 函數組件和自定義 Hooks 函數內部調用 Hooks 函數
// ❌
function someRegularFunction() {
const [state, setState] = useState(1);
}

// ✅
function ParentComponent() {
const [state, setState] = useState(1);

return (
<ChildComponent someProp={state} />
);
}

// ✅
function useSomeCustomHooks() {
const [state, setState] = useState(1);

return state;
}
-
組件內部定義的函數類型 props 必須使用 useCallback 包裹
// ❌
function ParentComponent() {
const handleChange = () => {
// handle change
};

return (
<ChildComponent onChange={handleChange} />
);
}

// ✅
function ParentComponent() {
const handleChange = useCallback(() => {
// handle change
}, []);

return (
<ChildComponent onChange={handleChange} />
);
}
-
所有組件必須使用 React.memo 包裹
function ChildComponent() {
return (
<div>
<span>child component</span>
</div>
);
}

// ❌
export default ChildComponent;

// ✅
export default React.memo(ChildComponent);
-
不要在 JSX 中出現 Hooks 函數
// ❌
function ParentComponent() {
return (
<ChildComponent
onChange={useCallback(() => {
// handle change
}, [])}
someMemoProp={useMemo(() => (
computeWith(dep)
), [dep])}
/>
);
}

// ✅
function ParentComponent() {
const handleChange = useCallback(() => {
// handle change
}, []);

const someMemoProp = useMemo(() => (
computeWith(dep)
), [dep]);

return (
<ChildComponent onChange={handleChange} someMemoProp={someMemoProp} />
);
}
註:後期需求調整過程中,Hooks 函數所在的 JSX 塊可能會出現 if 之類的條件渲染邏輯,此時就需要將該 Hooks 函數遷移到組件函數的最外層很不方便,為了後期維護起見,應該統一在組件函數的最外層調用 Hooks 函數
-
大計算量的計算屬性推薦使用 useMemo 包裹
function ParentComponent() {
// ❌
const someComplexComputedValue1 = () => doSomeComplexComputeWith(...deps);

// ✅
const someComplexComputedValue2 = useMemo(() => (
doSomeComplexComputeWith(...deps)
), [...deps]);

return (
<ChildComponent
      someComplexComputedValue1={someComplexComputedValue1}
      someComplexComputedValue2={someComplexComputedValue2}
    />
);
}
-
傳遞給子組件的引用類型的計算屬性建議使用 useMemo 包裹
function ParentComponent({ someProp }) {
const [state, setState] = useState(1);

// ❌
const someComputedProp1 = doSomeComputeWith(state, someProp);

// ✅
const someComputedProp2 = useMemo(() => (
doSomeComputeWith(state, someProp)
), [state, someProp]);

return (
<ChildComponent
      someComputedProp1={someComputedProp1}
      someComputedProp2={someComputedProp2}
    />
);
}
-
useMemo 只能作為性能優化手段,而不能作為回調函數執行與否的依據
// ❌
export default function usePrevious(value) {
const previousValueRef = useRef(value);

return useMemo(() => {
const previousValue = previousValueRef.current;
previousValueRef.current = value;
return previousValue;
}, [value]);
}

// ✅
function usePrevious(value) {
const previousValueRef = useRef(value);
const currentValueRef = useRef(value);

useEffect(() => {
previousValueRef.current = currentValueRef.current;
currentValueRef.current = value;
}, [value]);

return currentValueRef.current === value
? previousValueRef.current
: currentValueRef.current;
}
參考://zh-hans.reactjs.org/docs/hooks-reference.html#usememo
-
使用 useRef 快取數據,以移除 useCallback 的 deps 數組裡不必要的依賴項,減少因 handler 變化引起的子組件重新渲染
function ParentComponent() {
const [state, setState] = useState(1);

// ❌
const handleSubmit1 = useCallback(() => {
submitWith(state);
}, [state]);

// ✅
const stateRef = useRef(state);
stateRef.current = state;
const handleSubmit2 = useCallback(() => (
submitWith(stateRef.current);
), []);

return (
<ChildComponent
      onSubmit1={handleSubmit1}
      onSubmit2={handleSubmit2}
    />
);
}
-
對於需要監聽參數組件使用 observe,不需要監聽的使用 React.FC
// 需要監聽參數變化
export const component = observer((props: any) => {

})
// 不需要監聽參數變化
const FC: React.FC = () => {
  return <Wrapper></Wrapper>;
};

export default FC;
Hooks 調用位置和順序建議: useSelector useContext useState useReducer useDispatch 統一在程式碼最頂層依次調用,其次是 useCallback useMemo ,然後是 useLayoutEffect useEffect , useRef 的位置可以依據被使用到的位置靈活放置, useImperativeHandle 一般和 useRef 一起使用,建議跟隨在與其相關的 useRef 之後。其它一些局部變數按需要靈活放置
Mobx
version > 6
import { makeAutoObservable } from 'mobx';

class Store {
  constructor() {
    makeAutoObservable(this);
  }
  fontSize = 80;
  updateFontSize(fontSize) {
    this.fontSize = fontSize;
  }
}

export default new Store();
TypeScript
環境
基本遵循 JavaScript Style Guide 與 ES-Next Style Guide
1、工程配置
TypeScript 文件使用 .ts 擴展名。含 JSX 語法的 TypeScript 文件使用 .tsx 擴展名。
tsconfig.json 配置文件應開啟 strict、noImplicitReturns、noUnusedLocals 選項。
tsconfig.json 配置文件應開啟 allowSyntheticDefaultImports 選項。
示例:
// ✅
import React, { PureComponent } from 'react';

// ❌
import \* as React from 'react';
使用 VS Code 編寫 TypeScript。
2、 文件
在文件結尾處,保留一個空行。
3、 命名
介面 使用 Pascal 命名法。
介面名 不使用 I 作為前綴。
示例:
// ✅
interface ButtonProps {
// ...
}

// ❌
interface IButtonProps {
// ...
}
類型別名 使用 Pascal 命名法。
示例:
// ✅
interface HeaderStateProps {
// ...
}

interface HeaderDispatchProps {
// ...
}

type HeaderProps = HeaderStateProps & HeaderDispatchProps;
語言特性
1、 變數
使用 const 聲明 枚舉 。
示例:
// ✅
const enum Directions {
UP,
DOWM,
LEFT,
RIGHT,
}

// ❌
enum Directions {
UP,
DOWN,
LEFT,
RIGHT,
}
2、 類型
不應顯式聲明可以自動推導的類型。
示例:
// ✅
let shouldUpdate = false;

// ❌
let shouldUpdate: boolean = false;
使用 string / number / boolean 聲明基本類型,不使用 String / Number / Boolean。
示例:
// ✅
let str: string;

// ❌
let str: String;
不使用 Object / Function 聲明類型。
數組元素為簡單類型(非匿名且不含泛型)時,使用 T[] 聲明類型,否則應使用 Array
數組元素為不可變數據時,使用 ReadonlyArray
示例:
// ✅
let files: string[];
let tokens: Array<string | number>;
let buffer: Buffer[];
let responses: Array<Promise<number>>;

// ❌
let files: Array<string>;
let tokens: (string | number)[];
let buffer: Array<Buffer>;
let responses: Promise<number>[];
不使用 ! 聲明對象屬性非空。
示例:
// ✅
if (foo.bar && foo.bar.baz) {
// ...
}

// ❌
if (foo!.bar!.baz) {
// ...
}
不使用 any 聲明類型。
示例:
// ✅
const identity = <T>(x: T) => x;

// ❌
const identity = (x: any) => x;
使用 as 進行類型聲明轉換,不使用 <> 。
示例:
// ✅
const root = document.getElementById('root') as HTMLDivElement;

// ❌
const root = <HTMLDivElement>document.getElementById('root');
介面不應為空。
介面中同一函數重載的類型聲明需相鄰。
示例:
// ✅
interface AnyInterface {
foo();
foo(x: string);
bar();
bar(x: number);
}

// ❌
interface AnyInterface {
foo();
bar();
foo(x: string);
bar(x: number);
}
3、 條件
使用 === 或 !== 判斷相等性,不使用 == 或 !=。
示例:
// ✅
if (foo !== null && foo !== undefined) {
// ...
}

// ❌
if (foo != null) {
// ...
}
4、 循環
使用 Object.keys / Object.values / Object.entries / Object.getOwnPropertyNames 遍歷對象,不使用 for .. in 。
示例:
// ✅
Object.keys(obj).forEach(key => /_ ... _/);

// ❌
for (const key in obj) {
if (obj.hasOwnProperty(key)) {
// ...
}
}
索引僅用於獲取數組當前被迭代的項時,使用 for .. of 遍曆數組,不使用 for 。
示例:
// ✅
for (const item of items) {
// ...
}

// ❌
for (let i = 0; i < items.length; i++) {
const item = items[i];
// ...
}
5、 數組
使用 … 進行數組淺拷貝,不使用 Array.from / Array.prototype.slice 。
示例:
// ✅
const copies = [...items];

// ❌
const copies = items.slice();

// worst
let copies = [];
for (let i = 0; i < items.length; i++) {
copies.push(items[i]);
}
使用 … 將類數組對象轉化為數組,不使用 Array.from / Array.prototype.slice 。
示例:
// ✅
const elements = [...document.querySelectorAll('.foo')];

// ❌
const element = Array.from(document.querySelectorAll('.foo'));

// worst
const element = Array.prototype.slice.call(document.querySelectorAll('.foo'));
6、 對象
使用 … 進行對象淺拷貝,不使用 Object.assign 。
示例:
// ✅
this.setState(state => ({...state, clicked: true}));

// ❌
this.setState(state => Object.assign({}, state, {clicked: true}));
7、 函數
避免 return undefined ,應直接 return。
示例:
// ✅
function foo(bar: boolean) {
if (!bar) {
return;
}
}

// ❌
function foo(bar: boolean) {
if (!bar) {
return undefined;
}
}
8、 類
每個文件中最多聲明一個類。
類成員的可訪問性為 public 時,不應顯式聲明。
構造函數可忽略時,應忽略。
類成員之間使用空行隔開。
示例:
// ✅
class Button extends PureComponent<ButtonProps, ButtonState> {
readonly state: ButtonState = {
clicked: false,
};

    render() {
        // ...
    }

}

// ❌
class Button extends PureComponent<ButtonProps, ButtonState> {
public state: ButtonState = {
clicked: false,
};
constructor(props: ButtonProps) {
super(props);
}
public render() {
// ...
}
}
構造函數初始化實例屬性時,應盡量使用參數屬性。
構造函數的參數中,作為屬性的參數應排列於其他參數前。
示例:
// ✅
class AppComponent {
constructor(private readonly heroService: HeroService) {}
}

// ❌
class AppComponent {
private readonly heroService: HeroService;

    constructor(heroService: HeroService) {
        this.heroService = heroService;
    }

}
9、 模組
使用 ECMAScript 2015 標準的模組系統。
除類型聲明文件外,不使用 module / namespace 關鍵字。
不使用 /// <reference path= > 。
示例:
// ✅
import foo from 'foo';

// ❌
import foo = require('foo');
對於同一個模組路徑,僅 import 一次。
示例:
// ✅
import React, {PureComponent} from 'react';

// ❌
import React from 'react';
import {PureComponent} from 'react';
對於使用 webpack 等構建工具的項目,在模組中引入其他資源(如樣式、圖片等)時,為資源編寫類型聲明文件,或使用合適的 loader 生成類型聲明文件。
示例:
// ✅

// Button.scss.d.ts
export clicked: string;

// logo.png.d.ts
declare const logo: string;

export default logo;

// Button.tsx
import styles from './Button.scss';
import logo from './logo.png';

// ❌
const styles = require<any>('./Button.scss');
const logo = require<string>('./logo.png');


