C#學習系列文章之Windows窗體應用程式打開和保存圖片
- 2020 年 1 月 16 日
- 筆記
背景
緊接著上一篇文章,我已經學習了控制台的使用,以及創建不同應用的Helloworld程式,這一篇文章,我介紹Windows窗體應用程式的使用。
操作步驟
第一步,打開vs2017–》新建–》項目–》點擊確定:

然後,項目已經創建成功了,截圖如下:

其中,白色面板部分就是我們所創建的項目的初始介面,我們可以點擊運行項目,紅色框柱的部分就是我們運行出來的桌面應用的介面。

上面運行成功的是一個空白的介面,接下來,我們就要來創建我們的自己想要的介面了。

主程式的程式碼
using System; using System.Collections.Generic; using System.Linq; using System.Threading.Tasks; using System.Windows.Forms; namespace WindowsFormsApp4 { static class Program { /// <summary> /// 應用程式的主入口點。 /// </summary> [STAThread] static void Main() { Application.EnableVisualStyles(); Application.SetCompatibleTextRenderingDefault(false); Application.Run(new Form1()); } } }

點擊左側的工具箱,我們可以添加我們想要的控制項,可以拖動到面板上,面板上的布局需要自行設計。
工具箱有以下的類型:
- 公共控制項
- 容器
- 菜單和工具欄
- 數據
- 組件
- 列印
- 對話框
- WPF互操作性
- 常規

每一個工具箱里的控制項比較多,可以依次使用每個控制項,知道有什麼控制項可用。

第二步,添加按鈕

添加了兩個按鈕,雙擊按鈕我們可以進入控制項的方法體程式碼部分,截圖如下:


雙擊工程目錄被控住的部分,我們就跳轉到描述控制項資訊的程式碼:
程式碼詳情如下:
namespace WindowsFormsApp4 { partial class Form1 { /// <summary> /// 必需的設計器變數。 /// </summary> private System.ComponentModel.IContainer components = null; /// <summary> /// 清理所有正在使用的資源。 /// </summary> /// <param name="disposing">如果應釋放託管資源,為 true;否則為 false。</param> protected override void Dispose(bool disposing) { if (disposing && (components != null)) { components.Dispose(); } base.Dispose(disposing); } #region Windows 窗體設計器生成的程式碼 /// <summary> /// 設計器支援所需的方法 - 不要修改 /// 使用程式碼編輯器修改此方法的內容。 /// </summary> private void InitializeComponent() { this.button1 = new System.Windows.Forms.Button(); this.button2 = new System.Windows.Forms.Button(); this.SuspendLayout(); // // button1 // this.button1.Location = new System.Drawing.Point(311, 55); this.button1.Name = "button1"; this.button1.Size = new System.Drawing.Size(109, 45); this.button1.TabIndex = 0; this.button1.Text = "button1"; this.button1.UseVisualStyleBackColor = true; this.button1.Click += new System.EventHandler(this.button1_Click); // // button2 // this.button2.Location = new System.Drawing.Point(311, 171); this.button2.Name = "button2"; this.button2.Size = new System.Drawing.Size(109, 41); this.button2.TabIndex = 1; this.button2.Text = "button2"; this.button2.UseVisualStyleBackColor = true; this.button2.Click += new System.EventHandler(this.button2_Click); // // Form1 // this.AutoScaleDimensions = new System.Drawing.SizeF(6F, 12F); this.AutoScaleMode = System.Windows.Forms.AutoScaleMode.Font; this.ClientSize = new System.Drawing.Size(800, 450); this.Controls.Add(this.button2); this.Controls.Add(this.button1); this.Name = "Form1"; this.Text = "Form1"; this.ResumeLayout(false); } #endregion private System.Windows.Forms.Button button1; private System.Windows.Forms.Button button2; } }
其中,我們來看一下button1的資訊設置,我們可以通過設置部分的程式碼設置按鈕的基本屬性。
// button1 // this.button1.Location = new System.Drawing.Point(311, 55);//按鈕位置資訊 this.button1.Name = "button1";//按鈕名稱 this.button1.Size = new System.Drawing.Size(109, 45);//按鈕的大小 this.button1.TabIndex = 0;//按鈕的索引 this.button1.Text = "button1";//按鈕上顯示的名稱 this.button1.UseVisualStyleBackColor = true; this.button1.Click += new System.EventHandler(this.button1_Click);

我們可以拖動窗口調整大小使得適應圖片,也可以在屬性里設置自動適應圖片大小,截圖如下。

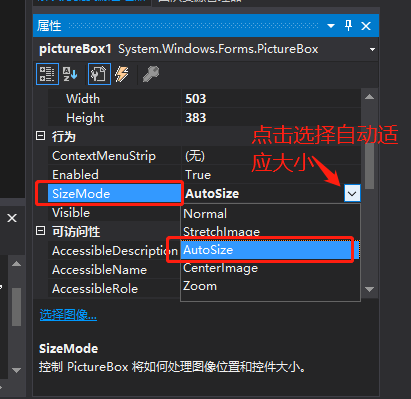
1、Picturebox控制項SizeMode屬性
(1)Normal模式:如果圖片大於Picturebox控制項大小,圖片不能完全顯示。
(2)AutoSize:自動調整Picturebox控制項大小去適應圖片的大小,圖片可以完全顯示。
(3)StretchImage:Picturebox控制項大小不變,自動調整影像適應控制項。
完整的Windows 窗體應用程式打開和保存圖片
具體的操作步驟如下:
1. 選擇新建項目,選擇Windows 窗體應用,並命名為showPicture。

2.從工具箱中拖動兩個Button和一個PictureBox到面板上,並調整位置對齊為如下的設計:

3.拖動調整大小

4. 設計按鈕
首先,右鍵單擊按鈕,然後選擇屬性,然後在右下角屬性框設置名稱為打開圖片;同理,button2設置名稱為保存圖片。

然後,修改PictureBox的背景色

最後,修改結果如下

5. 添加程式碼
雙擊打開圖片按鈕,添加如下程式碼:

OpenFileDialog file = new OpenFileDialog(); file.InitialDirectory = "."; file.Filter = "所有文件(*.*)|*.*"; file.ShowDialog(); if (file.FileName != string.Empty) { try { pathname = file.FileName; //獲得文件的絕對路徑 this.pictureBox1.Load(pathname); } catch (Exception ex) { MessageBox.Show(ex.Message); } }
雙擊保存圖片按鈕,跳轉到按鈕調用的程式碼,添加紅框部分的程式碼:

SaveFileDialog save = new SaveFileDialog(); save.ShowDialog(); if(save.FileName!=string.Empty) { pictureBox1.Image.Save(save.FileName); }
完整的Form1的程式碼如下:
using System; using System.Collections.Generic; using System.ComponentModel; using System.Data; using System.Drawing; using System.Linq; using System.Text; using System.Threading.Tasks; using System.Windows.Forms; namespace showPicture { public partial class Form1 : Form { public Form1() { InitializeComponent(); } private string pathname = string.Empty; //定義路徑名變數 private void button1_Click(object sender, EventArgs e) { OpenFileDialog file = new OpenFileDialog(); file.InitialDirectory = "."; file.Filter = "所有文件(*.*)|*.*"; file.ShowDialog(); if (file.FileName != string.Empty) { try { pathname = file.FileName; //獲得文件的絕對路徑 this.pictureBox1.Load(pathname); } catch (Exception ex) { MessageBox.Show(ex.Message); } } } private void button2_Click(object sender, EventArgs e) { SaveFileDialog save = new SaveFileDialog(); save.ShowDialog(); if(save.FileName!=string.Empty) { pictureBox1.Image.Save(save.FileName); } } } }
然後,點擊啟動

彈出如下對話框之後,單擊打開圖片

選擇圖片結果如下圖,PictureBox已經自適應圖片的大小。

然後選擇保存圖片,設置名稱

然後就有了兩張圖片在文件夾中

總結
這就是一個簡單的Windows窗體應用程式的使用介紹。有了這個基礎之後,以後有可能可以通過這個應用,傳入圖片,調用我們的人臉識別產品的介面,去實現不同應用場景的需求。

