學習axios必知必會(2)~axios基本使用、使用axios前必知細節、axios和實例對象區別、攔截器、取消請求
- 2022 年 1 月 23 日
- 筆記
- 基本使用、使用axios前必知細節、axios和實例對象區別、攔截器、取消請求
一、axios的基本使用:
✿ 使用axios前必知細節:
1、axios 函數對象(可以作為axios(config)函數使用去發送請求,也可以作為對象調用方法axios.request(config)發送請求)
■ 查看源碼發現,起初axios是一個函數,但後續又給它添加上了一些屬性【方法屬性】
2、[, ] 是可選參數列表 舉例:axios.get(url[, config]),其中的[, config] 是可選參數
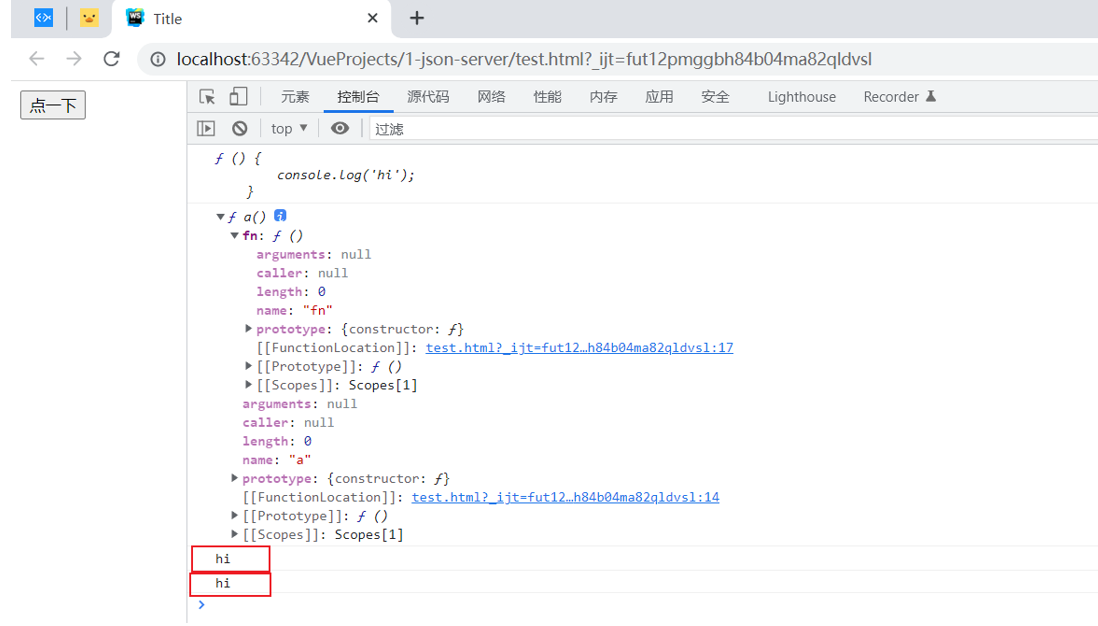
✿ axios 函數對象可以調用自身axios(config)發送請求也可以調用屬性的方法axios.request(config)發送請求的原理:
<script>
//一開始a只是一個函數
    var a = function () {
        console.log('hi');
    }
    var fn = function () {
        console.log('hi');
    }
    //給a這個函數對象添加屬性後,讓它的屬性指向某個函數,則a調用自身函數,或者調用屬性fn的方法----效果是一樣的
    a.fn = fn;
    console.log(a);
    console.dir(a);
    a();
    a.fn();
</script>

1、axios(config):調用自身,通用/最本質的發任意類型請求的方法:
<button class="btn btn-primary">post請求</button>

//獲取按鈕
const btns = document.querySelectorAll('button');
btns[0].onclick = function (){
    //調用axios方法來發送AJAx請求,axios方法的返回值是一個Promise對象(then方法可以拿到非同步請求的結果)
    axios({
        //請求類型
        method: 'post',
        //URL
        url:'//localhost:3000/posts/2',
	    //設置請求體(即傳輸的數據)
        data:{
  	 	  title: "candy",
   	  	  author: "i like"
        }
    }).then(response => {
        console.log(response)
    })
};
2、axios.request(config):調用屬性的方法發送請求,等同於 axios(config)
<button class="btn btn-primary">post請求</button>

//獲取按鈕
const btns = document.querySelectorAll('button');
btns[0].onclick = function (){
    //調用axios方法來發送AJAx請求,axios方法的返回值是一個Promise對象(then方法可以拿到非同步請求的結果)
    axios.request({
        //請求類型
        method: 'post',
        //URL
        url:'//localhost:3000/posts/2',
	    //設置請求體(即傳輸的數據)
        data:{
  	 	  title: "candy",
   	  	  author: "i like"
        }
    }).then(response => {
        console.log(response)
    })
};
3、使用axios的實例對象(通過axios.create([config]) 進行創建):
//一般創建axios實例時,傳入一些默認配置
const instance = axios.create({
baseURL: '//some-domain.com/api/',
    timeout: 1000,
    headers: {'X-Custom-Header': 'foobar'}
});
//instance 實例和 axios對象功能基本差不多
//使用axios的實例對象instance,方法的返回值是一個Promise對象(then方法可以拿到非同步請求的結果)
instance({
    //請求類型
    method: 'GET',
    //URL
    url: '/getJoke',
    //設置請求體(即傳輸的數據)
    params:{
       title: "candy",
       author: "i like"
    }
}).then(response => {
    console.log(response);
})
✿ 使用axios(config) 方法 和創建 axios實例對象的區別?
■ axios.create(config) 對axios請求進行封裝,創建axios實例對象的意義:不同請求介面擁有不同配置,創建新的axios實例就可以有新的配置來應對介面配置需求。每個axios實例對象都有自己特有的配置, 分別應用到不同要求的介面請求中。
■ axios實例對象和axios基本相同,只是實例對象少了有取消請求和批量發請求的方法。
二、axios的攔截器(對請求、響應做預處理)
1、請求攔截器:axios.interceptors.request.use(成功處理函數,失敗處理函數)
■ 請求攔截:
1,可能是config中有一些資訊是不符合伺服器的要求
2,希望每次發送網路請求,在介面可以顯示有一個請求的圖標,就是那個轉呀轉的圓圈
3,一些網路請求必須要有特殊資訊,例如登錄(需要有token)
2、響應攔截器:axios.interceptors.response.use(成功處理函數,失敗處理函數)
■ 響應攔截:
1,對響應的數據進行格式處理
三、axios的取消請求
■ 作用:取消掉某些用戶,多次不斷地點擊請求按鈕而發送請求給伺服器造成壓力
■ 取消方式:
(例如通過構造函數來創建取消令牌):在配置對象中添加 cancelToken屬性,然後拿到執行函數中的參數c(取消函數)
let cancel = null;
//檢測上一次請求是否完成(沒完成,取消當前的請求)
if(cancle != null){
    cancle();
}
//axios發送請求
axios.get('/user/12345', {
    cancelToken: new axios.CancelToken(function executor(c){//參數c是取消函數        	cancel = c;
    })
}).then(response => {
    console.log(response);
    cancel = null; //請求執行完畢,恢復cancel的初始值

});


