Nginx部署及Web基礎
- 2022 年 1 月 4 日
- 筆記
- Linux 進階, Nginx部署及Web基礎
Nginx部署及Web基礎
Nginx簡介
Nginx是一個開源且高性能、可靠的http web服務、代理服務
- 開源:直接獲取源程式碼
- 高性能:支援海量開發
- 可靠:服務穩定
Nginx特點
- 高性能,高並發:nginx支援很高的並發,nginx在處理大量並發的情況下比其他web服務要快
- 輕量且高擴展:功能模組少,只保留核心模組,其他程式碼模組化,需要什麼模組再安裝模組,不需要全部安裝,並且還支援第三方模組
- 高可靠性:幾乎不會出現問題,其他的web服務需要每隔一段時間進行重啟,nginx不需要,nginx的宕機時間,是99999級別
- 支援多路復用
- 支援熱部署: Nginx支援熱部署,它的自動特別容易,幾乎可以7天*24小時不間斷的運行,即使,運行數個月也不需要重新啟動,還能夠在不間斷服務的情況下,對軟體版本進行升級。
- Nginx使用的網路模型是Epool
網路模型:select、poll、epoll
Web服務
Web服務就是B/S架構,Web伺服器常常以B/S(Browser/Server)方式提供服務,瀏覽器和伺服器的交互方式。
Web伺服器軟體
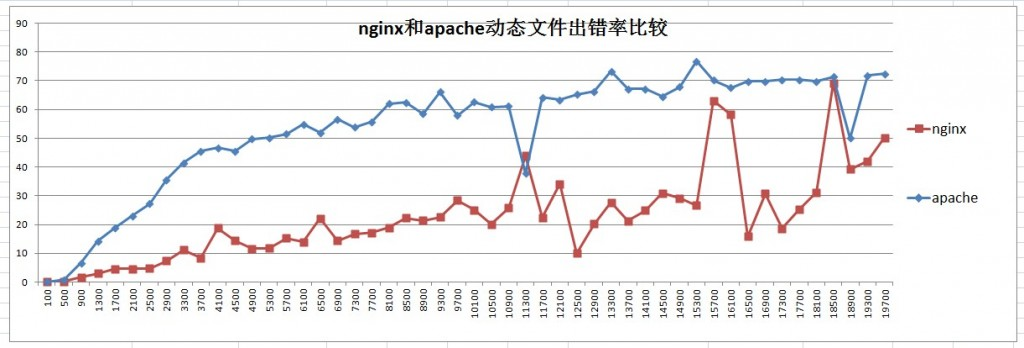
Web伺服器常用的有Apache和Nginx,兩者都實現了HTTP 1.1協議,兩者的優缺點如下文(寫的相當詳細了):
👉[Nginx vs Apache](Nginx 和 Apache 區別最全詳解? – 雲+社區 – 騰訊雲 (tencent.com))
Nginx和Apache對比圖
部署Nginx
yum安裝
到官網拷貝一下
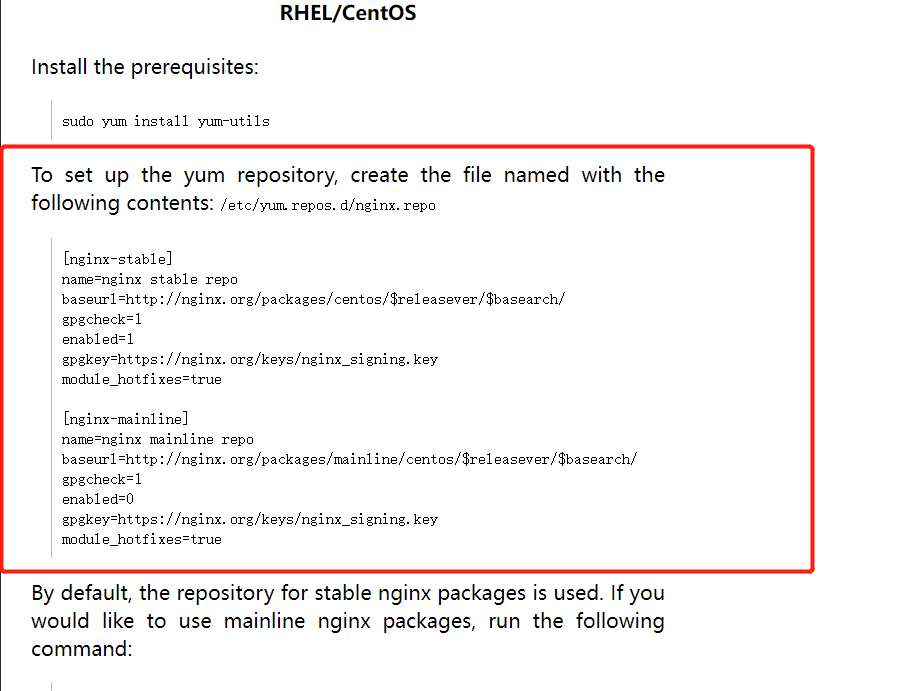
- 創建官網指定文件目錄
 [root@web01 ~]# vim /etc/yum.repos.d/nginx.repo
 # 將上述官網內容拷貝到這個文件中
 # 我已經拷貝好了👇,拷貝到文檔中在插入模式粘貼
 [nginx-stable]
name=nginx stable repo
baseurl=//nginx.org/packages/centos/$releasever/$basearch/
gpgcheck=1
enabled=1
gpgkey=//nginx.org/keys/nginx_signing.key
module_hotfixes=true

[nginx-mainline]
name=nginx mainline repo
baseurl=//nginx.org/packages/mainline/centos/$releasever/$basearch/
gpgcheck=1
enabled=0
gpgkey=//nginx.org/keys/nginx_signing.key
module_hotfixes=true
- 安裝Nginx
[root@web01 ~]# yum install nginx -y
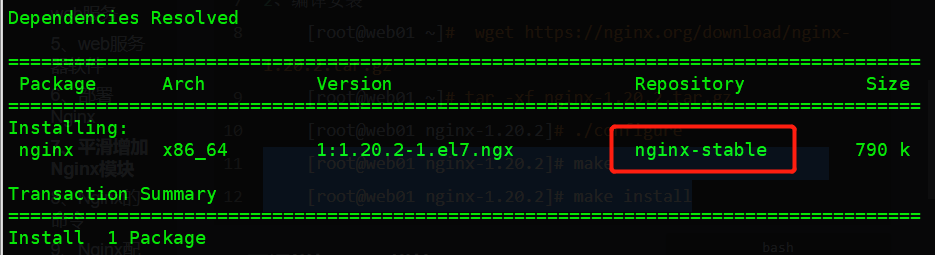
這裡的源改成了官網的~
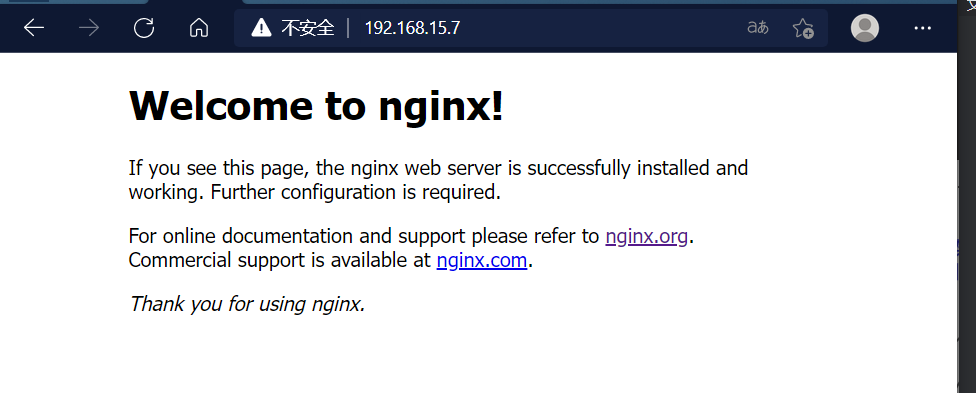
- 啟動nginx
# 如果開啟了httpd請關閉服務,再打開nginx
[root@web01 ~]# systemctl stop httpd
[root@web01 ~]# systemctl start nginx
編譯安裝
- 獲取文件
[root@web01 ~]# wget //nginx.org/download/nginx-1.20.2.tar.gz
- 解壓
[root@web01 ~]# tar -xf nginx-1.20.2.tar.gz
- 預處理
[root@web01 nginx-1.20.2]# ./configure
補:configure是一個腳本,一般由Autoconf工具生成,它會檢驗當前的系統環境,看是否滿足安裝軟體所必需的條件:比如當前系統是否支援待安裝軟體,是否已經安裝軟體依賴等。configure腳本最後會生成一個Makefile文件。
- 編譯安裝
[root@web01 nginx-1.20.2]# make
[root@web01 nginx-1.20.2]# make install
補:
make是一個命令,它使用第1步得到的Makefile文件,如果只有”make”命令,而沒有指明”目標”,一般情況下是編譯源碼。
make install表示運行”目標為install的make命令”,即將編譯後的結果複製到相應目錄中。
推薦使用yum安裝的方式!
平滑增加Nginx模組
平滑增加Nginx模組必須是編譯安裝的模式,因為yum安裝會自動安裝模組,無法指定,切換到web02做示例:
- 在web02虛擬機中編譯安裝nginx
[root@web02 ~]# wget //nginx.org/download/nginx-1.20.2.tar.gz
[root@web02 ~]# tar -xf nginx-1.20.2.tar.gz
[root@web02 nginx-1.20.2]# ./configure
[root@web02 nginx-1.20.2]# make
[root@web02 nginx-1.20.2]# make install

# 補充:如果使用編譯安裝nginx查看版本,不能直接使用nginx -v,因為沒有環境變數,必須切換到/usr/local/nginx/sbin目錄下,這個目錄下的nginx是可執行的
[root@web02 sbin]# /usr/local/nginx/sbin/nginx -v
nginx version: nginx/1.20.2
- 查看模組
[root@web02 sbin]# /usr/local/nginx/sbin/nginx -V
nginx version: nginx/1.20.2
built by gcc 4.8.5 20150623 (Red Hat 4.8.5-44) (GCC)
configure arguments:

# 沒有模組,重新編譯增加模組
- 重新編譯增加模組
# 如果解壓過,刪除重新解壓編譯安裝
[root@web02 ~]# rm -rf nginx-1.20.2
[root@web02 ~]# tar -xf nginx-1.20.2.tar.gz
[root@web02 ~]# cd nginx-1.20.2
# 查看要增加的模組名
[root@web02 nginx-1.20.2]# ./configure --help
# 增加模組--with-http_ssl_module
[root@web02 nginx-1.20.2]#./configure  --with-http_ssl_module
# 如果報錯:./configure: error: SSL modules require the OpenSSL library.就安裝openssl,沒有就繼續安裝
[root@web02 nginx-1.20.2]# yum install openssl openssl-devel -y
# 重新增加
[root@web02 nginx-1.20.2]# ./configure  --with-http_ssl_module
# 編譯安裝
[root@web02 nginx-1.20.2]# make
[root@web02 nginx-1.20.2]# make install
- 查看是否增加模組
[root@web02 local]# /usr/local/nginx/sbin/nginx -V
nginx version: nginx/1.20.2
built by gcc 4.8.5 20150623 (Red Hat 4.8.5-44) (GCC)
built with OpenSSL 1.0.2k-fips  26 Jan 2017
TLS SNI support enabled
configure arguments: --with-http_ssl_module
# 增加成功
Nginx的命令
安裝成功後輸入nginx -h查看所有參數
[root@web01 nfs]# nginx -h
nginx version: nginx/1.20.2
Usage: nginx [-?hvVtTq] [-s signal] [-p prefix]
             [-e filename] [-c filename] [-g directives]

Options:
  -?,-h         : this help
  -v            : show version and exit
  -V            : show version and configure options then exit
  -t            : test configuration and exit
  -T            : test configuration, dump it and exit
  -q            : suppress non-error messages during configuration testing
  -s signal     : send signal to a master process: stop, quit, reopen, reload
  -p prefix     : set prefix path (default: /etc/nginx/)
  -e filename   : set error log file (default: /var/log/nginx/error.log)
  -c filename   : set configuration file (default: /etc/nginx/nginx.conf)
  -g directives : set global directives out of configuration file
常用參數
- -v:列印版本號
[root@web01 nfs]# nginx -v
nginx version: nginx/1.20.2
- -V:列印版本和配置項
[root@web01 nfs]# nginx -V
nginx version: nginx/1.20.2
built by gcc 4.8.5 20150623 (Red Hat 4.8.5-44) (GCC)
built with OpenSSL 1.0.2k-fips  26 Jan 2017
TLS SNI support enabled
configure arguments: --prefix=/etc/nginx --sbin-path=/usr/sbin/nginx --modules-path=/usr/lib64/nginx/modules --conf-path=/etc/nginx/nginx.conf --error-log-path=/var/log/nginx/error.log --http-log-path=/var/log/nginx/access.log --pid-path=/var/run/nginx.pid --lock-path=/var/run/nginx.lock --http-client-body-temp-path=/var/cache/nginx/client_temp --http-proxy-temp-path=/var/cache/nginx/proxy_temp --http-fastcgi-temp-path=/var/cache/nginx/fastcgi_temp --http-uwsgi-temp-path=/var/cache/nginx/uwsgi_temp --http-scgi-temp-path=/var/cache/nginx/scgi_temp --user=nginx --group=nginx --with-compat --with-file-aio --with-threads --with-http_addition_module --with-http_auth_request_module --with-http_dav_module --with-http_flv_module --with-http_gunzip_module --with-http_gzip_static_module --with-http_mp4_module --with-http_random_index_module --with-http_realip_module --with-http_secure_link_module --with-http_slice_module --with-http_ssl_module --with-http_stub_status_module --with-http_sub_module --with-http_v2_module --with-mail --with-mail_ssl_module --with-stream --with-stream_realip_module --with-stream_ssl_module --with-stream_ssl_preread_module --with-cc-opt='-O2 -g -pipe -Wall -Wp,-D_FORTIFY_SOURCE=2 -fexceptions -fstack-protector-strong --param=ssp-buffer-size=4 -grecord-gcc-switches -m64 -mtune=generic -fPIC' --with-ld-opt='-Wl,-z,relro -Wl,-z,now -pie'
- -t:檢查配置文件
[root@web01 nfs]# nginx -t
nginx: the configuration file /etc/nginx/nginx.conf syntax is ok
nginx: configuration file /etc/nginx/nginx.conf test is successful
- -T:測試配置文件並運行
[root@web01 nfs]# nginx -T
- -q:列印錯誤日誌
[root@web01 nfs]# nginx -q
- -s : 操作進程
	stop	:停止
	quit	:退出
	reopen	:重啟
	reload	:重載
nginx -s stop #強制停止Nginx服務
nginx -s quit #優雅地停止Nginx服務(即處理完所有請求後再停止服務)
nginx -s reopen #重啟Nginx
nginx -s reload #重新載入Nginx配置文件,然後以優雅的方式重啟Nginx
- 指定路徑參數
-p : 指定nginx的工作目錄
-e : 指定錯誤日誌路徑
-c : 指定配置文件的路徑
nginx -p prefix #設置前綴路徑(默認是:/usr/share/nginx/)
nginx -e logfile # 設置錯誤日誌路徑(默認是:/var/log/nginx/error.log)
nginx -c filename #設置配置文件(默認是:/etc/nginx/nginx.conf)
- -g : 設置一個全局的Nginx配置項
[root@web01 ~]# nginx -g 'daemon off;'
Nginx配置文件
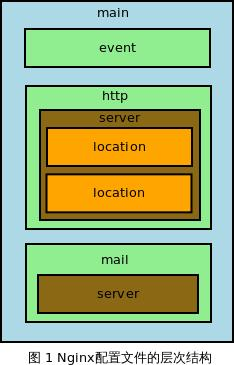
nginx分為全局配置和模組配置
相關文件:/etc/nginx/nginx.conf

配置文件內容
user  nginx;
worker_processes  auto;

error_log  /var/log/nginx/error.log notice;
pid        /var/run/nginx.pid;


events {
    worker_connections  1024;
}


http {
    include       /etc/nginx/mime.types;
    default_type  application/octet-stream;

    log_format  main  '$remote_addr - $remote_user [$time_local] "$request" '
                      '$status $body_bytes_sent "$http_referer" '
                      '"$http_user_agent" "$http_x_forwarded_for"';

    access_log  /var/log/nginx/access.log  main;

    sendfile        on;
    #tcp_nopush     on;

    keepalive_timeout  65;

    #gzip  on;

    include /etc/nginx/conf.d/*.conf;
}
配置文件內容剖析
全局配置
-
user:指定Nginx的啟動用戶 -
worker_processes:定義Nginx的worker進程數,auto相當於CPU的數量(auto可以修改為整數) -
error_log:錯誤日誌路徑 -
pid:pid的存放文件路徑 -
events : 模組配置,
# 可配置項: worker_connections:代表每一個worker進程最多同時接入多少個請求(每一個進程處理的請求個數) use : 指定Nginx的網路模型 -
http:web服務模組
include : 載入外部的配置項,降低了文件的複雜度 default_type : 如果找不到文件的類型,則按照指定默認類型處理 log_format : 定義日誌格式 日誌格式默認為簡潔版(main),可以修改為json格式(詳細版) log_format json '{"@timestamp":"$time_iso8601",' '"host":"$server_addr",' '"service":"nginxTest",' '"trace":"$upstream_http_ctx_transaction_id",' '"log":"log",' '"clientip":"$remote_addr",' '"remote_user":"$remote_user",' '"request":"$request",' '"http_user_agent":"$http_user_agent",' '"size":$body_bytes_sent,' '"responsetime":$request_time,' '"upstreamtime":"$upstream_response_time",' '"upstreamhost":"$upstream_addr",' '"http_host":"$host",' '"url":"$uri",' '"domain":"$host",' '"xff":"$http_x_forwarded_for",' '"referer":"$http_referer",' '"status":"$status"}'; access_log /var/log/nginx/access.log json ; sendfile : 高效讀取文件 keepalive_timeout : 長連接保持連接的 # timeout不能太低,不然和短鏈接一樣- include : 載入外部的配置項
相關文件/etc/nginx/conf.d/*.conf
# 重點
server : 網址模組,每一個server代表一個網站,可以有多個
listen : 監聽的埠
server_name : 定義域名
location {} : 訪問路徑
	root : 指定網址路徑
	index : 指定網址的索引文件
小遊戲案例
搭建超級馬里奧和中國象棋
超級馬里奧
- 上傳程式碼
# 源程式碼百度自己下載的,想要私我就可以了
# 在/opt/創建存放遊戲文件的目錄/opt/Super_Mario
- 編輯配置文件
[root@web01 ~]# cd /etc/nginx/conf.d/
[root@web01 conf.d]# vim /etc/nginx/conf.d/game.conf
server{
    listen 80;
    server_name Mario.test.com;
    location / {
        root /opt/Super_Mario;
        index index.html;
    }
}
- 測試配置文件是否正常
[root@web01 conf.d]# nginx -t
nginx: the configuration file /etc/nginx/nginx.conf syntax is ok
nginx: configuration file /etc/nginx/nginx.conf test is successful
- 重啟Nginx
[root@web01 conf.d]# systemctl restart nginx
- 域名解析
在文件 C:\Windows\System32\drivers\etc\hosts中添加ip 和域名
192.168.15.7 mario.test.com

成功啦~
中國象棋
- 上傳遊戲文件,並創建存放遊戲的目錄
[root@web01 opt]# mkdir chess
- 編輯配置文件
[root@web01 conf.d]# cd /etc/nginx/conf.d
[root@web01 conf.d]# vim chess.conf
server{
    listen 80;
    server_name chess.test.com;
    location / {
        root /opt/chess;
        index index.html;
    }
}
- 測試配置文件是否正常
[root@web01 conf.d]# nginx -t
nginx: the configuration file /etc/nginx/nginx.conf syntax is ok
nginx: configuration file /etc/nginx/nginx.conf test is successfu
- 重啟Nginx
[root@web01 conf.d]# systemctl restart nginx
- 域名解析
在文件 C:\Windows\System32\drivers\etc\hosts中添加ip 和域名
192.168.15.7 mario.test.com chess.test.com

成功了
補充:長連接短鏈接區別
HTTP 1.0 短鏈接
HTTP 1.1 長連接
長連接意味著進行一次數據傳輸後,不關閉連接,長期保持連通狀態。如果兩個應用程式之間有新的數據需要傳輸,則直接復用這個連接,無需再建立一個新的連接。
短連接意味著每一次的數據傳輸都需要建立一個新的連接,用完再馬上關閉它。下次再用的時候重新建立一個新的連接,如此反覆。
補充:解決NFS持久化
方式一
- 通過開機自啟動腳本掛載
使用方式一,注意開機需要關閉防火牆和selinux
[root@web01 ~]# vim /etc/rc.local
/usr/bin/mount -t nfs 172.16.1.31:/web/upload /var/www/html/upload
[root@web01 ~]# chmod +x /etc/rc.d/rc.local
方式二
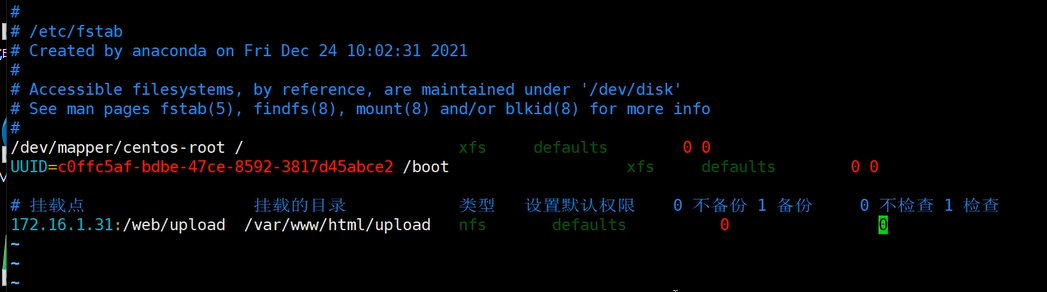
- 通過/etc/fstab配置文件
使用方式二,需要在服務端開啟nfs-server服務
systemctl start nfs-server
[root@web02 ~]# vim /etc/fstab
172.16.1.31:/web/upload  /var/www/html/upload   nfs       defaults          0                0
# 測試是否掛載成功,不報錯就是掛載成功了!
[root@web02 ~]# mount -a
# 修改文件的格式內容如下圖